I submitted the following to the magazine nearly 10 months ago but it was never used. I guess it wasn't what they were looking for. I thought I'd share on the forum... maybe it will inspire one of you.
I purchased two MTH Rail King Double Traffic Light Sets, 30-1089-2 from an OGR forum member online. I really wanted the Single Traffic Light 30-1089-1 due to space concerns, but the forum member offered me such a great price for brand new double light sets, that I could not let the opportunity pass me by.
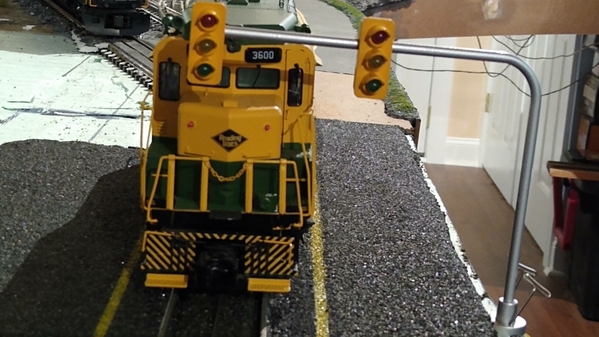
When the package arrived, I eagerly opened one set and positioned the light pole on my layout in a street running scene I am constructing. My fear had come true. There was not enough space on the edge of the layout where the cars share the street with the trains. The train would bump the second traffic light. See Photo #1.
I initially thought about just cutting off the outer light and making it a single light. But that evening while taking a drive I was observing the prototype and saw how many intersections have a traffic signal on the vertical part of the pole as well as the horizontal part. So, my mind started racing on how I might accomplish this with my MTH lights.
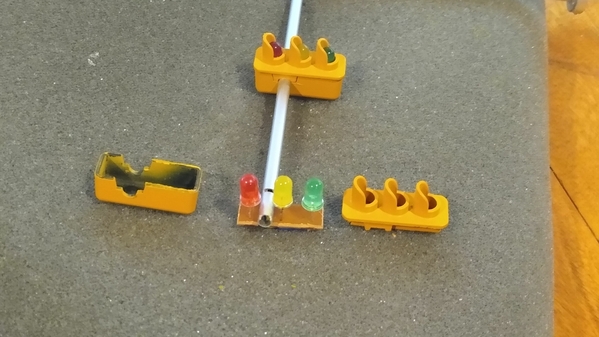
I decided to disassemble the entire assembly and reassemble in the manor which best fit my space. I started with a hobby knife to score the seam on the traffic light and gently start to separate. Once I had enough space for a small common screwdriver to fit the gap, I was able to remove the front and back halves. See Photo #2.
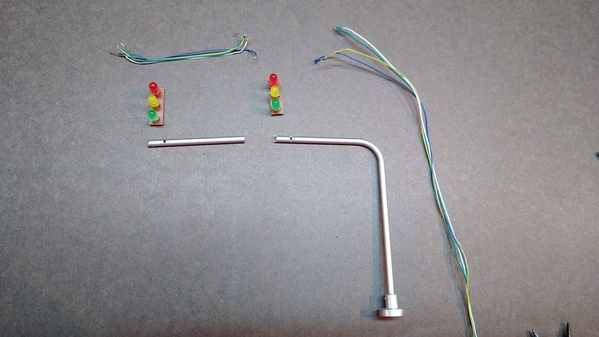
I determined the wire between the two lights was not going to be long enough for my new configuration, so I decided to unsolder all of the wires from the lights. There was enough slack wire at the end of the light pole to use when I reassembled. Then I cut the horizontal part of the light pole just after the existing hole for the original inside light. Unless you have a photographic memory, I recommend taking a picture of the wires so you can easily recall where to re-solder them later. See Photo #3.
Once everything was disassembled, I drilled a 1/8 inch hole on the back side of the vertical pole to accommodate the wires for the new light position. Then I fished wires through that new hole out to the end of the horizontal pole and reconnected the horizontal pole light. I tried to fish all 4 wires at once but that did not go well. One wire at a time ended up being the easiest to accomplish. See Photo #4.
Next I fished wires from my newly created pole down to the bottom of the pole where they will connect to the light controller. I initially tried to fish them up from the bottom, but trust me it will be easier to fish one wire at a time from the vertical pole hole down to the bottom. You will be re-soldering all 8 wires to the vertical pole light to help carry power to the horizontal pole light. See Photo #5.
Once I re-assembled the front and rear light covers I used a dab of CA glue to attached the light to the pole. Even though I had the wires tucked in tight, you could still see a small exposed section that ran from the side of the light to the pole. I used some scrap plastic styrene to make a small box to cover the wires. I painted it black. It is totally hidden from the front, but from a rear view it looks natural like it is meant to be there performing some function to control the lights. See Photo #6.
A test fit on the layout shows that cars and trains can now safely navigate the street at the same time. The train can successfully pass the traffic light without hitting it. See Photo #7.
This was a fun project to do and I completed it in one evening. I greatly appreciate all of the friendly people on the OGR forum who provide me with daily ideas, knowledge and the courage to try a modification like this.
Building a train layout has definitely helped me become more knowledgeable in how things work mechanically and electrically. A few years back, I would have never attempted something like this. But knowing I have the support of many OGR friends to help me, I can take on projects I would have never thought to try.
Have Fun!
Ron


