
On the Mouser web site, you can download CAD models for DipTrace using a conversion program called the Library Loader. Although not every part is covered, there are many that will provide a schematic outline, a footprint, and sometimes a 3D model. These can be used in a number of ECAD programs including DipTrace.

I've mentioned this before on this Forum but was not sure I understood how to use it at the time and am sure that I don't know the whole story or if I'm using it correctly but I'll tell you what I can.

To get started, find a part that you're interested in on the Mouser web site. A section of the listing will include the ECAD Model  information regarding the Library Loader as shown below:

The Learn More link will land you at a brief description and some videos from SamacSys; the providers of the Library Loader program. Or you can download it to your computer.

After it has been downloaded, I believe you select RUN from the download complete dialog box at the bottom of the screen. That will install it and ask some questions about file directories and such. I always choose the defaults.

For DipTrace users, it's important to remember the file directories for downloads and where you want to store saved component libraries.

The Library Loader should appear as a new item on the DeskTop:

Double click to start the program running. Make entries in the program's dialog boxes where appropriate. In particular, select "DipTrace" from the drop down list as the ECAD tool that you use:

If you click on the "Settings" button following the ECAD tool entry, another box appears that wants to know where to store 3D models. Again I think the default is what DipTrace uses normally:

If you then click on "Help" of the DipTrace Settings dialog box, you will be linked to a web page that contains detailed instructions on how to use the Library Loader with DipTrace. You should read through that because it's important. I may overlap with this information as I explain how I use it but that's okay.

So here's what I do when I want to download a part from Mouser and get it into Diptrace.

1. If you have not yet run the Library Loader, do that. When you click the big X to exit the proram, it continues to run in the background. If you don't hit the big X, the program remains on the screen and is annoyingly in the way.

2. Find the part that you want to download from the Mouser web site.

3. Click on the ECAD symbol that looks like an op-amp.

The 3D symbol, next to the op-amp symbol, indicates that this part includes a 3D model as well as the schematic symbol and footprint. Clicking on either one takes you to the same place:

Note that the 3D symbols here include a footprint in the rendering. The drop down list "Device on Footprint" allows you to select it without the footprint. I always do that. I'm not sure how it would affect DipTrace if your 3D model includes a footprint but I always change it.

Click the "Download" button and the transfer begins. It will send a "zip" file and all you have to do is SAVE it to the normal download directory:

Now you can start up the "Component Editor" in DipTrace to add your new component.

Click on Library > Import > DipTrace ASCII. That will bring up a file selection box:

Navigate to the download directory to find the ".asc" file for your part.

Select it and click "Open". Then this comes up:

Here I select "User Components" rather than the default which is "Other Libraries". And then click OK and there it is:

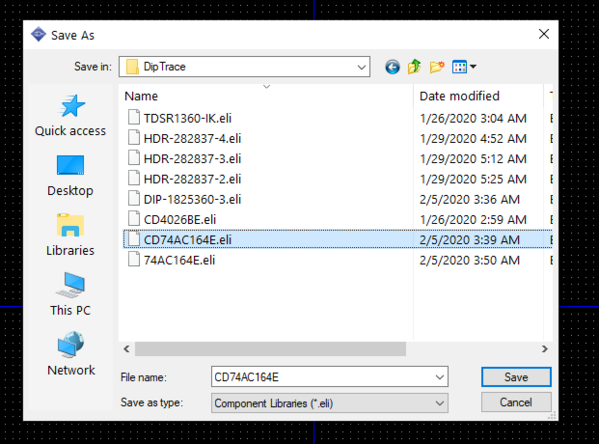
The last step is to save this new library. I usually just hit exit because I don't know how else to do it. Then it askes if you want to save the changes. You respond YES and another file directory dialog box shows up:

Again, you need to navigate to the proper place to store the library. I use my user directory where there is a DipTrace directory for this kind of thing. It stores it as an ".eli" file. You have to type the name you want it to be called carefully so you know what it is:

Click SAVE and your done.

So I am creating a new library for every part that I download. I know there's a way to combine parts into one library but I don't know how to do that just yet.

Everything that I've picked up from Mouser in this way has worked without a problem. You don't have to buy anything to do any of this. You can search the Mouser site for whatever you're looking for; maybe a 3D model. If they have it you will know by the "3D" symbol on their product page.

It's a bit tedious and I read somewhere that it is supposed to be drag and drop simple. If it is, I don't know about it working that way for DipTrace.

Good luck -- Leo

Attachments

Images (22)
  • mceclip8
  • mceclip0
  • mceclip1
  • mceclip2
  • mceclip3
  • mceclip4
  • mceclip5
  • mceclip6
  • mceclip7
  • mceclip8
  • mceclip9
  • mceclip10
  • mceclip11
  • mceclip12
  • mceclip13
  • mceclip0
  • mceclip1
  • mceclip2
  • mceclip3
  • mceclip4
  • mceclip5
  • mceclip7
Last edited by Consolidated Leo
Original Post

Replies sorted oldest to newest

Thanks, Leo!  I will give this a try. Looks like you have covered everything pretty well here, nice details.

I've managed to 'hack' (and save) a few parts (very few) as GRJ & CJ mention above. I got them saved to the .eli files like you have done with your Mouser files, but I haven't gotten the 'Library' (as put them all in one User library) part mastered either? Havent messed with it for a while, but I will definitely have to try your instructions above. 

riki: What's an app? Just kidding! As Tom says, DipTrace is not geared to work with a cell phone but who knows. Maybe someday.

CJ & GRJ: It's not surprising that you seasoned veterans with electronic design would prefer a hands-on approach. You guys know all the jargon. But for lame-brains like me who can easily get lost in a datasheet, its better to rely on leaving dimensional criteria to the experts at Mouser, DigiKey and other electronics distributors.

The other day, while wandering through a datasheet, I came across the terms PDIP and CDIP and wondered if that was an important difference in terms of package dimensions. I had to look it up after staring at the component drawings with tiny, little dimensions in both inches and millimeters. I didn't know that it had to do with plastic vs ceramic materials. You guys don't even have to think about it.

So as Tom likes to say, "We need all the help we can get."

Tom: Good news! I found out how to move parts to a collective library with DipTrace. Easy!

So I downloaded some parts from Mouser and saved them each in their own library. They show up under the "User Components" group with their own names. These correspond to those ".eli" files we talked about earlier.

Start up DipTrace using the Schematic Editor. Then the component libraries are on the left side of the screen. Select "User Components" and the individual libraries are displayed just below that. Select the parts that you want to add to a new library and put them on the layout section.

Then you select a part (normal mode with the arrow from the tool bar) by clicking on it. The four little widgets appear showing the part is selected. Then right click to produce the context menu that goes with that part. In the list it says "Save to Library". If you click that, another selection appears that asks if you want to save to the current, active library (no) or save to file (yes). Then a dialog box appears where you give it the name for the library and select the "group" (User Components) where it will be placed.

Click OK and the file save dialog box comes up. You navigate to where you want the new ".eli" file to go and you should see a list of other files there with the ".eli" extension. You have to fill in the name for the new library at the bottom and click on SAVE.

Now it gets easier because you've already created the new library and you can easily save other components to it.

First you want to make your new library the "active" one by selecting it from the list under "User Components" that should now include the name of the one that you just created. If it doesn't show, select the "Components" group at the top and then go back to the "User Components" group. You should see the new library in the list.

Select the new library to make it the "active" library. And you will see in the bottom half of that section the parts that belong to that library. Again, you want to have your parts in the layout area of the screen. Select the next part to save, right click to get the context menu, then "Save to Library" and this time just save to the active library (your new one). That's where it will go and it should show up in the components list at the left.

Finally, if you want to remove the individual libraries with just the single parts in them, use the "Library Tools" item also on the left side of the screen. It should have an entry that asks if you want to "remove" the selected library from the "User Components" group. Click on that and it will disappear. However, it does not delete the ".eli" file from your computer. It's just no longer seen by DipTrace as one of the libraries in the User Components group.

Wow, when you write it all down it doesn't seem so easy at all. It really is once you get going on it.

Here's a shot of my User Component library list as it now appears:

I hope this is helpful. It will certainly help me to remember how it's done. Good luck!

Attachments

Images (2)
  • mceclip0
  • mceclip1

Leo, Good you got it figured out. Just saved this entire thread to a PDF to try out and also for future reference! Thanks for documenting this so we can all use it! I have several items saved in the ".eli" files that I want to combine into one library so there is plenty here to try it out on.

Earlier, I forgot to add, C-DIP = Ceramic, P-DIP = Plastic, I did look it up...  

Last edited by rtr12

Add Reply

Post

OGR Publishing, Inc., 1310 Eastside Centre Ct, Suite 6, Mountain Home, AR 72653
800-980-OGRR (6477)
www.ogaugerr.com

×
×
×
×
Link copied to your clipboard.
×
×