I received a pair of these from eBay.  They both arrived with the blue wire UNattached.  I also received a switch with them.  I'm beginning to think buying used, especially on eBay is a crap shoot.

Can anyone shed some light on this blue wire and switch please.  I hope I didn't just purchase a couple of ornamental crossing gates.

Ponz

PonzCrossing gateCrossing gate switch

Attachments

Images (2)
  • Crossing gate
  • Crossing gate switch
Original Post

Replies sorted oldest to newest

stan2004 posted:

Per instructions linked above, you do not need the blue wire when using the ITAD (or what you call the switch) to activate the gates.

If you are using another method to activate the gates - such as the isolated outer-rail method - then you might want to re-attach the blue wire though there are simple workarounds. 

Stan - 816-305-1918

Chuck Sartor posted:

I would guess the blue wire was intentionally removed by the previous owner as he was using a Itad so not to confuse wiring,or get it out of the way since it wasn't be used.

I wish I could find a video or instructions on how to hook up two gates to the one ITAD I have.  It's an MTH ITAD

BTW - What the heck does ITAD stand for?

Ponz

Infrared Track Activation Device. Since your trackwork is completed, and you don't use MTH's track, the 2 legs that have the metal connectors will need to be sawed off. Then you use the accessory side of the rocker switch. Set the Itad close to the tracks, and fallow the wiring diagram on MTH's site, with the link provided by GN Man, and just duplicate the wiring for both gates to 1 Itad.

stan2004 posted:

I can draw you a color coded wiring diagram for 2 gates and 1 ITAD if chuck's explanation not enough?

So you do NOT have Realtrax?

Stan - I followed Chuck's instructions and nothing happened.  I have a feeling that there is something wrong with the ITAD or the gates.  I'm using Gargraves track that is ballasted down.

Ponz

OK.  We need to isolate the problem  It could be the crossing gate, the ITAD, or both.

Test the crossing gates one at a time:

1. Apply Accessory AC voltage to RED and BLACK wires of gate.  RED to "hot", BLACK to "common".

2. Touch the YELLOW wire to BLACK.  The gate should go down and flash.  

3. Remove YELLOW from BLACK.  Touch WHITE to BLACK.  Gate should go up.

Testing the ITAD is a little trickier.  I'll make a short video for you which I'll put up on youtube shortly.  Hopefully in the meantime you can test the crossing gates.

The ITAD can be difficult to work with since it can be overly sensitive to ambient room light - especially if there's sunlight from a window, or a bright incandescent lamp or ceiling light.

You can experiment with the ITAD by simply applying power to it.  Be sure to set the rocker-toggle switch on the unseen side of the ITAD to the "AUX" position (as opposed to the "TRACK" position).  Also, for testing, turn the "DELAY" screwdriver adjustment on the ITAD to the minimum of full CCW position.  And turn the "RANGE" screwdriver adjustment on the ITAD to around the mid-point.

The idea is when a train passes in front of the window (my hand being the train in this case) you will hear the relay "click" ON.  After train passes, you can hear the relay click OFF.  A frequent criticism of the MTH ITAD is it can be overly sensitive and always click ON even with no train in front of the window.  That is, ambient light can trigger the ITAD as demonstrated by turning on a lamp in the video.  With the lamp on, the relay clicks ON as soon as power is applied to the ITAD.  This is not useful!

So before even attempting to hook up the crossing gate(s) to the ITAD, you want to be sure the ITAD can toggle between OFF and ON in response to the train in front of the ITAD sensor window.

Last edited by stan2004

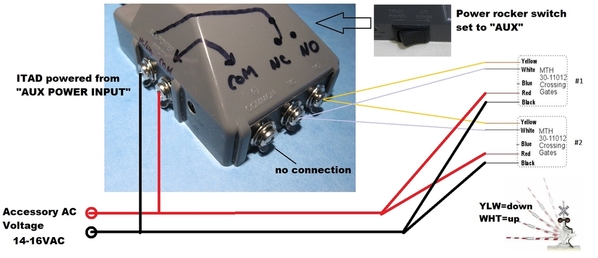
After separately testing the ITAD and crossing gates and deciding they are in order, here's my suggested wiring scheme:

itad to two crossing gates

As Chuck suggested earlier you might need to whack off the Realtrax plug-in appendage to allow you to place the ITAD sensor window (the reddish window) close to the track. 

realtrax itad whack job

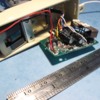
Here's a photo of an opened ITAD.  3 screws on the bottom release the bottom plate.  I suppose if you didn't want to whack the bottom plate, you could disconnect the green and yellow wires and operate the ITAD without the bottom plate.  This would allow you to restore the ITAD for use with Realtrax.

mth realtrax itad

In any case, you will likely need to fuss with the "RANGE" screwdriver adjustment on the ITAD.  Then, if you get the RANGE working, you can then fuss with the "DELAY" screwdriver adjustment to keep the gates down for an adjustable number of seconds after the metaphorical caboose (last car) passes the sensor window.

Note: there are other optical trigger units that arguably operate better than the MTH ITAD.  That's a separate discussion.  I'm trying to get you up and running with what you already have in hand.

Attachments

Images (3)
  • itad to two crossing gates
  • realtrax itad whack job
  • mth realtrax itad
stan2004 posted:

OK.  We need to isolate the problem  It could be the crossing gate, the ITAD, or both.

Test the crossing gates one at a time:

1. Apply Accessory AC voltage to RED and BLACK wires of gate.  RED to "hot", BLACK to "common".

2. Touch the YELLOW wire to BLACK.  The gate should go down and flash.  

3. Remove YELLOW from BLACK.  Touch WHITE to BLACK.  Gate should go up.

Testing the ITAD is a little trickier.  I'll make a short video for you which I'll put up on youtube shortly.  Hopefully in the meantime you can test the crossing gates.

Well Stan - that settles that.  Neither crossing gate works per your instructions.  Now I don't regret sending them back for a second!

Ponz

What Stan forgot if you are wiring the gates up for mechanical sensing, the blue wire must play into action. This the ground wire. The correction method of operation is touch blue and yellow, gate goes down and lights start to flash. There is a automatic cut off switch in the signal to stop the gates. Now touch the white and blue (if it was there) and the gates will rise and signal lights stop.

Last edited by Chuck Sartor
stan2004 posted:

After separately testing the ITAD and crossing gates and deciding they are in order, here's my suggested wiring scheme:

itad to two crossing gates

As Chuck suggested earlier you might need to whack off the Realtrax plug-in appendage to allow you to place the ITAD sensor window (the reddish window) close to the track. 

realtrax itad whack job

Here's a photo of an opened ITAD.  3 screws on the bottom release the bottom plate.  I suppose if you didn't want to whack the bottom plate, you could disconnect the green and yellow wires and operate the ITAD without the bottom plate.  This would allow you to restore the ITAD for use with Realtrax.

mth realtrax itad

In any case, you will likely need to fuss with the "RANGE" screwdriver adjustment on the ITAD.  Then, if you get the RANGE working, you can then fuss with the "DELAY" screwdriver adjustment to keep the gates down for an adjustable number of seconds after the metaphorical caboose (last car) passes the sensor window.

Note: there are other optical trigger units that arguably operate better than the MTH ITAD.  That's a separate discussion.  I'm trying to get you up and running with what you already have in hand.

Very informative.

  • Here's the deal.  Neither gate works when tested. If I apply some pressure to a raised arm the lights will flash - that's it.
  • The ITAD seems to work.  However, the delay screw is frozen in one position (approximately 5.5 seconds)
  • The range adjustment varies between approximately 2" and 6"

Now, it's off to the "Want to Buy" section!

Thanks a million Stan

Chuck Sartor posted:

What Stan forgot if you are wiring the gates up for mechanical sensing, the blue wire must play into action. This the ground wire. The correction method of operation is touch blue and yellow, gate goes down and lights start to flash. There is a automatic cut off switch in the signal to stop the gates. Now touch the white and blue (if it was there) and the gates will rise and signal lights stop.

  • Here's the deal.  Neither gate works when tested. If I apply some pressure to a raised arm the lights will flash - that's it.
  • The ITAD seems to work.  However, the delay screw is frozen in one position (approximately 5.5 seconds)
  • The range adjustment varies between approximately 2" and 6"

Now, it's off to the "Want to Buy" section!

Thanks Guys

Ponz

Could I ask you to try one other test on the gates?  In Step 2 and 3, try RED instead of BLACK.

1. Apply Accessory AC voltage to RED and BLACK wires of gate.  RED to "hot", BLACK to "common".

2. Touch the YELLOW wire to RED.  The gate should go down and flash.  

3. Remove YELLOW from RED.  Touch WHITE to RED.  Gate should go up.

stan2004 posted:

Could I ask you to try one other test on the gates?  In Step 2 and 3, try RED instead of BLACK.

1. Apply Accessory AC voltage to RED and BLACK wires of gate.  RED to "hot", BLACK to "common".

2. Touch the YELLOW wire to RED.  The gate should go down and flash.  

3. Remove YELLOW from RED.  Touch WHITE to RED.  Gate should go up.

No Go Stan.  Nada - Nothing.

Ponz

Hmm.   Unless anyone else chimes in with another idea, is the plan to send it all back on eBay?

I don't know how much money is/was involved, return policy, who pays return shipping, etc. etc. but curious if there's some path by which I could get my hands on a crossing gate.  Point being there was a situation last year here on OGR where a Realtrax ITAD was giving a member fits - I did not have one at the time.  He ended up sending it to me in the interest of the greater good - I took it apart, drew out the schematic which I published, and now feel quite comfortable advising OGR members on using the Realtrax ITAD.

I would return it to you in any case albeit with a chance that dis-assembling it to get to the electronics might damage it.  Again, my interest is to understand how it works and would publish the information here on OGR.  And if the problem is something that is electrically repairable I'm fairly confident I can do that and you'd get back a working gate.  OTOH, if you search other threads on these gates, there have been mechanical issues with stripped gears and the like.  But since it appears you aren't hearing whirring sounds (from the motor trying), it seems like it might be an electrical issue.  

stan2004 posted:

Hmm.   Unless anyone else chimes in with another idea, is the plan to send it all back on eBay?

I don't know how much money is/was involved, return policy, who pays return shipping, etc. etc. but curious if there's some path by which I could get my hands on a crossing gate.  Point being there was a situation last year here on OGR where a Realtrax ITAD was giving a member fits - I did not have one at the time.  He ended up sending it to me in the interest of the greater good - I took it apart, drew out the schematic which I published, and now feel quite comfortable advising OGR members on using the Realtrax ITAD.

I would return it to you in any case albeit with a chance that dis-assembling it to get to the electronics might damage it.  Again, my interest is to understand how it works and would publish the information here on OGR.  And if the problem is something that is electrically repairable I'm fairly confident I can do that and you'd get back a working gate.  OTOH, if you search other threads on these gates, there have been mechanical issues with stripped gears and the like.  But since it appears you aren't hearing whirring sounds (from the motor trying), it seems like it might be an electrical issue.  

I agree Stan.  I stand firm in my belief that these are defective in some way.  The eBay seller is being cooperative.

Thanks Again!

Ponz

stan2004 posted:

Hmm.   Unless anyone else chimes in with another idea, is the plan to send it all back on eBay?

I don't know how much money is/was involved, return policy, who pays return shipping, etc. etc. but curious if there's some path by which I could get my hands on a crossing gate.  Point being there was a situation last year here on OGR where a Realtrax ITAD was giving a member fits - I did not have one at the time.  He ended up sending it to me in the interest of the greater good - I took it apart, drew out the schematic which I published, and now feel quite comfortable advising OGR members on using the Realtrax ITAD.

I would return it to you in any case albeit with a chance that dis-assembling it to get to the electronics might damage it.  Again, my interest is to understand how it works and would publish the information here on OGR.  And if the problem is something that is electrically repairable I'm fairly confident I can do that and you'd get back a working gate.  OTOH, if you search other threads on these gates, there have been mechanical issues with stripped gears and the like.  But since it appears you aren't hearing whirring sounds (from the motor trying), it seems like it might be an electrical issue.  

Stan

The eBay seller refunded me AND allowed me to keep the gates!  Shoot me an email with your full name and address and I'll send them to you to see if you can repair them!

Ponz

Ponz posted:

Doh!  That didn't work for me!

Right; I wouldn't expect it to.  This is after some mechanical adjustment and, while not shown, this gate has an intermittent transmission issue where the motor spins but NO gate movement.  The 2nd gate shows no motor activity whatsoever.

My interest is in the electronics which is more components than I expected but just busy-work to extract the schematic.  And, yes, there's the venerable 555 timer IC chip on the lower right!

MTH 30-11012 teardown 1

Attachments

Images (1)
  • MTH 30-11012 teardown 1
Chuck Sartor posted:

Interesting, I didn't know you could operate them that way. So the blue wire must be the common, for a contactor or mechanical TAD.

I can see where the blue wire was cut off the board.  It is connected on the circuit board to the red wire.  So you're correct - it's the "common" wire to a 3-terminal contactor/TAD or an SPDT relay.

Here's my take on the electrical schematic for the crossing gate.  

mth crossing gate 30-11012 aug 2018

There's nothing particularly tricky about the circuit.  I find it curious the board is labeled Revision 6 - presumably there were previous revisions.  In any case I am now comfortable answering questions about how to electrically wire these crossing gates for non-standard configurations.  The values or part numbers of various components are not shown because it would take some measurements or research to figure them out.  I don't recommend attempting component-level troubleshoot/repair of the electrical circuit.

The motor winding is about 10 Ohms.  The power source to the H-bridge motor drive is from the 5V regulator.  A 555 timer IC chip flashes the alternating red LEDs whenever the gate is not at the top.

stan2004 posted:

Here's my take on the electrical schematic for the crossing gate.  

mth crossing gate 30-11012 aug 2018

There's nothing particularly tricky about the circuit.  I find it curious the board is labeled Revision 6 - presumably there were previous revisions.  In any case I am now comfortable answering questions about how to electrically wire these crossing gates for non-standard configurations.  The values or part numbers of various components are not shown because it would take some measurements or research to figure them out.  I don't recommend attempting component-level troubleshoot/repair of the electrical circuit.

The motor winding is about 10 Ohms.  The power source to the H-bridge motor drive is from the 5V regulator.  A 555 timer IC chip flashes the alternating red LEDs whenever the gate is not at the top.

Stan the Man!   Photo not showing.

Ponz

Ponz,

Member DKDKRD has posted several threads about mechanical issues with this crossing gate.  Here's one that details replacing the plastic spur gear on the motor with a metal one.

https://ogrforum.ogaugerr.com/...48#57883406198852148

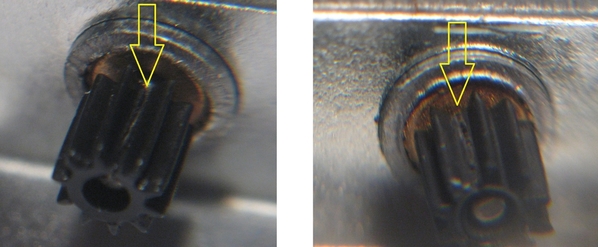
Both of the gears on your motors are split and hence the motor spins freely upon application of load.  The video I showed was, as stated, kind of a teaser since I got it to run a full cycle.  But most of the time it spins freely when going up (more load lifting the gate than dropping the gate).  Here's what the cracked spur gears look like on your 2 gates.  I couldn't find any photos in various DKDKRD's threads but I'm assuming this is what he is/was seeing too.

cracked spur gears

His suggested repair from a couple years back is a metal spur gear from NWSL.  $10 each but it also looks like one needs to fuss with the replacement gear.  I just checked the NWSL site and it appears to be available.  

nwsl brass spur gear for 30-11012 gates

I'm not quite clear on why you have to ream out the metal gear when the NWSL site suggests (to me anyway) that it is effectively an exact replacement. 

In this thread from a couple years ago, it appears an MTH rep responded to DKDKRD's comments about the gear issue so maybe MTH also has something available at this time.

https://ogrforum.ogaugerr.com/...hers-30-11012-repair

In any case, my mission is to check out your gates from an electrical perspective.  With schematic in-hand, I think I can confirm operation assuming a working gear mechanism.  I'm not sure how you should proceed from a mechanical perspective.  DKDKRD suggests you can remove the gate portion and have a flashing crossing gate sign assuming the electrical portion works.  Lemon-lemonade?


Attachments

Images (2)
  • cracked spur gears
  • nwsl brass spur gear for 30-11012 gates
Last edited by stan2004

For anyone attempting a DIY repair, first read DKDKRD's posts about not just the spur gear, but other issues like gear noise and limit switch adjustment.  Point being, I'm convinced you will run into a mechanical issue before an electrical one.

That said, if you do want to mess with the electrical side, here's how the limit switches work (see schematic).

limit switch adjustment screws

This will allow you to confirm the motor electronics works in both directions.  That is, no point in going thru the trouble of replacing the spur gear if the motor or electronics is burned out!

As described earlier, the limit switches (when closed) cut off power to the motor.  The switches are metal leafs (like a diving board) that press against a tip of a metal adjustment screw to close.  By turning the adjustment screw, this adjusts the distance to the leaf and hence closes sooner or later in the rotation of the gate arm.

If you remove the panel as shown, the gate mechanism does not contact either leaf so both limit switches open.  This means the motor is free to run in both directions.  Of course you have to think about this for a second.  If there is nothing to stop the motor then the gate will rise or lower and surely stall at some point possibly breaking something.  But again I'm referring to case of a loose spur gear so that the motor is not engaging with the gear mechanism.

Apply red/black power to gate.  You should see the crossing lights flash.

Touch Yellow to Red (or Blue).  You should hear the motor spinning.  This is trying to send the gate down.  Take a toothpick and press the leaf switch until it touches the adjustment screw tip for the gate-bottom switch.  This should shut off the motor.

Touch White to Red (or Blue).  You should hear the motor spinning.  This is trying to send the gate up.  You should be able to detect a slight difference in the sound as the motor spins the other direction but maybe not.  Take a toothpick and simulate the gate-upper switch closure.  This should shut off the motor AND stop the flashing lights.

Attachments

Images (1)
  • limit switch adjustment screws

KD, thanks for responding!   

Ball's in Ponz' court.  Sure would be nice if MTH stepped up, changed the gear in production, and provided it as an end-user replaceable part for existing gates.  I'd think it could be much less than $10 each with their buying power.  Or maybe this might be an fun project for someone with a 3-D printer!

So Ponz' near-term plan is to convert the broken crossing gates to flasher-only as suggested by KD elsewhere.

It's a straight-forward mechanical-only (no wiring, no soldering) conversion.  4 screws hold the crossing arm to the poles.

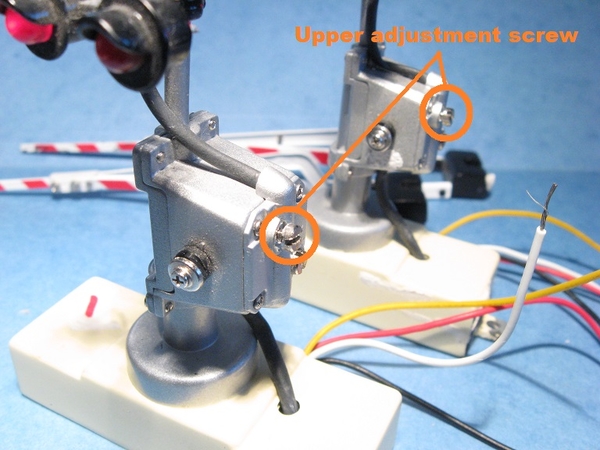
As discussed earlier, the flashers operate whenever the crossing arm mechanism is not triggering the upper limit switch.  So simply back off (turn CCW) the upper adjustment screw until the LEDs start flashing when red/black power is applied.  No connection is needed to yellow, white, or blue wires.

mth 30-11012 flasher only screw adjustment

Done this way, if there be occasion to attempt a gear replacement, the electrical side is good-to-go.

 Addendum:

If converted to flasher-only operation (no gate arm movement), the wiring to an ITAD is much simpler.  Only the red and black wires are used.

wiring for flasher only - no gate operation


Attachments

Images (2)
  • mth 30-11012 flasher only screw adjustment
  • wiring for flasher only - no gate operation
Last edited by stan2004

Add Reply

Post
This forum is sponsored by MTH Electric Trains

OGR Publishing, Inc., 1310 Eastside Centre Ct, Suite 6, Mountain Home, AR 72653
800-980-OGRR (6477)
www.ogaugerr.com

×
×
×
×
Link copied to your clipboard.
×
×