
Hi all. Anyone out there have an MTH motor , new, used or even kaput they can part with for an O gauge Railking 4-6-2 Pacific  or 4-6-4 Hudson?  I believe the worm gear dimensions are 6.5mmx28mm with 13 to 15 mm thread length. Not worried about the flywheel stripes or color as it's for an older PS1 unit.

I've repeatedly tried to get one through both MTH and Brasseur to no avail. I have a gear puller so even a dead motor with the correct worm gear can be utilized.  Thanks all.

Last edited by Kosco42
Original Post

Replies sorted oldest to newest

Kosco42 posted:

I have a gear puller so even a dead motor with the correct worm gear can be utilized

It sounds like you need the worm gear, more than the motor.  What happened to the original motor?  You know that removing these worms from the motor shaft without destroying them isn't a trivial job, right?

A parts diagram is not available for that locomotive.  Most Railking locomotives have a vertical motor that mounts into the drive gearbox.  Is this what you have?  What exactly is the problem with the motor?    You can test the locomotive by placing the locomotive on rollers on a test track and applying dc voltage directly to the motor brush leads.  Increase voltage and change direction.  Disconnect the tether prior to doing this.  Does the motor run?  The BE-0000015 is not available.  The motor should have some identification on its side.  What is it?  If the motor has a worm gear on its output - do NOT try and remove it.  It is virtually impossible without a gear puller for model trains.  Even if you get the worm gear off it is difficult to install one.  You can bend the motor armature shaft by doing so. Post a picture of the motor by itself so we can help you further.  

Bruce

bruce benzie posted:

A parts diagram is not available for that locomotive.  Most Railking locomotives have a vertical motor that mounts into the drive gearbox.  Is this what you have?  What exactly is the problem with the motor?    You can test the locomotive by placing the locomotive on rollers on a test track and applying dc voltage directly to the motor brush leads.  Increase voltage and change direction.  Disconnect the tether prior to doing this.  Does the motor run?  The BE-0000015 is not available.  The motor should have some identification on its side.  What is it?  If the motor has a worm gear on its output - do NOT try and remove it.  It is virtually impossible without a gear puller for model trains.  Even if you get the worm gear off it is difficult to install one.  You can bend the motor armature shaft by doing so. Post a picture of the motor by itself so we can help you further.  

Bruce

There is no motor... that's the problem. Bought it off the 'bay' without a motor. I have a gear puller and have redone enough of these to know how tricky it can be to swap worm gears. I have several good RS-385 motors that I've already removed the worm gears from so even if I can find a dead motor with the proper worm gear it should have the unit back in business. Most Railking PS1 Pacifics and Hudsons utilize motors with similar worm gears.

Kosco42 posted:

I have a gear puller and have redone enough of these to know how tricky it can be to swap worm gears. I have several good RS-385 motors that I've already removed the worm gears from...

Wow!  There are some talented folks here who struggled to remove the worm intact, and ended up cutting it off.  Pressing it back on square, snug, and without bending the motor shaft is another challenge.  Would you mind sharing your secret!? 

Ted S posted:
Kosco42 posted:

I have a gear puller and have redone enough of these to know how tricky it can be to swap worm gears. I have several good RS-385 motors that I've already removed the worm gears from...

Wow!  There are some talented folks here who struggled to remove the worm intact, and ended up cutting it off.  Pressing it back on square, snug, and without bending the motor shaft is another challenge.  Would you mind sharing your secret!? 

Ditto what Ted said,....these little motors have their gear pressed on with unbelievable force....please share your procedure possibly with pics, I’d like to learn how you do it too.......Pat

Chuck Sartor posted:

Are you sure this is the motor? You said it was missing. Did this photo come from Trainz?

The picture is from the MTH parts site. It's a similar motor from a 4-6-4 Hudson. Same worm gear. Only difference is that the flywheel has a slight taper to fit into the Hudson without rubbing the roof.

gunrunnerjohn posted:

The PS/1 RK K-4 is in the RailKing Parts Catalog, Second Edition; Rev 090999.

The motor listed is BE-0000017.

That's right John. Have a parts catalog but according to Midge at MTH it's no longer available. Same with Brian at Brasseur. I checked just about every motor listed in the MTH website and was told the ones that looked compatible are not available.

 Just yesterday Midge emailed me back and said BE-0000229 might work so I ordered one. 

 John Grasson responded to an email and said he thinks he may have found one too.

Keeping my fingers crossed.

harmonyards posted:
Ted S posted:
Kosco42 posted:

I have a gear puller and have redone enough of these to know how tricky it can be to swap worm gears. I have several good RS-385 motors that I've already removed the worm gears from...

Wow!  There are some talented folks here who struggled to remove the worm intact, and ended up cutting it off.  Pressing it back on square, snug, and without bending the motor shaft is another challenge.  Would you mind sharing your secret!? 

Ditto what Ted said,....these little motors have their gear pressed on with unbelievable force....please share your procedure possibly with pics, I’d like to learn how you do it too.......Pat

I've been using a Great Plains Pinion and Gear tool I found on Ebay for under $25 including shipping. Less than the cost of a new motor from MTH. Most times after the worm gear breaks free I have to put the base on top of  vise jaws and gently tap the shaft the rest of the way out of the worm gear with a long punch. Desperate times call for desperate measures!  LOL! But I've had good results.

To install the worm gear on the selected motot I open the vise (with the jaws smooth sides inboard) place the side with the flywheel against the stationary jaw, line eveything up squarely  and slowly close the vise pushing the worm gear onto the shaft to the correct distance. Voila! 

Attachments

Images (1)
  • 20190919_132116
Kosco42 posted:

I've been using a Great Plains Pinion and Gear tool I found on Ebay for under $25 including shipping. Less than the cost of a new motor from MTH. Most times after the worm gear breaks free I have to put the base on top of  vise jaws and gently tap the shaft the rest of the way out of the worm gear with a long punch. Desperate times call for desperate measures!  LOL! But I've had good results.

I have one of those that I have yet to try on a worm gear, your post makes me think it might be worth a shot.  I was a bit worried it would buckle under the strain.

FWIW, I'd be VERY careful about tapping on the shaft.  That will frequently slide the commutator on the shaft and destroy the motor.

*** Update ***

The Great Plains Pinion puller does work!  However, there are a few issues with the process.  The 2mm pin that comes with it is too short for most worms.  The other pin is 3mm and 4mm, too large for the 2.5mm shafts.  However, it did break it free, and since the motor is already dead, I figured there was no harm in finishing it off with the punch to do the final push. 

What is needed to make this a perfect worm puller is a new pin as below,  the left hand side is 4mm, the cut is at 3/4 to 7/8 from the large end.  The smaller end would be about 2.4mm and 3/4" long, that would handle a vast majority of the worms.  The existing smaller side now is about 9/16" long, it needs to be a total of 3/4" to really do the job in most cases.

Great Plains Pinion Puller Pin

Attachments

Images (1)
  • Great Plains Pinion Puller Pin
Last edited by gunrunnerjohn
gunrunnerjohn posted:
Kosco42 posted:

I've been using a Great Plains Pinion and Gear tool I found on Ebay for under $25 including shipping. Less than the cost of a new motor from MTH. Most times after the worm gear breaks free I have to put the base on top of  vise jaws and gently tap the shaft the rest of the way out of the worm gear with a long punch. Desperate times call for desperate measures!  LOL! But I've had good results.

I have one of those that I have yet to try on a worm gear, your post makes me think it might be worth a shot.  I was a bit worried it would buckle under the strain.

FWIW, I'd be VERY careful about tapping on the shaft.  That will frequently slide the commutator on the shaft and destroy the motor.

*** Update ***

The Great Plains Pinion puller does work!  However, there are a few issues with the process.  The 2mm pin that comes with it is too short for most worms.  The other pin is 3mm and 4mm, too large for the 2.5mm shafts.  However, it did break it free, and since the motor is already dead, I figured there was no harm in finishing it off with the punch to do the final push. 

What is needed to make this a perfect worm puller is a new pin as below,  the left hand side is 4mm, the cut is at 3/4 to 7/8 from the large end.  The smaller end would be about 2.4mm and 3/4" long, that would handle a vast majority of the worms.  The existing smaller side now is about 9/16" long, it needs to be a total of 3/4" to really do the job in most cases.

Great Plains Pinion Puller Pin

I just ordered one of these pullers John, I should have it by Tuesday....I’ll see if can make a new pin from tool steel...I have a small stick, I’ll see if I can turn it on my small machine...😁........Pat

harmonyards posted:

I just ordered one of these pullers John, I should have it by Tuesday....I’ll see if can make a new pin from tool steel...I have a small stick, I’ll see if I can turn it on my small machine...😁........Pat

Pat, can I get you to make two?   This puller seems perfect for gears with the right pin.

One other simple mod you'll want to make.  Take the 2mm slot base and file it out slightly so it'll fit around the 2.5mm shaft of the smaller motors.  That with the "improved" pin would make this a perfect setup to remove the worms.

gunrunnerjohn posted:
harmonyards posted:

I just ordered one of these pullers John, I should have it by Tuesday....I’ll see if can make a new pin from tool steel...I have a small stick, I’ll see if I can turn it on my small machine...😁........Pat

Pat, can I get you to make two?   This puller seems perfect for gears with the right pin.

One other simple mod you'll want to make.  Take the 2mm slot base and file it out slightly so it'll fit around the 2.5mm shaft of the smaller motors.  That with the "improved" pin would make this a perfect setup to remove the worms.

Hey Pat... can you make 3? 

Kosco42 posted:
gunrunnerjohn posted:
harmonyards posted:

I just ordered one of these pullers John, I should have it by Tuesday....I’ll see if can make a new pin from tool steel...I have a small stick, I’ll see if I can turn it on my small machine...😁........Pat

Pat, can I get you to make two?   This puller seems perfect for gears with the right pin.

One other simple mod you'll want to make.  Take the 2mm slot base and file it out slightly so it'll fit around the 2.5mm shaft of the smaller motors.  That with the "improved" pin would make this a perfect setup to remove the worms.

Hey Pat... can you make 3? 

Four!  Do I hear four, sir!? 

gunrunnerjohn posted:
harmonyards posted:

I just ordered one of these pullers John, I should have it by Tuesday....I’ll see if can make a new pin from tool steel...I have a small stick, I’ll see if I can turn it on my small machine...😁........Pat

Pat, can I get you to make two?   This puller seems perfect for gears with the right pin.

One other simple mod you'll want to make.  Take the 2mm slot base and file it out slightly so it'll fit around the 2.5mm shaft of the smaller motors.  That with the "improved" pin would make this a perfect setup to remove the worms.

Yep!....shouldn’t be a problem John, I see exactly what you mean about modding the slot base....that should be fairly simple...I should have enough material to make a handful of these.....limited edition pins...I’ll make a run of these for you and the other fellas....it’ll just take a little longer to turn down tool steel vs. say, brass or mild steel....I have to sneak up on tool steel, doing skim cuts a little bit at a time....these will be nice pins, the material I have is Mil Spec...........Pat

Gee, Mil Spec pins, the rest of the tool might fall apart!   I just took a little file to the slot in the base, it fits nicely around the small motor shaft now.  I figure the large pin is good for the larger 5xx series motors, so this pin should work for the 3xx series.  Truthfully, most of the larger motors don't have a worm, they usually are connected to a driveshaft.

I was impressed how easily the puller popped the worm loose, I didn't expect that after my previous attempts with a different motor and the Timko puller.  The problem was I was using the larger pin, and it's more than 2.5mm.  The hole in the worm is tapered, and then the pin got stuck!  I had to use the puller to yank the pin out of the worm, that's when I realized that it was too large.  Yep, close to 3mm, no wonder it got stuck! 

The Timko puller is great for flywheels and drive wheels, so I have that base covered.

Now, getting the worm back on a new motor may be another challenge to over come.....I’ll try KOSCO42’s  method on some junk motors and see how it works.....maybe Sean might chime in, I know he’s done a Lionel worm on a 385, I think he might have passed an appropriate drill bit through his and actually locked it down with a set screw.....not 100% sure how he installed it, but I know he had good results....I’d like to see a tried and true method of removal and install that’s reliable and repetitive......I’ve destroyed plenty of these little 385’s already .....and I’d like to be a quitter as far as destruction goes........Pat

Last edited by harmonyards

I used a bit just smaller than the shaft, heated the gear, chilled the motor and then used the arbor press to put it together. I was worried that I was going to break/bend the motor shaft. I need to pull the rear motor out of my K line and install a matching motor, so hopefully this tool works. Pat needs to try it on some junk motors first.

harmonyards posted:

Now, getting the worm back on a new motor may be another challenge to over come.....I’ll try KOSCO42’s  method on some junk motors and see how it works.....maybe Sean might chime in, I know he’s done a Lionel worm on a 385, I think he might have passed an appropriate drill bit through his and actually locked it down with a set screw.....not 100% sure how he installed it, but I know he had good results....I’d like to see a tried and true method of removal and install that’s reliable and repetitive......I’ve destroyed plenty of these little 385’s already .....and I’d like to be a quitter as far as destruction goes........Pat

I figure my arbor press will put the gear on the new motor.  I'll heat the gear to press it on.

On the Great Planes puller set:

FWIW, I have it and love it. I do have some tips though. I also bought this puller https://www.amazon.com/gp/product/B00GDAJYSK

Walkera W010 Gear Pinion Puller Remover Tools Set For RC Motor Pinion Parts

The why is because both use the exact same thread on the pusher. This gives you a wider selection of matching pins for different shafts. I've also found that these pins fit into the MTH worm gears and are needed to give you the total pin length required to push them off. Put the silver pin inside the gear, use the other black pin on the Great Planes puller, you can press the gear right off.

For flywheels, I also got this puller since the gap between the motor and the flywheel prevents other types from working. I chucked up the screw section in a drill and used a Dremel and cutoff wheel to shape the pointed tip into a shaft as it needed to match the motor shaft size and actually go into the flywheel some.

https://www.amazon.com/gp/product/B07GFLBY1R/

Again, what I found best was buying the silver Walkera puller set, and using both sets, then you have the ultimate puller set. I saw earlier in the thread that others made custom pins for the Great Planes puller, and that's a good route too, just saying, I don't think folks might have known the 2 completely different brands were compatible, and the resulting combination set can do what the custom pin does, and more.


Last edited by Vernon Barry

I grabbed the Walkera set, I'll see if the pins fit the Great Planes and allow the full push.

I want to get some longer screws for the Great Planes set, and I liked the idea of using some steel tubing to align them properly as well.

The Timko puller works for me with flywheels and wheels.

Jetguy posted:
 Put the silver pin inside the gear, use the other black pin on the Great Planes puller, you can press the gear right off.

I'm not getting what you're talking about here.

Last edited by gunrunnerjohn

Sorry, don't have it in front of me at the moment to take a picture, so trying to do this via edits.

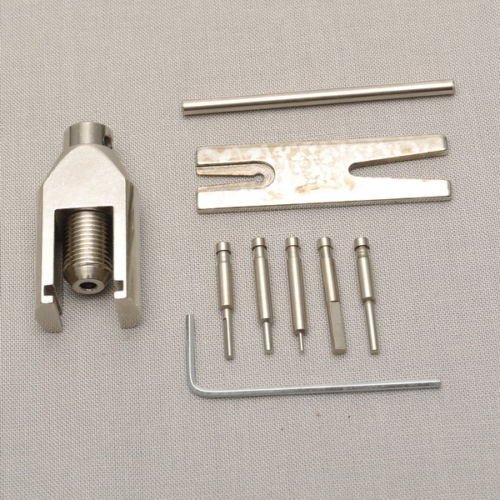
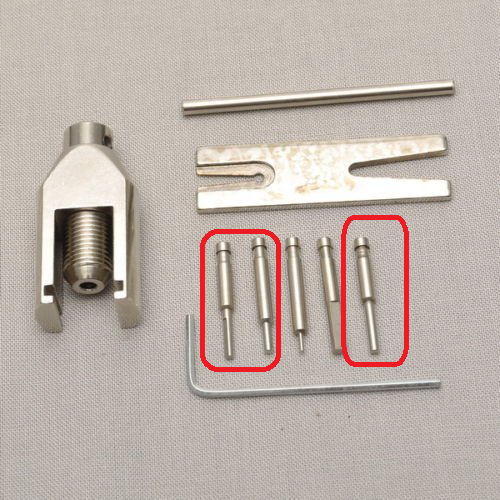
The silver Walkera pins are of a smaller shank diameter and then also have the smaller pin tip. It just so happens that that diameter happens to match the typical bore size of the MTH worm gear from the end. The MTH worm gears (at least every one I've touched PS1, PS2, PS3, steam or diesel) is a stepped bore system. The bore through the actual screw section is larger, and then the solid shank section that matches the motor shaft is stepped smaller. It just so happens the length of these pins is near perfect as is the diameters and step shaft size. So you insert the silver pin with the small end first into the end of the worm gear. The sizing is such that the bore keeps the pin straight so the smaller tip aligns and presses on the nose of the motor shaft deep inside that worm gear. Externally, your puller is pushing on a pin, that pushes the motor shaft out of the gear. This puts no pressure on the motor body or the armature (something you already know not to do). I've circled the pins I commonly use.

Then they insert, small end first into the larger bore end of the worm gear.  Again, what folks may not know is that is a stepped bore, not a straight bore. The step is where the threads end typically. So if you use a motor shaft sized pin, it can often kink or bend in the long wider bore section because it has room to bend sideways. If you have a stepped pin, it reduces the length of the small shank and reduces the chance of bending the pin.

Image result for mth can motor

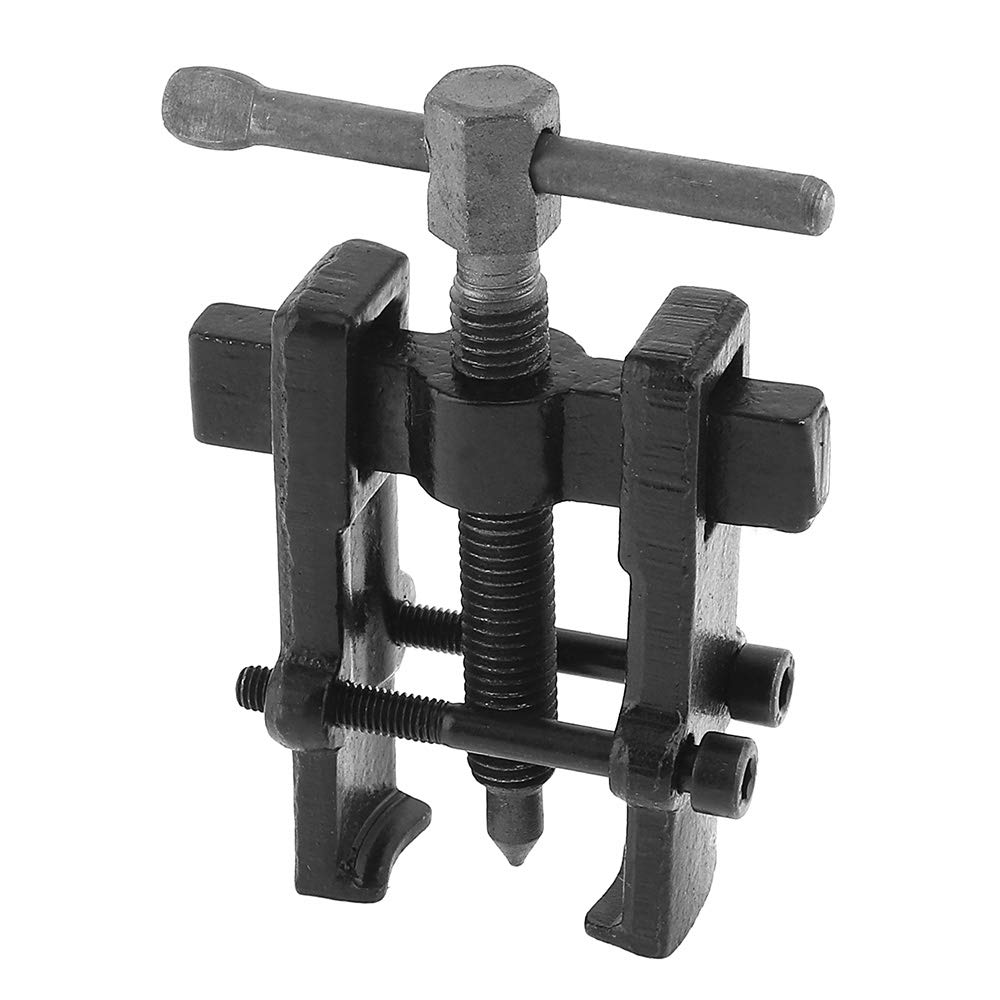
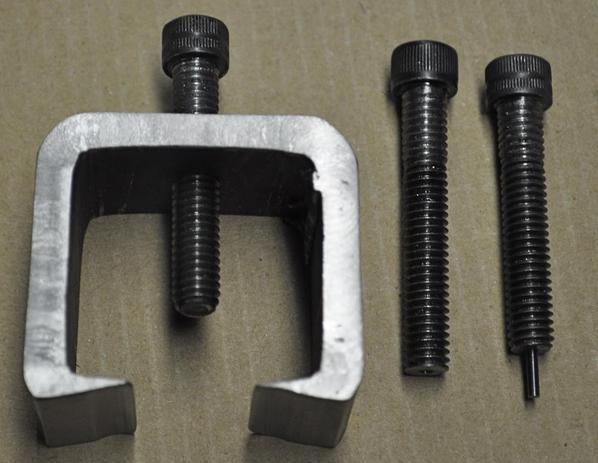
What I'm getting at is one method is a custom machined extra long pin to press these long worm gears off. Extra long for some steamers. If you make that extra long pin the same diameter as the motor shaft, even in hardened steel, it might flex, bend or break over such a long length. You could step size it diameter wise, and that's an option. What I'm giving is a third option. There is a way, with no custom pins, just these 2 puller sets, to mix and match parts such that the silver pins can be dropped into the worm gear bore and act as short of a shuttle pin, a pin that floats inside there and transfers the pushing force. This allows the puller with standard pins to push on this shuttle and press the shaft right out of the worm gear. Those same pins come handy in dozens of other situations and the fact the silver threaded section also matches the black Great planes threads means you can adapt the parts of the 2 pullers for a lot of situations that a single set could not.

Attachments

Images (1)
  • mceclip0
Last edited by Vernon Barry

I just received my puller from Great Plains the other day. I’ll be making y’all some pins when I get back from York.....it’ll be my pleasure....(at least until I burn up all the tool stock I have 😊) I know John wanted one and Ted, and maybe one more....y’all can shoot me an email as to who needs them bad....I’ll get the service guys like John first out....as they use these tools all the live long day.........Pat

Well, I decided to "upgrade" my gear puller with a suggestion that was posted here.  I picked up some 3/8" OD steel tubing and cut three pieces to the exact same length.  Then I repeated this for longer lengths, I made three sets.  I also picked up a longer set of screws, AAMOF I had to buy ten of them to get the correct size.  With these tubes, it's a lot easier to assemble the gear puller and get the plates exactly parallel.  My gear puller "kit" just expanded a bit!   Now I just need a longer pin for the jackscrew and I'm all set to handle worm gears.

Great Plains Gear Puller Enhancements N1Great Plains Gear Puller Enhancements N2

Attachments

Images (2)
  • Great Plains Gear Puller Enhancements N1
  • Great Plains Gear Puller Enhancements N2
Norton posted:

Just found this thread and ordered a Great Plains puller. Pat, John, any reason the back end of a drill bit wouldn't work instead of tool steel? No turning required, just drill a hole in some brass or mild steel to fit the screw.

Pete

Could work, I’ll give it a spin...if not, I’ll turn some pins down, no problem, I haven’t forgot about this project....as soon as I got back, I started finishing up projects for folks, plus Pete & I have had FEF’s on the brain...😉........Pat

gunrunnerjohn posted:

The trick is getting the drill bit perfectly straight in the base. 

I don't have the tool yet but looking at pictures it appears to have a few sizes with a wide part that fits in the screw and narrower end that fits in the gear. If thats the case its just matter of taking some bar stock , turning it down to fit the screw, then center drilling for a drill bit to fit the adapter. The bit will be centered and on axis.

Turning hard metal down to a small diameter can be tricky especially something 3/4" long. The metal wants to bend away from the cutter and hard metal shears off more easily. It would be easier on a grinding machine which is probably how the bits in this tool were made.

I did a similar thing when I made my flywheel puller but skipped the adapter and just drilled directly into the screw as I had many of those. In this case I used dowel pins instead of drill bits but drill bits use harder metal.

Pete


Last edited by Norton
Ted S posted:

Maybe off-topic, but I would love to learn how to use machine tools.  Lathe, drill press, etc.  I'm way too old for a H.S. shop class.  Where can I go to learn this kind of stuff in my retirement??

Some community colleges offer classes like that....ours does...don’t expect to become a machinist overnight, but at least you can get the basics..and put your hands on the machines.......Pat

Add Reply

Post

OGR Publishing, Inc., 1310 Eastside Centre Ct, Suite 6, Mountain Home, AR 72653
800-980-OGRR (6477)
www.ogaugerr.com

×
×
×
×
Link copied to your clipboard.
×
×