I finally took the time to try this out:

As I have mentioned before, I am running Lionel Conventional, Lionel Lion Chief, and MTH remote locomotives on the same layout.

So far, I have been doing this with two separate power inputs and controllers:
1) CW-80 for Lionel conventional and Lion Chief locomotives.
2) MTH Ready To Run power brick, control box, and remote for my MTH remote locomotive.

I have these on separate switches, and going to separate track power input sections, which I shuttle on and off depending on the locomotive that I am running.

I have thought about this for a long time, and finally tried it out as follows:
1) Z1000 brick power input into the Z1000 controller barrel connector.
2) Z1000 controller power, from banana plugs, input into MTH Ready To Run control box barrel connector.
3) MTH Ready To Run control box power, from banana plugs, input to track, direct wired.

I can run everything the way that I want except when it comes to the MTH remote locomotive.
It will power up when I turn up the power at the Z1000, and will set there making the idling sounds,
but the remote has no effect. I see the light on the control box blinking when I try a command from the remote,
but nothing happens.
However, I can control the locomotive with the buttons on the Z1000 controller.

If I unplug the brick from the Z1000 controller, then plug it directly into the MTH Ready To Run control box,
the locomotive responds to the Ready To Run remote as it should.

This doesn't seem to make any sense. as the MTH Ready To Run control box is the last component in line to the track,
so that the remote should be putting the signals into the track as normal.
However, it seems that having the Z1000 upstream, negates the Ready To Run control box from sending signals to the locomotive.
Or the locomotive is seeing the Z1000 controller, upstream from the Ready To Run control box, and is changing its reception to receive signals from it rather than the Ready to Run control box.

If the Z1000 is confusing the issue, is there any way to add a filter between the Z1000 and the Ready To Run control box so that signals can go only one way thru it, and so that the control box, or the locomotive, would see nothing but power from the brick, and in effect have no knowledge of the, upstream, Z1000 in the line of power to it?

Any thoughts or ideas are welcome.
Thanks,
Roger

Last edited by RWL
Original Post

Replies sorted oldest to newest

It is a slender remote with colored buttons, and it is most definitely line of site to the small control box that is inline between the brick and the track.
If works fine as long as I point it at the control box.

What do you mean my having your dealer swap them out for conventional controllers?
Are you referring to something like the Z1000 that I am using?

I'm pretty sure your problem is feeding the Remote unit with the Z1000 track output terminals.

You can't "daisy chain" a DCS TIU with a Z1000 that way either.  I think the manual calls this out, specifically stating to use the Brick plug directly into the TIU (via pigtail adapter to convert the barrel to banana plugs).

I know you are not using a TIU, but I think it may be the same issue.

-Dave

RWL posted:

...

It will power up when I turn up the power at the Z1000, and will set there making the idling sounds,
but the remote has no effect. I see the light on the control box blinking when I try a command from the remote,
but nothing happens.
However, I can control the locomotive with the buttons on the Z1000 controller.

If I unplug the brick from the Z1000 controller, then plug it directly into the MTH Ready To Run control box,
the locomotive responds to the Ready To Run remote as it should...

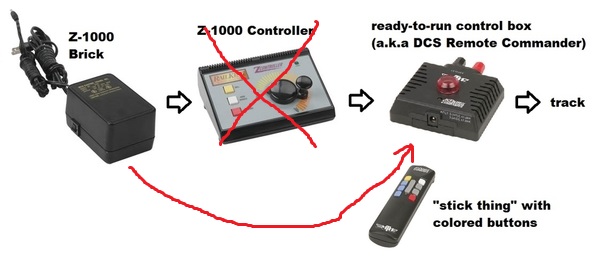
So everyone's on the same page, I believe you're describing the following situation:

mth issue

If you only turn up the Z-1000 controller to the point where the engine starts its sounds (maybe 1/2 way rotation of the knob dial), you are not providing a suitable voltage to the RTR control box to properly operate under DCS control.  I think you'll find if you crank the Z-1000 controller as far Clockwise as it will go, then it might actually start working.  This is sort-of but not exactly along the lines of what Dave is suggesting above about placing a Z-controller between a brick and a TIU.

Since a Ready-to-Run set "just" comes with the brick and the control box (NO Z-controller), it's kind-of sort-of a clue that the Z-controller does not belong in the chain-of-command so to speak. 

Attachments

Images (1)
  • mth issue
stan2004 posted:
RWL posted:

...

It will power up when I turn up the power at the Z1000, and will set there making the idling sounds,
but the remote has no effect. I see the light on the control box blinking when I try a command from the remote,
but nothing happens.
However, I can control the locomotive with the buttons on the Z1000 controller.

If I unplug the brick from the Z1000 controller, then plug it directly into the MTH Ready To Run control box,
the locomotive responds to the Ready To Run remote as it should...

So everyone's on the same page, I believe you're describing the following situation:

mth issue

If you only turn up the Z-1000 controller to the point where the engine starts its sounds (maybe 1/2 way rotation of the knob dial), you are not providing a suitable voltage to the RTR control box to properly operate under DCS control.  I think you'll find if you crank the Z-1000 controller as far Clockwise as it will go, then it might actually start working.  This is sort-of but not exactly along the lines of what Dave is suggesting above about placing a Z-controller between a brick and a TIU.

Since a Ready-to-Run set "just" comes with the brick and the control box (NO Z-controller), it's kind-of sort-of a clue that the Z-controller does not belong in the chain-of-command so to speak. 

Yep, this is exactly the configuration that I was attempting to use.

Thanks for putting it into a clear pic.

Well, thanks for being a good sport and volunteering for guinea-pig duty!   I am somewhat surprised it did not work but so be it.

The specified configuration for the DCS Remote Commander is to just use the brick (no Z-controller in between).  Since you are using the CW-80 for conventional operation, I guess my question is why you are even using the Z-controller (meant for conventional control) as you apparently have "one" DCS locomotive that is command-controllable?

I guess I wasn't clear.

I tried the Z1000 in line with the Remote Commander in order to do away with the CW-80, and to have only one single power feed to the track. The CW-80 is no longer in the mix.

You see, when I do my full layout, I will have 3 separately powered track sections.
- One main outer loop
- One secondary inner loop
- One yard
Each with several power blocks.

I can't be feeding each of those three track sections with two separate power supplies, hence the attempt at daisy chaining the Z1000 and the Remote Commander.

In the end I want to be able to handle all of my locos with one single power supply (3 in total) to each of those track sections, and I had planned for each to have its own Remote commander in line.

I hope that gives a better picture of what I am trying to accomplish.

I believe a workaround may be to make a jumper wire from the Lock-On terminals to plug into the Z-Controller. That would have one track for remote control and then whatever you are doing after the controller.

You can get terminals or bare wires behind the Lock-On nuts.

Remote-Commander_to_Controller

You do need to control the voltage for LionChief or Lionel electronic engines and limit the voltage to 18 volts. The Z-1000 can output close to 20 volts.

Attachments

Images (1)
  • Remote-Commander_to_Controller
Moonman posted:

I believe a workaround may be to make a jumper wire from the Lock-On terminals to plug into the Z-Controller. That would have one track for remote control and then whatever you are doing after the controller.

You can get terminals or bare wires behind the Lock-On nuts.

Remote-Commander_to_Controller

You do need to control the voltage for LionChief or Lionel electronic engines and limit the voltage to 18 volts. The Z-1000 can output close to 20 volts.

So are you saying that I should try putting the Z controler downstream of the Remote Commander box?
I am not using this type of track, so I don't have this type of lock on.

RWL posted:
Moonman posted:

I believe a workaround may be to make a jumper wire from the Lock-On terminals to plug into the Z-Controller. That would have one track for remote control and then whatever you are doing after the controller.

You can get terminals or bare wires behind the Lock-On nuts.

Remote-Commander_to_Controller

You do need to control the voltage for LionChief or Lionel electronic engines and limit the voltage to 18 volts. The Z-1000 can output close to 20 volts.

So are you saying that I should try putting the Z controler downstream of the Remote Commander box?
I am not using this type of track, so I don't have this type of lock on.

yes, the concept is the same.

When you direct connect the brick to the remote commander module you have joy with the MTH engine via the remote.

I just thought that if you jumpered off of the track connection that you could feed your other existing setup with the Z controller and switches.

I also want to repeat that you do not want to use the Z-brick direct voltage for the Lionel equipment.

RWL posted:
Moonman posted:

I believe a workaround may be to make a jumper wire from the Lock-On terminals to plug into the Z-Controller. That would have one track for remote control and then whatever you are doing after the controller.

You can get terminals or bare wires behind the Lock-On nuts.

Remote-Commander_to_Controller

You do need to control the voltage for LionChief or Lionel electronic engines and limit the voltage to 18 volts. The Z-1000 can output close to 20 volts.

So are you saying that I should try putting the Z controler downstream of the Remote Commander box?
I am not using this type of track, so I don't have this type of lock on.

I have same question.  Moonman, are you suggesting putting the Z-controller between the DCS-RC and the track like this?

mth%2520issue

RWL, if you have a "pigtail" cable with the mating barrel/coax plug, you might try this.  There are also screw-terminal adapters for less than $1 that would allow you to feed the DCS-RC into the Z-controller barrel/coax input jack.  I'd think you'd need to set the Z-1000 controller to its max CW setting...but I was wrong the last time!

Attachments

Images (1)
  • mth%2520issue
Moonman posted:

...You do need to control the voltage for LionChief or Lionel electronic engines and limit the voltage to 18 volts. The Z-1000 can output close to 20 volts.

mth brick output voltage

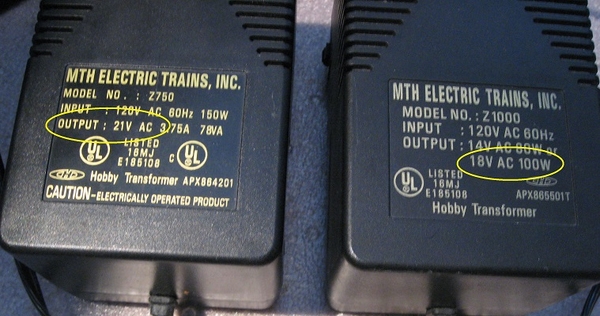
Just to be clear.  Are you saying the Z-1000 bricks that have a nameplate output voltage of 18V output 20V?

There was an issue with some versions of MTH bricks that had higher nameplate output voltage greater than 18V (as shown in photo) and indeed output the higher voltages.


Attachments

Images (1)
  • mth brick output voltage
stan2004 posted:
RWL posted:
Moonman posted:

I believe a workaround may be to make a jumper wire from the Lock-On terminals to plug into the Z-Controller. That would have one track for remote control and then whatever you are doing after the controller.

You can get terminals or bare wires behind the Lock-On nuts.

Remote-Commander_to_Controller

You do need to control the voltage for LionChief or Lionel electronic engines and limit the voltage to 18 volts. The Z-1000 can output close to 20 volts.

So are you saying that I should try putting the Z controler downstream of the Remote Commander box?
I am not using this type of track, so I don't have this type of lock on.

I have same question.  Moonman, are you suggesting putting the Z-controller between the DCS-RC and the track like this?

mth%2520issue

RWL, if you have a "pigtail" cable with the mating barrel/coax plug, you might try this.  There are also screw-terminal adapters for less than $1 that would allow you to feed the DCS-RC into the Z-controller barrel/coax input jack.  I'd think you'd need to set the Z-1000 controller to its max CW setting...but I was wrong the last time!

Yes, and then use the Z-Controller to feed the other tracks conventionally.

stan2004 posted:
Moonman posted:

...You do need to control the voltage for LionChief or Lionel electronic engines and limit the voltage to 18 volts. The Z-1000 can output close to 20 volts.

mth brick output voltage

Just to be clear.  Are you saying the Z-1000 bricks that have a nameplate output voltage of 18V output 20V?

There was an issue with some versions of MTH bricks that had higher nameplate output voltage greater than 18V (as shown in photo) and indeed output the higher voltages.


Good point, Stan!

Check the output of the brick to protect the Lionel equipment from overvoltage.

I assumed that all of them had the same 21 volt output. I have 3  Z-1000 for Christmas trains and accessory power, but I never bothered to check. We only had Z-500 and Z-750 at the museum, so I recalled the higher track output.

We haven't solved it yet.
I tried putting the Remote Commander box before the Z1000, and still no remote action.
The strange thing is that, with the Z1000 ahead of the remote commander, even though the remote has no effect, the Z1000 worked the remote locomotive properly.

in this configuration, with the remote commander ahead of the Z1000, the commands from the Z1000 are all jumbled up.

RWL posted:

We haven't solved it yet.
I tried putting the Remote Commander box before the Z1000, and still no remote action.
The strange thing is that, with the Z1000 ahead of the remote commander, even though the remote has no effect, the Z1000 worked the remote locomotive properly.

That is what is expected.

in this configuration, with the remote commander ahead of the Z1000, the commands from the Z1000 are all jumbled up.

This is also expected.

The Z controller should not be connected to the track that the DCS engine is to be operated on.


Moonman posted:
RWL posted:

We haven't solved it yet.
I tried putting the Remote Commander box before the Z1000, and still no remote action.
The strange thing is that, with the Z1000 ahead of the remote commander, even though the remote has no effect, the Z1000 worked the remote locomotive properly.

That is what is expected.

in this configuration, with the remote commander ahead of the Z1000, the commands from the Z1000 are all jumbled up.

This is also expected.

The Z controller should not be connected to the track that the DCS engine is to be operated on.


Could you elaborate on this comment?

I was in hopes that the Z controller could be used to power the conventional and Lion Chief locomotives, and that it could also be used as a simple pass through, for the DCS locomotives, so that when open it would let power through, from the brick, to the Remote Commander and then to the track, so that I could then use the remote for the DCS locomotives.

In the end I will have 3 discreet powered track sections, 1 each powered by separate sides of my Lionel ZW, with remote commander boxes in line on each feeder, and the third section powered by this Z1000 with a remote commander box in line with it.

What is it about the Z controller, and or possibly the ZW, that confuses the issue for the DCS locomotive?
Again, I was in hopes that the transformers would simply let power continue to the Remote Commander.

There was a thread a while back showing the waveforms out of the Z-controller.  IIRC even with the knob at the full/max CW setting, the Z-controller output slightly "chops" the pure sinewave coming from the brick.  I don't know if this is the explanation but the chopping surely can't help matters.

Would it be practical to insert a bypass switch.  That is, even if the Z-controller did a true no-modification pass-thru of the brick voltage (when turned to full/max), this is still a step you must consciously perform to go into the DCS-RC "mode."  Albeit another item in the chain, seems an electrical selector switch swap in and/or bypass the Z-controller when it is not needed.

I don't wish to have separate power supplies for conventional and DCS on each of the three  track sections, but I think I have a plan to make this work.

Your suggestion reminded me of a plan that I had thought about over a year ago.

Fore each of my three discreetly powered track sections, I could rout power from the power brick to a three position switch that could either be ( 1 ) off, ( 2 ) rout the power to the ZW or Z1000, depending on the track section, or ( 3 ) rout power to the Remote Commander box.

This would allow only one power supply per track controller, and still allow discreet control for conventional, or DCS locomotives.

Thoughts?

RWL posted:

I don't wish to have separate power supplies for conventional and DCS on each of the three  track sections, but I think I have a plan to make this work.

Your suggestion reminded me of a plan that I had thought about over a year ago.

Fore each of my three discreetly powered track sections, I could rout power from the power brick to a three position switch that could either be ( 1 ) off, ( 2 ) rout the power to the ZW or Z1000, depending on the track section, or ( 3 ) rout power to the Remote Commander box.

This would allow only one power supply per track controller, and still allow discreet control for conventional, or DCS locomotives.

Thoughts?

After some thought, I realize that I would also have to have another switch on the downstream side of the two controllers to bring the power back to the track in one place.


RWL posted:
 
...After some thought, I realize that I would also have to have another switch on the downstream side of the two controllers to bring the power back to the track in one place.


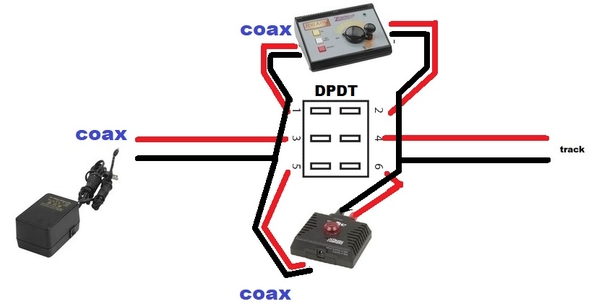
If I understand your idea, how about a center-off, double-pole double-throw (DPDT) switch?  One pole selects where the AC brick power goes to.  The other pole selects where the track power comes from. 

mth issue dpdt center off selector

The Black terminal is common so you're just switching the Red "hot" terminal.

Attachments

Images (1)
  • mth issue dpdt center off selector
stan2004 posted:
RWL posted:
 
...After some thought, I realize that I would also have to have another switch on the downstream side of the two controllers to bring the power back to the track in one place.


If I understand your idea, how about a center-off, double-pole double-throw (DPDT) switch?  One pole selects where the AC brick power goes to.  The other pole selects where the track power comes from. 

mth issue dpdt center off selector

The Black terminal is common so you're just switching the Red "hot" terminal.

Thanks for chiming in Stan,

I came to the same conclusion. 
I was reading up on STSP and STDP switches, and later on it hit me that I could do exactly as you have suggested.
I could take care of both selections with one single switch, which also takes one more step out of the configuration change between locomotives.

I do appreciate the suggestion just the same, for two reasons:
1) I might not have thought of it, and would be glad to learn of it.
2) It is always good to know that someone else has the same idea, as I am not that electrically inclined.

Thanks again

mth%2520issue%2520dpdt%2520center%2520off%2520selector

I edited the earlier photo which might help.  A DPDT (double-pole, double-throw) switch will have 6 terminals as shown.  When switch thrown one-way, it connects 1-3 and 2-4.  When switch thrown other way, it connects 3-5 and 4-6.  If you additionally have a DPDT with center-off, no connections are made in the middle position.

So in above diagram, the red/hot/center-rail power connections would be:

1  Z-controller input (center pin of coax/barrel jack)

2  Z-controller output

3  Brick output (center of coax/barrel plug)

4  Track center-rail

5  DCS-RC input (center pin of coax/barrel jack)

6  DCS-RC output

You will probably want to use adapters or pigtail cables to convert the coax/barrel connections to wires.

The black/common/outer-rail power connections are tied together and do not go thru the DPDT switch.

Untitled

If you go the DPDT switch route as shown, search for "DPDT center off".  You'll find hundreds of options in both the toggle or rocker style.  You need one that can handle at least ~5A (at 18VAC) as put out by the Z brick.  Note that you will most likely find the Amp rating referenced to house voltages (120/240 VAC).   If it rated at 5A at 120VAC it will be fine for a Z-controller. 

They might be referred to as ON-OFF-ON.  Just don't get one that says (ON)-OFF-(ON) with the parentheses around the ON.  This means it's a momentary type which is spring-loaded to return to the center-off position when you're not pushing on it (like the window up-down control in a car).  Obviously you don't want a momentary style; the above example uses the term "latching" to differentiate it from momentary but I'm not sure latching is a universally used term.

Finally, consider how you're going to wire up the switch.  There are some so-called "mini" sized switches that can handle the Amps, but if you look at the terminals, it can be a hassle to solder-to and dress the thick wiring many guys use for track power.  The above example uses quick-connect or Faston push-on/pull-off style of crimped connectors common in automotive applications.  There are DPDT center-off switches with screw-terminals so no soldering.  Whatever works for you!

Attachments

Images (2)
  • mth%2520issue%2520dpdt%2520center%2520off%2520selector
  • Untitled
Last edited by stan2004
stan2004 posted:

mth%2520issue%2520dpdt%2520center%2520off%2520selector

I edited the earlier photo which might help.  A DPDT (double-pole, double-throw) switch will have 6 terminals as shown.  When switch thrown one-way, it connects 1-3 and 2-4.  When switch thrown other way, it connects 3-5 and 4-6.  If you additionally have a DPDT with center-off, no connections are made in the middle position.

So in above diagram, the red/hot/center-rail power connections would be:

1  Z-controller input (center pin of coax/barrel jack)

2  Z-controller output

3  Brick output (center of coax/barrel plug)

4  Track center-rail

5  DCS-RC input (center pin of coax/barrel jack)

6  DCS-RC output

You will probably want to use adapters or pigtail cables to convert the coax/barrel connections to wires.

The black/common/outer-rail power connections are tied together and do not go thru the DPDT switch.

Untitled

If you go the DPDT switch route as shown, search for "DPDT center off".  You'll find hundreds of options in both the toggle or rocker style.  You need one that can handle at least ~5A (at 18VAC) as put out by the Z brick.  Note that you will most likely find the Amp rating referenced to house voltages (120/240 VAC).   If it rated at 5A at 120VAC it will be fine for a Z-controller. 

They might be referred to as ON-OFF-ON.  Just don't get one that says (ON)-OFF-(ON) with the parentheses around the ON.  This means it's a momentary type which is spring-loaded to return to the center-off position when you're not pushing on it (like the window up-down control in a car).  Obviously you don't want a momentary style; the above example uses the term "latching" to differentiate it from momentary but I'm not sure latching is a universally used term.

Finally, consider how you're going to wire up the switch.  There are some so-called "mini" sized switches that can handle the Amps, but if you look at the terminals, it can be a hassle to solder-to and dress the thick wiring many guys use for track power.  The above example uses quick-connect or Faston push-on/pull-off style of crimped connectors common in automotive applications.  There are DPDT center-off switches with screw-terminals so no soldering.  Whatever works for you!

So, I found another place with instructions, and you have nailed it down for me.
The only question that I have, and you addressed it, but I am still not clear on it.

Does the common (Black) wire from the power brick, go directly from the brick to the center rail?

Casey Jones2 posted:

Wire it up like you initially did but wire the DCS Remote Commander in passive mode because it just may work.

If you mean having the power go thru the Z1000 then to the track, and then having the Remote Commander connected to the track separately, and with no power to it:

I already tried it, and it doesn't work. The light on the R.C. box lights up, then blinks when receiving commands from the remote, but will not control the locomotive.

I can control the loco with the transformer, but not the remote.

RWL posted:
Casey Jones2 posted:

Wire it up like you initially did but wire the DCS Remote Commander in passive mode because it just may work.

If you mean having the power go thru the Z1000 then to the track, and then having the Remote Commander connected to the track separately, and with no power to it:

I already tried it, and it doesn't work. The light on the R.C. box lights up, then blinks when receiving commands from the remote, but will not control the locomotive.

I can control the loco with the transformer, but not the remote.

Has the Remote Commander ever worked with loco??

Casey Jones2 posted:
RWL posted:
Casey Jones2 posted:

Wire it up like you initially did but wire the DCS Remote Commander in passive mode because it just may work.

If you mean having the power go thru the Z1000 then to the track, and then having the Remote Commander connected to the track separately, and with no power to it:

I already tried it, and it doesn't work. The light on the R.C. box lights up, then blinks when receiving commands from the remote, but will not control the locomotive.

I can control the loco with the transformer, but not the remote.

Has the Remote Commander ever worked with loco??

Yes. It works perfectly, when used all by itself.

RWL posted:

...

So does it go Like a daisy chain?

Power Brick to Z controller to track?

mth a

Well, there are many ways to wire it and everyone is entitled to their opinion, but here's how I'd do it.  What I'm trying to show is the idea of keeping each inter-connection segment with a pair (red & black) of power wires together until "the last moment" when they must be split.  This doesn't use the minimum amount of wire, but I believe is the neatest way especially if using 2-wire lamp cord or "zip cord" for the red/black pair.

Attachments

Images (1)
  • mth a
RWL posted:
Casey Jones2 posted:

Wire it up like you initially did but wire the DCS Remote Commander in passive mode because it just may work.

If you mean having the power go thru the Z1000 then to the track, and then having the Remote Commander connected to the track separately, and with no power to it:

I already tried it, and it doesn't work. The light on the R.C. box lights up, then blinks when receiving commands from the remote, but will not control the locomotive.

I can control the loco with the transformer, but not the remote.

Right.  I thought you said you tried this (with no joy).

mth dcsrc passive

But to be clear, above diagram shows the "passive mode" that Casey Jones2 is talking about.  I believe this is what you mean when you said the DCS-RC was connected to the track with no power to it...i.e., with NO connection to the DCS-RC input connector as shown in above diagram.  As before, in the configuration you'd want the Z-1000 controller set to the max/full CW knob setting when using (attempting to use) DCS command mode via the DCS-Remote-Commander.

Attachments

Images (1)
  • mth dcsrc passive
Last edited by stan2004
stan2004 posted:
RWL posted:
Casey Jones2 posted:

Wire it up like you initially did but wire the DCS Remote Commander in passive mode because it just may work.

If you mean having the power go thru the Z1000 then to the track, and then having the Remote Commander connected to the track separately, and with no power to it:

I already tried it, and it doesn't work. The light on the R.C. box lights up, then blinks when receiving commands from the remote, but will not control the locomotive.

I can control the loco with the transformer, but not the remote.

Right.  I thought you said you tried this (with no joy).

mth dcsrc passive

But to be clear, above diagram shows the "passive mode" that Casey Jones2 is talking about.  I believe this is what you mean when you said the DCS-RC was connected to the track with no power to it...i.e., with NO connection to the DCS-RC input connector as shown in above diagram.  As before, in the configuration you'd want the Z-1000 controller set to the max/full CW knob setting when using (attempting to use) DCS command mode via the DCS-Remote-Commander.

Yep, that is what I tried, and with, as you said, No Joy.

stan2004 posted:
RWL posted:

...

So does it go Like a daisy chain?

Power Brick to Z controller to track?

mth a

Well, there are many ways to wire it and everyone is entitled to their opinion, but here's how I'd do it.  What I'm trying to show is the idea of keeping each inter-connection segment with a pair (red & black) of power wires together until "the last moment" when they must be split.  This doesn't use the minimum amount of wire, but I believe is the neatest way especially if using 2-wire lamp cord or "zip cord" for the red/black pair.

OK, let me take a stab at this setup. I tried laying out what I thought was the way, but got confused with the Red and Black Banana ins, and the barrel outs.
So than is this the layout?

1) Power out of Z1000 brick to splitter, then, from splitter, into Red sides of each of the Barrel Ins on Z Controller and Remote Commander.
2) Power out of each, from Red Banana Outs to either 1 or 5 on switch.
3) Power out of 2 and 6, on switch, brought together, into a reverse splitter, and back to single point on track.

4) Common out of Brick to Black side of the  Barrel In on Z Controller, out of Black Banana Out from Z to Black side of the Barrel In on Remote Commander, then out of Black Banana on Remote Commander to the track

Is this close to what we are looking at?

stan2004 posted:
RWL posted:
Casey Jones2 posted:

Wire it up like you initially did but wire the DCS Remote Commander in passive mode because it just may work.

If you mean having the power go thru the Z1000 then to the track, and then having the Remote Commander connected to the track separately, and with no power to it:

I already tried it, and it doesn't work. The light on the R.C. box lights up, then blinks when receiving commands from the remote, but will not control the locomotive.

I can control the loco with the transformer, but not the remote.

Right.  I thought you said you tried this (with no joy).

mth dcsrc passive

But to be clear, above diagram shows the "passive mode" that Casey Jones2 is talking about.  I believe this is what you mean when you said the DCS-RC was connected to the track with no power to it...i.e., with NO connection to the DCS-RC input connector as shown in above diagram.  As before, in the configuration you'd want the Z-1000 controller set to the max/full CW knob setting when using (attempting to use) DCS command mode via the DCS-Remote-Commander.

Yep, that is what I tried, and with, as you said, No Joy.

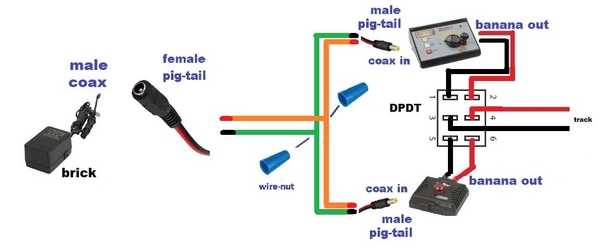
Not sure about using the term splitter and reverse-splitter, but where 3-wires come together I'm simply suggesting something like a twist-on wire nut.  Here's the diagram updated showing the coax power connectors (5.5mm/2.1mm) which are on the input side of the Z-controller and DCS-RC.  The output side of the Z-controller and DCS-RC have red/black banana jacks to which you can insert bare-wires.

mth b

You can buy pig-tail wires with either male or female coax (5.5mm/2.1mm) connectors on them for less than $1 each on eBay.  Or you can use the screw-terminal adapters I showed earlier in the thread.

Attachments

Images (1)
  • mth b
stan2004 posted:

Not sure about using the term splitter and reverse-splitter, but where 3-wires come together I'm simply suggesting something like a twist-on wire nut.  Here's the diagram updated showing the coax power connectors (5.5mm/2.1mm) which are on the input side of the Z-controller and DCS-RC.  The output side of the Z-controller and DCS-RC have red/black banana jacks to which you can insert bare-wires.

mth b

You can buy pig-tail wires with either male or female coax (5.5mm/2.1mm) connectors on them for less than $1 each on eBay.  Or you can use the screw-terminal adapters I showed earlier in the thread.

I am going to have to digest this diagram a bit. I think I understand it but I am not completely clear just yet.

Thanks for the responses.
I really do appreciate it.

stan2004 posted:

Not sure about using the term splitter and reverse-splitter, but where 3-wires come together I'm simply suggesting something like a twist-on wire nut.  Here's the diagram updated showing the coax power connectors (5.5mm/2.1mm) which are on the input side of the Z-controller and DCS-RC.  The output side of the Z-controller and DCS-RC have red/black banana jacks to which you can insert bare-wires.

mth b

You can buy pig-tail wires with either male or female coax (5.5mm/2.1mm) connectors on them for less than $1 each on eBay.  Or you can use the screw-terminal adapters I showed earlier in the thread.

I now have a complete understanding of this, I think, and have written a step by step set up instructions, which you will see below:
I would appreciate if you could let me know if there is anything amiss.

Thanks for all of the detailed help,
Roge
_______________________________________________________________________________

WIRING POWER BRICK
TO Z-CONTROLLER or ZW-C & TO REMOTE COMMANDER MODULE 

  1. Power (RED) from BRICK to center pin 3 of DPDT SWITCH.
  2. Power (RED) out of pins 1 & 5 of DPDT SWITCH to (Red) side of separate COAX MALE PIGTAILS.
  3. Common (BLACK) from BRICK to be split into two conductors, and to (BLACK) side of each of two COAX MALE PIGTAILS introduced in Step 2 Above.
  4. One each of two COAX MALE PLUGS to Z-CONTROLLER, and REMOTE COMMANDER COAX Power In terminals.
  5. Power (RED) out from Z-CONTROLLER (RED) Banana Plug to pin 2 of DPDT SWITCH.
  6. Power (RED)out from REMOTE COMMANDER (RED) Banana Plug to pin 6 of DPDT SWITCH.
  7. Power (RED) from pin 4 of DPDT SWITCH to TRACK CONNECTOR.
  8. Common (BLACK) from both the Z-CONTROLLER and REMOTE COMMANDER to be merged together and to TRACK CONNECTOR.

  I prefer a toggle with screws for best connections. Rockers look better but take more space topside and are too easily bumped imo. I like the feel and solid click that most toggles maintain. I think rocker click tends to go soft. I think most toggle cases are less prone to meltdowns when the metal limits are pushed to failure inside. Push on connection is often easier to use in hard to see or reach places when a pigtail connected to the sw. then the sw. mounted, just doesn't happen.

Adriatic posted:

  I prefer a toggle with screws for best connections. Rockers look better but take more space topside and are too easily bumped imo. I like the feel and solid click that most toggles maintain. I think rocker click tends to go soft. I think most toggle cases are less prone to meltdowns when the metal limits are pushed to failure inside. Push on connection is often easier to use in hard to see or reach places when a pigtail connected to the sw. then the sw. mounted, just doesn't happen.

I agree on the toggle, just wanted confirmation.
Regarding the screw on connectors, I think you are inferring that push on's can come loose, and fail the switch.
Is that correct?

As far as the amperage, most are 10 amps and above.

stan2004 posted:

Not sure about using the term splitter and reverse-splitter, but where 3-wires come together I'm simply suggesting something like a twist-on wire nut.  Here's the diagram updated showing the coax power connectors (5.5mm/2.1mm) which are on the input side of the Z-controller and DCS-RC.  The output side of the Z-controller and DCS-RC have red/black banana jacks to which you can insert bare-wires.

mth b

You can buy pig-tail wires with either male or female coax (5.5mm/2.1mm) connectors on them for less than $1 each on eBay.  Or you can use the screw-terminal adapters I showed earlier in the thread.

OK, I have the DPDT switch,12 - 24 volt / 20amp, and 18 gauge barrel pigtails.

I wired up the Z-1000 and Remote Commander, per the diagram above, which makes perfect sense, and things just are not working correctly at all.
I did verify that the switch is wired properly, with power in and power out of each of the two controllers going to the same end of the switch,
and with both powers ins into one side, and both power outs from the other side.

The Remote Commander barely runs my SD-70, very slow to start up, and I get no sounds of it at all.

The Z1000 runs conventional at full speed even with the knob turned all the way down.
The instant that I flip the switch to that controller on, the loco takes off, so I get no chance to check for sounds.

The Z-100 runs the Lion Chief but kind of funky, and with no sounds at all.

Any ideas?

So introducing the DPDT switch causes both conventional mode (using Z1000 controller) AND command-mode (using DCS-RC) to stop working.

I'd disconnect the DPDT switch and confirm the two modes still work independently.  In other words, the brick barrel plug directly into the Z1000 for conventional...and the brick barrel plug directly into the DCS-RC for command.

If the engine takes off at full-speed in conventional with the Z1000 knob turned down, then the Z1000 may have "shorted" thereby applying full brick voltage all the time.

As I see it, the "no sound" problem should be addressed later.   You might have stated in above but also remind us exactly what DCS engine you have (PS2 or PS3, item number).

Thanks Stan,

When I get home this evening, I will look and see about the DCS Loco.
It is the SD-70 from the sets that MTH had out a couple of years ago.
There was BNSF, CTX, Union Pacific, and mine is the BNSF.
Now those sets come with a Dash-9.

All worked perfectly before wiring in the DPDT switch.
However, as you have suggested, I will take it bake to standard configurations (Conventional Only) and (Remote Commander Only), then report back.

Could the 18 gauge barrel pigtails have anything to do with it?
Or could the switch be doing something to the signals?

stan2004 posted:

So introducing the DPDT switch causes both conventional mode (using Z1000 controller) AND command-mode (using DCS-RC) to stop working.

I'd disconnect the DPDT switch and confirm the two modes still work independently.  In other words, the brick barrel plug directly into the Z1000 for conventional...and the brick barrel plug directly into the DCS-RC for command.

If the engine takes off at full-speed in conventional with the Z1000 knob turned down, then the Z1000 may have "shorted" thereby applying full brick voltage all the time.

As I see it, the "no sound" problem should be addressed later.   You might have stated in above but also remind us exactly what DCS engine you have (PS2 or PS3, item number).

So, I tried the DCS loco, with power straight out of the brick, into the Remote Commander Box, and then to the track, and it works perfectly. Power Up, Sounds, Couplers, everything.

I have to do a bit of re-wiring to get back to straight conventional. I will do that tomorrow evening, and report back

The MTH DCS locomotive is PS3
I am not sure what you mean by "Item No", but there is a 2nd sticker on the bottom that says "PASS D2", and a 3rd one that simply says "4".


Also, as mentioned before, the loco is just as it came out of the box, and has never been programmed in any way.

It could be the switch. If you can remove it and make the same contacts wire to wire, in both configurations and it works, then the contacts in that switch are incompatible.  Usually it is point materials.   (Ive run into this with points blocking serial data after I replaced the relay with the "alternate". )

Another switch type or brand with brass to brass contacts should solve it if it IS a toggle internal contact point issue.

Also, every one in a whíle the pins of a switch are not in a normal arrangement. They do this to please big buyers at times.

There are usually numbers &/or letters next to each terminal that will match a tech sheet on the switch. Ideally you check with a meter, but expect to follow any numbers vs a diagram or map position.  Likely doesn't apply... just one of those "sometimes" notes.

Adriatic posted:

It could be the switch. If you can remove it and make the same contacts wire to wire, in both configurations and it works, then the contacts in that switch are incompatible.  Usually it is point materials.   (Ive run into this with points blocking serial data after I replaced the relay with the "alternate". )

Another switch type or brand with brass to brass contacts should solve it if it IS a toggle internal contact point issue.

Also, every one in a whíle the pins of a switch are not in a normal arrangement. They do this to please big buyers at times.

There are usually numbers &/or letters next to each terminal that will match a tech sheet on the switch. Ideally you check with a meter, but expect to follow any numbers vs a diagram or map position.  Likely doesn't apply... just one of those "sometimes" notes.

thanks for the suggestions,

I will take your advice, and try to make up the two configurations with direct wiring, including the 3-way connections with the grounds. This should be simple enough to direct wire the red side directly to and from each controller.

Also, these switches did not come with any nomenclature on the pins. Simply some voltage info on the side of the block.

I ordered them from Mouser, and they are Carling switches, so I trusted them to be good, but maybe not. They weren't terribly expensive, so it is not that much of a loss.

Can you recommend any good switches?

stan2004 posted:

So introducing the DPDT switch causes both conventional mode (using Z1000 controller) AND command-mode (using DCS-RC) to stop working.

I'd disconnect the DPDT switch and confirm the two modes still work independently.  In other words, the brick barrel plug directly into the Z1000 for conventional...and the brick barrel plug directly into the DCS-RC for command.

If the engine takes off at full-speed in conventional with the Z1000 knob turned down, then the Z1000 may have "shorted" thereby applying full brick voltage all the time.

As I see it, the "no sound" problem should be addressed later.   You might have stated in above but also remind us exactly what DCS engine you have (PS2 or PS3, item number).

OK, I have done a fare amount of experimenting. 
I also went thru all of my wires and pigtales, and verified that all have good continuity.

1. I went back and tried both controllers on their own, and they work flawlessly, and with all Locos.

2. I hooked everything up without the switch.
Z-1000 Hots connected, with RC Hots not connected
All grounds connected together as before.
RESULTS: Conventional Loco took off as soon as power was turned on, with the Z-1000 knob at "0".
Same as with switch in place.
Based on this result, I didn't go to the trouble to try the RC by itself.

3. I tried again, and this time I disconnected the grounds from either the Z-1000 and/or the RC box.
RESULTS: Definitely better results, but non that made seance, as all seemed backwards.
I can't remember the exact details, so I will try it again tonight and track the changes.

Bottom line is this: I believe that it is the grounds being tied together that is causing the confused behavior when all is connected with the switch, especially when I get the same results with the switch removed, and with the unused Hots simply not connected.

I feel that somehow there is some back feed, via the grounds, so I have a couple of alternatives to consider.

1. Alternate Switch wiring, using same DPDT:
a) Run Power and Ground into both Controllers.
b) Run Power out from both Controllers to one side of the Switch.
c) Run Power out from center of that side of Switch out to Track.
d) Run Ground out from both controllers to opposite side of Switch.
e) Run Ground out from center of that side of Switch to track.
Pro: Hot and Ground completely isolated between controllers.
Con: Power to all controllers at all times, even when not used.

2. Replace 2D2T switch with 3P2T switch:
a) Connect all Power leads, in and out, to Poles 1 & 2, as in original diagram.
b) Connect Grounds, separately, from Brick to each Controller.
c) Connect Grounds out from both controllers to outer terminals of Switch - Pole 3.
d) Connect Ground from center pin - Pole 3 out to track.
Pros:
1) Complete isolation between controllers and their signals
2) No power to Controller when not in use.
Con:
1) More expensive switch
2) More complex wiring.

Again, I will report back on the wired results, when using the original DPDT configuration, and disconnecting grounds from one or the other controller.

Stop the presses!  I gave you bad information on the Z-controller.   I examined mine and it appears "Black" is NOT common between input and output.  Instead it the "Red" that is connected internally.  OTOH for the DCS-RC, the "Black" is common between input and output.  I'll have to revise my diagram.  Maybe it can still be done with "just" a DPDT configuration but as you have intuited, it may require a more complex (e.g., 3P) switch type.  

If you have a meter, with nothing connected to the Z-controller, could you measure the Ohms between the input center-pin and the output "Red" banana...and separately the Ohms between the input "sleeve" and the output "Black" banana?  You can plug in the barrel-connector with pigtails if it makes it easier to attach the meter probes.

Last edited by stan2004
stan2004 posted:

Stop the presses!  I gave you bad information on the Z-controller.   I examined mine and it appears "Black" is NOT common between input and output.  Instead it the "Red" that is connected internally.  OTOH for the DCS-RC, the "Black" is common between input and output.  I'll have to revise my diagram.  Maybe it can still be done with "just" a DPDT configuration but as you have intuited, it may require a more complex (e.g., 3P) switch type.  

If you have a meter, with nothing connected to the Z-controller, could you measure the Ohms between the input center-pin and the output "Red" banana...and separately the Ohms between the input "sleeve" and the output "Black" banana?  You can plug in the barrel-connector with pigtails if it makes it easier to attach the meter probes.

Boy do  I know the feeling.
Up is down and  down is up.

I will check that out and, if I find as you suggested, I will try it again with regard to the reversal.

Thanks for checking into your controller.
That is going above an beyond, and I sincerely appreciate the effort.

Roger

stan2004 posted:

Stop the presses!  I gave you bad information on the Z-controller.   I examined mine and it appears "Black" is NOT common between input and output.  Instead it the "Red" that is connected internally.  OTOH for the DCS-RC, the "Black" is common between input and output.  I'll have to revise my diagram.  Maybe it can still be done with "just" a DPDT configuration but as you have intuited, it may require a more complex (e.g., 3P) switch type.  

If you have a meter, with nothing connected to the Z-controller, could you measure the Ohms between the input center-pin and the output "Red" banana...and separately the Ohms between the input "sleeve" and the output "Black" banana?  You can plug in the barrel-connector with pigtails if it makes it easier to attach the meter probes.

It is really strange.
I just did a continuity check on my Z-1000, and I get continuity between the center input and the red output, but on the other side I get high resistance between both the center and sleeve input and the black output.

Last edited by RWL
stan2004 posted:

Stop the presses!  I gave you bad information on the Z-controller.   I examined mine and it appears "Black" is NOT common between input and output.  Instead it the "Red" that is connected internally.  OTOH for the DCS-RC, the "Black" is common between input and output.  I'll have to revise my diagram.  Maybe it can still be done with "just" a DPDT configuration but as you have intuited, it may require a more complex (e.g., 3P) switch type.  

If you have a meter, with nothing connected to the Z-controller, could you measure the Ohms between the input center-pin and the output "Red" banana...and separately the Ohms between the input "sleeve" and the output "Black" banana?  You can plug in the barrel-connector with pigtails if it makes it easier to attach the meter probes.

OK, I redid the test without the switch, and with each controller wired in discreetly.

1) With the Z-1000 wired up, I got power to conventional locos with the knob at 0.
However, when I disconnected the ground from the HC the power stopped, and worked with the knob, as it should.
Now, when I disconnected the ground from the Z-1000, the power was still there, with the Z-1000 knob at 0.

2) WIth the HC wired in, separately, all worked as it should.

This leads me to believe that it is a ground issue with the Z-1000.

I will try reversing the hot and ground out of the Z-1000 to see what happens.

I'm thinking: less time messing with wiring, more time playing with trains!  So here's my recommendation. 

mth rev c

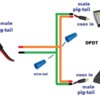
The DPDT switch now selects and switches BOTH red and black to the track.  The "penalty" is that brick power is applied to both the Z-controller and the DCS-RC all the time.  So even if only one is connected to the track at any given time, the other is nevertheless powered up (albeit its output goes nowhere).   Even if the DPDT is set to the "center-off" position with neither connected to the track, both the Z-controller and DCS-RC are powered up from the brick.

I did just measure the power penalty.  The Z-controller draws between 3-5 Watts (knob position OFF-max) with nothing connected to its output.  The DCS-RC draws about 1 Watt with nothing connected to its output.  So this method does has a small power "tax".  This tax is deducted from the 100 Watt brick capability.

While it may be possible to use a common Red (vs. Black) in this situation, it assumes facts-not-in-evidence.  I try to show this in the revised diagram above with Orange and Green being the 2-wire inputs.  In other words, I should not assume any commonality from input to output. 

Attachments

Images (1)
  • mth rev c
stan2004 posted:

I'm thinking: less time messing with wiring, more time playing with trains!  So here's my recommendation. 

mth rev c

The DPDT switch now selects and switches BOTH red and black to the track.  The "penalty" is that brick power is applied to both the Z-controller and the DCS-RC all the time.  So even if only one is connected to the track at any given time, the other is nevertheless powered up (albeit its output goes nowhere).   Even if the DPDT is set to the "center-off" position with neither connected to the track, both the Z-controller and DCS-RC are powered up from the brick.

I did just measure the power penalty.  The Z-controller draws between 3-5 Watts (knob position OFF-max) with nothing connected to its output.  The DCS-RC draws about 1 Watt with nothing connected to its output.  So this method does has a small power "tax".  This tax is deducted from the 100 Watt brick capability.

While it may be possible to use a common Red (vs. Black) in this situation, it assumes facts-not-in-evidence.  I try to show this in the revised diagram above with Orange and Green being the 2-wire inputs.  In other words, I should not assume any commonality from input to output. 

Works like a charm. It was those commons, letting signal thru, or something. Thanks for all of the help. One more hurdle crossed, and now on to the next, but this was one of the most critical to getting the system running with out a DCS system.

Thanks again,
Roger

RWL posted:
stan2004 posted:

I'm thinking: less time messing with wiring, more time playing with trains!  So here's my recommendation. 

mth rev c

The DPDT switch now selects and switches BOTH red and black to the track.  The "penalty" is that brick power is applied to both the Z-controller and the DCS-RC all the time.  So even if only one is connected to the track at any given time, the other is nevertheless powered up (albeit its output goes nowhere).   Even if the DPDT is set to the "center-off" position with neither connected to the track, both the Z-controller and DCS-RC are powered up from the brick.

I did just measure the power penalty.  The Z-controller draws between 3-5 Watts (knob position OFF-max) with nothing connected to its output.  The DCS-RC draws about 1 Watt with nothing connected to its output.  So this method does has a small power "tax".  This tax is deducted from the 100 Watt brick capability.

While it may be possible to use a common Red (vs. Black) in this situation, it assumes facts-not-in-evidence.  I try to show this in the revised diagram above with Orange and Green being the 2-wire inputs.  In other words, I should not assume any commonality from input to output. 

Works like a charm. It was those commons, letting signal thru, or something. Thanks for all of the help. One more hurdle crossed, and now on to the next, but this was one of the most critical to getting the system functioning with all three types of locos, and with not need for a DCS system.

Thanks again,
Roger


Add Reply

Post

OGR Publishing, Inc., 1310 Eastside Centre Ct, Suite 6, Mountain Home, AR 72653
800-980-OGRR (6477)
www.ogaugerr.com

×
×
×
×
Link copied to your clipboard.
×
×