
Got a 3D printer for Christmas, Ender 3 v2, so I am trying to create a model of the old family business from the forties.  I have several of the Atlas and MTH forty foot refer cars and my old Lionel Scout Loco.   I'm trying to create the main building, the old main building burned down which is why there are two different ones, from the building group.  The main building is a much too large when scaled to O gauge to fit  my grandsons layout so I had to trim the building a bit.  Old HatcheryHatchery FaceScreen Shot 2021-01-16 at 11.33.54 AMSample JointScreen Shot 2021-01-17 at 9.34.56 AM

My questions for the forum are;

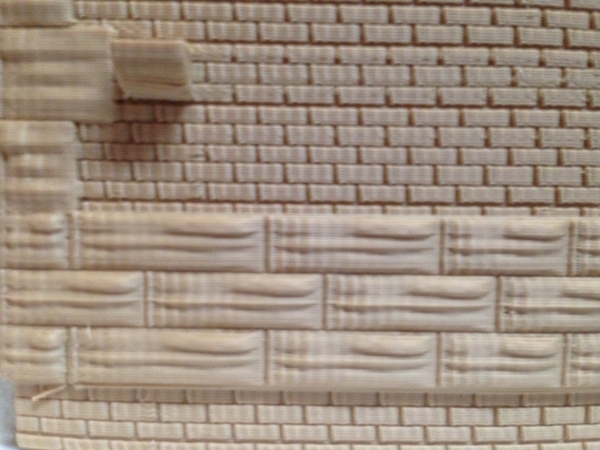
1. I have the front facade done and now am ready to start printing, I Think.  I have designed what I think would be a good joint for splitting the front but would like to verify this with someone a bit more experienced.  The building is a bit over twenty five inches so I'm thinking four or five sections will be required for printing.

2. What would be the best method to glue the sections back together and best hide the seams?

3. The wall is .3 inch thick but I'm thinking I will probably still need to stiffen it up a bit.

4. The bricks on the face are three different colors, Tan, Reddish, and a deeper red.  Suggestions on how to accomplish the painting a decorating.

Any and all suggestion would be greatly appreciated.

Attachments

Images (5)
  • Old Hatchery
  • Hatchery Face
  • Screen Shot 2021-01-16 at 11.33.54 AM
  • Sample Joint
  • Screen Shot 2021-01-17 at 9.34.56 AM
Original Post

Replies sorted oldest to newest

Jack

looks like you ae doing a nice job, the .300thickness should be plenty sturdy. If you use PETG filament it will be strong. I have built some structures that had to be done in sections and found a couple of things that worked, one was using a "V" design to align the walls with each other. (if you go into the  "3D Printing Repository" on this forum it has a lot of design ideas and even stl files you can download) The other thing I did for strength and perfect alignment was to incorporate holes in each section to accept a .125 dia styrene rod or tube to go in aprox. .300" deep in each.  I used a good liquid plastic cement after wiping the surfaces with alcohol. I've also used 15 minute epoxy for sections where I needed a lot of strength. If you get the alignment right the seams are pretty easy to hide. Of course all the pins and holes would have to be designed into the walls before printing.

Can't help you on painting those bricks.

tmp pins_1

Attachments

Images (1)
  • tmp pins_1

1. I use roll pins for pinning items together sometimes when alignment is important. I just design holes on each piece to be joined and the the roll pins do the hard work for me. Otherwise, a groove or something (V shaped, like you did) will work. It probably isn't worth the effort here but I have even printed jigs for parts I make over and over again. Then I use clamps or rubber bands to hold everything together while the glue sets.

2. I like using superglue (cyanocrylate, if that's the right spelling). The gel form is the easiest to work with for me. It holds well. I usually am gluing PLA together. But I have also used Loctite Go2 glue with success (again, on PLA). That stuff takes longer to set but still works well. I use it on bigger jobs.

3. The strength of sections depends more on the orientation of the layer lines in my experience. 0.3 inches should be plenty for this application, regardless of layer lines.

4. I am also at a loss for paint. I would recommend checking out Youtube. There is a community there that makes costume props with 3D printers and they have to paint their creations.

Have you printed anything with the Ender yet? I got a Creality printer about 3 years ago. It's a beast! But it didn't start out that way. It was kind of a pile of crap until I got the bed leveled and printer settings dialed in. I'm not sure if you got through that part or if it's needed on new machines but I would encourage to take deep breaths and work through it. It's worth it. The power to think up something and then make it poof into existence is really fun!

I'm also curious to see how your bricks come out. I couldn't find the video I saw where a guy said printed bricks usually don't come out very well. So he printed a mold and then cast them in resin. It was pretty slick.

Keep us posted!

@BillYo414 posted:

1. I use roll pins for pinning items together sometimes when alignment is important. I just design holes on each piece to be joined and the the roll pins do the hard work for me. Otherwise, a groove or something (V shaped, like you did) will work. It probably isn't worth the effort here but I have even printed jigs for parts I make over and over again. Then I use clamps or rubber bands to hold everything together while the glue sets.

2. I like using superglue (cyanocrylate, if that's the right spelling). The gel form is the easiest to work with for me. It holds well. I usually am gluing PLA together. But I have also used Loctite Go2 glue with success (again, on PLA). That stuff takes longer to set but still works well. I use it on bigger jobs.

3. The strength of sections depends more on the orientation of the layer lines in my experience. 0.3 inches should be plenty for this application, regardless of layer lines.

4. I am also at a loss for paint. I would recommend checking out Youtube. There is a community there that makes costume props with 3D printers and they have to paint their creations.

Have you printed anything with the Ender yet? I got a Creality printer about 3 years ago. It's a beast! But it didn't start out that way. It was kind of a pile of crap until I got the bed leveled and printer settings dialed in. I'm not sure if you got through that part or if it's needed on new machines but I would encourage to take deep breaths and work through it. It's worth it. The power to think up something and then make it poof into existence is really fun!

I'm also curious to see how your bricks come out. I couldn't find the video I saw where a guy said printed bricks usually don't come out very well. So he printed a mold and then cast them in resin. It was pretty slick.

Keep us posted!

You are absolutely correct, the first two weeks I thought this printer was cheap junk.  It took me some time to get the bed level thing down.  A couple of things that I did find on the leveling thing was FIRST replace the springs with something good (got some on amazon that worked) SECOND was to do the bed level thing when it was up to print temperature (Metal changes with temperature) and with the tolerances so tight it seems to make a big different.  After that things stated to level out.

I have printed several bricks, different sizes with different mortar depths.  Also color of filament seems to make differences.  When I get my first sections done I'll try to make some decent pictures and post them.

@sidehack posted:

Jack

looks like you ae doing a nice job, the .300thickness should be plenty sturdy. If you use PETG filament it will be strong. I have built some structures that had to be done in sections and found a couple of things that worked, one was using a "V" design to align the walls with each other. (if you go into the  "3D Printing Repository" on this forum it has a lot of design ideas and even stl files you can download) The other thing I did for strength and perfect alignment was to incorporate holes in each section to accept a .125 dia styrene rod or tube to go in aprox. .300" deep in each.  I used a good liquid plastic cement after wiping the surfaces with alcohol. I've also used 15 minute epoxy for sections where I needed a lot of strength. If you get the alignment right the seams are pretty easy to hide. Of course all the pins and holes would have to be designed into the walls before printing.

Can't help you on painting those bricks.

tmp pins_1

Thanks for the tips.  I saw your design with the dowel joints.  I was going to use that for the joining the building corners.  Another question that comes to mind for long multi section walls.  What kind of finishing do you do, if any, to the joints.  ie. sanding or buffing of some type.

I also got my first 3D printer last month; the same model you got, Jack, the Ender 3 V2.  I had the same thoughts using it my first week...what a disaster!  I had prints turning into fuzz balls, left and right. 

A few things quickly changed my mind.  Watching videos on YouTube greatly helped me to get things moving in the right direction.   From Amazon, I upgraded the factory springs for $10 and I added a Creality BLTouch V3.1 Auto Bed Leveling Sensor Kit for $52.

Since then, I have had a great deal of fun printing some tools and mounts for my GoPro cameras, a cool chess set, and a few baby Yodas (actually his name is Grogu).  Anyways, I will be looking into O gauge train things to print next, so I will definitely check out more of the listings in this "3D Printing Repository" forum.

Jack the joints maybe touch them with sandpaper but don't remember having any problems. I thought my bricks came out pretty good, you could download one of the samples from the "3D Printing Repository" on this forum to see how you like them.

I did try several printers that my son had a which caused me to buy a Prusa MKS Kit which took 4 days to build. So has logged 72 days of running (that's 1728 hrs run time) with no problems (just make sure the slides stay greased lightly) and today DHL brought another Prusa but this time a Mini, took 8 weeks to get here. Haven't even unpacked it yet but expect good things there.

Here is the hotel I did, 100% printed (except the awning)

Hotel Charles crop_9480

Attachments

Images (1)
  • Hotel Charles crop_9480
Last edited by sidehack

If you haven't checked out all3Dp.com, it's a really valuable source of hints, explanations and info about new materials. For instance, Polymax (by Polymaker) is even tougher than ABS, but there are some tricks to working with it and that's where we found them. (Shelf brackets. Who would have thought?) They also have a monthly roundup of the 50 best things to print (some repeat, like the bottle wrenches for those of us with imperfect hands,) or collections of really useful items, or a few small quick prints to learn with.

When we got our first printer, Thingiverse had a few dozen designs. There are so many now that even sorting through them takes a while. The printers are picking up speed and the searches are slowing down!

@Jack B - I have a Creaility Ender 3 Pro.  For detailed work, like your bricks, I would consider a 0.2mm nozzle.  You'll need some patience though.  I use a 0.1mm nozzle often times, but I can tell you it's not for the faint of heart.  I'm thinking you're going to have to lay those walls flat (with the bricks facing up) on the build surface, mainly because of the window openings.  The Ender is also great for sign work.  Here are some quick pic of signage left overs...

Left Over Signage

Attachments

Images (1)
  • Left Over Signage
Last edited by A. Wells

Sean,

You’ll get opinions from fans of all makes, but the Ender 3, in any version, is about the most common and customizable. If you’re really nervous about getting started, the Qidi Xmaker Tom got me for my birthday last year is simpler to use and comes with a customized version of the open source Cura software. They have both been reliable and give us decent results. (Occasional spaghetti piles are to be expected and don’t always mean you did anything wrong.)

If you need a very small, very quiet machine, a Monoprice might do the trick despite its small flaws. It’s supposed to have Bluetooth but doesn’t, USB connections don’t work, you need to download projects to an SD card and move files manually. Ours sits here in the bedroom and doesn’t wake us up while it runs. We use only PLA in it, so there are no stinky or dangerous fumes. DaVinci is still producing its printers in many sizes from “you need help to lift this” to little desktop cubes suitable for classroom use. The Ender can be modified to laser engrave, among other possibilities.

There are a lot of sales going on right now. A basic Ender 3 from the company or a reliable reseller will cost you less than $200. No matter which you choose, think about what material you want to use and how much space you have. Ventilation is key if you’re going to print in ABS; besides being smelly, the fumes can have health hazards. Go over to All3dp, read, watch and decide, but don’t be afraid to try it. We surprise ourselves with how often we use ours. Last week I needed a couple of buttons and was grumpily considering how I was going to get them with everything locked down, then looked up at the Monoprice and said “Oh...yeah.” Twenty minutes later, the buttons were printed and installed. The endless possibilities for train parts are great, but having one of these around can make the rest of life easier, too.

It is actually for another project I am doing.  Building a full size Lost in Space Robot.  But some parts I need are hard to get and I could 3D print them as the stl files are already made for them.  I don't mind spending dollars on a super reliable printer that doesn't require constant monkeying around, but I did not want to over simplify what I though it takes to do 3D printing.  I will check out that website.  If the stl files are already made, would I need to learn a lot of software to be able to print?  Or is it as simple as loading the file and you are off.

Thanks so much!

Sean

To weigh in (as someone who has been printing for less than a year, and still learning), you can use a .4mm nozzle to do bricks.  Though you need to balance heat, ambient temp, filament type, and vibrations perfectly.

Almost got the right calibration for my bigger printer, managed to fix the vibration/ghosting shortly after this image was taken (and then the heat bed crapped out so troubleshooting that currently haha)

Attachments

Images (1)
  • mceclip0
@A. Wells posted:

@sidehack - For the Bottling Works Sign, did you use filament for the blue or paint the blue? Anthony

At that time I was using grey PLA , but now I pretty much only use PETG grey or black "Solutech" which I have had great luck with.

The sign was all painted by me.

” Twenty minutes later, the buttons were printed and installed. The endless possibilities for train parts are great, but having one of these around can make the rest of life easier, too.

So right, whenever I see a need or a problem now my brain automatically says "can I 3D print something to help or did someone already do that"

For instance we use those plastic bags with handles in a small kitchen basket which makes it easy to tie it up and get rid of but how do you keep a bag like this held up?

Made a couple of brackets for each side to hold it up open and no more problem.

Had a handle break on a nice can opener, no problem made another and this one will never break.

I know this isn't trains but definitely relevant to the discussion. 

@Sean's Train Depot STL files can go directly into the slicer. The slicer makes the gcode that the printer uses to make the object. I think that you could totally learn how to use a slicer. There are some really great Youtube channels and websites that go over slicer basics and the 3D printer people here will be able to help you. The slicer is really just manipulating inputs in my opinion. The steeper learning curve is the CAD software in some cases. More powerful CAD programs often are little more difficult to learn but I think most people can figure it out if they are determined or can follow a Youtube tutorial.

I'm not sure how big the parts are that you're talking about but I'll vouch for the Ender 3 as a great machine because of the community surrounding it and the availability of parts and upgrades. I have a CR10S Pro (made by Creality, same as Ender 3) and it's a tank. It's a bigger version of the Ender 3.

Add Reply

Post

OGR Publishing, Inc., 1310 Eastside Centre Ct, Suite 6, Mountain Home, AR 72653
800-980-OGRR (6477)
www.ogaugerr.com

×
×
×
×
Link copied to your clipboard.
×
×