I've been looking for a #497 Coaling Station for about a year, but never pulled the trigger until now.  I came across a remake (#6-14107) in great condition for $23, great deal!  Well, controller was not included, slightly less great deal, and the UCS track that comes with these remakes was also not included, slightly less great deal.  But wait!  They threw in a modern coal dump car... deal is getting better again!  Overall, I'm happy with the purchase, but I need to cobble together a controller, or go out and find a modern controller.  I figure it can't be too hard to make one, but I need some help as I'm not familiar with the functions of the modern controller itself.

Can anyone point me to a wiring diagram of the modern coaling station/controller?  Can I just wire up some momentary on/off/on toggle switches?  Can I substitute two 022c switch controllers or maybe one of the 1122 switch controllers to control this accessory?

Thanks in advance!


Last edited by JD2035RR
Original Post

Replies sorted oldest to newest

Here is a link to Lionel which has links to the manual, etc.  It isn't a wiring diagram but it may help sort it out.  The controller is, essentially, two single pole, double throw momentary switch which hold contact as long as you keep pressing on it.  You might duplicate it with a project box and four push button switches. 

http://www.lionel.com/products...ing-station-6-14107/

For this accessory, the controller was pre-wired at the factory, therefore a wiring diagram was never published. Unfortunately, the controllers were never available separately from the accessory, so barring finding a loose one by dumb luck, your best option would be to make your own. And yes, while the controller is essentially two SPDT switches, it's actually a bit more complicated than that.

The controller worked the up/down movement of the loading bin, the loading chute and the uncoupling track for unloading a car. I can't think of a good reason why you couldn't use an 022 or 027 switch controller for the loading bin solenoid and the uncoupling track functions.

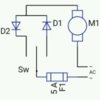
The DC motor controlling the bin movement was supplied with half-wave rectified DC via the controller. Basically a small diode (I think they were 1N4001) was wired in series with each of the two outputs of the other "switch" inside the controller. The first diode was installed in one direction for "up" and the second was installed in the other direction for "down." This gave the motor the appropriate positive or negative DC.

Good luck--

TRW

One additional fly-in-the-ointment.

I have this remake, and an addendum was released showing how to modify the internal wiring to allow it to work properly with the postwar style dump cars. From the factory, it's built to work with the modern, cheaper dump cars. However, none of the modifications are done in the controller, they're all done at the main motor assembly.


Can someone help figure out/draw a wiring diagram (including the diode needed for up and down) using the below switch controllers to control the 6-14107 Coaling Station?  Ideally, I would run this off of separate fixed voltage.  I know this remake says that it is driven off track power (UCS track) as wired out of the box.  Any help would be appreciated, thanks again!


Attachments

Images (1)
  • mceclip0
Last edited by JD2035RR
graz posted:

One additional fly-in-the-ointment.

I have this remake, and an addendum was released showing how to modify the internal wiring to allow it to work properly with the postwar style dump cars. From the factory, it's built to work with the modern, cheaper dump cars. However, none of the modifications are done in the controller, they're all done at the main motor assembly.


I have both styles, do the modifications work for both the new and old styles?


It only has 1 input and 2 outputs. You can quickly figure out which wire is which with a bulb and power I imagine. It can be internally done or at the wire's end.

  A diode on one output wire, a diode facing the other way on the other output wire. now tie both left over ends of the diode together. All done there.

The switch's input goes to one of the power legs (either), the now single output with diodes goes to the one input on the motor (either) and the motors other lead goes right to the other power leg.  "Got er done".


rockstars1989 posted:

Sounds like were back to not such a good deal.Nick

These are separated at one end by the switch. But back to back diodes are fine in series. It allows power to pass both wave directions and will simply reduce the voltage of each wave .75-1.5v. Pull one and you have a dc offset like horns and whistles use.

Not knowing the amperage the unit takes myself, I'd shoot high on the diode amps, 4-6a at least. (at least?  higher amps will be cooler to the touch. Diode get pretty hot. If you can't touch it for ten seconds go bigger )

Thank you Dan, TRW, Rob, Graz, and Adriatic. 

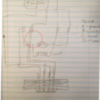
I made a diagram of the wiring as I see it now - before making any changes outlined in the addendum.

The D.C. Motor's red wire is connected at terminal D and black wire is connected to terminal A. The solenoid is currently connected between C and B (this seems incorrect, the addendum says to move the solenoid's B connection to the A terminal which seems to be the ground terminal - is that correct?)

The addendum also says to take the right control rail wire (from the UCS) and connect it to the A terminal (common ground terminal I think?)  within the coaling station. 

Below is the diagram before moving both the solenoid B connection and right control rail wire to the A terminal.  

IMG_2742

Am I looking at this correctly?

Attachments

Images (1)
  • IMG_2742
Last edited by JD2035RR

A few quick thoughts.

1) The comments above about "4-6 amp at least" diodes along with a fuse are overkill to the third degree. Tens of thousands of coaling stations, gantry cranes and intermodal cranes were built using the same motor and controller circuit, and they're fine with 1 amp 1n4001 diodes and no fuse. Of course, you can always go higher, but you really don't need to.

2) The controller "power" wire to terminal #3 on the UCS track is OK, but you'll probably have better operation by routing it to an accessory tap on a transformer. This way, you won't have to have track power on to work the accessory.

3) Other than that, your second diagram looks right for magnetic coal dumping cars (1974-onward) as well as the postwar 3469-style cars. Nice job!

TRW


Last edited by PaperTRW

Wait...I think you moved too many wires .....?

The right C rail is grounded at both ends. No magnetic dumps, etc.


   Left C rails alternated contact; power or ground. (or no contact) ; to ground during unload(dump).

   Right C rails get power for uncouple and unload buttons both. (or N.C.)

  Double dump cars used power going to both L&R rails though. (something like 16 presses per double dump)

   I'm not sure which cars used a ground shoe? I never looked. Maybe the wheel grounds were considered inadequate or the ground isolated for another reason..(switched etc?)

Any change needed should happen on the left side rails, that will depend on equipment. The load/dump sw. may have to be dpdt.. ?

I recently acquired a 6-14107 #497 Coaling Station.  It is good shape and all parts were included.  The 4-wire cable was connected with wire nuts.  I can get the upper hopper to operate but the tray does not move up and down.  I am wondering if the wires/wire nuts were reconnected correctly after it was removed from the previous owners' layout.

I have attached a wiring diagram from a PW 497 with some notes I added.  Is the 6-14107 wired the same way as the PW 497?  Is my diagram labeled correctly?  I know the 6-14107 has some diodes on the board in the controller.  I need to ensure that the controller wires were connect back correctly after the Coaling Station was removed from the previous layout.

If that does not make the tray move up and down properly, then I may need to ask for more suggestions on how to make it work.

Thanks


Attachments

DS Texas posted:

I recently acquired a 6-14107 #497 Coaling Station.  It is good shape and all parts were included.  The 4-wire cable was connected with wire nuts.  I can get the upper hopper to operate but the tray does not move up and down.  I am wondering if the wires/wire nuts were reconnected correctly after it was removed from the previous owners' layout.

I have attached a wiring diagram from a PW 497 with some notes I added.  Is the 6-14107 wired the same way as the PW 497?  Is my diagram labeled correctly?  I know the 6-14107 has some diodes on the board in the controller.  I need to ensure that the controller wires were connect back correctly after the Coaling Station was removed from the previous layout.

If that does not make the tray move up and down properly, then I may need to ask for more suggestions on how to make it work.

Thanks


The modern version is different than the postwar. There is a different controller, the modern version utilizes a Ucs track section, and the modern has a dc can motor vs the ac motor with the double wound motor field pw version.

As you identified, there are a few diodes in the modern controller. Power passes through those diodes on its way to the can motor, causing the motor to go in foward/reverse (up/down).

Lionel issued an addendum to the original instructions on these, instructing people to move some wires around to operate pw and modern dump cars.  

Try to follow the wire(s) coming from the controller to the motor and make sure the motor is connected to ground via the first terminal on the left.

read the addendum here:

https://www.lionelsupport.com/...roductNumber=6-14107


Last edited by JD2035RR

Add Reply

Post

OGR Publishing, Inc., 1310 Eastside Centre Ct, Suite 6, Mountain Home, AR 72653
800-980-OGRR (6477)
www.ogaugerr.com

×
×
×
×
Link copied to your clipboard.
×
×