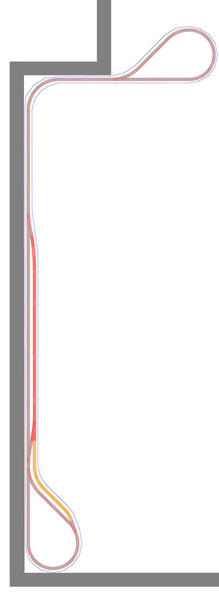
hello! first post here and since i've seen some really great ideas on the forum I thought I'd ask about my new layout. planning on building a layout in my loft using gargraves sectional track and switches and mostly postwar Lionel locos and rolling stock. I have some postwar accessories but not sure i'll use them on the layout, things like the 282, 397, 350, 456, 497, etc.


trying to come up with an interesting layout that doesn't take up too much width and represents some of the east coast main lines, NYC, PRR, etc. would like to run two trains at once - the outer loop would be for a passenger train with a siding to store an extra set of cars along the lower right wall. the inner loop would be freight with an industrial yard inside the right loop and the ability to switch to the outer loop if necessary. would appreciate any help with the yard layout to make it more functional.


Also was trying to figure out how to add some elevation with topography rather than an open trestle. maybe the long straight in between the two loops could be stacked somehow - the line closest to the wall could be above or below the other two lines. still trying to figure that out!


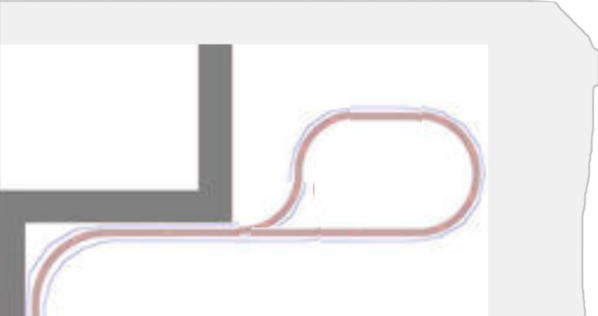
goals would be to keep the left loop as tight as possible (showing o32 and o42 tracks) to keep clearance at the door and to keep the straights as narrow as possible because there will be a sofa in front of it. the right loop can't be much more than the 8'-7" shown but if there's a good reason to make it wider I could probably do that.


thanks in advance!

at

*updates below*

Last edited by atanz
Original Post

Replies sorted oldest to newest

Hi atanz,

I like the design for the space.


Thoughts on your questions:

Elevation-The opportunity appears to be from the center to the small loop end. Moving the crossover towards the larger loop or other set of crossover switches frees up the track for elevation. Using the Ross 4-way crossover near the right loop would make that sweet.


You don't need as much elevation as you think to achieve the visual effect. I would try elevating the red loop to perhaps 3". Then I would start a grade in the front center and run the green line to 3" and back down to 0 close to the center of the back wall.


using L-girder construction would let you cut the road bed out of the level deck and elevate it with risers.


The Yard lead:

Change the angle or curve of it to lengthen it and move the switch closer to the end


Wye Possibility:

I like the use of the space at the right with a spur. Changing the angle of the red inner line would let you move the green line switch out further and possibly put a wye in there. The depth of the spur may limit the usefulness, as a complete train may not fit, negating the whole idea.


I would really recommend using Ross switches.


What size switches are you using? I usually don't suggest things and not try them out myself. I'd like to work with your design to see how my comments work or don't work.


Last edited by Moonman

ok, I experimented with a wye and it doesn't appear to be worth the effort. The siding for a train to sit in after clearing the switch is only 55.8". Too short of train. The nice curving on the right loop had to be sacrificed to make room for the inner line.


two strikes and the third is that it required custom cut curves because the wye is on 30° and the 042 switches are on 45°\22.5°


So, scratch that off of the list. Would have been a neat feature.

Attachments

Images (1)
  • atanz wye experiment
Last edited by Moonman

thanks for the replies! I really like that Y idea, but I think you're right, can't really store another train there so that doesn't make sense although I like the increased level of complexity it adds to the layout.


i'll have to experiment with your elevation suggestions, good to know that just a few inches will make a difference. will try elevating the middle line and inner left loop and see what happens. it could even be nice if the line closest to the wall could tunnel under neath and pop out on the left where the siding is.


also that ross double crossover is insane! I'm still looking into what switches to use but I'll probably go with GG track because its pretty economical.


I've been doing the planning in Rhino but is compatible with .dwg files, not sure if anyone else here uses autocad but i've attached the drawing if someone wishes to mess with it! I couldn't quite get the hang of scarm although it would be useful for parts list and to double check if everything works.


also my friend John Sanderson makes amazing rail landscape photos and has taken a few along the Hudson river that I really like: photo 01photo 02 and I'll probably base the scenery on those. I think these were taken a little south of West Point near Bear Mountain.

Attachments

Files (1)

The Ross dbl x won't work because it sets a different spacing. So, just move the one set of switches closr to the other to give you more track to work with for some grades.


I have tried recreating you plan and it doesn't flow\fit well with sectional and cut sectional to the shape that you have designed.


I think you'll find that you'll be scribing your arcs and bending flex to get the curves that you have drawn.


That's where the software is helpful. SCARM has the radius and arc displayed when you hover over a library piece. Each manufacturer has a different arc for their turnouts. Knowing that helps determine how much of curve you need to get to a certain point.


I did discover that changing the yard lead to lengthen would result in the spurs being shorter. So, keep that as it is.


Keep the design, but try to determine the actual build. I think you'll find some combination of elevations to create the visual effect that you want.


Post some updates as you progress.

yeah I was having the same problem trying to lay it out in SCARM. I originally started drawing it with Lionel O-27 track in mind which divides o42 and o54 into 12 and 16 segments per circle whereas gargraves divides into 8. so to end up with a similar reverse loop I might have to cut the gg segmented track in half or thirds to end up with the exact type of curve. I'll try again with SCARM and see how it goes. it was also a bit frustrating because it didnt seem like there were make up curves for o54 turn outs in the gg track catalog.


I'll have to re-read this thread to get some tips to make it work.

My point exactly-if you hover over the GG 054 turnout, you see the angle of the turnout is 23.16°


So, if make a flex trax track using the 054 radius and the difference in the desired arc angle to create a make up track in the flex tool in the toolbox.


54 has a radius 23.68, then subtract the turn out angle from 45° or 30° to match up to the track that will connect next. 


I used 054 on the inside of the right to come off of horizontal and then back to 032 for the loop on the end.


Learning the flex tool will let you create the entire layout from flex track. I usually build it with sectional first and then replace with the longest lengths of flex that will fit.


I do suggest using the sectional track for the 032, as that is the tightest bend that can make with flex track. A lot of effort for only a few bucks savings there.


In view, you can use your drawing as an overlay by selecting background image. Just click and drag the lower right gray corner.


here's my SCARM file with the background image for you to play with.

Attachments

tried to use some of Moonman's suggestions with elevations and yard layout (thanks moonman for the first pass at this!). managed to use mostly standard curve sections except the siding to the right of the yard. pretty happy so far but definitely looking for critiques if you have them!


also, unfortunately since i'm using SCARM on a mac with a windows emulator I can't see the 3d view for some reason! so I have no idea how this looks in isometric but there is a tunnel in there somewhere!


atanz 11.06.15 v.4 with tunnel


thanks!

alan

Attachments

your cad skills are being revealed.


It looks nice. Splitting the elevation from the crossovers works nicely.


One concern-access to the tunnel should a train stop for some reason or just track cleaning \maintenance stuff.


The longer yard lead doesn't help because it's not connected to the ladder. The original design seemed more functional.


We have only a few members using SCARM in Parallels. They have not reported 3D view issues. Some have tried Wine, but no feedback.


let me know if you want some views\angles of the 3D.


PS-I didn't round the table corners originally to save time. Select the baseboard, put the cursor at the desired location, right-click and select "insert new point". Then you can round the corners. I created the table with the "absolute coordinates" tool.

atanz 11.06.15 v.4 with tunnel 3D2

Attachments

Images (3)
  • atanz 11.06.15 v.4 with tunnel 3D1
  • atanz 11.06.15 v.4 with tunnel 3D2
  • atanz 11.06.15 v.4 with tunnel 3D3
Last edited by Moonman

Hello all! resurrecting this thread from 2+ years ago! got some news from my landlord that he's moving the door to my apartment so it quickly invalidated my Foyer layout above. Now thinking about doing a narrow around the walls shelf layout in the living room and dining room, running through a book case and reverse looping on itself on both ends. the layout will be 16" off the floor and is 30' long with about 75' of track, a passing siding for a second train, and some room for engine or rolling stock storage. The reverse loops have around 12' of track so I can still run some pretty long trains.

If you guys have any comments on the track plan let me know! any interesting ways to make the reverse loops a bit different or the passing sidings more functional would be great. I need to keep the layout a single track on the north (right side in 3d view) to fit behind some furniture and onto the book case but could be more flexible on the south half. However I am using gargraves o32 curves to keep the impact on the living room furniture arrangement to a minimum, all of my rolling stock and engines work with o31 so I'm not too worried about it. 

also really inspired by Bob Anderson's new layout so I'm planning to build the track shelf in a similar fashion except cantilevered from the wall. I'm planning to use 4" shelves spaced 3/4" off the wall so engine overhangs don't hit the wall. Also curious to any great ideas to wire the layout since both the top and bottom will be visible, I was thinking about routing a 1/2" x 1/4" deep channel beneath the road bed but I'm not sure its enough for all the wiring? 

Track Plan

living room layout 2.2

Here's the 3d model from Rhinoliving room

Attachments

Images (2)
  • living room layout 2.2
  • living room
Last edited by atanz

ATANZ,

I think the gap between the shelf and wall provide a great place to hide the wiring.  or underneath the shelf at the very back edge. This layout should only need a 2 wire bus and a few drops with splice taps. At the rear would make it difficult to see.

A third option would be to use a router and create a channel in the bottom of the shelf.

Thanks for the suggestions! I've never really operated or wired a layout with blocks and multiple trains but I took a first pass at diagraming everything after some research on the forum last night! 

I divided it up in 5 blocks to run 2 trains conventional (might try to find some TMCC stuff at York, we'll see) - trains can pass on the orange and yellow sidings and operate at the same time in either the red or green reverse loops. the blue siding could be for a third engine or rolling stock to create a longer train or swap engines by running around the green reverse loop.

I'm planning to wire the layout with SPDT on-off-on switches powered by a postwar Z transformer so I can switch any block to either the A or the B pole to power each train - or turn off power to any block. Another terminal will power the dz1000 switch machines.

living room layout 2.1 BLOCKING

I would like to use Wago or Suitcase connectors and self adhesive wire clips to attach everything to the bottom or between the wall and shelf as suggested by Moonman. I'll end up with 5 sets of wires for track power and 6 sets of wires for switches, if I keep everything flat to the bottom it shouldn't be that visible. 

I'm trying to think of everything before I start so I can prefabricate each section with track, roadbed and track leads and connect the rest of the wires when everything is mounted to the wall. I'm sure I'm not thinking of something so any other suggestions welcome!

Attachments

Images (1)
  • living room layout 2.2 BLOCKING
Last edited by atanz

"I'll end up with 5 sets of wires for track power and 6 sets of wires for switches, if I keep everything flat to the bottom it shouldn't be that visible. "

You'll have a 3 wire bus for track power and a 1 wire bus for switch power. Common is common for all power from the ZW and only 1 wire of 14awg or 12awg is needed. 1 hot bus wire each for Handles A & D.  1 hot wire for switch power from C or D at 14v.

Track power and switch power from bus to supply points will be very short.

The switch controller cables will be the issue. They will use the most space in the back gap (wire channel) purely because six are necessary. I would consider a Cat 5 cable 24 conductor cable. Trim the sheathing away at a switch location and pull out 3 wires of the length needed.

I have tried this, but it sounds like a neat and tidy bus for the switch controller wires. I have some pieces lying around. I'll give it try to test if you don't have any. Trimming the sheathing without cutting any wires is issue 1. A longitudinal slit appears that it would create the most space. 

Issue 2 is whether the wires can be pulled out. I have a feeling that it may not be easy as a wire could be stuck to the sheathing or be too tightly bound in the bundle.

This would avoid a home cable for each switch motor from the control panel and eliminate the need for terminal bars. It would also have some spares, just in case a repair is needed.

Let me know if you have any cable to test.


I did some wiring diagrams over the weekend so I think I have a handle on how this thing is going to get wired - thanks to the input here. this is for block control and switch control (dz1000s). Hopefully this will allow me to switch any of the blocks to two different inputs on the Z transformer or turn them off complete. And for switch control I'm using momentary SPDT toggles, is there any other wiring requirements for these to work without dz1002s? I just don't think they'd fit on my control panel. I like the idea of the cat5 for the switches but figured dealing with slicing and pulling out the wire would be a bit difficult so I just bought some flat 4 conductor telephone wire for the switches, its pretty compact.

wiring diagram

also did some mock ups of the track shelf with hand cut cork roadbed. I white washed plywood so you could still see the grain a bit to match the distressed look of the brick walls it'll be mounted to. then I used 24"x36"x1/4" sheets of cork underlayment from Home Depot to cut the curves instead of bending Midwest roadbed. the straights will be much easier!

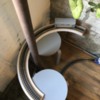
also discovered the o32 gargraves plastic tie curves I have DO NOT match the specs listed on their website! the diameter of mine were about 5/8" smaller than listed. odd. 

i'm planning to insert spade connectors in the bottom side of the rails, how large of a hole do you guys usually drill in the subroadbed for them? 

2018-01-29 10.18.22

2018-01-29 10.51.102018-01-29 10.51.20

Attachments

Images (4)
  • 2018-01-29 10.51.10
  • 2018-01-29 10.51.20
  • 2018-01-29 10.18.22
  • wiring diagram

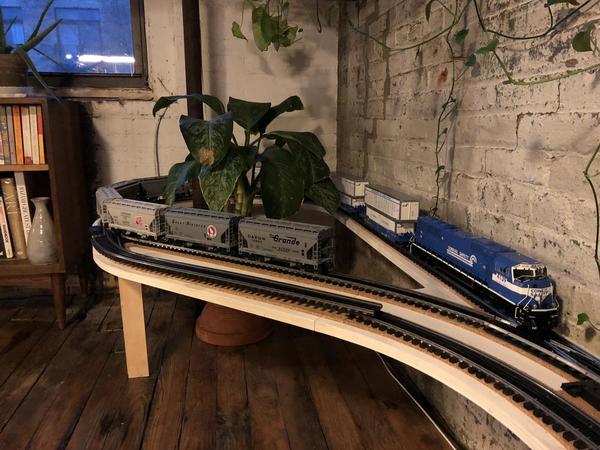
updates! finished up the benchwork and laid track for phase 1 which includes one of the reverse loops, a couple of sidings and the main line. started wiring the layout as well, ran the power and common buses for track power, next I'll have to get to the switches and uncouplers. started the control panel and installed SPDT toggles for block control and SPDT momentary toggles for the dz1000 switch motors. we'll also have momentary push buttons for the uncoupler track. 

plywood roadbed cut for track diameter, ready for cork roadbed
2018-01-29 17.19.41
mounted to the wall, bending and fitting flex track for the sidings
2018-02-04 17.20.50

view from behind the TV, need to hide those coaxial cables!
2018-02-04 15.44.59
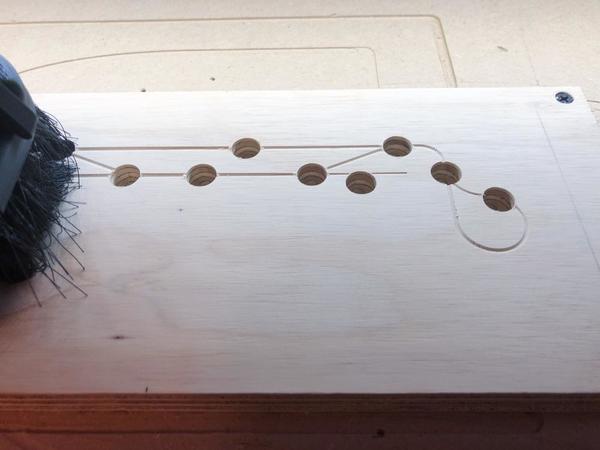
CNCing the control panel out of 3/4" plywood, had to flip it over and mill out a 1/2" for the toggles to tighten down on the face.
2018-02-16 13.23.54-1
control panel with toggles (kind of cluttered but I needed to keep it compact). looking for ways to color code the toggles, maybe some nail polish on the ends?
2018-02-16 17.36.37-2
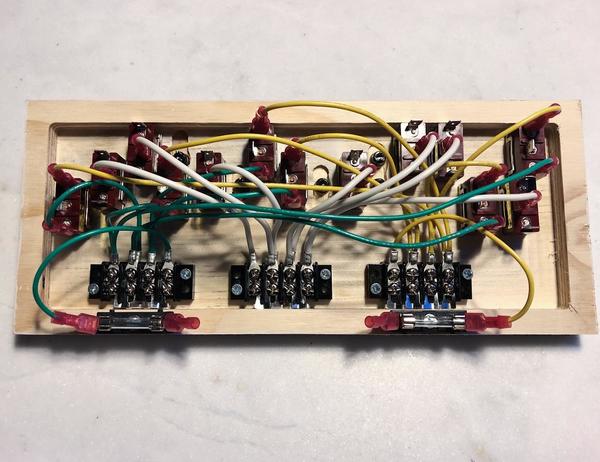
the back of the panel - green will go to the C terminal on the Z transformer and yellow will go to D terminal to power two trains on any block of the layout. might also control one of them with a TMCC Command Base and the other conventional, we'll see how it works out. white is ground for the switch motors. (hope its not an issue i'm using 16 gauge for the ground but will likely use something smaller for the wires running to the dz1000s)
2018-02-16 17.36.46-1
next up will be mounting the control panel and attaching all the block power to the back of the toggles. then running the control wires to the dz1000s. should be up and running after that - albeit running back and for and through one reverse loop

phase 2 will be the second reverse loop, but I have to move some 110v electrical conduit and junction boxes so i'm procrastinating on that. 

Attachments

Images (6)
  • 2018-02-04 15.44.59
  • 2018-02-16 13.23.54-1
  • 2018-02-16 17.36.37-2
  • 2018-02-16 17.36.46-1
  • 2018-01-29 17.19.41
  • 2018-02-04 17.20.50
Putnam Division posted:

What a creative use of space! Well done!

Peter

    Yea, I'm eyeballing this one close for that, but seeing it, it looks like furniture there.  You should spring for some turned table legs or spindles. Up front at least.

  They make a rubber toggle cover for sealed applications. I've seen red, black green and yellow; but there may be more colors "They are a nut with a hood".

  I have picked them up at summertime flea markets a few times, seen them on lots of tables from Pa. to Indiana, so I don't have a sure supplier. But I'd guess boating, aircraft, autoracing, tractor supply, or an industrial supply like Grainger carries them. 

They also make colored collars; flat disks, kinda like the metal on/off labeled collars.

Hello All, its been awhile. I finished up the construction last year and have been enjoying running trains. However after learning more about switching layouts on the forum I decided to add a siding or two to simulate an Inglenook siding. What I've shown below in green are the new additions. It would probably be more interesting with three tracks the entire E-W length and a few more switches but after mocking up it impedes on the dining area a little too much. Instead I've reduced the third track to the corner.

I've shown four options, if anyone has any ideas on which version would be the most interesting and provide the most flexibility in switching, that'd be great. Or how to make any version more functional. 

I've also included the Scarm file if anyone wants to take a look, it also has some options in it that didn't make the cut. I'd like to keep the third track only in front of the E-W wall

I have the following switches already so it would be great to use them if I can. 
Ross O72 LH + RH
Ross (2) 054/031 RH curved switches 

layout options

Attachments

Add Reply

Post
The Track Planning and Layout Design Forum is sponsored by

AN OGR FORUM CHARTER SPONSOR

OGR Publishing, Inc., 1310 Eastside Centre Ct, Suite 6, Mountain Home, AR 72653
800-980-OGRR (6477)
www.ogaugerr.com

×
×
×
×
Link copied to your clipboard.
×
×