Excellent work Joe, I will go back and review the last few pages as I enjoy your thorough detailing of your work. Great layout. Happy Railroading Everyone
Just learned something new.
Guess I was never paying attention but one day I realized my 'Legacy' CAB 2 remote kept coming on showing 'CAB 1' I could find no way to change it to CAB 2 so was thinking I was limited in my available functions. Lionel tech support came to the rescue. The CAB 2 always defaults to CAB 1 on turn-on. If there is a Legacy loco programmed into the remote it will show the Legacy menu. However the remote is not a 'Legacy' device with TMCC capability but a TMCC device with Legacy capability.
Because of below I took the last two weeks off from the diesel shed build but will get back to it next Saturday.
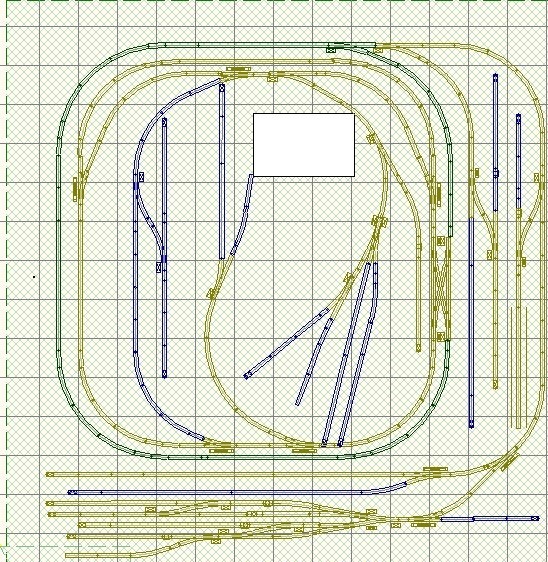
I was running locomotives around the layout to double check power and ground. From a way earlier post I had talked about a half John Allen 'timesaver' track game I installed on the edge of the layout. The intentions were noble however with the number of turnouts and short track I came to the conclusion while running my bigger locomotives that the track game would work however the rest of the time I could not really do much with that section. Because of the position of the three double turnouts I had little room to maneuver the larger loco without having one truck on the point rails in some cases. I decided to modify the track design by deleting one double turnout. Technically the design is no longer a 'timesaver' but I have gained an spur for an engine shed plus a caboose track.
The old design is shown below. The crane is on the left side of the track design. It was impossible to maneuver the steam loco to the track where the cabooses are. Plus the loco's tender was sitting on top of point rails. I deleted the double turnout between the tracks with the cabooses and the steam loco, moved the double turnout from the lead track and the track with with the loco further down the lead track.
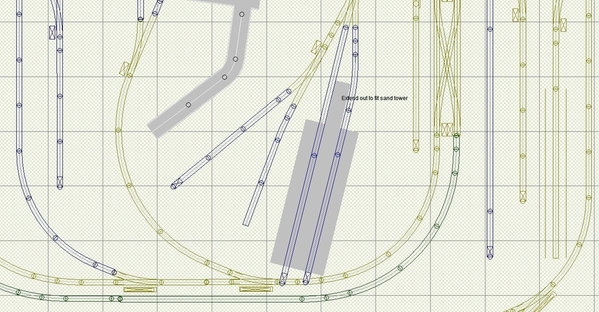
The new design is shown below. The crane is now on the track closest to the lead track. The spur on the left side will have the engine house. I hope to fit the coal tower and a sand house on that spur. If I can then the track in the middle will have hoppers delivering coal to the tower. The other end of the track will be where the ash dumps into a gondola. The caboose track is where the UP caboose resides. A locomotive will be backed into the engine house track for 'maintenance'. A switcher loco will make up consists on the yard track and pull them out on the lead track. It will then disconnect and move on the crane track. Another switcher will then push the consist out of the yard lead track to the main line where the steam locomotive will be re-positioned and waiting. Switcher 2 will then go back to the yard and switcher 1 will grab a caboose and attach it to the end of the consist.
An RR-Track design is shown below. Some diesels will be stored on the blue yard track at the bottom. If I want to use them for a consist I will roll one out to the main track first then repeat the building of the consist mentioned above. The shorted blue track on the lower right will hold the switch engines.
Attachments
That is good you got to try out the old design and identify its shortcomings, make changes, and find a better way. Too often we get too much built before realizing it doesn’t work so well.
Spent Saturday working on the diesel shed and most of Sunday completing the wiring of the turnouts for the redesigned yard.
I filled in the mold holes on the top panels of the walls since they will be seen once the roof is on. I also glued 40 mil styrene to the bottom inside of the walls to hide the depressions from molding (see photo below). I'm not sure why these depressions are there in the first place.
Right now my plan is to hide the seems between panels with Plastruct H-12 columns. I will then glue in Plastruct OWTA-24 Trusses to stabilize the structure and on top of which the roof will sit. With these in place all inside seams will be covered. All the walls are now assembled. I will be gluing them together next Saturday. I want to leave the H-columns black so will tape the seams before I paint the walls.
The two double turnouts are wired and work. DZ-1008 relays came in so I was able to wire two MTH dwarf signals to the 1008 relay /1000 switch machine to indicate turnout position
I need to replace some Atlas 200 snap relays with DZ-1008 relays which I will do next W/E. The reason for this is mostly the non-derail function for the DZ-1000 motor. The 200 snap relay would stay on and burn out if a long enough train consist rolled through the turnout.
Attachments
I normally work on structures for my layout on Saturdays and the layout itself on Sundays. I was running trains at the mall for the kids yesterday so decided to make today Saturday part duo.
I finished cutting and gluing 40 mil sheet styrene to cover the molding depressions on the bottom foundation walls. The back end has a door so I had to trim stock away before gluing so the door would fit. 1/4 sq. styrene was glued to the top to act as a roof support. As mentioned before the black H-Column (H-12) is not glued in as yet since I want to keep it black. Styrene strips 80 x 250 were glued to hide a seam between panel pieces - see next photo.
I had to make sure the styrene strips would not interfer with window placement on the bottom floor so used the windows to position the strips.
This is what a finished side will look like on the inside.
Now the fun part - gluing the walls together.
To help try keeping the walls square to each other I clamped right angles where I could.
I ran into an issue gluing the end walls to the side walls. If you look closely at the end of the foundation wall you will see a tab sticking out. This is a placement tab when gluing two foundation walls together however I discovered the tab got in the way when trying to fit and end wall to the side wall so I had to cut it off. I left this one on as a show and tell. What you are looking at here is the front entrance. Since there are no foundation walls here the entrance comes to an end above the foundation wall. I will be filling in the corner spaces with corner trim and the middle piece with styrene on the inside and trim on the outside. Things will be more clear next week.
Now for the 20-20 hind sight. The building measures 28 inches long. It will fit over the track where I want it to go but as usual I fell victim to rule #2 - never think you have to fill in all the space. I forgot about sand / water / fuel structures on the outside of the entrance.
Attachments
It’s looking great, Joe! I always forget about something.
Joe, you have an amazing layout coming together here. I have skimmed the other pages and I really like what you're doing. I have learned some things too. I am definately going to try to modify my Gargraves uncoupling tracks the way you did. Keep up the great work. I'll be following along!
Michael
I'm late to the party (not sure how I missed this thread), but it looks like you're making great progress.
One question, and sorry if it's already been covered in the previous 7 (!) pages of posts, but it looks like you have some areas that require a long reach - how do you handle it? Topside creeper, lift-outs, etc.? Thanks.
Nice tablesaw setup, BTW.
While I have a corner cutout where two walls meet (by OGR buildings on left) and a larger cutout towards the top-middle of the layout this is definitely a layout I need to walk on.
Attachments
Looks like my eyes were bigger than my stomach. There is no room at the entrance for stuff I want to put there. So I had to remove one panel from each side yesterday.
Removing the panels was easier than I thought (not necessarily a good thing). I reattached the structure - glued and clamped overnight. I also finished the entrance. I need to add some puttty to gaps, glue in some missing roof supports and the structure is ready for paint.
As mentioned earlier I am going to use Plastruct H-12 columns inside the shed to hide seams and glue in OWTA truss pieces. I want to keep these pieces black so will wait till the shed is painted then glue them in.
I am also thinking about installing a crane fixture. I have a Walthers "super crane" kit, I also have designed and built my own version for customers. I am thinking about pulling the wheels off the HO truck shown below and incorporating them into a motor housing design. I want to glue the crane track structure to both sides of the H-12 so I believe my normal design is too wide - see last photo
Attachments
I have the shed in paint.
The building will be painted black, then red oxide followed by desert bisque.
The windows and brick were painted with flat red.
When I had the kit put together by Rich Redman, he provided an abundance of detail parts. I am not going to use them all however I figured I would paint (dull nickel) every thing and store what I don't use for other projects.
Attachments
After painting the brick panels flat red I used joint compound for mortar. I gave the compound one day to dry then sprayed with Dullcote. After letting the Dullcote dry I applied several coats of India ink/water wash. If you don't use Dllcote the water in the wash tends to soften and remove the joint compound. The results are shown below.
Before India ink / water wash
After several washes. It is hard to see in the photos but there is a marked difference.
The shed is fully painted. I glued in the brick panels.
I then glued in the Plastruct H-12 columns and OWTA-24 trusses.
I am reserving the middle columns for a crane-way. I elected to build my own design. The crane-way itself is:
BFS-20 I-beam (if I had the black ABS version I would have used this saving have to paint)
C-16 channel inserted on one side as a stiffener
C-6 channel cut to size and glued vertically to the other side of the I-beam
H-6 column to be used as 'track' for the motor housing I will build next W/E
Attachments
Great work Joe. And I thought I had a lot of clamps!
Charlie
I did not get anything done last W/E due to the monthly running of trains at the mall.
Made progress today.
The windows were installed using DAP Rapid Fuze (I am starting to like this stuff a lot)
I cut and painted 1/8 inch thick hardboard for the roof
I then glued on all those Korber detail parts I built earlier
Next W/E I will build the crane motor housing then I will be start the design for the 'concrete' base.
Attachments
Looks great.
Chuck
WOW Joe, that looks Outstanding! I really like your updates!
Had some time yesterday to build the conveyor motor housing. This is not anything super detailed since no one will probably ever see it.
The sides are 60 mil styrene which fit very nicely inside the H-8 columns. I drilled 1/16" dia holes into both side walls, inserted the rods and glued them in place. I made small side covers and glued these over the holes. I won't be rasing/lowering the hook and will most like glue the conveyor motor housing in the center of the overhead track again since I doubt no one will see it unless they look real hard.
I cut and glued a top cover then a smaller piece to look like a lift up lid to get inside. I then glued a ladder to the H-12 column on one side of the building so some one can get to the motor. I will glue some HR-8 railing later today.
Attachments
Joe, the conveyor housing looks really slick!


