@Chuck, I am sure many of us are amazed at 1/4 peg board plus carpet. How do you screw things down?
PS, You must grin at the threads extolling 2x4s and 3/4 plywood. ![]()


|
|
@Chuck, I am sure many of us are amazed at 1/4 peg board plus carpet. How do you screw things down?
PS, You must grin at the threads extolling 2x4s and 3/4 plywood. ![]()
I put a flat head screw, occasionally, in the pegboard joints that rest over the Sievers Benchwork 1 X 4s. It’s slightly flexible when I walked on it but quite strong. The Sievers has 1 foot centers.
It all developed when I found all the plywood at Home Depot so wavy and some downright warped. The 1/4 pegboard was nice and flat. Actually I think it’s 3/16 and at Lowe’s and Menards it was 1/4, but basically the same.
I just measured my access holes, they are actually 1 foot by 3 feet, I was guessing 2 by 4 and got to thinking when I remembered that the Sievers had 1 foot centers on the benchwork. I guess that's why I have to duck down to turn around. My hip bones are farther apart than a foot. ![]() But with a small foot stool under the layout I can easily climb up out of the hole if I want.
But with a small foot stool under the layout I can easily climb up out of the hole if I want.
So it all works for me...I love being able to poke an awl into the carpet and find a hole to run the power for things thru. I noticed in my picture that sometimes I didn't go under the switch which is a bit constrained and found the nearest hole just outside. But the grey covering on the 4 conductor cable blends in with the grey carpet...thought about green, but grey blended better with the track.
Slow and not so steady, but I'm making some progress. I got my Ross switches and Gargraves track in, and I just picked up my wood for the top. I went with 5 x 5 birch multi-ply, it's really nice and flat and will make getting it together a lot easier than the cheaper plywood. It also helps with the Mianne spacing, my 4 foot wide bench actually needs 49 3/4" to go to the outer edges of the legs. This would be a giant PITA with 4 x 8 sheets.


GRJ-
those birch multi- ply sheets of 60” x 60” will be really solid now and over the years! No warping I’m sure!
Carl J
I'm going to hate to cover it with track and scenery, it's such pretty wood. ![]()
Right, that's nice stuff GRJ, too bad it'll be covered with scenery and ballast! ![]() I've done a little cabinetry with that material and it looks great with a stain and finish--and super flat it certainly is.
I've done a little cabinetry with that material and it looks great with a stain and finish--and super flat it certainly is.
I didn't realize it was so inexpensive, I expected nice panels like this to cost more. ![]()
GRJ, Which thickness did you go with?
Tom, I cheaped out and used 1/2". Handling 3/4" by myself is pretty heavy, I hefted a sheet of each and decided on the 1/2". ![]()
gunrunnerjohn posted:Tom, I cheaped out and used 1/2". Handling 3/4" by myself is pretty heavy, I hefted a sheet of each and decided on the 1/2".
Had to laugh as I was thinking about myself as I read this. As I age I want and NEED Lighter materials. It is not cheap just age for me!
Well, it was 80% age for me as well. If the 3/4" panels were easy enough to handle by myself, I'd have gone that way. I wasn't that concerned about the difference in price, I only have a 12.5 x 20 layout.
gunrunnerjohn posted:Slow and not so steady, but I'm making some progress. I got my Ross switches and Gargraves track in, and I just picked up my wood for the top. I went with 5 x 5 birch multi-ply, it's really nice and flat and will make getting it together a lot easier than the cheaper plywood. It also helps with the Mianne spacing, my 4 foot wide bench actually needs 49 3/4" to go to the outer edges of the legs. This would be a giant PITA with 4 x 8 sheets.
Where does on buy 5x5 sheets of plywood. Did this come from a big box store, or did you need to go to a lumber yard?
You have to go to a lumber yard, and for this I went to a place in Reading PA, Russell Plywood. They specialize in plywood and had several hundred sheets of this in stock. Cool stuff, it has 9 plies as opposed to standard 1/2" plywood with three.
gunrunnerjohn posted:Slow and not so steady, but I'm making some progress. I got my Ross switches and Gargraves track in, and I just picked up my wood for the top. I went with 5 x 5 birch multi-ply, it's really nice and flat and will make getting it together a lot easier than the cheaper plywood. It also helps with the Mianne spacing, my 4 foot wide bench actually needs 49 3/4" to go to the outer edges of the legs. This would be a giant PITA with 4 x 8 sheets.
Have gone to using Baltic Birch for everything I can John. A lumber yard near here had the 5' X 5' as well as 4' X 8' in different thicknesses.
That looks nice! I think you will be just fine with the 1/2". Not Baltic birch, but I did the same thing with 1/2" due to weight of 3/4". Even had Home Depot cut the 1/2" sheets to size before trying to load them up. I got Sandply (7 plies) which is (or was) also pretty good stuff, flat and smooth and no voids in the plies.
All the 'real' lumber yards here have turned into Home Depot or Lowes. I have not yet checked with Menards, they have opened a few stores in this area over the last few years. Menards does seem to have a better selection than the others when it comes to different lumber types.
Also, wish I would have done like you are and extended the plywood out to the edge of my Mianne legs. Maybe even a little past the edges.
My plan is a fascia on the outside of the legs, and I want the table surface to come up to the fascia. Still cogitating on any extra surface on the plywood, I might go with some thin hemosite on the surface, but I'm up in the air about that. First things first, get the basic top on after some pre-wiring.
I looked at the sandply, but the 5 x 5 sheets were perfect for my situation. It really wasn't much more for the birch.
That really is some nice birch.
John that looks and sounds like furniture grade plywood could be that place was selling waste or surplus to get that high quality at a bargain price. Good job finding it.
I don't think so, they're a wholesale plywood company, it's their business. Russell Plywood - Home. When I asked before going up, they had 200+ sheets in stock, and they stated this was a stock item that they normally always have on hand. I have a contractor friend that uses them, that's how I found out about them. None of the local stores or lumber yards carried the right size.
It certainly looks like furniture grade, one side is a perfect wood grain. The other side is also smooth without voids, but it has the oval patches in places. It really is great looking wood, seems a shame to use it on the layout. OTOH, I know where to get more at a good price if I ever have a different project. ![]()
That's nice stuff John. Perfect for going a little over 4'. With the Mainne base the 1/2" should be fine.
Now if it was me I would have put a loop of track on that pile and ran a train....but that's just me ![]()
Well, I tried to put a loop on the benchwork, but it fell through. ![]()
![]()

I guess you need the birch ply there to stop it from falling like that. I hate when that happens.
gunrunnerjohn posted:Well, I tried to put a loop on the benchwork, but it fell through.
Oh, the humanity!!!
Lol John, every new RR begins one track at a time!!
This one has just been a long time coming. However, we're slowly moving in the right direction. ![]()
John, I am glad to see your Dream Layout is progressing along. Your certainly buying quality building materials which is the right way to go, I do recommend Homasote for the sound deadening and ease of screwing the track to just the Homasote. It’s fun, when you get to the point of running your trains, to sometimes simply turn off all sounds and listen to the trains run Quietly with just the clickety clack of the wheels going over the rails.....I have noticed over the years that each engine, whether it be Lionel, Atlas O, Sunset 3rd Rail, MTH, ETC., HAVE their own unique situations on the track and turnouts. If your running Big Boys, or 0-4-0’s, or 4-8-4’s, Whatever, the Front End swing, or the rear end swing, it’s all in the Game.
Thanks for the updates, looking forward to more.....Happy Railroading
Larry, if you lay homesite on top of plywood don’t the screws engage the plywood? Does this cause the plywood to resonate ?
Homosote
Homasote.
You glue it to the plywood and use 3/8” screws to secure the track to the...
1/2” homasote.
If you are using homasote, you really don’t need expensive cabinet grade birch plywood, but it certainly doesn’t hurt. Not my call. Just sayin.
Just build it man. Have fun.
.
I have built a lot os layouts over the last 70 years. Always used 1/2 inch plywood. Never a problem.
The reason for the multi-ply was simple, it's much flatter than the standard plywood generally available. Also, since a lot of my layout is going slightly over four feet wide, 4x8 sheets are very wasteful. The difference in the price of plywood and the multi-ply wasn't all that great, especially considering the multi-ply came in the 5x5 sheets that work out more efficiently for this particular layout.
Another reason for better wood is the Mianne benchwork only has attachment to the plywood at the legs, so the possibility of warping later is much greater with fewer layers in the plywood, this stuff has nine layers and is much less likely to warp over time. I've already spent around $4000 on all the track, switches, benchwork, wire, and roadbed. Less than $100 extra for better wood seems like a really good investment.
Hmmm, guess this isn’t the prototype you’re wanting to model, huh John? ![]()

I've run on layouts like that, some of them mine, so I'm trying to do better this time. ![]()
Ok, everyone has great ideas, I used 5/8, 5 ply plywood, 5/8 homasote, and 1/4 inch cork roadbed, and used Atlas O screws to fasten the track to the homasote. They do not penetrate The plywood. Atlas O and Ross track. Also, one very important suggestion, when laying the track, I highly recommend leveling the track. Homasote is wavy and another thought is to paint it a good color of your choice. We used dark green and dark brown. This helps keep the moisture out. My layout is located in my basement, so far, no moisture issues. We do have a 16 seer Trane system for our middle level and the basement.
If I have looked at the pictures correctly, the layout Benchwork is made of excellent materials, and rests on nice carpet. I am not sure homasote is necessary if cork roadbed is under the track. My thinking was in the olden days, tubular Track fastened to plywood laying on saw horses, running TinPlate toy trains caused vibration issues. Happy Railroading
John:
The multi-ply is the right way to go for exactly the reasons you state. It’s one thing I’ve sworn to use if I ever build another layout. When I built my layout I was extremely careful to get the flat parts perfectly flat. After 12 years there are a couple wavy spots that can only have resulted from wood movement. My basement is extremely dry, so I’m sure this hasn’t been caused by dampness and the room is also heated and air conditioned, so temperature swings aren’t an issue either. An additional benefit, I believe, is that the rigidity and stability of the multi ply might help a little to dampen vibration and be a little quieter.
The “wavy” areas on my layout are very subtle and I doubt anyone but me has noticed. I actually like the minute rocking of freight cars traversing this section caused by the plywood warping slightly, passenger trains, not so much.
I sure wish we lived closer together, I’d love to be helping with your construction.
I wish you lived closer too Pat, because you'd be a real asset in putting this together! I've seen your woodworking, and it would be a think of beauty with your hands in the mix! The jury is still out what it'll look like after I get through with it. ![]()
As for vibration, since the Mianne benchwork only attaches in a few places, I'm seriously considering running a bead of construction adhesive along all the beams to prevent them from vibrating against the beams, I suspect that could be a major source of vibration and noise. My other thought was some thin rubber sealing strips along the beams to keep them from vibrating against the beams. They would have the benefit of not being permanent if I had to pick a piece of the plywood up.
Although I'm really Jonesing to have a layout to run on, I'm glad I took my time as I've made several changes after reflection on where it was headed. If I had charged ahead with the first concept, I don't think I'd have been as happy with the end result.
John, have you considered sill sealer to place between the base and plywood? It comes in rolls at the box stores, can be doubled if desired and if compressed between the plywood and beams, will stop vibration and be easy to separate if work on it later.
I wasn't sure what it was called, that's what I'm thinking about. It's about 3/8" wide and maybe 1/8" to 1/4" thick, and indeed comes in rolls. I have some, but it's not in it's package, so I was just going to go look for it in Lowes. ![]()
The rolls of sill sealer are for wedging between bottom beam of a wall section and the foundation plate, usually 6 inches or so wide and 50 foot rolls for about $10. I doubled it in spots where I butted my tables together. I used 2'x5', 3'x4' and 3'x5' tables to form my base using 1x3 pine frames and 2x4 studs for the legs, with multi-ply 3/4" tops, I knew I would be walking on it, so built it for my 250 pounds of dead weight. The sealer compresses well and so far, after 3 years, kept the wood from making noise.
I think what I'm going to need is weatherstripping. The beams on the Mianne benchwork are only 3/4" wide, so what I am looking at is the one sided sticky weatherstripping rolls. I'll stick it to the benchwork beams and then just lay the plywood on top of it. I just want it to keep the plywood from rattling against the beams.
That will work John, I needed 2.5 inch wide strips for between the benches so I just doubled the sealer and stapled it every 12-15" then screwed the benches together.
gunrunnerjohn posted:I think what I'm going to need is weatherstripping. The beams on the Mianne benchwork are only 3/4" wide, so what I am looking at is the one sided sticky weatherstripping rolls. I'll stick it to the benchwork beams and then just lay the plywood on top of it. I just want it to keep the plywood from rattling against the beams.
That's probably a pretty good idea. I didn't think of weather strip, but I did have a couple of places where the top had a very small gap between it and the Mianne frame. This was in places where there were no legs and I only had enough brackets to fasten to the legs, so I ordered some extra brackets and screws from Tim and all was well. My sandply probably wasn't as flat/level as your Baltic birch either, but still the extra brackets may provide added stability and cut down on any extra vibrations.
rtr12 postedMy sandply probably wasn't as flat/level as your Baltic birch either, but still the extra brackets may provide added stability and cut down on any extra vibrations.
Guys, not all vibrations are bad.
John, how about a strip of weather stripping like they put between a truck and camper shell? Adhesive on one side and foam rubber on the other. I wish I had done that but I also put additional 90 deg mounting brackets anywhere I thought they would do some good. I got metal ones from Lowes but I bet they have the same basic type Mianne uses.
Weather stripping is actually what I'm considering.
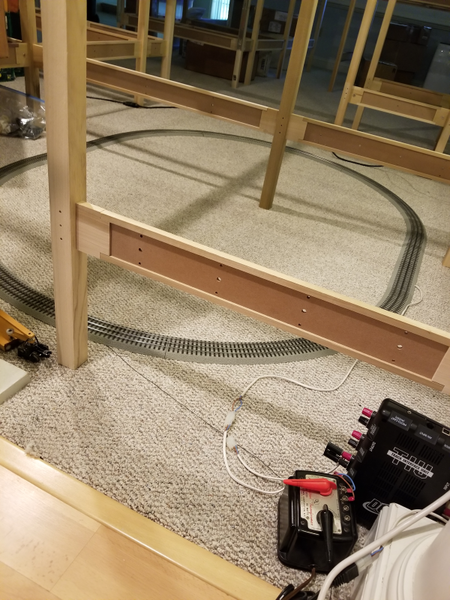
The saga continues. A little 2 foot "bump out" was added on one end, and the plywood is going on. ![]() I may yet get to run trains on this...
I may yet get to run trains on this...


Looking good John and much bigger with some of the plywood down.
Yep, it suddenly looks like it doubled in size. Now, if that were only reality... ![]()
Of course, it did get two feet longer, I went around the poles... ![]()
I think it does look bigger with the top going on. Starting to take shape now and looking good!
If I can only get the splinters out of my fingers, all will be well. The Hemasote is sitting in the garage, that goes on when the top is finished. ![]()
Good night John! ....that is a nice size...great work!....now can we get the loop off the floor?...........Pat
Well, the loop is off the floor, so I have to get cracking on laying track! ![]() A few steps to go before that, but it's coming...
A few steps to go before that, but it's coming...
That will be a very nice layout John, half the fun is making changes on the fly when finally do start laying track down:-P
Looking good John
Alex
GRJ, if your going to glue down your Homasote, 12" x 12" flooring tiles work great for weight to hold it flat til the glue dries. Check with your friends and neighbors they may have some left over from a project. Most contractors leave extra behind just in case a repair is needed down the road. You can also find them very cheap when a style is discontinued.
Love watching these all come together. Exciting! ![]()
John
my offer is still open. if you need specialized bridges or structures laser cut. I'd be happy to do it for you. You have given me ( and others) so many great "electronic" stuff it's the least I can do.
Looking great John. ![]()
Thanks all for the comments, and of course for the offer of any assistance! ![]()
I already know my track plan will be undergoing a lot of alterations now, I've expanded at one end, and some new ideas have surfaced about the traffic flow. I'm also doing a bit more to plan for the yard that will be added next.
Dave, the glue we're using is something Tom uses all the time for layouts, it's a once and done product. You drop the sheet in place and it's there for the duration! I'm getting more psyched about finally having a layout again! ![]()
Good going GUNS!!!!! Keep on keepin on.
One more step, I just humped the Hemasote from the garage around to the basement, I'm sitting in front of the fan cooling off. ![]()
The downside of getting older John, we have the time, it is the gumption to get the heavy haulin done we stumble on, now is when a grandson or nephew or neighbor kid with a strong back would be good.
I should have gotten my grandson over to help, he's big enough to husk them around now. ![]()
Hemasote? Drew blood? ![]()
gunrunnerjohn posted:Thanks all for the comments, and of course for the offer of any assistance!
I already know my track plan will be undergoing a lot of alterations now, I've expanded at one end, and some new ideas have surfaced about the traffic flow. I'm also doing a bit more to plan for the yard that will be added next.
Dave, the glue we're using is something Tom uses all the time for layouts, it's a once and done product. You drop the sheet in place and it's there for the duration! I'm getting more psyched about finally having a layout again!
This is causing me to want to tear up my layout and rebuild it. I mostly enjoyed building the layout, running it is fun, but building it is the most fun.
gunrunnerjohn posted:The saga continues. A little 2 foot "bump out" was added on one end, and the plywood is going on.
I may yet get to run trains on this...
Was there a sale on clamps that I missed ? ![]()
Lookin' good, John.
Gunrunner, the platform for your new layout is looking really good. I look forward to seeing some trains run and how are your going to control your trains. Will you be using Legacy and DCS? Also, will you be controlling your trains Via IPad and or IPhone? I look forward to seeing you at York in October. Keep posting those great pictures. Happy Railroading
"Was there a sale on clamps that I missed ? ![]() "
"
Now I know why I couldn't find any at the hardware store the other day. John cleaned out the supply.
More cutting and fitting, doesn't look like much, but it's coming. ![]()


Farmer_Bill posted:Hemasote? Drew blood?
Well, the spell checker can't spell Homasote either, so I don't notice when I type the wrong thing. ![]()
![]()
Looking good.....I’ll have use all your techniques....if you don’t mind...lol
Nessmuck posted:Looking good.....I’ll have use all your techniques....if you don’t mind...lol
Use away! ![]()
Richie C. posted:gunrunnerjohn posted:The saga continues. A little 2 foot "bump out" was added on one end, and the plywood is going on.
Was there a sale on clamps that I missed ?
Lookin' good, John.
No, and we ran out of clamps, bringing more tomorrow. ![]()
![]()
One of the neat things about working with John is anytime I suggest to push the layout edge out here or add a bump out on over there his only response was "OK".
However, he was a bit hesitant to let me take a notch out of the basement door to clear the expanded benchwork. I figure I'll just swap in a smaller door and pack out the jamb when he's not looking.
leapinlarry posted:Gunrunner, the platform for your new layout is looking really good. I look forward to seeing some trains run and how are your going to control your trains. Will you be using Legacy and DCS? Also, will you be controlling your trains Via IPad and or IPhone? I look forward to seeing you at York in October. Keep posting those great pictures. Happy Railroading
I'll be running Legacy/TMCC and DCS, and I do have both the WiFi adapters from the two makers. I will be using LCS at some point. I will also be able to switch in for conventional on the mainlines, I'll probably keep the Z-4000 on tap for that feature. I have the Z-4000 remote receiver, and I can control that from the DCS remote.
Tom's giving all my layout building secrets away. Actually, I only have one real secret. I invite Tom over to do the heavy lifting! ![]()
![]() I'm the guy that gets to crawl under and hold things.
I'm the guy that gets to crawl under and hold things. ![]()
Great Progress John. It’s coming along nicely. Nice to see a master at work.
Andy
Steamfan77 posted:Great Progress John. It’s coming along nicely. Nice to see a master at work.
Andy
Well, the "master" is the guy in the background that's busy working while I'm goldbricking. I'd be lost without his guidance. ![]()
Tom Tee posted:The rest of the clamps were tied up:
And there are those missing clamps! ![]()
![]()
Nice fit up around that pole! I am gathering from some of the posts here that you have some top notch help with you too, very hard (maybe impossible) to beat that kind of pro quality help. You will have track and trains running in no time now!
Yes, that's the only reason I'm anywhere near this far along. ![]() Now only will the trains be running, but I think the layout will have a unique flair that many don't. I'm getting pretty pumped to get some track down.
Now only will the trains be running, but I think the layout will have a unique flair that many don't. I'm getting pretty pumped to get some track down. ![]()
Excellent progress John! That is great Tom is helping out!
Using the angle and extending the edges when cut out the post section was a great idea John, much stronger than what I would come up with. I think you missed a spot with a clamp though, I saw too much wood showing ![]()
I'm afraid all the good ideas aren't mine, but I'll get to enjoy them when we're done. Mark, it's truthfully more like I'm helping out, for layout building Tom is the 16" gun here. I have moved a lot of wood around... ![]()
Unique flair indeed! With the assistant and assistance you have here it's guaranteed to be spectacular!
Here's some more progress pictures. We've done a lot of cutting, and also some planning and reconfiguration of how the track will be laid. This is also the post that the track will come around on the one end.
The hole in the center is the "command" station. ![]()


Wow you guys are making a lot of progress , and it's looking real good.
Alex
Looking Great John; Tom is a master at building layouts. I have seen his work at Jack Malley's home.
The guy does spectacular work. And he's a nice guy Too.
If I only had the space, Id be calling on Tom for his help as well.
Really looking good John
Franky-Ogee
Great updates. I like the use of the rounded or curved corners so as to lessen that annoying pain when your side hits a sharp edge as you move about the layout.
I would have never thought of all the rounded corners if it weren't for Tom, but I can see the effect will be stunning! There will be very few straight sides when we're done.
Looking good!!
Yes John, I see now that now! Great Job, Tom!!
Have you snuck a loop of track on it to run a train yet John? ![]()
Looking really good, good luck...
No trains running yet Ron, but I'm eager to see that happen. ![]()
I’m enjoying the show, keep up the good work. The benchwork is beautiful.
Morning John, I just got done catching up with your thread. I don't know if you and Tom are building a layout our a master piece of art, in my eyes it looks as to be both! I sure hope you are taking lots of pictures for your record and future magazine article ! Looks great and best of luck as you move forward! I will be trying to do a better job keeping up with the build!![]()
I can say with Tom's eye, the layout will be far and away more impressive than anything I could have whacked out myself. Clearly, being a woodworking craftsman is key to getting a great result here, something that I never claimed to be. ![]()
John,
As a former framer, my experience with lumber made it a no brainer to build with studs, 1x3 and dimensional along with sanded 3/4 plywood. I was not sure how to make the curved edges so stayed with square edges, the final product was enjoyable, but like many I would definitely change a few things and add a second layer to it. Tom is definitely a finish carpenter with loads of talent.
I will pitch in also with praise and admiration of Tom's expertise not just on your layout but on many other topics where he has shared photos. With a hand saber saw and no sander, my curved cuts have only been for roadbed that is covered up with scenery. Covered, the sooner the better!!
The final shape is made, Monday we'll nail everything down. Next comes the Homasote and then the fascia. We do have to put the top on the upper deck, that's the last of the plywood.
All the outside profile is set. One of the neat features is virtually no straight lines, it'll all be graceful curves. Once the fascia is on, I think it's going to look outstanding, I can't wait! It may look too good to run trains on! Well... not really. ![]()
![]()


That looks beautiful John! Please post pictures when you're putting the fascia on because I like to see how that's done with the curves involved and I know Tom is a master Carpenter so I'd love to learn cuz I'm getting ready to start mine and I need all the tips I could get. Good luck its looking good.
John,
The surface of the layout is beautiful, looks like furniture grade workmanship. It'll be tough to cover it up but its looks will be no deterrent. As for the railroad, you've mentioned changes and offered a rough sketch but I wonder if you would post the latest iteration of your track diagram. Enquiring minds want to know!
When the bench work looks this good you know the end result is going to be something special. John, this is absolutely grand and I can't wait to see the progress from this point on. Thanks for sharing this with us.
Dave
Looking real good, John!
Peter
Thank you all for the kind words, however IME the most essential material component is the 5' X 5' X 1/2" Birch multi-ply. Lacking that level of decking integrity we would have potato chips at this point. Another positive aspect of this 5' X 5' multi-ply is how it works in over hanging the Mianne bench work which otherwise frequently leaves a linear half of the perimeter bench work frame exposed.
Building with multi-ply allows reverse construction in that I usually built the bench work frames then over lay them with some form of skin. Because this plywood is like a surface plate it allows one to free form the desired finished layout shape then fabricate the frame accordingly.
Tom Tee posted:Thank you all for the kind words, however IME the most essential material component is the 5' X 5' X 1/2" Birch multi-ply. Lacking that level of decking integrity we would have potato chips at this point. Another positive aspect of this 5' X 5' multi-ply is how it works in over hanging the Mianne bench work which otherwise frequently leaves a linear half of the perimeter bench work frame exposed.
Building with multi-ply allows reverse construction in that I usually built the bench work frames then over lay them with some form of skin. Because this plywood is like a surface plate it allows one to free form the desired finished layout shape then fabricate the frame accordingly.
This is a really key point that I didn't realize when I built my layout with Mianne.......48x96 is more like 50x100....that extra inch and three quarters is a huge bonus that I didn't take advantage of.... I will on my rebuild.
Peter
I'll be posting more pictures as we go, it's really fascinating to see this take shape and how it all goes together. It's pretty clear that I was probably not going to end up with something nearly as nice without a professional eye, so I'm forever thankful Tom is on the case. ![]() I wouldn't have tackled this design alone as I'm pretty sure I don't have the skills to pull it off!
I wouldn't have tackled this design alone as I'm pretty sure I don't have the skills to pull it off!
Really taking shape John! ....you’ve got to be stoked!....maybe it’s been mentioned before, and I just didn’t catch it???.......what’s the plan for the pillar(s) .....possibilities could be seemingly endless??.............Pat
harmonyards posted:...what’s the plan for the pillar(s) .....possibilities could be seemingly endless??.............Pat
Well, Tom was eyeing them and waving his Sawzall around, but I had to stop him. They are just cosmetic at it turns out, but I'd have to fix the flooring and carpet to remove them, so they stayed. I'm sure I'll be able to figure something out in time to "dress them up". ![]()
"They are just cosmetic", in that case chop the babies off flat at the deck and leave the bottom half intact, problem solved. ![]()
![]()
Seriously, that is one fine looking layout. If you happen to change your mind that sure would be one great looking bar top, think of the parties. ![]()
Hi John,
I have been off the forum for a while due to work and home projects and just saw your posting here. What a great layout and new place to move to! hard to believe it's a condo you're doing a great job looking forward to seeing updates as you go along. Also love everyone's posts on this thread as there are a lot of great ideas for me to incorporate in mine.👍👏.
Joe Gozzo
One thing not that apparent so far is that John thoughtfully included the knee saving Mianne powered layout lift up entrance. So this is a real walk in layout.
Tom,
Not having to crawl under a layout is long term planning, the throttle time will be ten fold being a walk in vs duck under.
I built my layout in a E shape just so I didn't have to do a lift out or duck under.
Congrats John, that's going to be spectacular! Seeing all that space is mind blowing. I find myself switching back and forth between pictures, just thinking of the possibilities. Any idea of a completion date yet, or you just going to "let it flow"?
Lion
Lookin' good John. You and Tom have done a great job. You do have one advantage over some of us as well....A nice, well lit, AIR CONDITIONED room to work in. Sure beats my old northeastern basement! ![]()
Looking forward to seeing some track and trains soon. I like the curved look as well. Should give you some nice opportunities for more realistic scenery. Not much in nature is square after all.
Bob
Lion L 226E posted:Congrats John, that's going to be spectacular! Seeing all that space is mind blowing. I find myself switching back and forth between pictures, just thinking of the possibilities. Any idea of a completion date yet, or you just going to "let it flow"?
Lion
Surely you know that a layout is never complete. ![]()
![]() Truthfully, I don't have a "firm" date for anything, just trying to get as far as fast as other commitments allow. The space is deceiving, the total length is 23 feet, and the width varies between about 13 feet on the big end to about 11 feet on the narrow end with the posts. It's big enough for me, that I know.
Truthfully, I don't have a "firm" date for anything, just trying to get as far as fast as other commitments allow. The space is deceiving, the total length is 23 feet, and the width varies between about 13 feet on the big end to about 11 feet on the narrow end with the posts. It's big enough for me, that I know. ![]()
RSJB18 posted:Lookin' good John. You and Tom have done a great job. You do have one advantage over some of us as well....A nice, well lit, AIR CONDITIONED room to work in. Sure beats my old northeastern basement!
Looking forward to seeing some track and trains soon. I like the curved look as well. Should give you some nice opportunities for more realistic scenery. Not much in nature is square after all.
Bob
Yes, year around comfort is a nice thing. The curves are Tom's doing, I truthfully had not thought of that, but I think it really gives is a different and more realistic look. That's what happens if you've built a ton of layouts and have refined the techniques I guess. ![]()
Wow, I just looked at this thread 2-3 days ago. What a difference in such a short time. What workmanship!
Stunning!
Not to worry, I'm sure when Tom leaves that the progress will slow considerably.
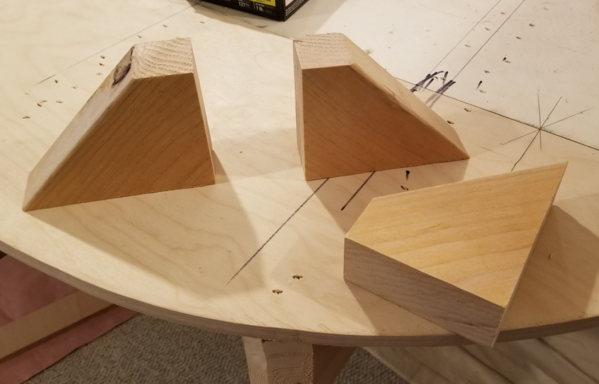
Back at it yesterday. Now it's time to take all the pieces laying on top and make them into a continuous sheet. Since we used 5x5 to maximize usage of the wood, they don't fall onto supports conveniently. Truthfully, with the Mianne benchwork, they wouldn't anyway, so it's necessary to knit all the pieces into one in the gaps. I hope to finish this today and maybe get some of the supports for the fascia installed. Those have to all be in place and secured before we can put the Homasote on.
There are actually two different joining methods in use, I'll shoot the other type today. Either works well, the fingers illustrated can be left unsecured on one side for each finger and allow you to take stuff apart. Since I have no intention of taking this apart with anything but a chainsaw, we saw no reason to make them removable.


John, now that is craftsmanship. Looking great.
I wish I had the cash to have Tom build mine! Very nice.
John:
Looking at the photos reminds me of an old woodworker saying - "One can not ever have too many clamps"........................
gunrunnerjohn posted:The hole in the center is the "command" station.
gunrunnerjohn posted:
If the command center doesn't work in the center, it looks like you might have enough room for a heart shaped hot tub.![]()
That is a handy way to support and join the pieces. Thank you for so many photographs, John and Tom!!
Keystone posted:gunrunnerjohn posted:The hole in the center is the "command" station.
gunrunnerjohn posted:
If the command center doesn't work in the center, it looks like you might have enough room for a heart shaped hot tub.
Totally unplanned, but we noticed it after the wood was cut, so I had to get a couple of shots of it. ![]()
Just a quick couple of snaps, this is how some of the other sections are joined. Both methods work pretty much the same, we now have a continuous top, all the wood is joined (except for the lift bridge, we allowed that to move!). ![]()


Very nice John, I'm impressed! ![]()
I'm going to be really impressed when I can run trains on it! ![]() Next is the mounts for the fascia, the Homasote, and then the fascia and finally TRACK!
Next is the mounts for the fascia, the Homasote, and then the fascia and finally TRACK! ![]()
Totally awesome train room. Congratulations!
It's looking very nice and coming right along. Looks like furniture or custom cabinets! Running trains will be great too, but when finished, you may not want to cover it up so you can still admire the quality and craftsmanship of the build. ![]()
You are making me want to tear my layout down and start over! But, without help like Tom, my rework would look no better than it does now. ![]() It would probably end up in the landfill or fireplace (out of pure frustration) if I tried all the curves, joints, additions etc. that you guys are creating there, a work of art! Squares and rectangles only for me....the one thing I have learned with age is my limits.
It would probably end up in the landfill or fireplace (out of pure frustration) if I tried all the curves, joints, additions etc. that you guys are creating there, a work of art! Squares and rectangles only for me....the one thing I have learned with age is my limits. ![]()
RTR12, I am with you. I know my limitations. One think about my benchwork, roadbed, and scenery supports; they provide motivation to get the scenery going as fast as possible to cover up the mess!!!
John, does your talented helper have a face?
The anticipation is building. The furniture look is coming, it's going to have a really nice finish fascia all along after the Homasote goes on, that will really impart the finished look.
Mark, I know my limitations, and if it's electronic or mechanical, I'm fine, but woodworking is not my long suit. In addition, Tom has every tool imaginable to do the work, which really does make a difference as well. A ton of experience and expertise doesn't hurt. ![]()

Obviously, Tom has made all the bad judgment calls that I would have made here, which is why we're making progress! ![]()
![]()

I thought Tom had one of my trim nailer/staplers at first?

Nope, it's here. Good stuff.
So the fingers were glued, nailed and screwed? Your right someone is going to need a chain saw to take that apart.
Nah Joe, yours has the plain vanilla, standard pedestrian, everyday common fixed nipple, Mine has the super duper, premium, multi angle, fits-all swivel nipple. Circa 1981. ![]()
If you need servicing on that gun I was told by General Flooring in West Chester PA that they picked up the repair side of Duo-Fast. General Flooring has a good presence along the upper/mid East Coast.
The curved edges: Not just random cutting. Most all edging has a purpose. The larger of the front edge bump outs is for a station, the smaller front edge bump out is for a control tower at the bridge abutment.
The cosmetic curves are to break up any parallel lines with the right a way. Visually it helps to have a train close in on or travel away from the platform edge.
The big French curve embracing the two columns is just to blend in the otherwise boxie 2' X 7' centered addition to the original Mianne foot print.
The heart at the heart of "Command Central": The curves just soften the angular edging of the Mianne benchwork with a 2 to 3 or so inch overhang. The right angle making the foot of the heart is the panel location.
Due to the even number unit build out of a typical Mianne foot print, using the 5 foot square multi ply panels can provide a safe ample degree of unsupported overhang on a 4 foot wide section of Mianne benchwork.
IMO, one would defeat the clean edge enhancement of the 5 foot panels it you used 3 foot and 2 foor Mianne framework members.
Today we should be installing the bracing for the new curved benchwork edging plus the backups addressing possible torqueing of the crossmembers.
Joe, your stapler is way too pristine to be Tom's unit, his has put in a lot of miles! ![]()
Things are looking great John! Between you and Tom your going to have some wonderful furniture in your train room! ![]()
Tom is responsible for anything that resembles furniture, I'm in charge of ransom cuts and hacks. ![]()
![]()
gunrunnerjohn posted:Joe, your stapler is way too pristine to be Tom's unit, his has put in a lot of miles!
Mine are from the later 80's. They have served me well. Many builds, too many to count. I oil regularly!
About half of mine needed rebuilds a few years back as they were leaking. I can't keep track of just how much work they've done. I do remember a disgruntled boss trying to damage one of mine over jealousy. He fired it into a furring strip attaching to tiled masonry. He claimed he was shooting for the grout but he was at least an inch over directly on the tile. I grabbed it away from him before it got damaged further. His nailer was right at his feet and he chose to grab mine. So the driver needed replacing early.
30+ years and it's still working!
"I'm in charge of ransom cuts and hacks. ![]()
![]() "
"
John, who or what are you hold ransom this week?![]()
![]()
Chris
LVHR
gunrunnerjohn posted:Keystone posted:gunrunnerjohn posted:The hole in the center is the "command" station.
gunrunnerjohn posted:
If the command center doesn't work in the center, it looks like you might have enough room for a heart shaped hot tub.
Totally unplanned, but we noticed it after the wood was cut, so I had to get a couple of shots of it.
I know you love railroading, John, but everything has limits.... ![]()
gunrunnerjohn posted:
I like that, this is a really good one! A keeper! Now, if I could just figure out when all my bad judgement had been used...
Reminds me of another one from my working life... An Optimist: One who lacks experience.
This applied whenever sales had just gotten a large, new project and were all excited about it... which always preceded transfer to the operations department and discovery of the true scope of the project... reality would then set in that they were already in the hole before beginning. ![]()
RTR12, I like that one too, but for “ optimist “, I’d substitute “idealist”, but I completely understand your reference. 😝
Wow, it looks fantastic so far!
I actually agree with all the philosophizing! I think all of us are old enough to have learned from our mistakes!
Some more progress, we're putting the supports for the fascia on, and I've been crawling around tacking things down as well.
This is the support structure for the large bump-out "bubble" on the one side, it's made from 3/4" plywood. This is secured (very solidly) to the underside of the table top. Then 2x4 extensions to the edge of the table were added and fastened to the table and sides of these supports, they extend to the edge to support the first layout of the fascia.


Here's the start of the fascia supports on one end of the table, they're glued and stapled to the table top. The longer ones will also get additional support behind the benchwork I-beams to prevent any possibility of twisting there.

Here's a run of the fascia supports in place and ready for the bottom fascia layout to be attached.

Another section of the table, the strip on top is the bottom layout of the fascia that will be glued and tacked to the supports and table top. After the Homasote goes on the second finish fascia will cover this and also the edge of the Homasote.

Cruising on, can't wait! ![]()
Your bench work is beautiful. It’s a shame you’re going to ruin it by putting a layout with trains on it.
One thing I've discovered about the Mianne benchwork, the method of attaching the plywood just by the legs is woefully inadequate for best noise suppression. Even with the higher quality multi-ply, the top doesn't lay firmly on the I-beams. I can just hear the vibration when things are running on the layout, that's not good. I'm tacking the top to each of the beams using that power stapler, the difference in both sound when you tap on the table and the overall rigidity of the structure is greatly improved. Turns out, I won't be using the brackets to attach the top at all, it's much more secure the way I'm going it.
romiller49 posted:Your bench work is beautiful. It’s a shame you’re going to ruin it by putting a layout with trains on it.
I like to view it as an "enhancement". ![]()
GRJ, you do really nice work. I’ve been wondering about track noise with the Mianne fasteners, so thanks for posting a comment about that.
Well, Tom is doing the nice work, I'm holding the tools. ![]()
The boards rattling on the I-beams is something I always thought would be an issue, and I figure to solve that one once and for all. We did sacrifice a piece of the benchwork shooting staples into it to make sure we didn't have a splitting issue. However, it seems the staples work with some pretty small pieces of wood without a splitting issue, I was just somewhat concerned and figured it was worth testing before doing the whole table.
An important consideration when driving staples is to not exceed the body into which you are anchoring the fasteners.
The 1/4" crown staples used for the deck attachment appear to have the exact same 1/4" crown as the staples used in fabrication of the Mianne beam ends.
Although this is a permanent layout, disassembly could be accomplished with a circular saw set at 1/2" for plywood or set 1" for plywood and Homosote running a chalk line parallel & adjacent to a cross member row.
Tom, I'm really hoping to never have to disassemble this one, that will be a project for my heirs! ![]()
![]()
I think one part of the issue with the leg fasteners for this layout is a lot of four foot spans, that's a lot of area to span without securing the deck to the bench structure in between.
John, earlier in this thread were you considering using rolled sill-plate foam as a possible sound deadener between the bench work & top? If so, did you try any and what was your opinion?
After having built very many layouts I have come to the conclusion that the only way to really quite an 0 gauge layout is to use a two rail format or run the three rail trains at a reduced speed.
My layout combines both two and three rail trains over Homsote. If I run the three rail trains at a reasonably slow speed they blend in with the two rail trains. If I run the three rail at normal model train speeds the sound overpowers all the two rail trains.
Fasteners of the deck material (plywood) through sill insulation will just transfer the vibrations.
Side thought:
One thing I have found is that the sound muffling laminate floor underlayment pad can reduce foot traffic noise tremendously. The biggest complaint in laminate flooring is the foot traffic noise level. Underlayment padding has come a long way in addressing that problem.
It would be interesting to glue down the underlayment pad then screw and glue down the Homosote then remove the screws after the adhesive has set up. In theory that may work well.
John, What is the length of the staples you are using? They must be huge to go through 1/2" plywood in to the Mianne.
After having built very many layouts I have come to the conclusion that the only way to really quiet an 0 gauge layout is to use a two rail format or run the three rail trains at a reduced speed.
My layout combines both two and three rail trains over Homsote. If I run the three rail trains at a reasonably slow speed they blend in with the two rail trains. If I run the three rail at normal model train speeds the sound overpowers all the two rail trains.
Fasteners of the deck material (plywood) through sill insulation will just transfer the vibrations.
Side thought:
One thing I have found is that the sound muffling laminate floor underlayment pad can reduce foot traffic noise tremendously. The biggest complaint in laminate flooring is the foot traffic noise level. Underlayment padding has come a long way in addressing that problem.
It would be interesting to glue down the underlayment pad then screw and glue down the Homosote then remove the screws after the adhesive has set up. In theory that may work well.
7/8" DUO-FAST style staples are used to attach the decking to the Mianne. 1 1/8" is used for mounting the fascia blocks, 1" screws will be used to fasten the Homosote. The fascia finish will be applied with urathane adhesive.
What he said. Tom, it it time to go find underlayment padding? ![]()
Floor Muffler has the highest decibel rating for both STC sound class and IIC impact transmission. It is also carries a double adheared certification. Meaning you can trowel glue it down then trowel glue a surface over it. Amazon has the best pricing. Stocked at most HD.
WOW, I looked it up and Amazon will ship 100sq/ft for $43, and HD has it for $65, that's quite a difference? Is this something that makes sense for my layout?
Top fastening may be the weak spot in the Mianne system? I didn't do as nicely as you are doing, but I did add quite a few angle brackets, like the ones supplied with the original kit. As you, I was also a bit leary of the 4' spans and anywhere it looked like there was a gap between top and benchwork, and then a few more spots just for good measure.
With the way you guys are going at it you should have maximum sound deadening and top notch stability when finished. I don't think vibration will be a problem there at all. Hopefully you will still be able to hear the trains coming... ![]()
Or maybe not hear the trains coming? ![]()
When assembling my first section of Mianne, I thought of the wide spacing of the top anchor brackets. I'm not inclined to fasten it from the top, I will go the route RTR12 did and add some more underside anchors. I intend to show my daughters and sons-in-law how this is fastened together. Actually, I think they could figure it out since they are familiar with Ikea furniture. I don't intend to leave a hefty mess for them to clean up and dispose of like my dad left us. Though Dad is still living, he has been in personal care for 2 years, and we still have a long way to go on getting the house and property ready to sell. ![]() I guess it boils down to, that is just the kind of guy I am (for better or worse - take your pick).
I guess it boils down to, that is just the kind of guy I am (for better or worse - take your pick). ![]()
So,I forgot to thank both of you, John and Tom, for sharing all these neat construction methods! I am picking up a lot with this topic for sure!!!!
I didn't want anyone to getting hit by a train! ![]()
Mark Boyce posted:So,I forgot to thank both of you, John and Tom, for sharing all these neat construction methods! I am picking up a lot with this topic for sure!!!!
I'm picking up a lot more here on the front lines. I've learned enough to know what I don't know, that's for sure! ![]()
That is one of the nice things about this forum, many different skills, resources and ideas are shared for the common good.
We pretty much took the day off. I had a little time in the afternoon so I did a few more blocks prepping for the fascia. A couple of these needed to be slotted for the joints under the layout, they all get glued to the surface, so they have to be flat to the table top. We have a lot more of these to put on yet. I feel like the turtle, slow and steady wins the race. Next week the hare will come back, then there'll be more progress! ![]()

JD2035RR posted:
![]()
Funny - but spot on
I was going to ask about time off for the master craftsman. Never want to over exert or exhaust them completely! So I'm glad to hear the 'hare' is finally getting some rest! And 'turtles' need some rest too! ![]()
I'm trying to do some "busy work" before the next artistic shot. There are tons of little blocks to make and glue in place, something that even a dummy like me can do. ![]()
Got around to gluing those fascia support blocks and some more down today. I also cut a bunch of them to size as well. When the glue dries, I'll move all my clamps over and do the other section. After all of these, we still have more to do, but a few steps on the journey...


Mounted more fascia blocks and secured one of the bump-out humps that was taken off after the initial fit.


LOOK-N-GOOD. ![]()
Some day I'm going to count all the fascia blocks, I had no idea there'd be that many! I've been putting them on for days and I'm not done! ![]()
John thank you so much for the update. This is what I wanted to see being done or should I say how it was done. Now I have a question are you going to use a piece of thin flexible wood on there for the first layer? And if so then what will it be followed up by ? I understand the part that the next piece will be taller to cover the homosote but what will it be made of? Or from.
Here are the two pieces, they're both three-ply, obviously the inside piece is much thicker. If you wet these, you can apparently make pretty tight corners with them, that's the plan for the corners on the layout. This is Tom's design, so I'll be watching intently as this goes on to see how it's done in detail. I'm trying to get all the blocks on so we can move to this step. ![]()
The thick one goes on and just comes up to the top of the plywood, the thin one also extends up over the Homasote and slightly below the thick one. That's the "finish" piece, and I'll probably stain that one.


Okay that's what I thought John. Thank you very much for your reply. now I understand we have that wood here at work that's why I figured that's what you would be using or something similar but that's exactly what we have in a few different thicknesses to.
And the sad part is they put tons of those strips about 3 or 4 inch wide into the dumpsters on a regular basis.
Which dumpster? I may need more! ![]()
![]()
Lol. Over here you cant pull stuff out of dumpsters and walk out. Its considered stealing. Unreal.
The tall outside layer of plywood is 1/8" Birch. Seconds of this material is often used as shipping skins for other plywood skids.
John, I can always provide more of either material.
I was joking about the dumpster Tom. ![]() I haven't measured, but I suspect we have enough of it here to do the fascia, at least I think so.
I haven't measured, but I suspect we have enough of it here to do the fascia, at least I think so.
So, John/Tom, are the blocks for the fascia ~6” centers(within reason), and the length going back to the Mianne benchwork? Are they attached to the Mianne also?
Tom Tee posted:The tall outside layer of plywood is 1/8" Birch. Seconds of this material is often used as shipping skins for other plywood skids.
Yes Tom. We use that to ship radiators throughout the system. They go in the dumpsters too. No one wastes money like the nycta.
The fascia mounting blocks extend back to the benchwork. For longer ones, there's a backing block to prevent the Mianne I-beam from twisting if there's weight on the cantilevered top in those places, those go on after all the blocks are in place. The shorter ones are also glued to the Mianne benchwork I-beams and the top.
The Mianne frame work is OK for it's designed purposes but has it's limitations. The cross members are not designed to provide torsional support. This form of deck installation exceeds the anticipated bench work use.
Yes the fascia blocks go back to the Mianne frame members for a precise full depth 3 1/2" contact/interface. At that point any downward force on the edge the plywood deck could be putting pressure on to the bottom cord of the Mianne cross member. However this decking material has exceptional stiffness. Very minor action expected
So....drum roll...if John could provide a photo.......There are precut, a series of back up blocks designed to be installed tight to the opposite side of each fascia block behind the perimeter Mianne cross member to assist in transferring force to the bottom of the decking.
The Mianne perimeter frame becomes an inert sandwich core. On overlapping Mianne deck installations the blocks have no attachment to the Mianne bench work. the deck can be lifted off and the benchwork reused.
The Mianne cross member, although weak torsionally has enough vertical strength to become the fulcrum for the cantilevered deck. The rigid multi ply decking makes this very doable.
Ask... and you shall receive! ![]()

Wow that’s some beautiful craftsmanship!!
Alex
You can thank Tom for the craftsmanship, I'm to gang laborer working in the trenches. He shows me what needs to be done and I do my best to execute some of it. ![]() It's been a learning experience, I figure after another four or five layouts I could venture out solo.
It's been a learning experience, I figure after another four or five layouts I could venture out solo. ![]()
![]()
The ah hah moment... But to tie a bow on it, and if it’s no trouble, could you take a photo of a mock up of the application with a fascia block to mianne(or simulation piece of benchwork), then the back up block(s) orientation on the backside of the mianne sandwich?
Well, I could, but soon I'll have an actual picture of them installed. ![]()
Great! Thank you sir.
Normally I would say that benchwork is a means to an end (running trains). In this case its almost a shame to cover up all of your (Tom's) great work.
Bob
That is a very good question, Ted! I'll wait for John'd photograph!
Bob, I am with you! I think I said it before, My benchwork provides incentive to get the scenery roughed in at least!! ![]()
Access to this requires an OGR Forum Supporting Membership


