
Tom was back today and we made some progress on a new phase, the fascia bottom layer!  Love the look of the inside curves in the center hole, when that's finished it will be dynamite!

I'm pretty sure the fascia won't fall off, we used half a tube of glue, and that's the large tube!

20190702_14053620190702_14054920190702_14132020190702_14185020190702_15165320190702_151705

If you question or efficiency, here's what's left of twelve 5x5 birch multi-ply sheets.  Looks like a couple of pirate swards in that pile, I'll have to work on a handle!

20190702_154401

Attachments

Images (7)
  • 20190702_140536
  • 20190702_140549
  • 20190702_141320
  • 20190702_141850
  • 20190702_151653
  • 20190702_151705
  • 20190702_154401

That system is slick as snot.  An when finished will look superb.  I think I have the fascia/backer blocks oriented properly.  Given your materials, what’s the ballpark guess on depth of cantilever.  Do I see drying brush marks where you applied the water to bends, just brushed it on?  Did you tack the fascia also or does the glue hold on setup?  Last stupid question, would  standard 1”x4” ‘s(or plywood) in place of Mianne perform similarly?

4FAF0650-3AA0-4A7E-94DE-2166C8E6C018

Attachments

Images (1)
  • 4FAF0650-3AA0-4A7E-94DE-2166C8E6C018

John- looks very nice. Puts a nice clean edge on the bench. I think you used more liquid nails then you have in your entire condo

Ted- the I beam style construction and use of plywood for stringers is structurally stronger that dimensional lumber. When I was still in the home building industry, laminated beams and wood I beams were just hitting the market. They were many times stronger than standard 2X10's, 12's etc. What gives plywood its strength is the orientation of the wood grain layer to layer. All that being said, for what we are are using the lumber for I think it is adequate. When I build my next layout I plan to use an open frame design with 1x4 stringers.

For those who don't want the mess- Mainne is the way to go by far.

Bob

Truthfully, if it had it to do over, I wouldn't use the Mianne.  While it works well, there are compromises that are made that I wouldn't have to make if I had simply built the benchwork.  That being said, I'm happy with the Mianne, and it's going to work out fine.  I was originally looking for the no mess solution, but as you can guess, that ship has sailed.  Now I'm just trying to keep the mess off the carpet for the grand cleanup after we're done at this point.   There was no mess with the Mianne, but then I added all the rest of the benchwork build!

Ted, no water on these curves so, on the really sharp bull nose we may have to use water to make the turn.  The cantilever on the large bump-out is about 22 inches, but there's very little "give" on that when you apply weight to it, I have no doubts it'll hold anything I could possibly put on it.  The base fascia is 3/8" bendable Lauan plywood, the top layer will be 1/8" birch plywood.

The fascia is tacked at a couple of places, but 90% is just the grab of the glue holding it.

As for substitutes for the Mianne, I can imagine that plywood beams of similar size to the Mianne would be more than sufficient.  If I were doing it with plywood, I'd use the multi-ply I used here for the deck, that stuff is a pleasure to work with.  The cost difference between multi-ply and regular plywood is minimal as it turns out, and the difference in quality is immense!

For framing, if multi ply is not available a 4' x 8' of 3/4" Birch shop grade plywood can be ripped into 13 pieces of 3 1/2"  by 8' pieces.  This will be far superior form of bench work construction material.  Dividing 13 into the cost of any sheet of quality 3/4" plywood yields a very affordable net material expense. 

I would never want to use solid dimensional lumber.

The fabricated beams used here have minor ridges or offset where the hardwood ends that tie the ends of each set of top and bottom solid wood cords and Masonite together.  If you just have a basic table it can be forgiving, one may never notice it.  However when a lift gate is involved the cumulative effect on this job is causing us to have difficulty in gaining proper alignment.  I imagine the situation is random.   

Last edited by Tom Tee

Hopefully, we're on the road to sorting out the lift gate issues.

Speaking about the lift gate, I have to say, the limit switch arrangement sucks!  While the upward travel limit isn't an issue as there's room for "slop" there, the downward travel is a PITA.  In addition, for reasons I can't fathom, the lift gate blew right through the limit switch bending the crap out of the lever on the leg!

I'm working on a solution that will replace the lower limit switch, and I'll likely replace the upper one as well.   The problem with the lower limit is there's a fine line between the lift gate setting in place aligned and the switch not triggering and just unwinding the cable.  Obviously, when it unwinds the cable, it jumps off the pulleys, what a PITA!

My solution will be simple.  I'll replace the lower limit switch with a microswitch that is attached to a idler pulley and a short spring.  As long as the cable is taunt, the microswitch will remain closed, as soon as I get a little slack, the switch will open and stop the downward travel.  This will always result in the table being seated as far as it's going to and eliminate the issue of the cable jumping the pulleys as there will be a spring tension on it at all times.  The only PITA about this solution is I have to run the one limit switch cable up to the top of the lift gate where I have a nice long expanse of cable that I can run my idler pulley on with the switch.  However, I think this will result in much more reliable operation of the lift gate.

I'm ordering microswitches and pulleys as we speak.

A lot of little things today.  The installed base layer of fascia got sanded down level with the table in preparation of the Homasote installation that will come to the edge.  Also, of course, installed more blocks for the remaining fascia to be installed, supports for the future bridge to a yard, and supports for a bump-out that was not sufficiently supported.  For those following along, all the base layer of fascia will get this treatment to be exactly level with the table, the Homasote covers this and is cut to the outside dimension to prepare for the top fascia layer.  I'm also finalizing my design for the replacement limit switch for the lift gate and ordering parts.

20190703_20122320190703_201230

Attachments

Images (2)
  • 20190703_201223
  • 20190703_201230
gunrunnerjohn posted:

Tom was back today and we made some progress on a new phase, the fascia bottom layer!  Love the look of the inside curves in the center hole, when that's finished it will be dynamite!

I'm pretty sure the fascia won't fall off, we used half a tube of glue, and that's the large tube!

20190702_14053620190702_14054920190702_14132020190702_14185020190702_15165320190702_151705

If you question or efficiency, here's what's left of twelve 5x5 birch multi-ply sheets.  Looks like a couple of pirate swards in that pile, I'll have to work on a handle!

20190702_154401

John: How do you bend your facia wood? Do you soak it in something to make it more plyable?

 The base fascia is 3/8" bendable lauan (Philippine mahogany) plywood, the top layer will be 1/8" birch plywood.  So far, the lauan had bent with no water, I suspect the really tight corner will require some moisture, we'll see.  The 1/8" birch also bends very freely, so for the base layer that's already up, it'll just be glued on top of the first layer after the Homasote is on and trimmed.

Bryant Dunivan 111417 posted:

John,

When complete, you’re on my bucket list of must sees.  Great contribution to the hobby and industry of your talents.  Thank you.

I have to fess up, all the innovation on the layout is really Tom's talents.  I'm just following behind and trying to learn as much as possible from his woodworking skills.  Once I see it done, I can do some of the stuff.  Many of the insights that are shaping the layout aren't really mine.  My talents run a lot more to the electronics and mechanical side of things.  Without Tom's help, I wouldn't be getting something like we're turning out.

Last edited by gunrunnerjohn

John,

Sharing of talents and knowledge is the 600 pound Gorilla this hobby has over others, instead of jealousy or parochialism, most willingly give advice, help or information without hesitation.

If we all had the same talents, the world, let alone this hobby would be very boring.

John, Thanks for the kind words  but it has to be known that you are one of the fastest understudys  with whom I have ever worked.  Sometimes I feel I just have to get out of the way.  Many folks do not realize the many nuances that goes into a project such as this.   It might look good and simple but it does not fall together.  We should wrap up the wood working portion sometime later this year, or so it seems.

Well, to Tom and John- That is one beautiful execution of an idea. Not just the woodwork and construction, but foreseeing the final project at the end. That alone is pretty impressive in the grand scheme of things. I'll tell you honestly I could never do that, not just the building of the layout, but having the foresight of what the grand plan is. Now that's pretty impressive. When the wife and myself were looking at houses years ago, I turned down many a new house because all I saw was a concrete pad and a drawing of what it was "supposed" to look like when it was done. I just couldn't fathom it. So for you guys to know and the key word here isknow what you want at the end of this project is truly amazing in my eyes. Good Luck with it all.

Richie,

When one is building towards a finished product each step can be used to improve the foundation of the next.

When cutting French curves free hand there will be mild occasional wiggles.  Mounting the lauan with urethane allows the installer to tune-up the linear edge.  Then the thin fascia will have an improved/corrected flowing edge.

If I just mount the Homosote on a freehand cut spiral curve the subsequent routering for a smooth Homosote edge will only replicate run out of the plywood.  Not good.

Remember, this is just a basic home made way to trim an edge that anyone could do.  No special tools, no expensive equipment, just a common power tool assortment.  The purpose of showing these steps is not to demonstrate  perfection or to prove a point but rather to encourage others to step up and do something similar and even better.

Please do not think there is a thought that this is the best way or the only way.  It's just two old guys tripping over one another n' having fun.

Tools that help would be along the line of levels, drill motor, brad or staple gun, tube dispenser and polyurethane adhesive, saber saw w /fine metal tooth blade,  100 grit paper, etc etc.  Using quality plywood is a given!

We will attempt to answer questions of what we are doing and why we do it, but we make no claim of superiority.  More like one beggar telling another beggar where to find bread.

Last edited by Tom Tee

Tom and John,

Seeing the steps is always good for those contemplating a build.

I will go back through my pics as I built and post them in a new thread for those who feel a dimensional lumber build is what works for them. My benchwork is 1x3 select pine with sandable 13/16 plywood tops, covered with foam sheeting and edged with an engineered facia.

It is by no means as intricate as what you two are building, but might be a good contrast of skills needed for those afraid to use power tools and make a few mistakes as they go.

John / Tom,

Many thanks to you guys for posting your progress in this forum.  The work is beautiful and an inspiration to those if yes yet to build our dream layouts.  I've picked up alot if great ideas from this thread.  Looking forward to the rest if the build, and of course the trains!


GRJ,

That is going to be one awesome layout! Also the surrounding area looks really comfortable and inviting..a perfect atmosphere to build your masterpiece. I'm thinking the mess from construction is worth the finished product and it really looks like you're a "clean as you go" kinda guy so it never gets out of hand....

Like many others here who are just starting their own builds the tips and ideas in this thread are priceless! Thank you and Tom for sharing the process...


Another day, today was leveling day.  The layout is on carpet, and without some pads, it was sinking unevenly into the carpet.  Legs could also move around, time to solve those problems.  The Tom Tee patented fix, pads with teeth!  A do-nut of plywood, a depression for the leg adjuster, and a piece of office chair mat with teeth glued to the bottom.  These go under the legs and keep the leg from moving and also provide a much wider base for the leg.

Of course, then there's the Pergo floor, the teeth didn't seem to stick there.  So, a similar do-nut without the teeth and add a layer of carpet tape to keep the leg in place.

Legs are all level, top is all attached, time to move on to the last of the first layout of fascia and then the Homasote goes on.

Attachments

Images (4)
  • mceclip1
  • mceclip0
  • mceclip2
  • mceclip3
gunrunnerjohn posted:

A couple places up the street are for sale Jim, want me to refer you to an agent?

GRJ, thanks for the offer, but I am going to have to pass.  I am following in your footsteps.  I am just about 6 months behind you.

We bought a ranch townhome in late March.  Rented it back to the previous owner for the month of April.  We they moved out we cleaned it out and hired painters to paint all the rooms on the main level and the 1700 sgft finished basement.  Finally closed the sale of our previous house on June 20th.

We are all moved in and currently the kitchen if being remodeled,  new cabinets, sink, counter tops, dishwasher and lighting.

I am just a bit ahead of you with the layout build.  Bench work completed, all track ( 2 main lines and a 7-track pass thru yard) laid, wired, debugged and fully ballest. Signals being installed, scenery about 5% completed.  All structures are built and weathered.  Access lift gate needs some fine tuning.

BTW, layout is HO, 22’ x 11’ being professionally built as per the track plan that was first submitted in June of last year.  Final version of track plan submitted in November and construction started December 28 along with a 33% down payment.

Expected delivery late September / early October.

Long story short, moving again is out of the question.


 PS -  I have not posted anything about my layout because this forum is O Gauge.


Last edited by SantaFeJim

Hokie, The Forstner bit provides an even floor in a shallow hole enough to limit leg movement yet provides  access for adjustment.  A drill press of any size is helpful in providing a level floor.

The clear plastic floor mat with carpet nipples is available at Staples.  I use a hole saw for round coasters and their mat interface.   A chop saw can be used for square coasters and chair mats.

I actually tack the mats on the bottom.

Forstner drill

I use a 1 1/4" bit for Mianne adjusters.

Attachments

Images (1)
  • Forstner drill

Hokie,  Not sure of what you are saying.  Your photo is of a Monoco swivel leveler with a 1 1/2"  nylon face.  That stem is a 3/8-16 thread with a top hex for adjusting when used with external mounting brackets.  A significant up grade from the feet that came with the bench work kit.  The Monoco face will swivel to conform to irregular surfaces so as to provide full contact.

Adjustment is much easier in recessed sub feet with the 9/16" nut immediately above the foot.  I discovered them when I was building Free-mo modules a long time ago.

That is a much more preferred adjustable foot.  Considerably more expensive.  I have been using them for 19 years.

If that is the leveler you are using you have made a wise choice.

I will try to post top and bottom photos of both styles.

Tom Tee posted:

Hokie,  Not sure of what you are saying.  Your photo is of a Monoco swivel leveler with a 1 1/2"  nylon face.  That stem is a 3/8-16 thread with a top hex for adjusting when used with external mounting brackets.  A significant up grade from the feet that came with the bench work kit.  The Monoco face will swivel to conform to irregular surfaces so as to provide full contact.

The one part of the leg levelers for the Mianne benchwork that I like is the threaded insert for the leg, it works much better than the one pictured above with the T-Nut.  T-Nuts work their way out of the leg far too easily.  Once you pound the the Mianne nuts in, they're not coming out without a fight.

Attachments

Images (1)
  • mceclip0
gunrunnerjohn posted:

I'm sure the scenery will take some time to complete, of course it'll probably never be "complete".

John, Model railroads are never completed. The NMRA has visited my so-called completed railroad off and on for over a decade. But, I still have a box of detail stuff i need to add when i get "around to it." And that box gets more cluttered every time i go to a train show. Plus the scenery always needs to be refreshed. Creating and building a model railroad can easily be half the fun.

John is absolutely correct.  I stock both kinds of "T" nuts.  IME,  The two different "T" nuts are for two different types of wood.

The Mianne legs are a harder better quality wood.  Hardwood is a much stronger unyielding material and is given to prefer the so called "Propeller" nuts which install with an interference fit as shown in John's photo. 

I use the Mianne selection of propeller nuts and fixed feet for display modules I used to travel with.  

For benchwork installation I usually used a Fir leg and use the nuts with the impaling nuts which are  for softer wood.   Soft wood does not provide a long lasting interference fit.

When using either style of nut , I also coat the interface with Locktite's urethane adhesive and leave it cure overnight to assure an secure installation.  They need to be chiseled out when removed.

The higher adjustable 9/16"  hex nut built into the lower portion Monoco leveler makes adjustment quick n' easy.

IMO, just consider the type of host wood used.

Edit:  I failed to mention one of the main reasons I switched to use the finned nut.  When I used to deliver layouts I was not always sure how much runout the floor may have.  So I would usually start off with long adjustable leveler stems.  If my predrilled hole was just a tad off it would jack a long "T" nut off it's base when the stem hit a wall being screwed deep into the leg.  So I usually drilled a slightly oversized hole which allowed for runout.  Propeller nuts MUST have only one perfect sized hole, a natural for shorter stems.

Last edited by Tom Tee
gunrunnerjohn posted:
Tom Tee posted:

Hokie,  Not sure of what you are saying.  Your photo is of a Monoco swivel leveler with a 1 1/2"  nylon face.  That stem is a 3/8-16 thread with a top hex for adjusting when used with external mounting brackets.  A significant up grade from the feet that came with the bench work kit.  The Monoco face will swivel to conform to irregular surfaces so as to provide full contact.

The one part of the leg levelers for the Mianne benchwork that I like is the threaded insert for the leg, it works much better than the one pictured above with the T-Nut.  T-Nuts work their way out of the leg far too easily.  Once you pound the the Mianne nuts in, they're not coming out without a fight.

John:

Can the type of nuts that Mianne uses be purchased anywhere. If so, what are they called?

Hi John,  That looks like a typical drywall Tee nut for hanging decent sized loads.  I use them for heavy pictures. 

Also used in inexpensive soft core boards typical of IKEA type construction.

The drywall version usually has a pointed nose so you can just jam it through the drywall, twist and set in place using a Phillips screw driver.

John, I had to put the blinders on when paying for the fastrack, switches and DCS, Legacy systems, I know my layout is somewhere in the $15k range but not knowing lets me look the spouse in the eye and say I have no clue.

There are 27 switches on the layout, and about 400 feet of track, 2 legacy Cab 2, 1 TIU, 4 AIU and one Wifi DCS.

Last edited by Ron_S
eddie g posted:

It looks like you are spending more money on tools than trains.

Not really.  I did have to pick up a compressor, mine crapped out.  I bought one just like Tom's, the Porter-Cable 6 Gal model.  I also did buy the DeWalt portable worksite saw, very nice piece.  

I think Tom has every woodworking tool on the planet, so I haven't needed much.

John, if I didn't have the yard ladders it would be in the 8 to 10 range for switches, I have 4 yard entrances and within each yard several steps to the ladders which added up a lot quicker than I thought, I also wanted to be able to switch main lines on any of the 4 sides which added more in plus the reversing elevated section.

gunrunnerjohn posted:
eddie g posted:

It looks like you are spending more money on tools than trains.

Not really.  I did have to pick up a compressor, mine crapped out.  I bought one just like Tom's, the Porter-Cable 6 Gal model.  I also did buy the DeWalt portable worksite saw, very nice piece.  

I think Tom has every woodworking tool on the planet, so I haven't needed much.

Porter-Cable makes great power tools.  I had a friend that worked for them and every year right before Father's Day they would offer employees tools at a very nice (around 40%) discount.  He would get me  whatever I needed.

Their stuff is really tuff.  I have since passed most of that to my son and he loves it!  He should... he got it FREE.  


As we are on the topic of tools, if you already don't have one, the Harbor Freight cut off saw is great for cutting track.  We use it at the club and I built several layouts with it.  The track fits into the built-in clamp, straight cuts every time.   You can usually pick it up for $30-35 with sale/coupon.

6 in. 5.5 Amp Cut-Off Saw 61204 alternate photo #1

gunrunnerjohn posted:

Bob, one of those is in my future.

Engineer-Joe posted:

Man, I'm losing my patience here. Are we running yet? Where's the trains? 

Let's go! Throw down a loop and run something already. 

Yes, I am not a patient person.

 Like fine wine, some fine layouts need ageing!

LOL!

Tell him John.... it has to breathe.. 🚂


Someone asked if the fascia would make the right corner, hope this answers the question.   In case the question of the apparent gap comes up, that's by design, we're interested in the proper curve around the radius, and all of that will be covered by the Homasote that will come to the outer edge of the table and be wrapped by the finish layer of the fascia.

All the main level fascia is up, and we're moving on to the Homasote.

20190710_204936

20190710_20494220190710_20495320190710_20495920190710_20500720190710_205015

Cutting the Homasote is interesting, Tom has a great tool for the job.  While you can use a saw, it's pretty messy, so he uses this little gem.

20190710_175138

A few passes with the knife and we have a clean cut with minimal mess.

20190710_17343920190710_17344320190710_17354720190710_17365020190710_17371120190710_17371420190710_173847

Attachments

Images (15)
  • mceclip0
  • 20190710_204936
  • 20190710_204942
  • 20190710_204953
  • 20190710_204959
  • 20190710_205007
  • 20190710_205015
  • 20190710_175138
  • 20190710_173439
  • 20190710_173443
  • 20190710_173547
  • 20190710_173650
  • 20190710_173711
  • 20190710_173714
  • 20190710_173847

Thank you Carl,

I find Bosch thin knife blades burn up rather quickly cutting Homosote at any reasonable speed.  The Homosote is rather dense, so within 5 feet or so  the blade starts to warp from the heat and curls to  one side giving a crazy edge.  If you grind a knife edge on a worn out saw blade it can last a bit longer because it is thicker and resists the heat better.

5 or 6 passes with a super thin Airway #6 knife blade makes production work quick and clean in my experience.  We even use it for hand cutting most plywood underlayments.

Cutting with a vacuum equipped 32 tooth metal blade has given me the best saw approach.   I used that combo for cutting around the round columns.  Both for the plywood and Homosote.

Last edited by Tom Tee

A minor milestone.  Worked on the Homasote today, all of it is cut and fitted.  Of course, the minor task of screwing it down and sealing all the seams is yet to come, but this step has been completed.  I even have a full sheet left over.

The fun is all the curves and edges, so all those had to be marked, then flip the sheet over and cut it.

20190712_131152

We had a low spot right at the liftgate, so that was leveled before the Homasote went on.

20190712_131404

Cut out the curves...

20190712_132409

And at the end of the day, a blank canvas!

20190712_173231

Attachments

Images (4)
  • 20190712_131152
  • 20190712_131404
  • 20190712_132409
  • 20190712_173231

All Seams will first be sanded with a vacuum equipped oscillating 100 grit sander. 

All screw depressions and all seams will receive a skin coat of a Portland based feather finish.

The feather finish will be applied with a 12" straight edge steel trowel then sanded smooth.

That work is scheduled for next Wednesday.

Taping or not taping, I have gotten cracks or lifting of the tape both ways.  Homosote can be dynamic.  The leveling/feathering is more to achieve a flat surface.  Ground cover  hides cracks.  Tape can also be pushed up and hump along the seam,  even push up ground cover to where you can detect the seam.  I no longer tape Homosote seams.  Your experience may vary.

For two rail use, some irregular Homosote can be a challenge.  Skim coating for flatness may be essential. 

Your choice. 

I had a layout building business and have personally built scores of layouts over the years using various products. each with their own plus and minus features.  All things considered, in my practical experience Homosote is the preferred working surface.

BTW, My favorite OGR signature:

"I'm not an expert, I just play one on the forum".

Last edited by Tom Tee
lehighline posted:

Looking great, John! You have come a long way in a very short amount of time! Obviously getting Tom involved was the right move. I've been filing away a bunch of the techniques and tricks he has shown you. The better to build mine (whenever that happens!  

I can safely say that it wouldn't look anything like this without Tom's expertise and ideas.  My concept was a much simpler plan.  Obviously, when this is done, it'll be WAY more than I originally envisioned when I started.  BTW, that's a good thing!

============== A small amount of progress ================

Most of the Homasote is screwed down, we still have to do a little work around the lift-gate, we're putting J-channel on the edges so they don't get beat up, and the pop-up hatch will receive the same treatment.  After that, we have to trim the edges of the Homasote to match the base fascia layer in preparation for the top fascia layer.  any cracks and depressions will be filled in, and it'll be time to paint the surface to provide some sealing and a neutral color.

Of course, then there's the track...

A busy day today, got a bit done.

Cutting the slots around the lift-gate wider so I can install J-channel to protect the edges of the Homasote from damage when the gate goes up and down.

20190717_121251

We needed to route a relief slot in the Homasote to allow the J-Channel to sit flush on the surface.

20190717_143817

The same process for the J-Channel that will go around the pop-out in the middle of the table.

20190717_145434

Next step is routing all the edges of the Homasote to be flush with the fascia base layer.

20190717_152027 20190717_152036

Touching up the routing and base layer of fascia.

20190717_153721

Sanding all the seams and screw "bumps" before filling everything.

20190717_164507

Time to clean off all the sanding debris after the sanding.

20190717_164324

Last step of the day, first coat of fill for all the screw heads and seams.  When this dries, I'll sand it all and touch up anything we missed on the first pass.  Then I'll install the J-Channel around the lift-gate and the lift-out panel.

20190717_17530520190717_175314

Attachments

Images (10)
  • 20190717_121251
  • 20190717_143817
  • 20190717_145434
  • 20190717_152027
  • 20190717_152036
  • 20190717_153721
  • 20190717_164324
  • 20190717_164507
  • 20190717_175305
  • 20190717_175314

Thanks guys.  The track plan is generally the same as I started with, at least in the big picture.  However, as I went along, a number of other things presented themselves, and it's been evolving.  One thing is wider curves, I originally had all O72, but now the outside loop will be O96, O84, and then O72.  I'm also adding some switching for the future yard that comes after this section is at least up and running.  Finally, I'm considering a passing/programming siding on the workshop end to allow me plop something on the track right at the workshop.

In the overall scheme of things, mine is fairly plain-Jane for some of the stuff Tom does.  Much of the limitation was because I already started with the Mianne benchwork, so the basic form was pretty set.  If you want to see the more extreme benchwork examples, some of the amazing work Tom has done in the past: Curved and Custom Benchwork

Last edited by gunrunnerjohn

Oh my gosh, John!  It looks like you're having too much fun.  You'd better check on the legality of so much enjoyment! 

I've been following along and getting excited about documenting my near-future layout build.  That was until I saw the perfection you are achieving.  Now anything less than what you and Tom have done would be a disappointment for me.  I feel like just taking all my trains out to the yard, pour gasoline on them and set them all on fire and call it a day!     Congratulations on a fine build.  I hope to get to see it live someday, but until then I'll anticipate some great video.

I have a question about the homesote.  I have zero experience with it, which is why I ask.  I've read numerous suggestions about needing to paint both sides of the homesote to seal it from any warping.  Did you feel it was unnecessary to paint both sides?

Traindiesel posted:
I feel like just taking all my trains out to the yard, pour gasoline on them and set them all on fire and call it a day!     Congratulations on a fine build.  I hope to get to see it live someday, but until then I'll anticipate some great video.

I'd rather you just drop them off here.  I'll even pay the shipping.

I have a question about the homesote.  I have zero experience with it, which is why I ask.  I've read numerous suggestions about needing to paint both sides of the homesote to seal it from any warping.  Did you feel it was unnecessary to paint both sides?

 I think all the screws that are in my Homasote will prevent it from doing anything but behaving!   The idea of painting the bottom was floated, but I decided that it would be a PITA and take a lot of work as I'd have to let it dry and then position it again.  I've seen Homasote down for years with only a handful of screws and it wasn't warping.  I'm also in an all year around climate controlled space, which is also going to make a significant difference.

Thanks John.  That's good to know about the Homasote.  At the Mianne booth at York it was recommended to me to use Sound Stop to cover the plywood.  It seems to be a fibrous material, maybe similar to homasote. You can see it at the top of the picture on the right.

IMG_1096IMG_1097

I would ship my trains to you, but I'm way too lazy to pack them all up.  In fact, I'm too lazy to drag them all out to the yard and set them on fire.  I guess I'll just build my layout the best I can so everyone could have a good laugh!  

Attachments

Images (2)
  • IMG_1096
  • IMG_1097
Traindiesel posted:

Thanks John.  That's good to know about the Homasote.  At the Mianne booth at York it was recommended to me to use Sound Stop to cover the plywood.  It seems to be a fibrous material, maybe similar to homasote. You can see it at the top of the picture on the right.

IMG_1096

I would ship my trains to you, but I'm way too lazy to pack them all up.  In fact, I'm too lazy to drag them all out to the yard and set them on fire.  I guess I'll just build my layout the best I can so everyone could have a good laugh!  

Soundstop looks similar to Homasote, but I think the weight of Homasote may be better at supporting whatever is on the layout.  I'm walking around on the Homasote to finish up on top, and it's holding up fine.  Soundstop is also more expensive.

I'm sure you'll build a great layout, you've already done one!

Dan G posted:

GRJ: What is your table height?

The legs are 40", and the two 1/2" sheets (plywood and Homasote) make it 41".  Of course, that's at the high spot in the floor, there is almost a 1 1/2" runout on the floor surface as it turns out.  So, some of the table is around 42 1/2" high.

Moving forward, after the first sanding pass, I installed the J-Channel on the lift-gate and the pop-out panel.  That also allowed me to add the final sprinkle of screws that were waiting until I slid the J-Channel under the Homasote.  Next will come another round of fill for the new screw holes and all the ones that didn't get fully filled.  I can also cut the pop-out panel out of the 1/2" birch and have it ready to paint with the rest of the table, the size is fixed.

This should keep the Homasote from getting beat up over the years on the edges.  All the edges should be covered when we're done.

20190719_14592920190719_145940


Attachments

Images (2)
  • 20190719_145929
  • 20190719_145940

A word of advice, John: Don't complete your track laying until some of the scenery, buildings, and other details are in place. A number of years ago when I put in the "golden spike" on the Not-So-Great Eastern Railway,  I stopped even thinking about scenery, structure building, and detailing. For a little over a year all I did was run trains. Running trains after a period of deprivation can become addicting!!!

John, with all due respect I disagree.  Run dem trains!  What Jackson said it very true, however unless your HOA has layout inspections enjoy the sounds and smells.  Let her rip.  Fill up the right a ways   and haul ***.  A while ago I got most of my lines running and fired the work crew,  I do not even see the unsceniced benchwork, the trains give me tunnel  vision.

It's not like these are Half O scale sized miniatures,  Hefty 0 scale trains are a scenery element all there own.

Last edited by Tom Tee
gunrunnerjohn posted:

Moving forward, after the first sanding pass, I installed the J-Channel on the lift-gate and the pop-out panel.  That also allowed me to add the final sprinkle of screws that were waiting until I slid the J-Channel under the Homasote.  Next will come another round of fill for the new screw holes and all the ones that didn't get fully filled.  I can also cut the pop-out panel out of the 1/2" birch and have it ready to paint with the rest of the table, the size is fixed.

This should keep the Homasote from getting beat up over the years on the edges.  All the edges should be covered when we're done.

20190719_14592920190719_145940


Looks great John, Where did you get the J Channel?


Joe Gozzo

Since I'm coming up on spending time under the layout, I figured it was time to get this project out of the way.  It's always hard to strike a balance between comfort and accessibility for working under the layout, here's my entry in the sweepstakes.

I had some old fiberglass molded chairs that I've had for about 50 years, and several were living in the attic.  I was going to toss them, glad I didn't.  With some carpet glides, a bit of 2x3 lumber, and some screws, I have a layout work chair.  When I sit in it, my head just clears the beams by a little over an inch, the perfect height.  I have back support so I won't be cramping up after a couple of minutes working under there.

20190720_17215720190720_172204

Attachments

Images (2)
  • 20190720_172157
  • 20190720_172204
gunrunnerjohn posted:

Since I'm coming up on spending time under the layout, I figured it was time to get this project out of the way.  It's always hard to strike a balance between comfort and accessibility for working under the layout, here's my entry in the sweepstakes.

I had some old fiberglass molded chairs that I've had for about 50 years, and several were living in the attic.  I was going to toss them, glad I didn't.  With some carpet glides, a bit of 2x3 lumber, and some screws, I have a layout work chair.  When I sit in it, my head just clears the beams by a little over an inch, the perfect height.  I have back support so I won't be cramping up after a couple of minutes working under there.

20190720_17215720190720_172204

Absolutely brilliant!

gunrunnerjohn posted:

Since I have to relocate between the lower I-Beams, I figured the chair made more sense.  Of course, I'm also on carpet.  I do have a creeper that I haven't unpacked, but after evaluation, I'm not sure how useful it would be.

My platform is quite a bit lower. It was built for my son when he was 4 years old and is only 2 feet off of the floor. I use a creeper to move around under the platform  There is carpet on the floor. In addition to what little leg strength I have left, I also use my hands and arms to pull myself along. It is not as easy as if the floor was hard, but, it works.

gunrunnerjohn posted:

I did think about a lower platform, but then I thought about having to work under it.  Also, I want to have storage under there, so I decided to go with the "standard" 40" legs.  I also find it much easier to work sitting upright than laying on my back.

John:


I fully agree. If I had it to do over, my platform would be much taller. But, It was originally built so the my son, when he was very small, could walk up to it and run trains.

Well, the chair was new many  years ago.  Picked it up in a resale shop.  As Ron infers, the frame was  a HF furniture dolly sectioned and lowered.

I knew not to being it to your house because of your deep cushioned carpet.  I would really like to know how the furniture sliders work for you!

My low rider is OK for the lower benchwork but for my higher benchwork I use an office swivel chair fully depressed.  I also use another office swivel chair for scooting under a couple of arch bridges.

I had been thinking about my wife's very large wheeled garden stool.  Not really what one may consider safe thinking.

Last edited by Tom Tee
gunrunnerjohn posted:
Ron_S posted:

John, you should put some padding in that seat so you last longer while under the layout

Can't afford any padding, my head is pretty close to the beams now.  I made the seat as low as I could.

Didn't you infer that you had your own personal built-in padding? I read that somewhere.

Last edited by RoyBoy
RoyBoy posted:
gunrunnerjohn posted:
Ron_S posted:

John, you should put some padding in that seat so you last longer while under the layout

Can't afford any padding, my head is pretty close to the beams now.  I made the seat as low as I could.

Didn't you infer that you had your own personal built-in padding? I read that somewhere.

Yep, can't afford any more.

It's certainly not the smoothest paint job, but it's only a background color and sealing for the Homasote.  I don't intend for the layout to be brown, so I'll just cover it up with scenery.

I also added handles to the lift-out do it's easy to deal with.  I do have to get the proper paint to paint the metal J-channel a similar color, that's not urgent right now.

Thanks guys, it's been a long time coming!

As for the track plan, I had one, but with the expanded table and lots of new ideas, this one is only a ghost of what will be.  The plan below is where I started before Tom came and we extended the table and added all the curves.  I still plan on the big folded dog bone mainline, and then the separate inner loop.  However I'm adding access to the future yard on the lower left of this plan, that will extend down a wall to the left.  Also, I'm going to add several passing-storage tracks as well.  Since the right side is next to my workshop, a programming/storage track there will be added so I can just plop something on and take off for testing.  The original plan was all O72 curves, but now the three loops will be done with mostly flex track and be roughly O96, O84, and the inner one will be O72.

John Will Layout, Main Table 3D 2019-06-08

Attachments

Images (1)
  • John Will Layout, Main Table 3D 2019-06-08

John,

I'm really enjoying this thread and have learned so much just following the progress you and Tom are making....thank you for taking the time to post. I have a couple of questions ... one for you and one for Tom.. You mentioned that in the end you may have been somewhat limited by the Mianne benchwork.. if starting over knowing what you've learned in the process would you do benchwork from scratch?? (with Toms help of course).. 

For Tom... along those same lines I have seen more and more people ripping plywood for layout frame work rather than using regular 1"x  or 2"x whatever... is this a practice you recommend?  What are the benefits and what is needed to do it correctly?

Again thanks for the great thread ...it is totally fascinating to watch what a couple of real craftsmen can pull off!!


RD

My comments are based on my professional training in and 42 years of installing flooring.  Solid wood  (aka, dimensional lumber)  is kind of a living and breathing critter.  It has the capacity to move, swell. twist and otherwise deliver less than satisfactory results.  When you use it for benchwork all bets are off.  You may have somewhat satisfactory results but quite possibly not.  For many years I built layouts for folks.  The finished product has to be straight, flat and stay that way.  I could never in good faith use dimensional lumber and expect to stay in business.

However, in the three rail world one could get away with a wavy surface due to greatly exaggerated wheel profiles,  very flexible trucks & over sized couplers.  So you will find some folks using entry level building material and not realize the potato chip surface upon which they are running.

If you do use solid wood, consider not using Pine plywood.  That can go into gross distortion.  And NEVER use CDX  with knot holes.  Also only use Fir lumber dried to single digit moisture content.  Your layout may be the foundation of your fun for many many years.  Be true to your self, get a moisture density meter (cheap) and use it when buying any solid wood.  You will see readings typically in the high teens.  Never use it until acclimated in the room to be used and in the single digit range.   It may need to be run through  a jointer.

Solid wood flooring is not  rated to be installed below grade, engineered wood (read plywood)  flooring is.  Now what  should that say to anyone bringing solid wood into a below grade environment?

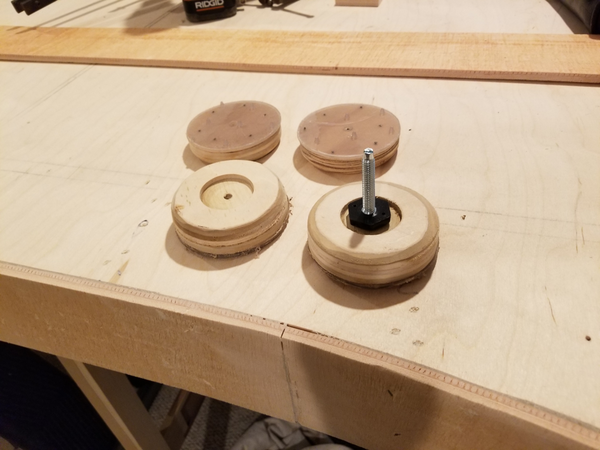
For benchwork I prefer a Birch or Maple wood with a minimum of 7 plys in the 23/32" (3/4")  category.  In better lumber yards (forget big box stores) you can find a great benchwork product called Birch/Maple Shop Grade.  Not to be used for staining but exceptional in construction quality with no knots or voids.  PLus good pricing.

I have most all wood working tools but I still pay extra to have the lumber yard rip my plywood, at least rip  it in half.  Their $24,000 table saw is far more accurate than mine.  Plus it becomes much easier for me to carry home.  You will get 13 strips of 3 1/2" rips from a 4' width.  Divide you per panel cost by 13 and you will have quality material near the cost of questionable material.

This is just a brief overview not getting into 5' X 5' Multi ply or Advantech.

Never purchase sheet goods from a merchant that stores their sheet goods on a three or four finger rack.

Always buy sheet goods that have  been stored on a flat bed rack with full 4' x 8' or 5' x 5' support,

I never buy the top three or the bottom three sheets of anything, packing bands can distort the panels.

Last edited by Tom Tee

This is great stuff!! Exactly what I was looking for... 

Like many here for years I've been planning and collecting all the different materials and tools I thought would be needed.. table saw..radial arm saw.. chop saw.. jig saw.. worm drive circular saw.. along with a bevy of hand tools and more books on the subject than you'd believe. All with the intention of one day building my masterpiece... but what I have learned here by following the threads of guys like Tom and John and Alex and Marty and all the craftsmen who are generous enough with their time and knowledge to post these threads and answer the questions goes so far beyond those pages...

Room prep... right materials.. new and better ways to do it.. it's all right here for the taking.. thank you all so much!

Next step, fascia is all on, I had to make a "clamp run" and buy 60 more clamps to finish the job!  We are truly in "clamp city" at this point!  The process is fairly simple butter up the fascia, line it up, and then use some material on the outside to clamp it firmly in place.  I got the extra clamps so we could do this all in one shot today.

These will get 24 hours to dry, then they'll be trimmed to fit exactly and any fill around the edges will be added.

20190725_15175620190725_15181520190725_15401520190725_15402420190725_18101220190725_181035


Attachments

Images (6)
  • 20190725_151756
  • 20190725_151815
  • 20190725_154015
  • 20190725_154024
  • 20190725_181012
  • 20190725_181035

Gunrunner John, all I can say is Wow, your hours of labor, your helpers time and expertise have really paid off. Amazing creativity, and as time moves on your going to have a lot of fun running your trains. Folks getting ready to build a layout should start on page 1 as this is a fantastic story, a true Journey, Pictures and Ideas In layman terms, easily understood, all backed up with beautiful pictures. One thing for sure, with your knowledge of electronics, I’m sure your going to have a working signal system, a great track plan, and a lot of fun in your man cave. Thanks for taking the time to share your cool ideas with us, your forum friends. Happy Railroading 

That be some serious clampin'.


clamp1 |klamp|

noun

a brace, band, or clasp used for strengthening or holding things together.


clamp

• an electric circuit that serves to maintain the voltage limits of a signal at prescribed levels.

verb[ with obj. ]

fasten (something) in place with a clamp: the sander is clamped onto the edge of a workbench.

• fasten (two things) firmly together: the two frames are clamped together.

• hold (something) tightly against or in another thing: Maggie had to clamp a hand over her mouth to stop herself from laughing.

• maintain the voltage limits of (an electrical signal) at prescribed values.

Only two types of adhesive were used for the whole project, Titebond 3 glue for joints on the main plywood deck and Loctite PL 3x Construction Adhesive for all the fascia work.  What you see is the Loctite on the fascia boards.  Nothing special at the ends, when the glue is totally cured (24 hours), there may be some minor fill at some of the joints.  I'll see tonight when I take all the clamps and support boards off the fascia.  Although you can't see it, there's a stripe of glue right next to the end which will hold them down solidly.

Last edited by gunrunnerjohn

The overhanging curves really cannot be confidently attempted with any common plywood such as CDX,  peg board,  Pine  or 3 ply entry  level budget panels.  They are all subject to going potato chip on you and will warp the edges.  

Many people overlook how foundational reliable benchwork is yet they put thousand dollar engines on something that could only qualify as a temporary holiday project.

There are a couple of OGR advertisers who may provide stand up custom benchwork.

The benchwork photos of some other work posted earlier have no screws, only adhesive & sometimes tacked with 18 ga. brads.

The tubes of adhesive are from HD or Lowe's  they are premium polyurethane Loctite at approx. $7.50 per tube.  Do not spill it on anything you do not want the adhesive to be permanently attached. 

Bunches of different style clamps are necessary.


richs09 posted:

I use titebond III for almost all of my woodworking -- good stuff.  Any reason you didn't also use that on the fascia boards instead of the loctite (no criticism intended - just curious)?  Ease of application?

Titebond III needs to be FIRMLY clamped and in 100% contact with the surfaces to bond.  The Loctite construction adhesive can span gaps and still provide a very solid bond.  Typically, I see Titebond III on flat surface, not on something like curved fascia where you're almost certain to have at least some small gaps.  For the fascia, the construction adhesive was a better choice.

Richie C. posted:

Will the fascia extend above the level of the layout ? 

No, exactly level with the surface when I get done trimming/sanding the top to be level with the Homasote.  That comes after the clamps come off and the adhesive is 100% set.

As you build to a finished surface you want each new layer to fine tune the last layer.  As in walls, floors, ceilings and benchwork.  The Loctite adhesive can dry hard and hold up to a 3/8" void.  The runout on the studs and first layer can be less than absolutely perfect in a spot or two. 

If you pull the fascia on over the adhesive and allow the adhesive to settle out irregularities yet not compromise any grab you have the best of both worlds.  On the same token you must use a firm backing plate or the clamp may push in a dimple into any local shallow spot or even make a shallow spot by pushing out the adhesive.  Tom Thorpe

Last edited by Tom Tee

Add Reply

Post

OGR Publishing, Inc., 1310 Eastside Centre Ct, Suite 6, Mountain Home, AR 72653
800-980-OGRR (6477)
www.ogaugerr.com

×
×
×
×
Link copied to your clipboard.
×
×