


Unfortunately don’t have one to send. Wish I did
Probably just as well Bob, I'd just crash it trying to get the video. ![]()
![]()
Yes flying inside might not be the best idea but it would look great
Watching ...
Looking good, John!
Peter
Thanks Peter. Got the rest of my switches in from Ross, just have to find time to make more progress, this is a busy time and lots of other stuff is popping. I don't know how other folks get anything done after they retire, I'm busier now than I ever was! ![]()
John,
I think this is part of the trap, we work to retire then realize it is a swap from a career to home, hobby, family, friends and Mother Nature :-p
Made some progress on one end of the layout, go a bunch of track and eight switches laid in. I don't know why I thought this would go quick with 22 switches and over 400 feet of track, but it's sure taking longer than I had originally anticipated! I like the fact that I can cut flex track to size, brings me back to the tubular track days. OTOH, it ends up being more time consuming and it's really easy to screw up. I also found out, to nobody's surprise, that the paper plan doesn't always work when you actually get track in hand! I've had to get a bit creative in a couple of places, but over all I'm happy with how it's coming.
This section was all cleaned up and with the arrival of my remaining switches, it's all in place.

A view from the end.

This is the workshop end, the rail at the edge is my maintenance siding, that's where I'll put stuff on from the bench for testing and drive it out onto the layout.

Attachments
Images (3)
Hey John,
I like the "drive-up" service center. Filler up with water, "black diamonds", earl ( as Norton alias Art Carney used to say) and wash the windows! Looks good!
John
Inching along... ![]()
And you haven't finished the landscaping yet??![]()
Great work John, looking good. It seems like everything to do with trains takes longer than anticipated. Maybe it's just because when you're retired, "There's no rush!" ![]()
Rod
Hey John there ya go ! look's great so far. Flex track is great, but it definitely takes a lot longer to lay down then standard track. OTOH you have a lot more flexibility.
Alex
Yes, Alex, I had a lot more flexibility, that was part of the problem! ![]() One issue with flex track it's so much easier to create a paper plan that won't actually work in reality, and it's not that obvious until you are physically placing track! Several places I found that due to the placement of my switches and the models used, my turns were too tight. I'm shooting for a bare minimum of O72 anywhere on the layout, so if they work out to be less, I had to rejigger the plan to make them work.
One issue with flex track it's so much easier to create a paper plan that won't actually work in reality, and it's not that obvious until you are physically placing track! Several places I found that due to the placement of my switches and the models used, my turns were too tight. I'm shooting for a bare minimum of O72 anywhere on the layout, so if they work out to be less, I had to rejigger the plan to make them work.
@modeltrainsparts posted:And you haven't finished the landscaping yet??
All I have to say to this is...

Attachments
Images (1)

Looking good, John.
Thanks Pat, baby steps, but we'll get there.
Lookin' great, John.
@gunrunnerjohn posted:Made some progress on one end of the layout, go a bunch of track and eight switched laid in. I don't know why I thought this would go quick with 22 switches and over 400 feet of track, but it's sure taking longer than I had originally anticipated! I like the fact that I can but flex track to size, brings me back to the tubular track days. OTOH, it ends up being more time consuming and it's really easy to screw up. I also found out, to nobody's surprise, that the paper plan doesn't always work when you actually get track in hand! I've had to get a bit creative in a couple of places, but over all I'm happy with how it's coming.
This section was all cleaned up and with the arrival of my remaining switches, it's all in place.
A view from the end.
This is the workshop end, the rail at the edge is my maintenance siding, that's where I'll put stuff on from the bench for testing and drive it out onto the layout.
Looks good John.
Two questions....
1- What happened to the second level shelf on the left? Did I miss a post?
2- I would have expected the service track to make a right turn and land the trains right at the bench ![]()
Stick a couple of buildings in the middle and call it scenery. We will not pass judgement. ![]()
Bob
Looking forward to seeing a locomotive testing the trackwork. Use the one most likely to derail. Do you have a finnicky steam locomotive to run?
Ron H
@RSJB18 posted:Two questions....
1- What happened to the second level shelf on the left? Did I miss a post?
2- I would have expected the service track to make a right turn and land the trains right at the bench
After considerable thought and consideration, I realized that my plans for that would really not work out very well. Any scenery for a town that was placed that far away would be pretty much lost when you're viewing it from 12-13 feet away. Besides, with the lack of space for sidings, I decided that maybe a three-track siding back there made more sense. ![]() The three tracks in pink replaced the shelf.
The three tracks in pink replaced the shelf.
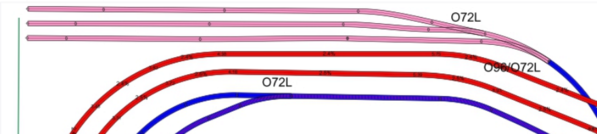
As far as the track to the bench, I figured the track in front of my side bench and cabinet would probably not have been all that functional. ![]()
![]()
@Ron H posted:Looking forward to seeing a locomotive testing the trackwork. Use the one most likely to derail. Do you have a finnicky steam locomotive to run?
Ron H
Does a bear do his business in the woods? ![]() I'm sure I can rustle up some temperamental locomotive for the test.
I'm sure I can rustle up some temperamental locomotive for the test.
Attachments
Images (1)

@gunrunnerjohn posted:After considerable thought and consideration, I realized that my plans for that would really not work out very well. Any scenery for a town that was placed that far away would be pretty much lost when you're viewing it from 12-13 feet away. Besides, with the lack of space for sidings, I decided that maybe a three-track siding back there made more sense.
The three tracks in pink replaced the shelf.
As far as the track to the bench, I figured the track in front of my side bench and cabinet would probably not have been all that functional.
Does a bear do his business in the woods?
I'm sure I can rustle up some temperamental locomotive for the test.
One can never have enough sidings. Wise move.
It looks great, John!!
John, Your track work is easy on the eye. Nice eye candy.
You're getting there, John. It's going to be fabulous.
Looking good!
I see you used curves switches with a continuing curve on the inside route that I assume is O-72. I had allot of issues with these situations where I matched the O-72 line I scribed on the table, only to find out I needed a little bit more relief for the curve radius when transitioning to the switch and off of it. I tested a few of bigger engines but not all of them, where I found the conflict later on. Definitely encourage you to try your all your big engines in these places for these situations.
@Tom Tee posted:John, Your track work is easy on the eye. Nice eye candy.
It's supposed to be train candy Tom! ![]()
@Phil McCaig posted:You're getting there, John. It's going to be fabulous.
Someday... ![]()
@Hump Yard Mike posted:Looking good!
I see you used curves switches with a continuing curve on the inside route that I assume is O-72. I had allot of issues with these situations where I matched the O-72 line I scribed on the table, only to find out I needed a little bit more relief for the curve radius when transitioning to the switch and off of it. I tested a few of bigger engines but not all of them, where I found the conflict later on. Definitely encourage you to try your all your big engines in these places for these situations.
Actually, coming in and leaving the curved switch the curves are wider, I just tried to keep it flowing. The curve after the exit is right at O81, it exactly matches the O81 Atlas curve. Going into that switch, there is 18" of almost dead straight track. I didn't have a choice about the O72-096, it was the only thing that would do the trick in that space. I looked at the larger curved switch, but it was way out of hand for the space I have there. There is no curve anywhere that's less than O72. I tried to keep things in the 80-90 range. I have some O81 & O90 atlas sectional track that I use to judge what I'm bending.
Not to say I won't have issues somewhere, with this much track and that many switches, I'm bound to screw up in a place or two!
John, I have enjoyed seeing the progress. That's impressive bench and trackwork!
I like your service track arrangment. That's a good place to confine those initial test runs when a repair comes in. I've sometimes made the mistake of letting some rather filthy customer repairs from the store track crud over my whole layout.
With all that track and potentially hard-to-reach locations, how are you planning to handle track cleaning?
@GregR posted:With all that track and potentially hard-to-reach locations, how are you planning to handle track cleaning?
Uh oh, here's a possibility for another 26 pages.![]()
john
you have a lot of columns in your basement.
John,
Alex M. had a nice industrial area on his last layout on the island. Perhaps he could post or share that design with you for the siding space. Did you get any photos at the open house?
Yes GRJ....your scenery seems to be lacking...lol. OTOH...your layout will be quite worth it once you can get the consists running...keep rockin!
I may be mistaken but I think that after we cut a close tolerance round hole in the plywood and the Homasote we determined that the columns were decorative. Oh well...
Nice!!
Yep, I could have chopped those columns down, but When looking at the floor, I'd have had to do something about the rug and the Pergo floor, the column intersects there. That would have been messy, I don't have any of the flooring or rug, so they stayed. Actually, I'm thinking the one that's closest to the left side I may actually cut a road through it for some scenic relief, I think that would look cool. They'll also get some sort of decoration, maybe I'll make them into giant redwoods. ![]()
@GregR posted:With all that track and potentially hard-to-reach locations, how are you planning to handle track cleaning?
Track cleaning? What's that? ![]()
![]()
@Lehigh74 posted:Only 2.
Well, technically, two and two halves.

@redjimmy1955 posted:Yes GRJ....your scenery seems to be lacking...lol. OTOH...your layout will be quite worth it once you can get the consists running...keep rockin!
Yep, I had this silly idea of getting the track all in place first. ![]()
Attachments
Images (1)

JOhn
Track work coming along nicely!!! You are so right about the flex track taking more time but after its laid in place its worth the effort. Hopefully you have someone to help as a second set of eyes and hands surely helps.
Wish I was closer for some help as my dremel has been idle for some time now.
Steve
Yep, I have a friend that was here and is coming back on Sunday, hopefully we'll have more progress to report. It's sooooo much easier with two people, especially when one of you is up on the layout screwing down track.
With the combination of the Dremel and my trusty 6" cutoff saw with the aluminum oxide cutting blade, we can make short work of cutting track to size. I'm am ending up with a lot of 3-4" pieces of track, somehow you can never plan all the cuts to use everything. ![]()
@gunrunnerjohn posted:I may actually cut a road through it for some scenic relief, I think that would look cool. They'll also get some sort of decoration, maybe I'll make them into giant redwoods.
Great Idea!!!
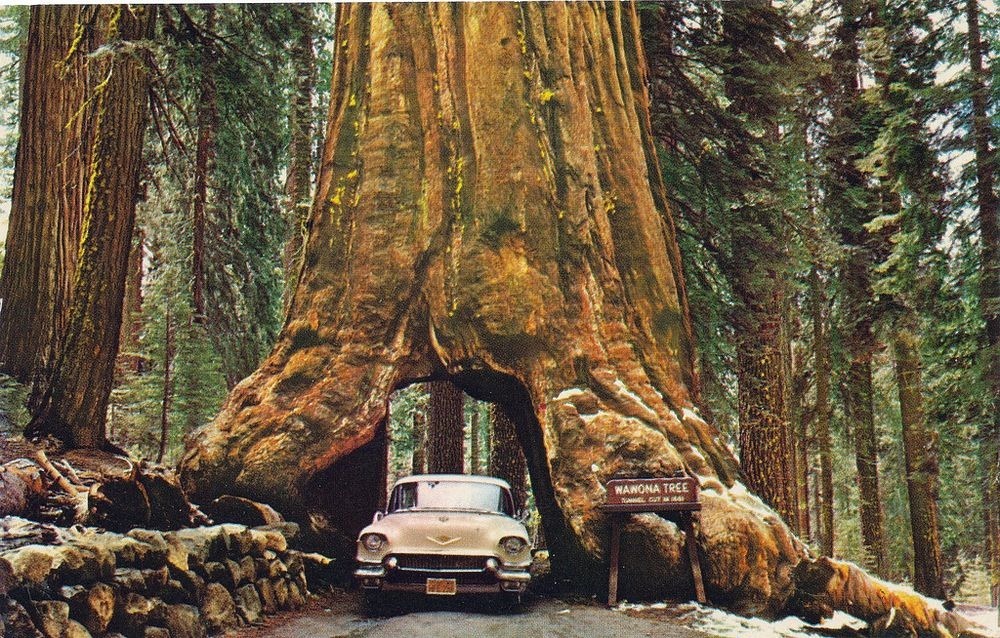
That's the idea Ron, and mine won't be closed to traffic like the one you picture is now. ![]()


I have a little awl and reamer that I open them up. I try to not get carried away so the pins still fit tight.
using a slip switch. . . I know you love wiring. The one I wired required two DZ- relays.
If you come up with a better wiring diagram .. please share!
Nope, I'm planning on two DZ relays for my two double slips, only way I see to power all the pieces. They're going to be the most wiring intensive part I suspect. With switching the powered rails and non-derailing on all the entry points, it'll be a busy section right under those two! ![]()

Attachments
Images (1)

Wait a minute!! Am I understanding correctly that these columns are DECORATIVE????
That drill trick to clean out the burrs inside a cut rail came just in time for me. I just finished laying all my track!! 🤪
I have used an awl and a sharp tapered punch tip but the drill is much quicker. Only go in half the length needed so there is still a good squeeze on the pins. I seem to have a batch of N.O.S. GG track that has tighter I.D. than my last batch.
Double slip wiring. Wired as if it was two switches.
Edit / add: As you work a curve, with flex track, the three rails will be different lengths. Adjust/cut as needed.
@Mark Boyce posted:Wait a minute!! Am I understanding correctLt that these columns are DECORATIVE????
My question as well. Short work for a Sawzall ![]()
@Mark Boyce posted:Wait a minute!! Am I understanding correctLt that these columns are DECORATIVE????
That drill trick to clean out the burrs inside a cut rail came just in time for me. I just finished laying all my track!! 🤪
Mark:
I use a small Phillips screw driver that fits the hole in the rail.
As I explained earlier, even though the columns are decorative, removing them would require work on the wood and carpeted sections of the floor, neither of which I have extra material for. It just didn't seem worth it to rip them out when it's actually kinda' cool to have them to build around.
You could paint them green and call them beanstalks
I'm thinking more along the lines of giant redwoods. I just have to find someone that can paint convincing tree bark on them. I'm considering a road through the one nearest the walkway, that would be a cool touch. ![]()
A trick we used to do when selling homes with small rooms was to use a flat wall paint color called Ivory Linen. It is like slightly aged piano keys. Interior decorators used this for staging small room homes because the eye does not readily focused on that color. The walls became visually recessive. Used the same color in enamel for the wood trim.
However in reality I found the John's columns to be a non issue when working on the layout.
As I mentioned earlier, Johns RR has a lot of what I call eye candy. Any one descending into the train room is first greeted on the landing with a wall filled by scores of beautiful engines. Then after a 180 degree turn this overwhelming RR empire strikes you. There is this very interesting track arrangement mounted on the grey roadbed framed by meandering bench work which could appear as a growing organic entity expanding and embracing the columns in a very nicely finished rec room, it all becomes a stylistic complement. Once the third dimension of the second level is finished there will be an increase in definition. The ascending grade wrapping around the back side adds topography to the valley of the scene.
I guess a good question for John would be what kind of comments do visitors have? Both RR people and non RR people. Outsiders perspective may provide an interesting insight. We all may be making too much of the columns.
IMO, this is a project any one of us would love to have.
Well, I have to say, many of the rave reviews have been for the benchwork, and I can thank Tom for pushing me in that direction. A number of people have come over just to see how that was done and were planning on looking into enhancing their layout with curves like mine.
Hey John,
Put a bunk bed and a hotplate down there, and there will be no need for you to ever go upstairs again. :-)
You been talking to my wife? She keeps saying that! ![]()
So, how does one get A table built by these professionals?
John, I totally agree once you had the room with the columns all the hassle, mess, and attempt to close in the flooring and ceiling to look like the column wasn't there is not worth it even if you wanted to do it. I just never heard of decorative columns in a house. I guess I am just used to columns being in the way no matter what a person wants to use the room for. I'm afraid I am in the 'Crappy Basement Layout' league. I was never sure if the basement was crappy, the layout was crappy, or both. ![]()


@Mark Boyce posted:John, I totally agree once you had the room with the columns all the hassle, mess, and attempt to close in the flooring and ceiling to look like the column wasn't there is not worth it even if you wanted to do it.
My original layout plan stopped just short of the columns, so I figured they might support a backdrop of some kind. However, someone came in and talked me into an extension that went beyond the columns! ![]()
![]()
@Mark Boyce posted:I just never heard of decorative columns in a house. I guess I am just used to columns being in the way no matter what a person wants to use the room for.
I was a bit surprised to find they were decorative, I actually expected them to be functional. However, since this place is truss construction, the spans are not a problem, and the columns are totally hollow. I briefly considered hacking them off, but then decided against it. I'd also have to consider how stupid the half-columns would work without these still standing. Also, I just didn't want to have to project of removing them and cleaning up all the issues they left behind...
Considering the recent spike in lumber prices that seems like a rather small stack of money.![]()
Good point Tom, let me finish counting here...

Humm...sitting in that position...that pile of gold bricks...begs the question...did he just produce that pile?
I'll come out of retirement to build a layout for him!
If he's pxxxing gold bricks, I want to get to know him! ![]()
@Mark Boyce posted:I just never heard of decorative columns in a house. I guess I am just used to columns being in the way no matter what a person wants to use the room for.
Mark, a pair of columns either smooth or fluted are a common design demarcation between two different living ares in today's homes here in this area at least.
Usually we RRers have to contend with concrete filled 4" support columns. I have one in the middle of one set of whisker tracks.

Another column was used to mount light switches:
Attachments
Images (2)
Yes Tom, what you have is what I am used to. Half our basement level is garage, with a column like yours between the two car stalls. A lot of houses have columns in finished basements.
A little more progress yesterday. Got all the switches and track back in place on the lift-bridge and finally made the cuts and allowed the bridge to be free! Also laid the inner loop on this part of the table, but still have to add the passing siding, the switches are hanging in space now. Had to order another case of Gargraves track, I'm running out and still have quite a lot of track to lay. ![]() I counted up ordering exactly what I need, but since individual pieces cost more, it only costs about $30 to do the whole case and have some left over.
I counted up ordering exactly what I need, but since individual pieces cost more, it only costs about $30 to do the whole case and have some left over.
A view I haven't seen for a while, the liftbridge can be raised now! ![]()

All the track on the liftbridge has been nailed down (OK, screwed down) and cut to allow bridge operation.

The inside loop is now complete, just have to add the passing siding at the far end inside the 3rd track.

Attachments
Images (3)


well done John!
Nothing is so easy as the job you imagine in your head.... Oh, I can do THAT...
Really taking shape now, John.
Datza nice![]()
![]()
![]()
![]()
Every new section I find that the paper plan is only a reasonable facsimile of what actually gets put on the table. Funny how all the stuff on the paper never fits like you think when you start actually laying track. ![]() This is the first time I actually tried to use a layout program, and I have mixed feelings. On one hand, I did get what looked to be what I wanted on the paper, so that was the good side. However, when I start laying track, I found out that a lot of the stuff that looked good on the paper didn't exactly work out in real life. I've gotten somewhat more cautious about assuming that my paper plan is all going to work out. In the places where I was using O72 sectional track... it didn't really work out at times. When one of the first track loops deviates from the exact shape of the plan, the ripple effect is enormous, and you end up changing a lot of other stuff, if only a bit, to make everything come out as you planned.
This is the first time I actually tried to use a layout program, and I have mixed feelings. On one hand, I did get what looked to be what I wanted on the paper, so that was the good side. However, when I start laying track, I found out that a lot of the stuff that looked good on the paper didn't exactly work out in real life. I've gotten somewhat more cautious about assuming that my paper plan is all going to work out. In the places where I was using O72 sectional track... it didn't really work out at times. When one of the first track loops deviates from the exact shape of the plan, the ripple effect is enormous, and you end up changing a lot of other stuff, if only a bit, to make everything come out as you planned.
So, if I had any advice for someone doing a new layout using a track planning program, I'd say either follow the plan to the letter or plan on alterations all along the way. I think the "flexibility" of flex track is the Achilles Heel of of using a track planning program. The ability for the program to "smooth" the track makes it look better than it is. Also, it's easily possible to end up with sharper curves than you intended that look "fine" on paper until you try to put the track down.
This is the biggest layout I've tackled, so it's been a learning experience all along. The journey continues... ![]()
The track looks smooth, John! I found the same issues using software for a track plan for the first time. Since I only looped twice around, and left plenty of room between track for grades and scenic features, I didn't have much of the ripple effect, but I do know what you mean. My plan only called for flex track at key points where things didn't quite fit with sectional, and it all worked out. Of course my plan has only a fraction of the track yours has.
How do you like the Mianne lift bridge? What is the headroom clearance? I am assuming you only have it raised partially or you layout is higher than I thought.
Awesome work John. Very motivating for me to get my behind in gear!!!!
Joe Gozzo
Mark Boyce - I own a Mainne Lift gate and love it. One word of caution to note. My table is 36" (actual leg length to bottom of table) and my lift gate does NOT go up anywhere near high enough for my 6' tall body to walk under. My wife who is 5'6 has hit her head because she is just a tad too high. I installed Foam Pipe Wrap on the three beams on the gate as HEAD Protectors. The height of your table is going to dictate how high it can go up. The slides are the similar to those on cabinet drawers. Hence if they are 36" long and have to overlap by 8-10" you do not get 6'. If your table height is 48" you just added over a foot to the raised height. Overall I love the gate and would not trade it. My one complaint is the short cord used to go to the control. If your gate is wider than a foot you can't reach it from both sides. Hence why John and others installed switches. I also will be installing switches.
@Mark Boyce posted:How do you like the Mianne lift bridge? What is the headroom clearance? I am assuming you only have it raised partially or you layout is higher than I thought.
The top of the layout table is 41" and the clearance under the liftbridge is 62" from the ground. Yes, I have to duck a little, but I don't have to crawl!
@Trainlover160 posted:Awesome work John. Very motivating for me to get my behind in gear!!!!
Great, it's a race! ![]()
John! That’s great news. Glad you’re getting a place to play.
Marty, I just had to stop spending all my time on repairs and upgrades and take a little time to do work on the layout. Still quite a ways from running trains, there will be a lot of wiring coming next!
Curtis and John, I thought it was low. I agree it is better than a duck under or crawl under. It could be what John Armstrong called a nod under. Yes, switches on both side are a must. Thank you!
John, You have discovered the short coming of track planing programs. Ya done good quite soon! It took me several layouts to walk away from them. They are OK for a basic island multi looper but industrious efforts bring out their limitations. Using spiral easements on all curves of any degree needs hands on touch, templates and trammels for large intricate pikes where there really is no room for error which can Domino the right of ways.
@Tom Tee posted:John, You have discovered the short coming of track planing programs. Ya done good quite soon! It took me several layouts to walk away from them.
Yep, being somewhat of a computer geek and using my computer for many tasks, this looked like a natural. It was actually very beneficial in any case, just not the do-all solution I was expecting. Actually, my Fastrack plans usually worked out right on the money, because every piece was a fixed size and curve. Throw in all the variables of flex track and the plan goes out the window.
I realized after the first track sections were laid that I was going to be doing a lot by the seat of the pants. I'm sure I don't have near the fine track work that you produce, but I can see that it's very difficult to capture all the little nuances of track work exactly in the program without a ton of work. I'd rather put that work into actually getting the track down.
I'm still stunned that from what I started with for my original plan how this mushroomed into what I have now. I probably have twice the track and switches that I ever expected to use.
John.... I but I like your repairs. With MTH demise and my obsession with MTH, I’ll “NEEEED” you. But yup, better to play!
Well, there's just a little extension of the time to turn some repairs/upgrades around. I'm waiting on parts for weeks now for several upgrades, and with the holidays and lots of family stuff, it's been slow slogging the last few weeks. I also am resolved to get trains running soon, that will probably actually help the repair work, I'll have a real test track!
Gotcha, my early sketches had about two dozen switches and as of Thanksgiving I just hit 110. However do not sell yourself short, anyone can lay nice right of ways in 0 flex. GG flex can be a real challenge for many to lay out smooth transitions and fixed curves.
When I said your layout is like eye candy it is primarily because of the flow of your track laying and turnout selection and placement.
Tom, you're simply out of control, I think you're trying to pave the whole basement with track. I suggest you at least leave a path to walk on! ![]()
![]()
John I’ve thoroughly enjoyed following along. Your construction and track work are top notch (I know Tom played a big part, but so did your skill). Getting the track work right is key to enjoying your layout.
Andy
John, Nice to see your progress! This is looking like a super start, now on to the wiring.
I’ve enjoyed watching the progress on your layout. We purchased a new house with a finished basement around the same time you did, so I’ve been keeping close attention on your posts and picked up many tips for mine by watching yours.
I already had most of the track, but it’s Fastrack. Since Fastrack is rigid, I had the opportunity to somewhat reverse the method of construction. I’m a layout building rookie, so I didn’t know if my initial plan would work how planned. So, I picked up a 4 ft role of brown paper and taped it down to the concrete floor. Then built and heavily modified the track layout on top. Followed with wiring and locating the buildings. Even built the modules for the elevated sections.
I am now testing the layout with various trains for the holidays to insure proper clearances and wiring. In January, the temporary layout will be disassembled, but not before tracing out the entire layout, marking each piece and wire location. I will then have a full size template to build the benchwork.
I will be building my own since I have a fairly equipped woodworking shop. Just need to finish the walnut bedside tables that were promised to the wife for Christmas.
@gunrunnerjohn posted:Marty, I just had to stop spending all my time on repairs and upgrades and take a little time to do work on the layout. Still quite a ways from running trains, there will be a lot of wiring coming next!
John, I'm glad to see you doing something for yourself. Now i think it's time for me to follow your lead and get back to my layout. A little less on upgrades and repairs and more enjoyment for myself, only thing is we most likely will soon be empty nesters (one or two years ). Won't need this large home any longer . So as i build it will be bittersweet for me, i won't go crazy because it will only have to be dismantled.
Your track work is looking fabulous !
Alex
Thanks guys, I'm hoping to FINALLY be able to run trains at home on a decent sized layout. ![]()
Alex, that's a bummer that you have to take it apart again. Are you building it in a modular fashion so it's easy to disassemble? I can assure you, mine is NOT modular, large hammers and a couple of Sawzalls will be required to get this layout out of the basement! ![]() I don't plan on moving anytime soon, and I'm pretty sure this is the last layout I'll be building.
I don't plan on moving anytime soon, and I'm pretty sure this is the last layout I'll be building.
@gunrunnerjohn posted:Tom, you're simply out of control, I think you're trying to pave the whole basement with track. I suggest you at least leave a path to walk on!
Guilty as charged.
"I suggest you at least leave a path to walk on!"...That is exactly what I have left. Paths. The basement now is pretty much full of free form finger modules forming puzzle paths. Even my modules have grown modules. However the nice thing is that there are no duck unders for running trains, total stand up walk around, and I do mean walk around. I believe this layout could keep at least six people busy operating.
Due to repeated casts I have been using a knee scooter to get around. Duck unders were out of the question.
I think I may be subconcsiously building endless benchwork to avoid starting scenery. ![]() Have not done serious scenery in half a century.
Have not done serious scenery in half a century.
John, your RR is an example of what could be a wise goal of most all layout builders. A sensible balance of layout size to room ratio, ease of operation, full visibility, and total access.
A posters comment I am looking at seriously. Could a drone be used to film a large layout?? Could a good operator be able to maneuver a video drone around a basement layout with an 8' ceiling?
Gotta run, just got in the rail joiners from Justrains that I needed for my 3 rail Atlas track on my 5th level subway layout. Something for the neighborhood kiddies to run if we ever get to having visitors again.
Tom, my ceiling here is 7 1/2 feet high and the layout top is 41" high. I'm sure someone could fly a drone in that 4' space, but it ain't me! ![]()
@gunrunnerjohn posted:Thanks guys, I'm hoping to FINALLY be able to run trains at home on a decent sized layout.
Alex, that's a bummer that you have to take it apart again. Are you building it in a modular fashion so it's easy to disassemble? I can assure you, mine is NOT modular, large hammers and a couple of Sawzalls will be required to get this layout out of the basement!
I don't plan on moving anytime soon, and I'm pretty sure this is the last layout I'll be building.
It's not really modular , but it will be quite easy to dismantle when the time comes. One thing is for sure, my next home will make certain for it to be the forever home and the layout will be the last one too. Next move will be our fourth, getting tired of lugging everything from home to home lol. I've actually spent some time in my layout room the past two weeks, made some changes and was able to make some progress. Hoping i can enjoy this current layout for two years.
Alex
Alex, where's your layout progress thread? ![]()
@gunrunnerjohn posted:Alex, where's your layout progress thread?
I will post on it right after the holidays, want to get a bit more done. Most likely two weeks
Alex
I'll look forward to it. ![]()
Gunrunner John, your layout is looking so good, it’s a lot more work, thinking, planning than a lot of folks can imagine. Your trackwork is great, I used Gargraves a little bit, mostly Atlas O and ross custom track and turnouts. I did use Ross’s pre curved track because I’m not good at bending gargraves track. My smallest diameter is 072, largest 0120, I just had to watch for clearances, using the inter-modal cars and the VL GG1’s for heights, and kept a 2 percent grade. Yes, soon you are going to love running those larger scale Big Boys and Challengers on your layout, it’s a great time to be in the model railroading hobby. Thank you for making this fun to read thread, your ideas, model work is amazing. Happy Railroading Everyone and Merry Christmas.
I am looking forward to seeing my big iron chewing up the track. ![]() It's been quite a while since I could actually run something large at home, I used to have to pack them up for club runs. Someday soon... I'm starting to get the hang of Gargraves flex track, but I don't hold the ultra precision that some do, I am just shooting for wide enough curves and no big kinks in the track. If it looks good and everything runs good, trackwork is done.
It's been quite a while since I could actually run something large at home, I used to have to pack them up for club runs. Someday soon... I'm starting to get the hang of Gargraves flex track, but I don't hold the ultra precision that some do, I am just shooting for wide enough curves and no big kinks in the track. If it looks good and everything runs good, trackwork is done. ![]()
I will say, this being larger than anything I've attempted before, it is a butt-load of work, and it's not nearly done yet! Wiring is still to come...
Things slowed down for the holidays, but I have started to make a little progress. I have all the main level track in place with drops for power dangling under the table. I also decided to use the CSM2 breakout boards for the DZ-2500 switch machines, so I'm waiting on twenty-odd boards to come in to get those underway. With the switches wired and the power drops in on the main level, I was able to put the second level deck back in place, it's just propped up right now, working on the permanent supports, trying to make them a bit more attractive than plain wood. Some changes in the exact track position have made the supports more "interesting" to do, there'll have to be some creative solutions in a couple of places.

I was mulling over the turntable idea I had, but the 32" one I was considering was a non-starter, no way I could possibly fit it in. However, just for fun, I found the Atlas 24" one, and it will actually fit in. Takes up a big chunk of the one end of the table, but I'll have my TT. Of course, this is changing a bit of the track I had already completed, there's always that issue that crops it's head.
I know it's a low-cost TT, but with the little motor drive fitted, it actually works better than I expected, the alignment is more consistent than I would have imagined coming from either direction. It's also very easy to install since it doesn't have the recessed pit that would have required me to tear up a bunch of the benchwork below and brace it for the hole for the pit. I think it'll be a fun addition to the layout, and it looks like I can park a bunch of my smaller steam and some diesels here, that will be nice. The power for the TT, whisker tracks, and TT control will all be controlled by manual switches and also through some Lionel SC-2's so I can command control it from the remote. Someone complained that the Atlas TT had trouble swinging a heavier locomotive, so I plopped my battery powered camelback on it. While the camelback wouldn't be that heavy, the three pounds of batteries add to it's "heft", so it's actually as heavy as any of my smaller steam and a lot heavier than most of the diesels. The TT had no issue at all swinging that. As many others have said, I took it out of the box and in about ten minutes the motor drive snapped the installed belt, that had been on there since manufacture and had obviously dried out a bunch. I'm going to round up the recommended Danko O-ring as a replacement for the remaining belt I have installed now, I have no idea how long it'll last. (Note the picture is still the hand crank).


Another brainstorm popped into my head in looking at my three hidden yard tracks, there was a possibility of adding about 30" to each of them. Can't have too much yard space, so I made a little lift-out panel and it'll get the track extensions. I needed it to lift out to be able to freely access the sump pump box under it in case (or rather when) I need to deal with any sump pump issues. I just used four dowels glued into the 3/4" panel to align it exactly to the main table surface, it's ready for some track.

Attachments
Images (5)
Some of my brainstorms turn into Cat 5 hurricanes John ![]() Better be careful!
Better be careful!
I like the TT and added yard space is always a plus.
Bob
John is that tt the old one or the new one. Just wondering if the new one has the same problem with the o ring as the old one
@RSJB18 posted:Some of my brainstorms turn into Cat 5 hurricanes John
Better be careful!
I like the TT and added yard space is always a plus.
GAD! If I have a CAT 5 Hurricane, I won't have to worry about the layout! ![]()
![]()
I am looking at how I'll link in the TT now, I think I have the one lead figured out from the side next to the bridge. I just have to move a switch and I can get enough straight lead before the O72 curve to insure I get lined up with the TT bridge. I was contemplating a second track out the other side to that connection, that allows an engine to drive out of the TT and go either way on that track, that would be a nice feature. Getting enough straight lead at the TT seems a bit more problematic on that side, so it may or may not happen. Of course, I can always back the train out and accomplish the same directional running, so I'm not going to stand on my head to get a second lead out of the TT.
@trainbob posted:John is that tt the old one or the new one. Just wondering if the new one has the same problem with the o ring as the old one
It was NIB, but I have no idea how "new" it is. The supplied O-rings are still a square profile, so I suspect that didn't change. I'm going to get over to Ace Hardware, they have the Danko 35747B # 33 O-ring that seems to be the best replacement, I'll get a few of those to be ready for the next belt breakage.
You can tell by the product number the old one is 6990 I think
Mine is Atlas #6910, so is that the new or old? I'd think the lower number might be the older model.
Finished the yard extension, track and drops added. Over eight feet of new yard track from previously unused and wasted space. ![]()
On to the TT install, that might take a bit more time!

Attachments
Images (1)
That turn table is cool! I didn't know there was a 24" version.
Great to see things coming along!
Just checked the train world website and the new number is 6999 so you have the old one
I hadn't considered the little one, I was fixated on being able to swing the Challengers, Y6b, and Big Boys, but that ain't happening on this layout. ![]() Since playing with it, it's not half bad for a couple hundred bucks. It's no Millhouse TT, but then that would have been about 10x what this one cost!
Since playing with it, it's not half bad for a couple hundred bucks. It's no Millhouse TT, but then that would have been about 10x what this one cost! ![]()
I have made it up page 14 and am now totally intimidated. I have plans for simple two loop(O72 and O84) on a 3 section table 8.5 x 16 feet total bolted together with inside space for a 24 inch turntable and 7 stall roundhouse that I crudely started building over 30 years ago as well as multiple switching tracks. It will be built in a garage bay with help from my carpenter and will be simplified at every step as much as possible. I plan on half inch plywood with foam board on top and trim around the edges to protect the foam. I found the rounded corners to be a good idea. I was going to use modified Super O but have decided to go with Ross and Gargraves. I am going to use John Brennan's method of ballasting using N scale cork to get the proper slope. I plan on using hand throws in the yard to simplify wiring. I run conventional with a ZW, two KW'S, and two LW'S. The one thing I cannot do is take four years- I am 73. I would like to be able to run the Big Boy Alex sold me as well as the Challenger although they are too big for the roundhouse- all the Hudsons should fit nicely. I thought I could simplify enough to do this but reading the above has given me pause. I will finish the last 14 pages tomorrow.
Well, I figure I will likely not build another one, so this has to be my "end all". ![]()
Excellent thread John. The turntable is a nice feature, adds a good amount of operational interest. Extending the tracks 30” is a nice add on.
Andy
The new turntable is physically in, all the tracks are aligned and nailed down. No wiring yet, that's yet to come. It's handy that I have one battery powered LC+ locomotive, it was useful in driving on and off to check all the alignment. I'm actually reasonably pleased with the operational aspects of the Atlas 24" TT, it certainly isn't a $2,000 model, but it works pretty well for what it is. Since the maximum size locomotive (including overhang) it'll swing is about 27" (24" or less wheelbase obviously), I made the longest whisker tracks 30" if there was space, no sense in having longer tracks there since I can't get a larger locomotive to them. The short tracks will be great for stuff like the new 0-6-0T switcher, track speeders, and I'm sure I'll park a Wienermobile on one of them. ![]()
![]()

Attachments
Images (1)
Looks great John.
Chipping away Don, there's still a lot of road in front of me before I'm moving revenue freight and passengers. ![]()


@gunrunnerjohn posted:The new turntable is physically in, all the tracks are aligned and nailed down. No wiring yet, that's yet to come. It's handy that I have one battery powered LC+ locomotive, it was useful in driving on and off to check all the alignment. I'm actually reasonably pleased with the operational aspects of the Atlas 24" TT, it certainly isn't a $2,000 model, but it works pretty well for what it is. Since the maximum size locomotive (including overhang) it'll swing is about 27" (24" or less wheelbase obviously), I made the longest whisker tracks 30" if there was space, no sense in having longer tracks there since I can't get a larger locomotive to them. The short tracks will be great for stuff like the new 0-6-0T switcher, track speeders, and I'm sure I'll park a Wienermobile on one of them.
Looks great John. Having a larger variety of power on the layout ready to roll will be a big plus. IIRC you have the ability to turn the big boys on a Y. Yes?
John the layout is definitely coming along and looks great!
It looks great, John!
The BB doesn't fit here. I suppose I can park one really large locomotive on one of the leads to the TT, that's the benefit of having two lead tracks. ![]()
@CBS072 posted:Looking Good, John.
I did not have room for a roundhouse. So I just built the foundation for a roundhouse, long torn down.
Thanks, I like the idea of the torn down roundhouse. I haven't really thought about the possibility of having any roundhouse, but it looks like it would be difficult to fit one in.
You did a fantastic job fitting that whole arrangement into the available space. One time I made the mistake of forgetting to account for the track length taken by bumpers. But I imagine your biggest challenge will be to scratch-build an elliptical roundhouse ![]()
I think the roundhouse might be over the top, that would be a big challenge. One mistake I almost made was not having enough straight track on the leads to the TT. However I remembered our club layout at Harry's place where the engines were hitting the TT bridge sides because the curve was too close to the TT. That meant I had to move the switches for the leads so I could allow at least 20" of straight track leading onto the TT to get the incoming engine aligned with the TT bridge.
I stuffed as many tracks as I could around the TT, I figured even the short ones would be useful for small stuff. I also realize that having engines and rolling stock readily available on the layout is going to be a key requirement, so I'm still thinking on somehow adding additional sidings. I already have the planned future 8-track yard off the current platform, we'll have to see if I can squeeze in a couple more places... ![]()
John,
Have you considered a subterranean yard for storage? Putting several under the layout in elliptical form would give you lots of made up train storage, and leave more track for freight and revenue runs.
I’ve often thought about/wished I could put a turntable on my layout. That one looks like it worked out great for you and the location is ideal. Too bad you need access to the sump pump, otherwise you could have had more 27” long whiskers. The short whiskers will be perfect for handcars and speeders. Excellent that you could have two leads to it. Only drawback is that you don’t have much room left for scenery and structures.
You will also need about a dozen of these.
300-SY Safety Yellow Track Bumper - HENNING'S TRAINS (shoplightspeed.com)
@Ron_S posted:Have you considered a subterranean yard for storage? Putting several under the layout in elliptical form would give you lots of made up train storage, and leave more track for freight and revenue runs.
I thought about it, but with the Mianne benchwork, I would have to do a lot of bracing to get the ramp down to the storage in. I'd have to go about 10" down, and that's a lot of distance for the ramp if I stick to a 3% of less grade!
@Lehigh74 posted:I’ve often thought about/wished I could put a turntable on my layout. That one looks like it worked out great for you and the location is ideal. Too bad you need access to the sump pump, otherwise you could have had more 27” long whiskers. The short whiskers will be perfect for handcars and speeders. Excellent that you could have two leads to it. Only drawback is that you don’t have much room left for scenery and structures.
You will also need about a dozen of these.
300-SY Safety Yellow Track Bumper - HENNING'S TRAINS (shoplightspeed.com)
I am going to use the Atlas O track bumpers, I have a few and I ordered eight more. I'm probably going to need a few more yet. I'm sure I'll be able to stick some scenery around the edges, and there's lots of other real-estate that is still open. ![]()
@Tom Tee posted:If you curve a couple of your opposing long whisker tracks a couple of the short whisker tracks may be able to be made longer. A rotary grinder will make the bridge easier to clear. I'm not one to play by the RR police rules.
The whisker tracks that are short are because they run into the service loop that goes around the area. I'm not willing to hack up the bridge to curve them, but I did briefly consider that. ![]()
John, I know you are planning to use Atlas bumpers. Here is a picture of two types of bumpers that I used on my layout.
One is just a GG tie turned upside down and slipped over the end on the GG track (may work on other brands on track)
And the other is too bend a GG track pin with needle-nose pliers and insert into the end of the GG track.

In this picture the tie is just placed over the GG pins, just to take this picture. On the layout I drive the tie over the end of the track without the pins in the end of the track.
Attachments
Images (1)
@CBS072 posted:John, I know you are planning to use Atlas bumpers. Here is a picture of two types of bumpers that I used on my layout.
One is just a GG tie turned upside down and slipped over the end on the GG track (may work on other brands on track)
And the other is too bend a GG track pin with needle-nose pliers and insert into the end of the GG track.
In this picture the tie is just placed over the GG pins, just to take this picture. On the layout I drive the tie over the end of the track without the pins in the end of the track.
Well, you're going to crack up when you see this. Yesterday I was contemplating how to do this for free, and what I came up with... Yep, I flipped the tie upside down on the rail, and then added a screw for good measure so it won't slide off. Job done for zero dollars spent. Well, I guess the 18 track screws cost something...

Attachments
Images (1)

I do not use the screw in the tie, but have not had a problem with them coming off by the cars wheels.
Some of the slide very easily, I figured the screw was cheap insurance, I have a pound bag of the screws, so I have a few to sacrifice to incidental tasks. ![]()
I added a connection panel that will terminate all the turntable connections. I still have to print out the labels for the connections. The panel has a couple of relays for directional control, AC-DC converter for motor power, so all I need is a contact to ground to rotate in either direction. The switch on the bottom is for local control when I'm tinkering with the TT. When all is said and done, the panel will be hidden by the skirting around the layout.

Attachments
Images (1)

Another minor milestone. The second level is in place and all permanently supported, ready for track! I still have a little work to do on the approach grade, it's still got some of the temporary foam supports in place, but that's coming. I'm pretty pleased with the visibility to the lower level, I have a lot of freedom of what I do to add scenery to support the look I'm trying to achieve.


Attachments
Images (2)
John, what are you planning for scenery to cover that beautiful handiwork?
Mine is for lack of a better word, ugly, so I can't wait to cover it all up. ![]()
I figure on some removable tunnel sections to give some interest to when it's running around the lower loop, but some openings so you can see the train as well. The removable sections are so I can do any required maintenance to track/switches and to grab any errant cars that refuse to stay on the tracks. I don't think I'll be covering the workshop side at all, that will be more ready access to the tracks as well. Besides, my maintenance track is on the workshop side, and it clearly has to be exposed.
The side of the grade ramp will be mostly filled in, obviously the first section where the track goes under to the hidden yard will remain exposed. I'm thinking of some kind of tunnel portal there to make it look like things continue on.
FYI, it probably doesn't look so "polished" if you were up close. ![]()
![]() I'll be trying to dress it up as much as possible in the future, first step is to get some trains running!
I'll be trying to dress it up as much as possible in the future, first step is to get some trains running!
Sounds like a good plan, John!!! Tunnels will look great, but access to track is paramount.
Looks real good, John.
Thanks guys. I was initially skeptical of the little supports, but they're way stronger than they need to be as it turns out. I put a fair amount of my weight on it all around, and nothing moves, the sag under 60-80 pounds can't be more than about 1/8" I'm guessing I could sit on the thing!
I'm thinking a few of those supports on the outside of curves near the workshop might be a hit with stuff like a Williams scale GG1 or a big boy.
All of the supports are at least 3.25" from the center rail, that was my check for clearance. The BB should clear that.
John, what is the approximate area that you are using for the turntable and whisker tracks? For something that typically eats a lot of real estate, it looks like you were able to be pretty efficient.
I didn't measure it, I just cut a piece of cardboard the size of the TT and it looked like it would fit. It was really the only place I had that I could consider putting it.
Here is a RR-Track screen capture and it may give a feel for the dimensions- this is 12 inch grid. I am obviously still playing around with the plan, For my two cents, I think the space for this 24 " Atlas turntable is well worth it. Compared to reversing loops, this does what I want and is cost and space effective.

Attachments
Images (1)

For reversing, you just need one track, drive in, spin around, and drive out. ![]()
I wanted parking for locomotives, so I put whisker tracks wherever they fit. Five of the whisker tracks are 30" long. I couldn't see making them any longer as the TT will spin at a maximum about 27" with overhang, obviously no more than a 24" wheelbase. So, the widest real-estate is roughly 85", and then the shorter tracks were just sized as big as I could make them before they ran into an obstruction.
BTW, you do realize this track will likely not be useful, right?

If you have a curve entering the TT, you'll hit the bridge sides.
Part of the issues I had placing the TT is allowing at least about 20" of straight track on the entry to the TT on my lead tracks. I did two lead tracks so I could drive out onto the service loop in either direction.
Attachments
Images (1)

@gunrunnerjohn posted:Another minor milestone. The second level is in place and all permanently supported, ready for track! I still have a little work to do on the approach grade, it's still got some of the temporary foam supports in place, but that's coming. I'm pretty pleased with the visibility to the lower level, I have a lot of freedom of what I do to add scenery to support the look I'm trying to achieve.
What a train room you've got now! Very nice.
Looking great John. Won't be long now.
You are reading my mind, tonight I started mocking up some tests (sounds familiar?) to see if an 054 or 072 would cut the corner???...... You may have saved me some experimental time! I am with you on the storage for engines, I was also hoping to have some easy yard access, hence the extra track. But, I may be guilty of doing the blivet ....trying to put 20 gallons in a 19 gallon tank! Or turn a 20x30 layout into a 13x10...NOT!
BTW, you do realize this track will likely not be useful, right?
If you have a curve entering the TT, you'll hit the bridge sides.
@hokie71 posted:You are reading my mind, tonight I started mocking up some tests (sounds familiar?) to see if an 054 or 072 would cut the corner???...... You may have saved me some experimental time!
Lessons learned the hard way for the club layout, we had a turn too close to the TT. ![]() It's obvious when you think about it, just look at almost any locomotive on the curve and the close spacing of the bridge sides on the TT.
It's obvious when you think about it, just look at almost any locomotive on the curve and the close spacing of the bridge sides on the TT.
@Engineer-Joe posted:What a train room you've got now! Very nice.
@E-UNIT-79 posted:Looking great John. Won't be long now.
Thanks guys, it is starting to look kinda' like a layout now. I'm certainly wanting to get something running. Trying to wire up all the tracks of the TT now, I think I'm going to have a lot of wire under there before this layout is done! ![]()
John sorry if I missed this from the previous pages but, whatis the scenic theme Industrial Cityscape? Also what sort of buildings will you be installing?
Somewhat to be determined Steve, I'll have mainly industry, and I'm still contemplating the overall look. I did mine backwards from many folks, the primary purpose was to have a place to run trains, then the scenery comes into play. I had a definite idea of the type of track plan I wanted, so that's where I started.
I was going to use the overhead shelf for a town, but I realized that all the way in the back it would probably not be all that easy to see any detail. So, the shelf went and my hidden yard replaced it. I will be doing partial cover back there and having some kind of buildings above the yard, probably some will be building flats along the walls.
@gunrunnerjohn posted:I did mine backwards from many folks, the primary purpose was to have a place to run trains, then the scenery comes into play. I had a definite idea of the type of track plan I wanted, so that's where I started.
Man, does that ever apply to me... even, after 15 iterations of planning before construction, I still made major changes thereafter. Actually, maybe I did it inside out????
Everyone seems to have their own way of doing a layout. My track layout came first, then we'll fill in with the scenery. Until I know basically what the track was going to look like, I have great difficulty imagining what the scenery might be. Gosh, the turntable that I just dropped in was an afterthought, I was looking at an industrial complex in that spot. However, the lure of being able to park a bunch of engines for ready access was just too much, so the TT was hatched. ![]()
Just finished wiring the turntable, lots of wires to make one of these go! I have to say, my little slide-around chair works really well under the benchwork, just the right clearance, and the back support was REALLY appreciated as I was reaching up to connect all the wiring from the whisker tracks, etc.

Attachments
Images (1)

@gunrunnerjohn posted:However, the lure of being able to park a bunch of engines for ready access was just too much, so the TT was hatched.
You don't need a turntable, you just need a slide chute from the 115 on the wall to the track!![]() That is going to be one awesome layout, John.
That is going to be one awesome layout, John.
I couldn't figure out how to get them back on the shelves automatically, so I ditched the slide to the layout idea. ![]()
![]()
If I could help, and you probably don't know this.....
red to red and black goes to black!
There,... I helped with the wiring.![]()
I figured since you're always there for me John, I'd pay you back.![]()
CRAP! I used green and black, what do I do now? ![]()
![]()
GRJ, I did my track work first also. I’m happy cause it forces me to kit bashing buildings for fit into the layout and I really enjoy that part.
@gunrunnerjohn posted:CRAP! I used green and black, what do I do now?
Drive a long brass rod down into the ground about 6 feet and clamp that green wire on it! ![]()
@romiller49 posted:GRJ, I did my track work first also. I’m happy cause it forces me to kit bashing buildings for fit into the layout and I really enjoy that part.
I still have lots of open space for scenery, I'm sure I'll come up with something. ![]()
@gunrunnerjohn posted:All of the supports are at least 3.25" from the center rail, that was my check for clearance. The BB should clear that.
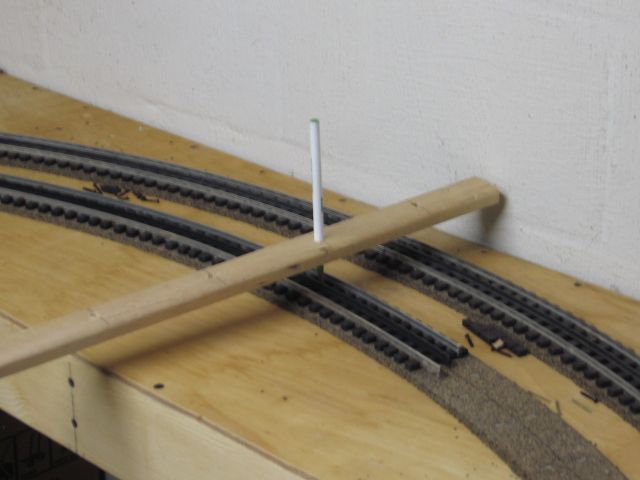
Hey John, I did a very unscientific measurement of the swing on my Vision Line Big Boy. Look at the folding rule. I swung the front drivers out as far as I could while on tangent track. It looks more like 4” or so from center rail. Not trying to be a wise guy, just wanted to pass this along.
Don


Attachments
Images (2)
I did my measurement on O72 track, and all the curves down here are wider than that. I got onto the curve, then pulled the boiler as far over as I could and measured. However, in the interest of being "sure", I just took the VL-BB and pushed it around all the corners to check the supports and insure my measurements were right. At each support I pulled the boiler out as far as I could and it cleared them all by more than 1/4", so I think I'm fairly safe.
For good measure, I tired the C&O M-1 Turbine as well, 25" long, but it clears about the same as the VL-BB.
John, the turntable looks good and I’m sure you’ll put it through its paces once the wiring is done. The second level looks solid as you say, and the clearance is generous. I did my track first as well, and am filling in the scenery as I go. Can’t wait to see a couple of videos when the time comes.
Andy
Thanks Andy, I REALLY can't wait to see something running! The TT wiring to it's junction panel is done, but that's just the tip of the iceberg! Once the second level track is on, hopefully I'll get to that tomorrow, I'll get those drops in and start the under-table wiring for power and the switches. I'm also still waiting on the CSM2 breakout boards for the DZ-2500 switch machines, those appear to make the wiring a bit cleaner for each switch. There's going to be a LOT of wires converging on the control panel location, each switch will have a CAB5 cable from the switch to the panel location. They will all terminate at a bunch of punch-down blocks for connection to the panel. Then I have to wire all the power blocks back to home base as well.
Miles to go before we run trains... ![]()
Almost at the finish line for the basic track laying task. I'm still missing one switch that I should be getting from Ross in the next few days, so there's about 8-9 feet of track on the outside top level loop waiting for that switch. The grade, inside loop, and most of the outside loop is in place.

Obviously, the huge job of wiring all this stuff is still in front of me, but we're making steps...
This is the section just finished, still waiting on the green circled switch. I have to cut the switches a couple of inches to allow sufficient inter-track spacing and keeping them on the straight section.

Attachments
Images (2)

John, everything is looking great ! as for overhang of the BB, you'll be fine. If i remember correctly 3 inches of clearance is good.
Alex
Thanks Alex, I actually took the VL-BB out and checked all the clearances for the supports, just to make sure I wasn't screwing up in my calculations. No sweat, I had well over 1/4" of clearance from the closest one pulling the boiler out as far as possible on the curve. I tried a couple other things like 21" passenger cars, auto carriers, and even the MTH M-1 Turbine, none of them came close to the supports.
It's by no means certain that I didn't miss anything, but before any ballast or significant scenery is done, it'll get some run time and I'll make sure I don't have any clearance issues in other places.
John this your layout is looking great and you're moving at a good pace. Your whole thread has been an inspiration for me for my next layoutwhich I should be starting very soon. I have a 24 by 13 room and I cant wait to get started
Thanks, I have tried to pick up the pace lately, the table sat for a long time before I started adding track, but now that I'm on a roll... ![]() It's getting close enough that I can imagine having trains running in the near future, that will be an exciting day!
It's getting close enough that I can imagine having trains running in the near future, that will be an exciting day! ![]()
Nice progress so far, John. I don't have any experience with a big boy but I know that on some of my bigger engines it's not the front that sticks out the most but the cab. Have you tried testing the big boy to see if the cab roof clears everything, especially in reverse?
@gunrunnerjohn posted:Thanks, I have tried to pick up the pace lately, the table sat for a long time before I started adding track, but now that I'm on a roll...
Trust me I know what u mean. I bought the house 3 years ago and life gets in the way for lack of a better term. Like you I had to take a break for a while but I'm coming down the home stretch right behind ya. I'm gonna go with an around the walls layout. Just got to close of door that's there and make an archway with a lift up section in the middle of the room. But you'll have trains running soon there . Lots of pics and videos I hope!!!
@Pat Kn posted:Nice progress so far, John. I don't have any experience with a big boy but I know that on some of my bigger engines it's not the front that sticks out the most but the cab. Have you tried testing the big boy to see if the cab roof clears everything, especially in reverse?
Yep, no sweat. I was trying to be fairly generous with the clearance as I've run into them in the past. Besides, I doubt I'll be doing much reverse on the mainline, it's a one-way rail! ![]()
@E-UNIT-79 posted:Trust me I know what u mean. I bought the house 3 years ago and life gets in the way for lack of a better term. Like you I had to take a break for a while but I'm coming down the home stretch right behind ya. I'm gonna go with an around the walls layout. Just got to close of door that's there and make an archway with a lift up section in the middle of the room. But you'll have trains running soon there . Lots of pics and videos I hope!!!
I'm certainly going to have pictures of the grand opening, ribbons, cake, the whole shebang! ![]()
Gunrunner John your trackwork is very neatly done, your table work nicely prepared, congratulations, now, Question, what are your plans for a border around the layout to keep your Locomotives from derailing and taking a plunge to the floor? Also, are you planning to have electronic blocks with Cab 2 control or DCS control, and also will you be able to operate your turnouts via command control? Just wondering because it’s fun to walk around the layout and have the ability to turn off or on track, switches, engines, trains wherever your standing. We used the legacy system on our layout simply for fun. Good luck with your electrical wiring and controls of your fantastic layout. It’s fun to watch how your progress and we look forward to seeing trains running. Happy Railroading Everyone
Larry, I'll have to see about any border, my locomotives are well mannered and usually don't try to find the floor. ![]() Also, close to the edge, they find carpeted floors to easy any impacts.
Also, close to the edge, they find carpeted floors to easy any impacts. ![]() For most of the track, there isn't far to fall, just along the front edge they get pretty close, but I'm not anticipating huge issues there.
For most of the track, there isn't far to fall, just along the front edge they get pretty close, but I'm not anticipating huge issues there.
All of the power districts, switches, yard tracks, and the turntable will be command controlled. As long as I remember all the numbers, I should be able to run everything from the remote. I will have a control panel with visual status lights as well. I will be wired and setup for TMCC/Legacy and MTH DCS operation. Since I have a bunch of MTH AIU's squirreled away as well as the SC2 boxes, I will likely parallel wire for both TMCC/Legacy or MTH remote operation of the switches and turntable at least. I'll be using my perpetual barking watchdog on all the yard tracks and turntable whisker tracks to allow MTH locomotives to come up dark as they should with a power on.
I understand about the border, your trackwork looks really nice, I was just remembering the days on building my layout which was built on the L-girder system with track in the air so to speak and the new Lionel Allegheny, 1999 version, (Year 2000) ran into a new Atlas O turnout that didn’t throw all the way, Ka-Boom, it fell to the floor, non-carpeted tile floor. Lionel re-built the steamer but I learned a great lesson. I actually decided to go to Ross turnouts then, and made sure no more trains could fall off the layout. From the nice pictures of your train layout and beautiful room, you should be fine. I look forward to your progress. Happy Railroading.
I'll be running cheap stuff around quite a bit before the $2,000 steam hits the rails! ![]()
I love the look of the open girder track-work, but a man's got to recognize his limitations, I knew I would screw that up!
The final switch came in and ALL the track for the main table and elevation is in place and secure! Obviously, I still have a ton of wiring under the table to do, but it feels good to reach a milestone anyway! ![]()

Attachments
Images (1)
Lookin' really good, John. Now's the time to have a battery powered engine to send on a maiden voyage.
@gunrunnerjohn posted:The final switch came in and ALL the track for the main table and elevation is in place and secure! Obviously, I still have a ton of wiring under the table to do, but it feels good to reach a milestone anyway!
Slacker!
LOL! Looks great John! It must be nice to be at a point where it all starts coming together.
I have my battery powered Camelback queued up for a trial run of the main two-level folded dogbone loop. I'm just waiting for my Mobius camera to charge up so I can document the run in real-time by sticking it to the cab. It'll go behind the track cleaner. ![]()

I'll also drag my magnetic debris pickup car around on the run to collect any bits that have fallen between the rails, there's a lot of little rail pieces from trimming the flex track. ![]()

Attachments
Images (2)


@gunrunnerjohn posted:I have my battery powered Camelback queued up for a trial run of the main two-level folded dogbone loop. I'm just waiting for my Mobius camera to charge up so I can document the run in real-time by sticking it to the cab. It'll go behind the track cleaner.
I'll also drag my magnetic debris pickup car around on the run to collect any bits that have fallen between the rails, there's a lot of little rail pieces from trimming the flex track.
Keep converting other engines to battery and you won't need to wire track or need that track cleaning car. ![]()
Looking Good!
Ron
That ain't ever happening Ron, there's no way I'd give up all the cool features just so I could avoid wiring power.
At long last, a train is running around the main loop from start to finish! I had to use my battery powered Camelback as I don't have the power wired under the table yet. I'm also dragging the magnetic pickup car to gather up any stuff that fell between the tracks, it picked up a few pieces. The run, at least according to my track layout program, is around 140 feet of track in the main loop.
NICE! Looks like You enjoyed it a lot more than Bobbi did.
Congratulations!!! And, Great Work! Scratch another mile into the Milestone...
You are definitely moving along at breakneck speed compared to me.
Awesome, just Awesome!
@gunrunnerjohn posted:It's by no means certain that I didn't miss anything, but before any ballast or significant scenery is done, it'll get some run time and I'll make sure I don't have any clearance issues in other places.
Amen to that!
Looking good. Thanks for the ride. I waved back to you.😁
Thanks guys, it was pretty great to actually see something make the whole main loop, a milestone that seemed I would never cross! ![]()
I'm working on getting all the switch wires under the main table level, I'm using the CSM2 DZ-2500 Breakout Boards to interface to all the switches, it'll make all those little wires a little easier to deal with. Just waiting on the last few breakout boards to arrive, but I have enough to move ahead. I think the next step is mounting the transformers and TIU and getting power over to the board.
Looks great John. Did you have a golden spike ceremony yet? ![]()
4 minutes + for a full loop is a nice run!
Bob
@gunrunnerjohn posted:That ain't ever happening Ron, there's no way I'd give up all the cool features just so I could avoid wiring power.
I can't speak to Lionel Legacy. But I can tell you I have not lost one "cool feature" running MTH DCC and Lionel Lionchief.
But I understand your situation. It's really coming along nicely.
Ron
@RSJB18 posted:Looks great John. Did you have a golden spike ceremony yet?
4 minutes + for a full loop is a nice run!
Bob, the key factor in my design was a reasonably long mainline so I could run decent sized trains and not have them chase their tail. If I want 40-50 cars, I want it to still see some track between the locomotive and caboose! ![]()
@Ron045 posted:I can't speak to Lionel Legacy. But I can tell you I have not lost one "cool feature" running MTH DCC and Lionel Lionchief.
But I understand your situation. It's really coming along nicely.
Legacy doesn't like DC, and I have around 25 Legacy locomotives, and I'm going to get more I suspect. Dead rail ain't an option at my RR. I have zero interest in investing in DCC, I suspect I can muddle along just fine for the rest of my railroading days using DCS, TMCC, and Legacy. I'll mix in a few LC+, Bluetooth, etc. engines as they come along.
Congrats John! very nice trip around your new layout ![]() . One thing, i noticed the smoke unit wasn't working. I can repair that for you, just let me know! LOL LOL
. One thing, i noticed the smoke unit wasn't working. I can repair that for you, just let me know! LOL LOL ![]()
![]()
![]()
![]()
Enjoy, Alex
GRJ, very very nice. You’ll have so much fun running all the trains you have it will take forever to get started on scenery. That’s what has happened to me.
Nice video John hope to see the bigboy soon. If your wife likes trains maybe she will crawl under the layout to do the wiring. They seem to be more flexible than we are.
@Alex M posted:Congrats John! very nice trip around your new layout
. One thing, i noticed the smoke unit wasn't working. I can repair that for you, just let me know! LOL LOL
I'll send it right up. ![]() Actually, I turned off the smoke so the video would be clearer, I figured I was trying to shoot the layout, not the haze of smoke!
Actually, I turned off the smoke so the video would be clearer, I figured I was trying to shoot the layout, not the haze of smoke!
@romiller49 posted:GRJ, very very nice. You’ll have so much fun running all the trains you have it will take forever to get started on scenery. That’s what has happened to me.
I'm sure scenery will take some time, first things first, get the sucker wired!
@trainbob posted:Nice video John hope to see the bigboy soon. If your wife likes trains maybe she will crawl under the layout to do the wiring. They seem to be more flexible than we are.
She's happy to see the progress, but I don't think she'll be under it wiring, that's a bridge too far! ![]()
I actually ran the VL-BB under the second level to check clearance of all the supports, I just sky-wired the track power. It had room to spare, so I'm happy. ![]()
@gunrunnerjohn posted:I'll send it right up.
I'm sure scenery will take some time, first things first, get the sucker wired!
I know LOL , PLEASE !! i have to much work already. I'll leave it to you ! ![]()
Alex
John,
Nice video, layout, workbench & basement. I've spent most of my live in basements and that is a nice basement. ![]()
Tom
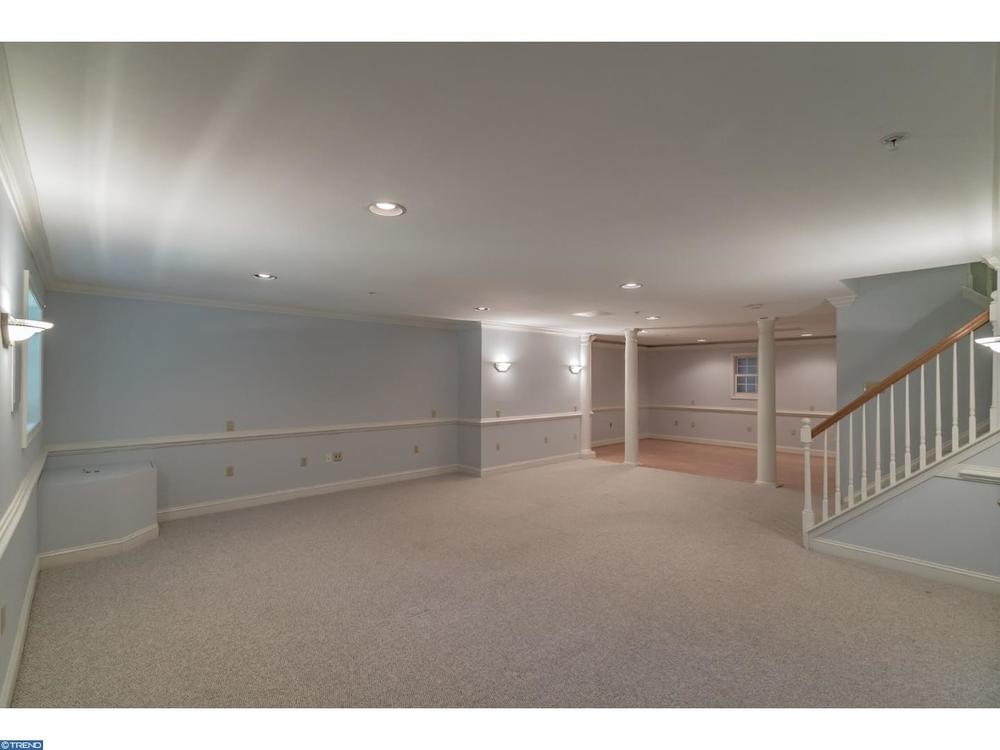
Tom, the basement was one of the key selling points, I wanted a daylight basement, and this house came along and the basement was a key selling feature. I don't know if you remember what I started with, this is what I saw when I walked down the stairs for the first time.
How could you not fall in love! 

Congats on your first run!!
Another 2 weeks and the whole layout will be completed!
John, I know you going to be running 'modern' controllers (radio/computer etc.) switch/block system... but, are you going to build an old school control panel as well?
@gunrunnerjohn posted:Tom, the basement was one of the key selling points, I wanted a daylight basement, and this house came along and the basement was a key selling feature. I don't know if you remember what I started with, this is what I saw when I walked down the stairs for the first time.
How could you not fall in love!
Agreed, and indeed, John, I have fallen in love with your basement! LOL, Arnold
Cool video. Your layout looks awesome and so well put together. Track and bench work are beautiful.
thanks for posting a video was looking forward to videos of your layout.
Congrats, John......really spectacular.....and, well-done!
Peter
Congratulation to John. Getting the mainline laid down is an important milestone.
Add Reply
Sign In To Reply
