I am a raw newbie!! I have never had model trains before. I live in Northern California and have a great backyard view of the Union Pacific line running south to the Roseville yard. My grandkids love the trains, especially the 4 YO grandson.

So, I figure a layout in the garage would make for some fun times. I am focused on Lionel post war kit, mostly because I like the construction, they are electric, (not electronic) and I can fix stuff. Plus it is the era of model trains I would have had as a kid. I can squeeze in a 4.5’ x 12’ layout in one bay of the garage.

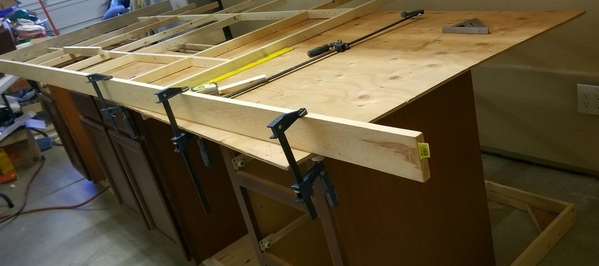
I have some kitchen base cabinets that can be repurposed to  form the base and provide storage. The layout will be on casters, so I can move the layout away from the back wall. I had to pull power to the wall to accommodate the layout.

Cabinets


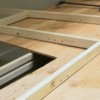
I am building the platform out of 1X pine lumber.  The base will be 2" foam sheet insulation.

Frame in Process


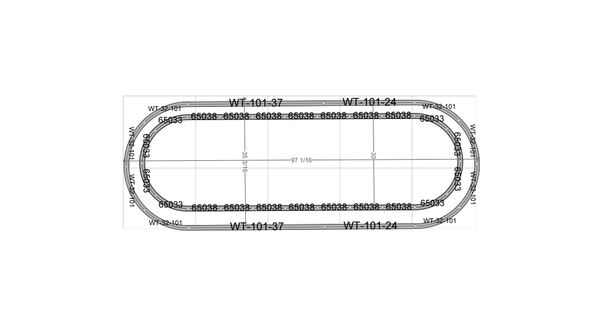
I am learning/using AnyRail to develop the track plans. My thoughts are to start relatively simple with an outer loop and an inner figure 8. The figure 8 will be elevated at the intersection.

Lyons 054 042 O31


Once I get the base level functioning, I plan to add a second level above the first.

Lyons upper 31+6 31


I have bought enough Gargraves track, (from OGR members!) to do the base level and one of the upper loops. If this is a “hit” with the kids, I will look to more sophisticated layouts with switches, sidings, etc.

I have a 250w ZW and a 175 TW. They should allow me to run the 4 loops independently and have dedicated accessory loops.

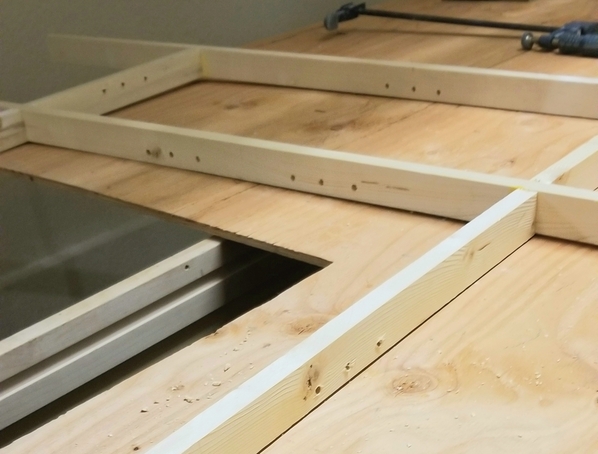
So, yes, I have headed down the road halfcocked, but that is normal for me. Any thoughts would be appreciated, especially wiring the layout.  I drilled holes on the frame to facilitate wire looms, and, at this point, can add/modify, as recommended.

Wiring Holes

Cheers,

Geary

Attachments

Images (5)
  • Cabinets
  • Frame in Process
  • Lyons 054  042 O31
  • Lyons upper 31+6 31
  • Wiring Holes
Original Post

Replies sorted oldest to newest

Hi Geary- welcome the the forum. Looks like you are off to a good start. Since you've never had trains, keeping it simple to start is a good idea. The wiring for basic loop running is simple. Just make sure you have several drops connected to prevent voltage drop.
I would drill the holes bigger while you can. As the layout grows, the wiring will as well, exponentially! Larger holes will make pulling wires easier, especially when working under the layout.
What kind of locos and rolling stock will you be running?

Keep us posted as you go. Don't be shy to ask questions if you get stuck.

Bob

Hello,

On your first diagram, I would suggest that you are going to need to get two sets of automatic switches  (Lionel 022 switches) and install them so that trains your outer loop can switch to the inside figure 8 and then out again.  A very simple classic layout.

Otherwise, your kids will get very bored watching a train go around and around on the large oval.  And then just in a figure 8 in the center.

The Lionel post war trains do not operate a low speeds very well at all.  Electronically (something to do with the number of coils), they don't kick in and start running until the throttle is up fairly high, and then they take off pretty fast.

One thing you may not realize is that the Post War trains run very fast, and believe it or not will be able to travel that 12 foot length in about 3 seconds.   So, all you will end up with is a fast Merry Go-Round effect.   Not really very much fun to watch.

I started out about 14 months ago, and like you, I was convinced I wanted the classic Post War trains I ran as a kid.  But, I soon found out otherwise.   Although I still have two Post War engines, and enjoy running them, I found out the wisdom of buying the 1990 to 2010 locos, with twin can motors.  1000% percent reliable, incredibly smooth,  and will run at any speed you want them to, from very slow to very fast.    Many of these have built in Proto -Sound or Train-Sound, and feature a bell, and a whistle, and random voices coming out of the engine, all at the push of a button on your transformer.     The diesels are especially nice.

You can buy these locos for anywhere from about $150 to $200.  Williams and Bachman Williams are high quality and pretty problem free.   The larger Lionels of this type are good too.

I am not telling you not to get your Post War locos, but do yourself a favor and buy at least one of the more modern twin can locos.     I think you and your kids may enjoy running it more than the Post War locos.  .

Also, don't feel as if you have to use a pre-existing track plan.  Feel free to build out the tracks however you want, like legos.  Yes you will need a metal cutter to custom cut shorter pieces here and there, and a small set of files to smooth out the metal flecks on the cut ends, but since you are a do-it-yourselfer, this will be very easy for you, as it was with me.

Hope this helps.

Mannyrock

Last edited by Rich Melvin

Excellent suggestion by Rich.

I did not build my layout from a pre-prescribed plan, but most people do now, and for someone just jumping into O Gauge there is certainly nothing wrong with that.     For me, the benefit of looking at these layouts was that it gave me ideas and possibilities that I would have never thought of on my own.

You actually have a very large layout surface (many folks on this board would kill for it).  With your large surface,  if you go forth and spend all of the time and trouble to put the track underlay down, and fit and nail down all of that track for your simple straight runs and loops, you are going to be understandably reluctant to do substantial changes to it later by pulling up lots of track and adding switches and extra curves and side tracks.   You'll probably be thinking, "Well, . . . maybe in a few years."

So, don't be in a hurry to lay down such a simple layout.    Take just 3 or 4 weeks longer to build it, and you will have something much more interesting and fun for you and your kids.

Hope this helps.

Mannyrock

Last edited by Rich Melvin

Simple start-up layouts are kid-friendly, but ...

Your junior engineers will soon grow up and want a layout that is more interesting -- or else they may become dis-interested. Tip:  Plan ahead so that the layout can evolve. Kids will soon become intermediate engineers and be able to participate in the adventure. Ultimately, they may grow up and become senior engineers. All to the good!

Mike Mottler     LCCA 12394

Many thanks for all of the comments!! I got the foundation finished today. Lost about 3 hours of production getting the purple rigid foam insulation sheets at Home Depot. Drove to the HD that is 15 miles from my house because the website said they had 24 sheets in stock. I get there to find an empty shelf.

Anyone who goes to HD knows the drill...find someone in an orange vest who has to find someone in an orange vest to page someone in an orange vest to come find the stock. There went nearly an hour! Then once found, the latest orange vest locates the stock, and then we wait for the only forklift certified orange vest to return from lunch….and the saga continued until I finally checked out! At least I got to pick sheets that had no strapping damage!

I took Bob’s advice and enlarged all of the wiring loom holes. Thank you! Definitely a smart move! The engines and rolling stock have evolved over the last 90 days. I started out buying a couple of in-the-box 70’s sets. Too much plastic and duplicate rolling stock. Between Craigslist and auction sites I have acquired several engines from 1946-1957 including a 671, 736, Adriatic, Hudson's and Prairie's. I have the Adriatic, Hudson's and Prairie's cleaned lubed and running well. I just got the 736 and 671. They are next in line for the bench. I have an assortment of rolling stock, but trying to make the trains appear similar to what rolls on the Union Pacific track behind the house. So boxcars, tankers, flat beds and lots’a lumber haulers. I do have a passenger car set, but looking for an Amtrak set.  I have focused on the steamers because that is what is mostly displayed at the Sacramento Train Museum and the UP yard. The grandkids love to go to the museum and ride the train.

I have gathered up some action accessories to spice up the layout. I did order the e-book version of the 21 Track Plans as Rich suggested. Looks like it will be a good read and helpful. I will just have to mentally convert the track to GarGraves!

I appreciate your comments, Manny and Mike! I do plan to make the layout more interesting and will not spend considerable time “finishing out” the simple loops. We will have the grandkids next weekend, so the push is to get the trains running, smoking and whistling, then have the kids “help” improve the layout. Adding switches to the loop/figure will be near the top!

Again, my thanks to everyone for sharing and encouraging!! Tomorrow will see the main wiring installed, the foam sheets cut and placed!!

Cheers,
Geary

Geary,

If you are just trying to get something down quickly, to whet the kid's interest, then be sure to use track screws, so that they may be easily removed.   

Also, you really don't need many screws per track section to hold it down tight.  One screw on each end of a section is all that is needed, with the screws being staggered.   Inside outside inside outside.

I didn't use foam insulation on my sheet top, so I'll leave others to tell you whether a screw will hold in foam insulation.

My guess it that maybe you may have to use a screw long enough to go all of the way through the foam, and down into the plywood.   So, you may not want to buy a really thick foam board.


Mannyrock

Using screws that are driven all the way down into the plywood will greatly increase the running noise.  If you want to make a truly flexible and relatively quiet  starter layout, use indoor-outdoor carpet tiles instead of foam board, and DON'T screw the track down.  The grab of the carpet tiles should be enough to keep the track in place.

Chuck

I have pretty much finished the rough foundation.  Casters in, rolls easily. Wiring next. I will pop out the foam to do the wiring.  Reading Riddle's wiring book.  Thinking of six blocks, 27"X 48" each. Does that make sense? There will be two transformer bays, one in each of the cabinet voids.  Should I post to the wiring section?

Cheers,

Geary


Wiring next

Attachments

Images (2)
  • Casters in
  • Wiring next
Last edited by Geary

Add Reply

Post
The Track Planning and Layout Design Forum is sponsored by

AN OGR FORUM CHARTER SPONSOR

OGR Publishing, Inc., 1310 Eastside Centre Ct, Suite 6, Mountain Home, AR 72653
800-980-OGRR (6477)
www.ogaugerr.com

×
×
×
×
Link copied to your clipboard.
×
×