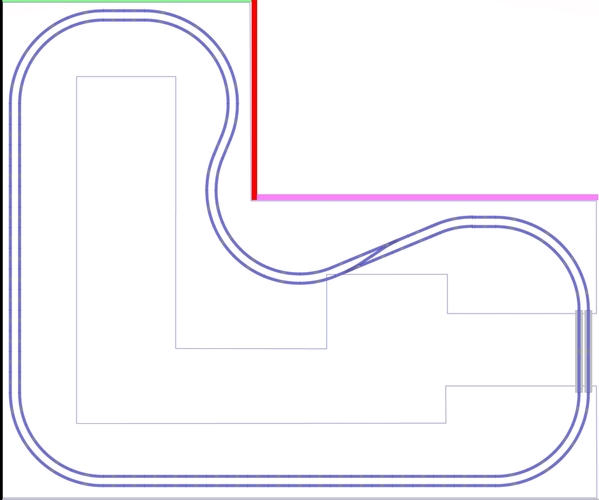
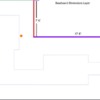
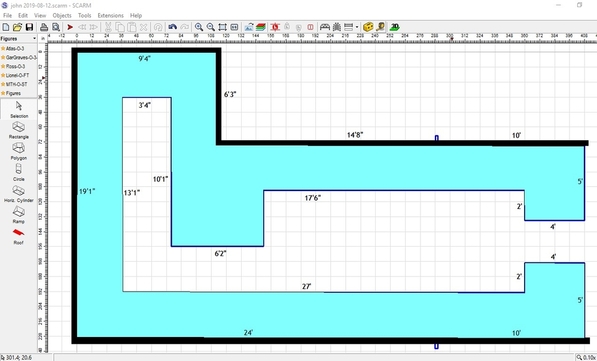
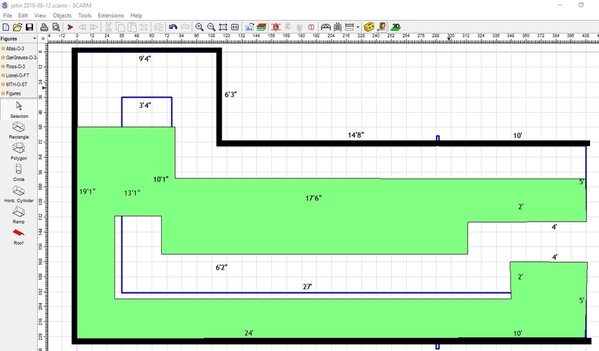
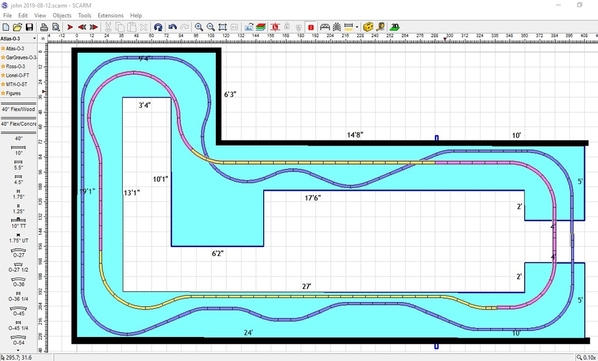
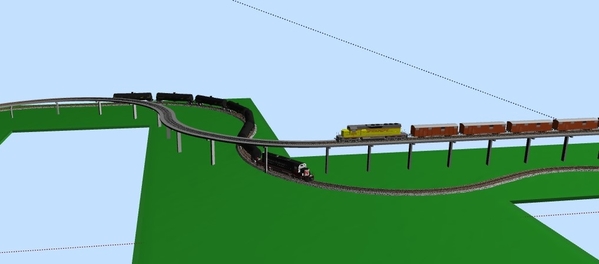
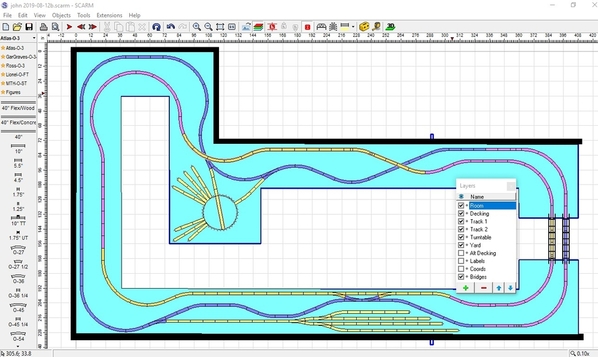
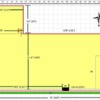
Hello All, First thanks for your patience in advance as I have some limiting conceptual issues. I have read much from magazines, books and forums about planning, however even the most basic step is eluding me. My available area is an L shaped space that is 12 foot wide twenty 24 feet long with an additional 10 foot wide by 6 foot deep leg of the L. While trying to keep a 30-36" reach, planning out aisles for this shape with retaining the most layout area is obviously something beyond my comprehension. Any help, advise will be greatly appreciated.
Replies sorted oldest to newest
You didn't say if there was an opening or where it was, so I guessed it was on the right where your lines don't connect. Here are 2 ways of approaching the space. First is an around-the-room design. The second is a table with access on all sides. Obviously you get more usable track space with the around-the-room design and can use wider curves.
Attachments
First thing that you gotta do is get down on your knees and thank the Lord for granting you so much space. ![]()
Sorry for not giving entrance to area. The assumption that the right side is open, is correct. And it is totally open, giving access to both sides of the around the wall part of that section. So the open area could be wider than 3 feet. I could put access door(s) on the sides that of the inner "L" So if you were standing at the left side looking into the room, the wall to your right, the wall that makes the 90 degree right into the "L" and the next wall that makes the next left. I hope that is not too confusing. I am not sure if that will give any benefits or be a hindrance. The right side entrance to the room could be lengthened in the future, from 24' to 32'. T
And yes I am VERY Grateful for the large space, and do not want to waste any of it.
I do lean towards the around the room design and wondered about putting in some peninsulas for more layout room.
Also hoping to make a "lower" subway level that will come up to main level for a small elevated section.
Thanks for the replies, they are extremely helpful.
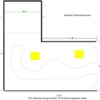
I don't know if I followed that, so I color-coded a few things.
And it is totally open, giving access to both sides of the around the wall part of that section. So the open area could be wider than 3 feet. Does this mean there is no Purple wall or does it just mean the small peninsulas on the right side could be 6' wide (Blue rectangles) instead of 3'?
I could put access door(s) on the sides that of the inner "L" So if you were standing at the left side looking into the room, the wall to your right, the wall that makes the 90 degree right into the "L" and the next wall that makes the next left. Does this mean you could add door access through the Red and Green walls? If so, I guess that would let you fill in the Gray area.
wondered about putting in some peninsulas for more layout room. I suppose you could add the Green peninsula.
Attachments
Thanks for helping on the clarity. The black and grey walls are foundation walls without access. The purple, red and green are accessible (they have yet to be built) There will be a purple wall built so the blue area could be 6' .
The purple, red and green walls, have at least four to twelve feet behind them for water filters and another room. This is a basement build and is right now totally open.
Thanks for the ideas!
Ok, so here's what I've come up with then, assuming I understood what you said about the purple wall. I don't think I'd add the doors just to fill in the gray area, but that's up to you. If I were to add a door, I'd add a double door on the green wall.
Attachments
Again clarity is not my strong suit. The purple wall is not moveable, it is 12' from grey wall. I like your peninsular ideas. Let me know what you think of this possibility? It is your design with purple wall fixed at 12' Let me know plus and minus of this and any improvements that will help.
Thanks for your time and help
Attachments
Ok, got it. As you can see, I left 2 small peninsulas on the ends in case you wanted to add reversing loop capabilities. The Blue tracks are Atlas with O72 curves. The Yellow tracks are Atlas with O54 curves just to show how reversing loops would fit.
Attachments
THANKS Sooooo Much! This is a great help and a fantastic start! Reversing loops were some of the hopefuls on my list of track.
Iam looking at getting RR-Track but they are not accepting orders until later this month. uess it will have to wait. Not a big deal as now it is more what industries and towns do I want to build and where they should be built. Figure out a purpose for the railroad and possibly a subway set stuck it somewhere.
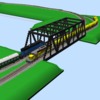
The blue track that goes across the opening, will allow me to, hopefully be using my 40" atlas bridge building a lift up to pass through to the middle of the layout.
Any thoughts on control area placement?
Again HUGE Thanks
Reversing loops were some of the hopefuls on my list of track. Unfortunately, they take up a lot of space if you try to use large curves, hence the O54 curves in my example. The thing is when you have the capability to run multiple trains in different directions, the need to reverse trains is lessened, especially in around-the-room designs.
I am looking at getting RR-Track but they are not accepting orders until later this month. Guess it will have to wait. Not a big deal as now it is more what industries and towns do I want to build and where they should be built. Figure out a purpose for the railroad and possibly a subway set stuck it somewhere. Just a thought, you might take a look at SCARM and AnyRail while you're waiting on RR-Track, both have trial versions limited to 100 tracks and both are cheaper than RR-Track. I have both RR-Track and SCARM and almost exclusively use SCRAM these days. Ken-OScale posts a lot of designs done with AnyRail.
The blue track that goes across the opening, will allow me to, hopefully be using my 40" atlas bridge building a lift up to pass through to the middle of the layout. Shouldn't be any problem adding the bridge to a design.
Any thoughts on control area placement? Not really, too much depends on the design you come up with and how you decide to control things, particularly switches and accessories. If you go with a full DCS system (remote, TIU, AIU. WiFi), you can control it all from the remote and/or a tablet. If you're "old school" and prefer pushing buttons, then you might want a central control panel.
Thanks for all the help again, I will get scarm and use that if I can post layouts from scarm, is that possible?
Again Many Thanks
Okay, thought I would toss this in -
- 30" wide table - perhaps 36" on one side if a yard is needed - it is plenty for tracks and scenery
- Atlas 081 and O72 double main - crossovers, sidings to be added
- O72 reversing circle on the inside corner- will only require a smaller increase of the table on that inside corner and still maintain good aisle width
I followed what I thought were the dimensions as none are marked on the table drawings
1' grid
refinement to come with design development
Attachments
Yes, you can post files from all the design programs. Here's the SCARM file of your space to get you started. I had to delete the reversing loops to get the track count below 100 so you can play with it. You won't be able to make add many tracks, but you can add a few and learn how to move tracks around, etc. To download the file, right-click and select Save As (or Save Link As, whatever is close). Sometimes it downloads as a .txt file, but all you have to do is change the filename to end with .scarm.
That said, I'm not trying to get you to buy SCARM instead of RR-Track. SCARM was free for a long time while it was in beta, so a lot of folks took advantage of that to save some money. Since it's gone commercial, the number of new users seems to have lessened, but then so has the number of new layout designs being posted. There is a lot of helpful information, tutorials, etc., on the SCARM site and a few folks here who will help you learn how to do things. There are also folks who will help with RR-Track and AnyRail.
I started using SCARM to help others with their designs. It wasn't available until after I had already bought RR-Track. Eventually, I was using it more and more because of all the designs being posted with it, the arguably better 3D view and the 3D simulation feature. RR-Track has a simulation too, but it's only 2D. When I mentioned it I didn't know the RR-Track would be available again on the 17th, so I thought you might want to check out other options. There are advantages/disadvantages to all of them. One advantage to RR-Track is you can purchase a library with a lot of accessories, buildings, bridges, etc. SCARM is limited, but you can create your own or copy what others have shared.
Note that SCARM and RR-Track are both Windows-based. If you use a Mac, you might consider RailModeler Pro or you'd have to use a Windows emulator.
Attachments
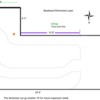
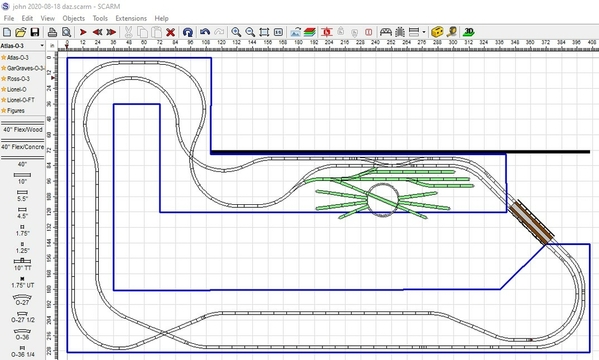
Hi Carl, Great ideas and starting points! I have taken a bit of a crash course in scarm and have room dimensions that I will try to upload to this post. It will also contain a possible layout base around the room. The room dimensions are all fixed and per wife non negotiable. ![]() The only leeway I will have is the black wall can extend another 10' in the future.
The only leeway I will have is the black wall can extend another 10' in the future.
Hope this helps clear any dimensional lack of clarity on my part.
Attachments
Hi Dave, I have jumped on the Scarm band wagon and have been taking a crash course so to speak. Thanks for the knowledge and work you have put into my project. It is so appreciated. As you can see from my earlier post, the room dimensions and possible bench work. Not sure on bench work as it will depend on track features and uses for the railroad.
To help all explain how new I am to this, I was fortunate as a young boy to get Lionel trains for Christmas and Birthday presents. My dad would set it up on in our tiny three room apt. that housed my Mom, Dad, Sister and myself. Not a lot of room to say the least. Over the years my collection grew and then college hit and life began. Trains were put away for years, except the occasional Christmas set up. I am now newly retired, moved to a new area, Hadley Pa. (near Mercer pa. home of Mercer Junction train shop) So I am fortunate to have the time, my health, and space to build a model railroad. The last forty year gap in technology is amazing and totally unbelievable. I have a lot to learn about the new generation of trains. I have not been into railroads and how they worked in industry, and also have little knowledge of model railroad track functions. (ie reversing loops) I get how they can make a more point to point railroad which is more reality than a train running around in a circle. However, these things I am just learning. Where to put sidings? Should there be a yard? What industries will the railroad serve? Towns and destinations? I have a HUGE list of questions and probably don't know have of the questions I need to ask.
So please all bear with me as I am the true Newbie.
Thanks in Advance for all the help.
Go with the largest curves you can fit in. Here is a double mainline with O81/O90 curves. The right side restricts using larger curves. The 90 degree curves could be replaced with larger curves.
Jan
Attachments
I don't mean to nitpick, but as drawn the Green wall is 10' 6" and that will make a difference when you start adding track. The upper jut-out on the right is 4' 8", not 4' 6", and that may or may not make a difference, but I thought I'd point it out just in case.
And just for the sake of total clarity, I'm assuming the dimensions are inside measurements and the walls you're going to build will all go on the outside of this space. That may seem like a small thing, but I've seen people add basement walls that end up taking away from the actual interior size of the room. Normally that doesn't matter, but model railroad designs are a matter of inches, so losing 5"-6" to walls can be a big deal if not accounted for in advance.
NOTE: This is referring to the SCARM file Aegis posted, not Jan's file. Jan was posting as I was composing, so I didn't see his post. Fortunately, Jan used the file with a 10' wall and his choice of curves fit. ![]()
How about a reversing siding? Pictured here in green... along with a double mainline and a double crossover...
Attachments
DoubleDAZ posted:I don't mean to nitpick, but as drawn the Green wall is 10' 6" and that will make a difference when you start adding track. The upper jut-out on the right is 4' 8", not 4' 6", and that may or may not make a difference, but I thought I'd point it out just in case.
And just for the sake of total clarity, I'm assuming the dimensions are inside measurements and the walls you're going to build will all go on the outside of this space. That may seem like a small thing, but I've seen people add basement walls that end up taking away from the actual interior size of the room. Normally that doesn't matter, but model railroad designs are a matter of inches, so losing 5"-6" to walls can be a big deal if not accounted for in advance.
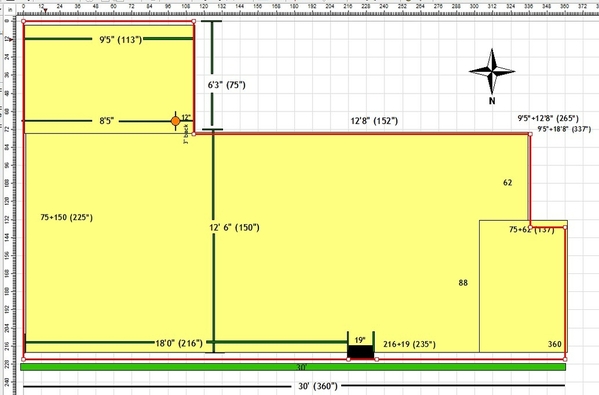
Hi Dave, nitpick and find all mistakes etc. The details are EXTREMELY important and an inch here or there does/can make huge differences. You are correct he green wall 10'6" dimension the marked 4'6" is adjustable to aisle width and is drawn as 4'8" (I was playing with track and nudged that a bit without changing the label.
You are also correct with the wall dimensions being interior. The basement is 27' wide with supporting columns at the center. This actually allows me to build the purple wall 12'6" interior dimension from black wall. I was being cautious with initial dimensions, so 12' is actually 12'6"
Now this is before the walls are built however I have the leeway to make those dimensions when I build.
Now the bad news. I originally thought the leg of the L was to be 8' by 8' and supporting column was covered. Now that I convinced my wife to give 2.5' it will no longer be covered and is represented by the orange circle... ugh!
Here is an updated, more precise drawing.
Attachments
Sorry about the pic being cutoff, still new to scarm and posting
Thanks Jan and Bob Great ideas and advise! I will be looking at these options as I start to formulate what the railroad will do as its functions. ![]() Had thought of, or seen a reversing siding till now. I also like the sweeping curves, it sounds like those lend more realistic views of a real railroad.
Had thought of, or seen a reversing siding till now. I also like the sweeping curves, it sounds like those lend more realistic views of a real railroad.
THANKS a ton!
John
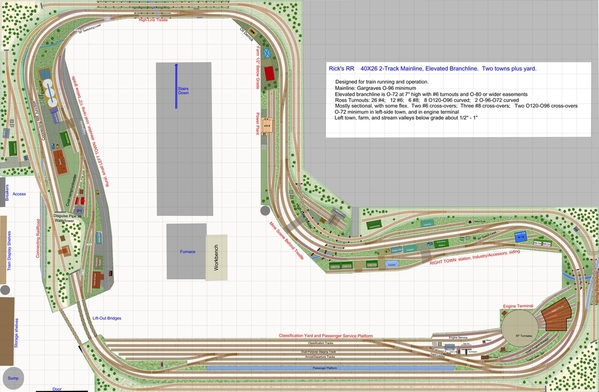
AEGIS21, you might be interested in my design thread for Rick's Layout which I did for Rick. I noticed the similarity in shape, and thought you might want to scan this discussion for ideas. Rick's layout space is larger, and access to the space is different, but many of the ideas and considerations would apply to your space as well. Rick went with a double-track plan with cross-overs, with an elevated third mainline. There are two town areas and a large yard, so trains can originate and service industries that make sense for train operation. -Ken
Attachments
Thanks Ken! I see the resemblance in shape. Hope I can get something half as good and I will be thrilled!
Jan posted:
I like Jan's double-track concept. And concur with his suggestion on using the largest diameter than can fit.
I would drop the idea for the jut-out in the center, as you will need space for operators and builders to move around comfortably. The 3'-wide aisle width is good, but you need more than just aisles IMO, you need space for two or three operators and visitors to move around the layout. So retaining a larger open operating and train-watching area in the center will add value and enjoyment, more so than the added scenery or industry area.
Hi Ken, Great advise on the opening/aisle, I was looking at possibly rounding that center jut-out and sweep it back some. Not sure how to make a curve baseboard in scarm, or if it is even possible. ??? I also like Jan's double track and sweeping curves. I am looking at Rick's posts as you suggested and read the opinions on prototyping real railroad versus "running Trains around" From what was written I am leaning towards Rick's concept of serving industries and point to point operation with leeway to let imagination and nostalgia run amuck, LOL
Thanks
john
Aegis21 posted:Here is an updated, more precise drawing.
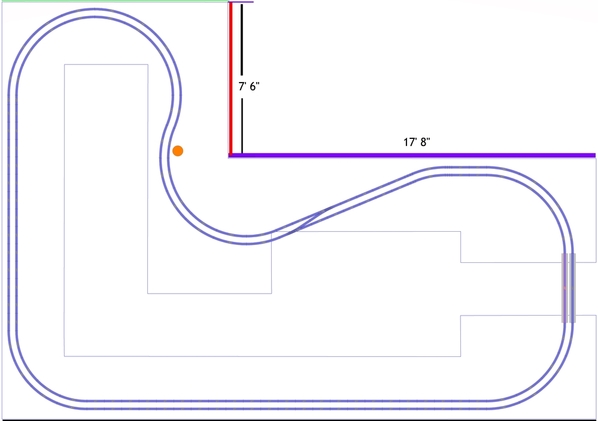
I don't see the pole as a major problem as long as we know exactly where it is, but the wall dimensions still seem off. The Green wall at the top is now marked 10' 10" and that is where the Red wall is. The Purple wall in the center is marked 18' 6", but they don't add up to the 28' 6" length of the Black wall on the bottom. So either the Green wall is really 10' and the Red wall needs to be moved to the left or the Purple wall is only 17' 8" to make the total length 28' 6".
On another note, I've always assumed you'd want a dual main, I just thought it was too early to offer layout suggestions. I added the O72 track and O54 reversing loops just to provide some perspective of the space.
While I agree with using the widest cures you can, I wouldn't let that influence what I'd "like" on my layout. My first inclination is list everything I'd like and then see what will fit with different track sizes and configurations. But then I don't really care too much about how my engines look running around when it comes to engine overhang. ![]() If I need to use O54 or any other size curve to get what I want on the layout so be it. I do shy away from anything tighter than O36 even though all my equipment is rated for O31.
If I need to use O54 or any other size curve to get what I want on the layout so be it. I do shy away from anything tighter than O36 even though all my equipment is rated for O31.
And while I also agree with the idea of wide aisles, that really depends on how many people you expect to be involved in operating the layout at any given time. I've visited 2000 sf layouts where the aisles are 36" throughout and was able to move around easily enough. Of course, that was just 5 adults walking around looking at various elements and not operating. If you plan to have grandkids playing engineer, then deleting the 6' wide peninsula might be a good idea, but that's completely up to and I think you're far from making that decision. My inclination would be to leave it in, but design around it unless you need to use it for something specific.
Along the same line, I agree with Carl's suggestion to use 30" deep decking and only add the extra 6" where you need to, like to add a yard, passenger station, etc. If you place track close to the wall and elevated, 36" can be too far to reach to lift a heavy engine or repair something.
John, to round things, you just "insert" new points and place them where you want them. However, I would keep the current baseboard as a template as you design and then modify the baseboard as you get closer to the final design.
Attachments
DoubleDAZ posted:Aegis21 posted:Here is an updated, more precise drawing.
I don't see the pole as a major problem as long as we know exactly where it is, but the wall dimensions still seem off. The Green wall at the top is now marked 10' 10" and that is where the Red wall is. This is correct!
The Purple wall in the center is marked 18' 6", but they don't add up to the 28' 6" length of the Black wall on the bottom. So either the Green wall is really 10' and the Red wall needs to be moved to the left or the Purple wall is only 17' 8" to make the total length 28' 6". Purple Wall is 17'8"
On another note, I've always assumed you'd want a dual main, I just thought it was too early to offer layout suggestions. I added the O72 track and O54 reversing loops just to provide some perspective of the space.
While I agree with using the widest cures you can, I wouldn't let that influence what I'd "like" on my layout. My first inclination is list everything I'd like and then see what will fit with different track sizes and configurations. But then I don't really care too much about how my engines look running around when it comes to engine overhang.
If I need to use O54 or any other size curve to get what I want on the layout so be it. I do shy away from anything tighter than O36 even though all my equipment is rated for O31. AGAIN Great Advice!
And while I also agree with the idea of wide aisles, that really depends on how many people you expect to be involved in operating the layout at any given time. I've visited 2000 sf layouts where the aisles are 36" throughout and was able to move around easily enough. Of course, that was just 5 adults walking around looking at various elements and not operating. If you plan to have grandkids playing engineer, then deleting the 6' wide peninsula might be a good idea, but that's completely up to and I think you're far from making that decision. My inclination would be to leave it in, but design around it unless you need to use it for something specific. I will leave it in for now and see how track and scenery dictate the final shape with always keeping an eye on comfort. Since I am new to the area and virtually do not know a soul, I do not anticipate a huge crowd. lol
Along the same line, I agree with Carl's suggestion to use 30" deep decking and only add the extra 6" where you need to, like to add a yard, passenger station, etc. If you place track close to the wall and elevated, 36" can be too far to reach to lift a heavy engine or repair something. These are the tid bits of info I desperately need. Since never building or working with a large layout, I don't know what I don't know.
Attachments
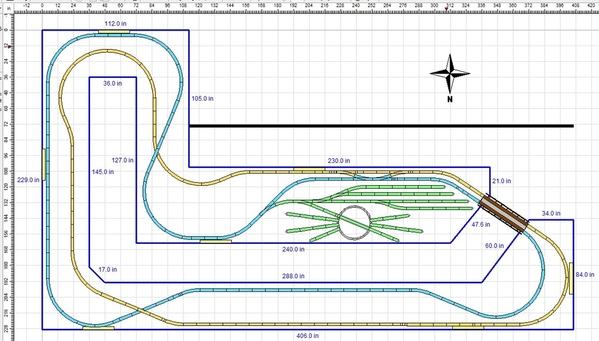
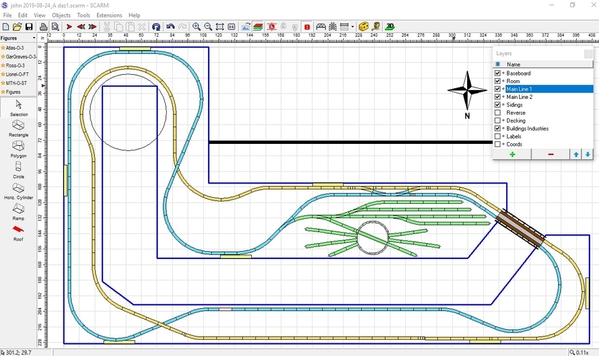
Ok this seems to have a life of its own! With the additional 10" in the L area. I need to move the one aisle over a foot to keep that section to less than 36" as recommended. It will be 34" with this revision. I also put in several points to round or shape at a later time if needed/wanted.
Still having trouble posting a full jpeg they all get cutoff. Is there a setting I need to change in scarm when exporting to jpeg?
Thanks again!
John
Attachments
John,
This seems to be a bug in SCARM (I need to contact Mixy about it), so I don't use the Export option. If you hit the "Fit To Screen" menu button, you'll notice that the "fill" is based on the baseboard and not all the elements in your project. I believe this is the reason some of the jpeg image seems to be cut off.
Here's what SCARM "fits"...........
Here's what's actually in the project..........Note the green rectangle.
Instead, I use the Windows "Snipping Tool" to snip as much or as little of the SCARM image as I want. To find the tool, simply hit the Windows key and start typing "snipping tool". When you see it, you can pin it to the Start bar. It's really a handy tool for capturing anything on the screen and lets you mark it up to point out items of interest, like what I circled in Red.
And since I'm posting, I fiddled a bit with Jan's rendition to fit the new space. Note I simply added some straight tracks and another crossover just to point out that you need both in order to travel between inner and outer runs.
Attachments
Attachments
I forgot to add that another reason I don't like the SCARM jpeg is because there are no rulers or grid lines.
Dave's right about the lack of ruler dots in the picture. I converted the original bitmap (bmp) exported by SCARM to a jpeg so I checked the original bmp to see if they were eliminated in the conversion. No dots in either.
Both Dave and I use a single crossover to establish track spacing of the loops. Your final plan will have crossovers to meet your wants,
Jan
I sent a note off to Mixy about the jpeg problem that I think is caused by the "fit" process. I didn't mention the ruler or grid problem, but I did point him to this thread, so hopefully he'll see this discussion too.
My dad always said everyone could be a good bad example. lol Hope this helps get jpeg resolved
In the mean time I did find snippet thanks to all the Huge help from Dave
Attachments
Hello All,
Another question I have is how close can two tracks be on straight and curved sections? I will be using Gargraves track and Ross switches. Using Gargraves how can I replicate Jan's track work of my layout? Keeping the two lines parallel through curves. I tried 80" 89" 96" curves with varying degrees of failure.
Thanks again!
Like Jan, I use a crossover to keep my mains parallel. The key is configuring a crossover with the desired amount of separation. Generally folks seem to agree that 3.5" separation is the minimum for yards where trains move slowly and 4.5" for mains. Curves can be a different story depending on equipment being run. There is the engine overhang on the outside of curves and the rolling stock overhang on the inside of curves. Where they both meet on a curve determines the minimum amount of separation for your equipment. Of course, it depends on the look you want too.
In Jan's example, he used Atlas #5 switches, partly because they have a 4.5" separation. However, since you want to use Ross switches with GarGraves track, the closest you can get is the Ross 11° switch with a Ross 10 straight for a 5" separation without cutting track. I believe you can substitute any Ross # switch and get the same result.
The placement of the switches doesn't matter because you'll only include the ones you need in the final design. I added a Crossover Layer with some examples for you to look at. Note the separation, but also note the footprint. That often plays a role in which configuration you actually use.
Finally, I tried using GG O96 (Layer 96-89), O89 (Layer 89-80) and O80 (Layer 80-72). The photo shows the 80-72 results. One thing to remember is that the curve going up into the "L" becomes an inside curve, so it uses the tighter curve. This applies to the curves by the rightmost crossover. There are also 2 pieces of Flex Track as well as some places where tracks need to be cut. There's really a lot of trial & error getting things to line up for cutting.
One of the drawbacks to using GarGraves is the lack of the smaller fitter pieces that both Atlas and FasTrack have. However GarGraves is fairly easy to cut and bend. In fact, some builders have used nothing but flex on their layouts.
Attachments
Thanks Dave Again! Cutting track is not a problem, just knowing what the clearances should be a huge help. I admit to having a tendency to have track too close. The instruction on the curves with examples is awesome.
Also I am hoping these loops can have sidings and spurs for industry use. Also someplace to reverse would be nice, however from what I have read that is probably out of the question with my space.
Thanks for the info and layout file as always, it is greatly appreciated.
Attachments
John, that's a good attempt, but the "S" curve should be avoided and the tracks across the opening appear to be too close, but that will be determined by your bridges. There is a 2nd "S" curve to the left, but it's smoother and might be okay.
Anyway, I cut an O42 curve in half (close anyway) and inserted a straight to avoid the"S", then lined everything up to close the loop. One thing to avoid is using too many flex tracks and bending them too tight. I don't know what size curves your equipment is or will be rated for, but that flex is awfully close to O32. Even though my equipment is rated for O31, I use O36 for a minimum. When designing, I try to get close with as large of curves as possible, then I either cut them or delete them and close the gap with a flex. That way I know it won't end up being too tight.
Attachments
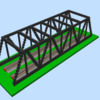
Hi Dave, ok another THANKS for the cutting curve in half, inserting a straight to smooth out the "s" Also putting in a straight and recommending using curves as a guide then using flex for actual track layment will be used for sure. The Bridge is an 40" Atlas O Gauge Double Track Pratt Truss Bridge So whatever the spacing is I will have to conform the track to use.
I tried to widen curves and clean things up a bit as it looked too crowded. Is the curved switch ok to use in the end of the loop?
Attachments
Sorry, but I think you can do better. The photo shows what I go through to line things up and get them as smooth as possible. The Red lines are where I've already "snipped" using the Snip Off tool or where I intend to snip. As you can see I use sectional track for the important parts and then cut curves and straights after I line things up. It takes some finesse, zooming and a lot of trail&error.
In this case, the first thing I did was fix the bridge because AFAIK the track separation over the bridge is 4.5".
I then removed the curved stuff and added straights.
I added the O72/O54 curved switch with O72 and O54 curves attached.
I moved them around until they matched the straights so I could snip them. This is where you have to zoom in enough to be able to see both ends and where the tracks overlap.
Here's the end result. As you can see, I went off the table, but one side can be extended and the other side reduced to compensate as long as the entrance remains wide enough.
Another alternative is to use O42 curves to stay within the existing baseboard.
All that said, I have no experience with the curved switches. I've read some say they are troublesome and others say they work fine. I did like that you didn't try to make the inside bottom tracks concentric. The example Jan posted was just to show how dual mains could work, but there is no reason to limit your thinking to everything being concentric around the entire layout. And many folks use flex for straights so they can add gentle curves vs long straight runs for a meandering effect like it is in reality.
Attachments
Sorry, I posted the wrong SCARM files, so I edited the post with the new ones.
Oh, and I'm trying to tell you how you should do things or how it's supposed to look, just showing alternatives.
Hey Dave these are great lessons and a ton of knowledge. I hardly ever get offended when someone expresses their ideas and wisdom. I am totally new and welcome ALL criticism, as that is how people expand and gain knowledge. No one was ever born knowing everything they know now. Lots of learning went on to get to what ever age you are and the knowledge you posses.
I was trying my best knowing it would not be anywhere close to really good, let alone perfect. Again I thank you for the help and priceless knowledge.
John, I think you're doing great with SCARM. Most folks new to software are afraid to post their attempts and I think you learn a lot more when folks have something to work with and can show you ways it might be improved.
Hi Dave, I am too old to be afraid of learning, that I am not all knowing. LOL Thanks for the support and lessons. I think my next step is to list out what I would like for industries, towns, accessories, roads etc. And start making that long list short so I don't have to build a train building, which I neither the land or finances to do!
Your thoughts?
Dave, you are really getting this stuff down well! Interesting tips on your fitting methods above too. I have been getting a brief urge every once in a while to fire up SCARM and these tips seem to add encouragement. ![]()
Just as a FYI, I was just going to say that the curved switches have the spacing vs pick up roller problems. I think that is the main problem with them. I don't think it matters what type of switch either? I think it's just the way they have to make them to get the curves correct? Anyway, I believe some folks here have found work arounds. I imagine it's more of a problem with the smaller engines as with the numbered switches as well. That is about all I know about these, FWIW.
Aegis21 posted:Hi Dave, I have jumped on the Scarm band wagon and have been taking a crash course so to speak. Thanks for the knowledge and work you have put into my project. It is so appreciated. As you can see from my earlier post, the room dimensions and possible bench work. Not sure on bench work as it will depend on track features and uses for the railroad.
To help all explain how new I am to this, I was fortunate as a young boy to get Lionel trains for Christmas and Birthday presents. My dad would set it up on in our tiny three room apt. that housed my Mom, Dad, Sister and myself. Not a lot of room to say the least. Over the years my collection grew and then college hit and life began. Trains were put away for years, except the occasional Christmas set up. I am now newly retired, moved to a new area, Hadley Pa. (near Mercer pa. home of Mercer Junction train shop) So I am fortunate to have the time, my health, and space to build a model railroad. The last forty year gap in technology is amazing and totally unbelievable. I have a lot to learn about the new generation of trains. I have not been into railroads and how they worked in industry, and also have little knowledge of model railroad track functions. (ie reversing loops) I get how they can make a more point to point railroad which is more reality than a train running around in a circle. However, these things I am just learning. Where to put sidings? Should there be a yard? What industries will the railroad serve? Towns and destinations? I have a HUGE list of questions and probably don't know have of the questions I need to ask.
So please all bear with me as I am the true Newbie.
Thanks in Advance for all the help.
Hi, I just saw your topic! Wow everyone has made a lot of progress in a short time. Yes, we had times of that kind of activity with my layout design too. Dave did most of the heavy lifting! (Thanks again, Dave!!) The folks here are a great help for sure. I'll follow along, if I can keep up!!
I quickly picked up on that you live in Hadley near Mercer. I live in Butler. I am hoping to get construction started on my layout after the first of the year.
I'll be 72 in March. I learn new things almost every day and hope that never stops. While I'm getting pretty good at using SCARM, I have a hard time coming up with ideas for cities and industries. I grew up 30 miles south of Green Bay and my only experience with railroads was the cabooses parked at a siding 300 or so yards form one of my childhood homes. I road the trains a few times from a small town called Brillion to a coastal town called Manitowoc on Lake Michigan. I never got to the point where I had enough space for a layout and still don't. My current project is building a showcase for my wife's Bedford Falls collection she got a long time ago from Target.
I got back into O Scale in 2012 and have had a number of setbacks getting something built. I've had rather large Christmas layouts (8x14), but nothing permanent. I've designed 5 different layouts for 2 bedrooms and part of the garage. I've even rearranged the garage for ta layout, but travel and a few medical issues kept delaying the build. Now I'm have issues with my sciatica that have affected my walking, so I'm having 2nd thoughts on the garage altogether. Between the heat and dust here in Phoenix, I think I'm going to concentrate on getting Bedford Falls up and running in the craft room.
It'll consist of oversize 4x8 tables butted to form an "L" in one corner of the 10x21 room. Since I really just like to watch trains run, it will have 3 simple ovals of various designs on 3 levels with the Bedford Falls buildings scattered around. All the excess buildings will be put on display shelves. It will be on wheels, so I can move it if I need to get behind it, but with no switches, I don't think that will be needed very often. I have a Christmas 4-6-0 steamer w/passenger cars I want to run during the holidays and a Veteran's SD70ACe diesel w/freight cars. I plan to add another diesel and maybe an old-style General 4-4-0 steamer w/passenger cars to run year round. It'll be DCS/TIU controlled and that's about it.
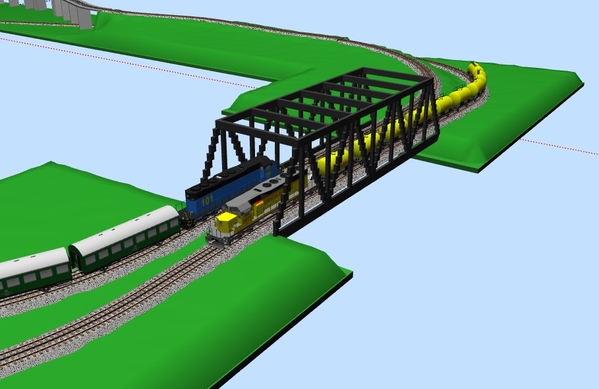
As for industries, there are the tried & true logging, coal mining, mineral mining and oil. You mentioned a subway rising up for a bit and that will kind of require a rather large cityscape, perhaps along the left wall. And since you mentioned lower level subway, you need to plan for elevation grades and those need to be 3% (3" in 12'), preferably closer to 2% (3" in 8'). The MTH graduated trestle set is made to rise 6.5" for a 4.7% grade (6.5" in 11.5').You need around 6." of clearance to account for track height and roadbed thickness. Of course, the subway will can be on it's own track below grade and you can hide the rise behind landscaping to achieve the look you want. But, it can take a lot of track below grade. Here's an example. Note that the Blue tracks in the Red circle do not clear the Purple tracks on top. That means the grade has to be started after the Purple tracks and then the grade will be steeper than most of is like, from 2.9% to 5.4%. Now, modern equipment can probably handle that, especially if the subway is limited to something like 3 cars. I'll let you look at the 3D view in SCARM.
Attachments
RTR12, you know I love the challenge and these days there's not much to challenge the old noggin. It brings up memories of when I wrote computer programs in the Air Force. It was always the challenge of doing things that hadn't been done before and doing them with minimum code, something that has been lost today with bloated coding. ![]() Thanks for the tip on curved/numbered switches.
Thanks for the tip on curved/numbered switches.
Mark, I had a lot of fun with yours and hope to see it some day.
DoubleDAZ posted:Mark, I had a lot of fun with yours and hope to see it some day.
Dave, I hope to see it some day too! LOL. And yours as well!!
Hi Dave I am 66 and try to learn something new everyday. We grew up almost opposite cultures. I was born and raised in New York city. My Dad worked for the Pullman company in Long Island City. When I was a little tot the biggest thrill was to go to Manhattan and visit the Lionel display and then walk to Madison Hardware and drool!
I have been to Milwaukee many times for business reasons and have stayed over the weekends and toured the area all the way up to Green Bay. Beautiful country for sure, and VERY Friendly people. Totally different than the big city. I did have the fortune to spend summers in Pa. with my Aunts and Uncles in a rural area, so I was truly blessed and grateful for all of those blessings. How did you end up in Phoenix? Long ways away for sure.
My back did act up this past summer and had me limping around in pain for several months. After constant pain and listening to my wife tell me to go to the chiropractor, I finally gave in and glad I did. It took several visits, but relief was quick and welcomed. That is what probably started me on this project. Another blessing in disguise. Well good luck on your project and stay healthy.
The subway vision is because growing up in NYC I virtually lived the subway system. It will be a second level under the main level and when it comes up out of the ground it will end at Coney Island, home of Nathan's Hot Dogs, the Cyclone and Parachute rides. So that can be a smaller isolated area without big skyscrapers. Coal is an industry that I would like to have as my uncle was a coal miner in Pa. and his back yard became home to man made mountains of shale. They were called column banks, I think. They were huge, (although I was small LoL) and went for miles along the Susquehanna river in Pittson Pa. Area Later in the 1980's kids would go 4 wheeling up on these banks of shale. Then someone finally figured how to use these mountains and they are all gone now. To me it feels like they are still there with white birch tress trying to grow on the sides of these mountains.
Sorry for getting nostalgic and side tracked.
Again thanks for all the help
DoubleDAZ posted:RTR12, you know I love the challenge and these days there's not much to challenge the old noggin. It brings up memories of when I wrote computer programs in the Air Force. It was always the challenge of doing things that hadn't been done before and doing them with minimum code, something that has been lost today with bloated coding.
Thanks for the tip on curved/numbered switches.
You're welcome and I think your old noggin has absorbed quite a bit of the layout planning software and layouts too! In the mid '80's I started dabbling in MS QuickBasic (it's structured, not like the built in DOS versions) as I got better at it I moved up to MS Basic Pro Development System with some add on libraries written in ASM. It could do about everything the fancier Prog languages could and yes we always tried to optimize the code. PCs were a lot slower back then. It was a lot of fun! Anyway, Windows became usable, MS discontinued development of the DOS based programming stuff (Basic PDS) and went to Visual Basic. To me it was just not the same after that and that ruined my interests in all of it. And so it goes for the old dinosaurs and program language documentation in book form. ![]()
I am learning a lot (finally) about what I might 'actually' want in a layout by following along with the design process you guys use to develop plans for others. For me it's still a learning experience. What I thought I wanted earlier on has changed quite a bit.
Apologies for the interruption. Now back to our regular scheduled topic here, the OP's layout... ![]()
Mark Boyce posted:Hi, I just saw your topic! Wow everyone has made a lot of progress in a short time. Yes, we had times of that kind of activity with my layout design too. Dave did most of the heavy lifting! (Thanks again, Dave!!) The folks here are a great help for sure. I'll follow along, if I can keep up!!
I quickly picked up on that you live in Hadley near Mercer. I live in Butler. I am hoping to get construction started on my layout after the first of the year.
Hi Mark,
I hope I can keep up! ![]() I have moved to Hadley this past year from Ct. about 500 miles away. I am not familiar with the area yet but I have been in Butler once this summer. Do you have postings of your layout here? Love to see them and learn so more!
I have moved to Hadley this past year from Ct. about 500 miles away. I am not familiar with the area yet but I have been in Butler once this summer. Do you have postings of your layout here? Love to see them and learn so more!
Looking forward to some new friendships.
Thanks
John
rtr12 posted:DoubleDAZ posted:RTR12, you know I love the challenge and these days there's not much to challenge the old noggin. It brings up memories of when I wrote computer programs in the Air Force. It was always the challenge of doing things that hadn't been done before and doing them with minimum code, something that has been lost today with bloated coding.
Thanks for the tip on curved/numbered switches.
You're welcome and I think your old noggin has absorbed quite a bit of the layout planning software and layouts too! In the mid '80's I started dabbling in MS QuickBasic (it's structured, not like the built in DOS versions) as I got better at it I moved up to MS Basic Pro Development System with some add on libraries written in ASM. It could do about everything the fancier Prog languages could and yes we always tried to optimize the code. PCs were a lot slower back then. It was a lot of fun! Anyway, Windows became usable, MS discontinued development of the DOS based programming stuff (Basic PDS) and went to Visual Basic. To me it was just not the same after that and that ruined my interests in all of it. And so it goes for the old dinosaurs and program language documentation in book form.

I am learning a lot (finally) about what I might 'actually' want in a layout by following along with the design process you guys use to develop plans for others. For me it's still a learning experience. What I thought I wanted earlier on has changed quite a bit.
Apologies for the interruption. Now back to our regular scheduled topic here, the OP's layout...

We are old dinosaurs for sure. I think I still have my MS Basic book and code for testing gaming systems. I did get into visual basic but I too have left those dino days behind. I work with arduino and esp8266 micros and will try to incorporate them into railroading. Lots of neat stuff to do with these micros for sure.
Aegis21 posted:How did you end up in Phoenix? Long ways away for sure.
I joined the Air Force in 1966 because I was tired of college and my friends got their draft notices, so I wanted to avoid the Army, but still wanted to serve. I went to the Navy recruiter, but he was busy on the phone, so I went next door to the Air Force, turned out to be the right move. First assignment was to Kadena AFB JA on Okinawa and then to Luke AFB here outside of Phoenix. While here I met my wife whose family lived here and fell in love with her and the Desert Southwest. Went to Da Nang Vietnam in 1971, then to Travis AFB CA followed by Scott AFB IL, Hickam AFB HI, Montgomery AL and Colorado Springs CO. I retired in 1993 and the plan was always to move back to Phoenix so my wife could spend time with her family as they aged. I had no desire to go back to cold WI, but we visit my side every couple of years or so when it thaws out. ![]() I delivered mail for 14.5 years and then called it quits for good. Now we do 3 or more road trips each year. There's always 1 to visit my brother wherever he's wintering on some beach and another to the Savannah area to visit our daughter and 2 college grandsons. Next year we hope the make the 3rd to Alaska and we always travel by car. No fear of flying or anything, just enjoy seeing the country.
I delivered mail for 14.5 years and then called it quits for good. Now we do 3 or more road trips each year. There's always 1 to visit my brother wherever he's wintering on some beach and another to the Savannah area to visit our daughter and 2 college grandsons. Next year we hope the make the 3rd to Alaska and we always travel by car. No fear of flying or anything, just enjoy seeing the country.
Hi Dave,
I was a bit behind you as far as the war was concerned. I was in the draft lottery and they stopped 10 numbers before mine. I finished college and went to work for a defense contractor that made guided missile systems for the navy. Wound up sailing on several ships around the world. Did the west pac tour on the USS Long Beach with the Truxton and aircraft carrier USS Enterprise. First nuclear fleet to sail together, 40 knots no smoke was the saying those days. Funny how so many lives run parallel without realizing it.
ok back to real railroading chit chat ![]() How much room should be planned for a small town or industry? Are there typical building sizes for O Gauge? Any guidelines at all?
How much room should be planned for a small town or industry? Are there typical building sizes for O Gauge? Any guidelines at all?
John, many of us include links to our layout planning threads in our signature, so check the bottom of our posts.
Again Thanks Dave
Aegis21 posted:Mark Boyce posted:Hi, I just saw your topic! Wow everyone has made a lot of progress in a short time. Yes, we had times of that kind of activity with my layout design too. Dave did most of the heavy lifting! (Thanks again, Dave!!) The folks here are a great help for sure. I'll follow along, if I can keep up!!
I quickly picked up on that you live in Hadley near Mercer. I live in Butler. I am hoping to get construction started on my layout after the first of the year.
Hi Mark,
I hope I can keep up!
I have moved to Hadley this past year from Ct. about 500 miles away. I am not familiar with the area yet but I have been in Butler once this summer. Do you have postings of your layout here? Love to see them and learn so more!
Looking forward to some new friendships.
Thanks
John
John, Welcome to Western Pennsylvania!! I am 62 and I would guess you could call me semi-retired. I grew up in rural Butler County, 17 miles from town, and went to a rural school. My wife grew up in Butler. I lived about a half mile from the B&O mainline to Pittsburgh, and there was lots of F-unit traffic in those days. I just missed the last of the Mallets that used to make that run. Dad said a train set was too expensive for a gift, so I saved money and bought an HO set when I was about 12. I build HO and N scale layouts, but in 2012, I decided to move to O gauge 3-rail because of my eyesight, and the great detail and sounds of modern O gauge trains. So I have had a lot to learn too, and this Forum and the magazine have been my number one source for help and inspiration.
I would like to meet up with you someday. Maybe we can pick a day to meet at Mercer Junction. I haven't been there in a while.
Here is the link to the layout Dave and others here helped me plan. Blackwater Canyon Line I started construction in January, then my wife saw how cramped my space was, so she gave me use of most of the family room. Since our girls are grown and married, we really don't use that space. That started us pack in the design mode all over again. We actually just expanded the previous plan. I want to get some updated thoughts on that layout topic soon.
Yes, I have been slowed a bit. At first it was helping 4 elderly relatives, but now I have a medical problem of my own. The chiropractor helped, but it looks like I have a disk problem affecting my right sciatic nerve. I'm getting PT and in the process of getting tests to see the full nature of the disc problem. I'm hoping to have some improvement so I can start moving what I started to build into the other room, and continue construction.
Aegis21 posted:ok back to real railroading chit chat
How much room should be planned for a small town or industry? Are there typical building sizes for O Gauge? Any guidelines at all?
Here is a site for accessories that are compatible with SCARM. The drawing are somewhat crude and I don't know how close to scale they are, but they're helpful in determining footprints, etc. They are regullr SCARM files, so downloading is the same as what you do to download a SCARM file, right-click and Save As. If you just click the Download link, you'll end up with a text file that won't mean much. To make it easy to locate and use them, I created an Accessories folder in the SCARM folder. I then downloaded any of the objects I thought I might use (most of them). Using them is a bit cumbersome. You have to open the file and Copy the contents, then open your layout file, Paste them and move them where you want them. It's too bad the Paste command doesn't paste objects below the cursor, but that's another subject. Some of them are Grouped as a single object, but some are not, so make sure you copy all the elements. If you find one that isn't a Group, it's easy enough to make it a Group and using it will be easier.
On a side note, view one in 3D to see the full object. Then you can learn how it's assembled and make your own. You can find some general footprint specs, like length, width and height, online, but you won't find specs for individual elements, so it's hard make much more than a 3D box unless you know someone who has the accessory to measure things.
Mark Boyce posted:Aegis21 postedHi Mark,
I hope I can keep up!
I have moved to Hadley this past year from Ct. about 500 miles away. I am not familiar with the area yet but I have been in Butler once this summer. Do you have postings of your layout here? Love to see them and learn so more!
Looking forward to some new friendships.
Thanks
John
John, Welcome to Western Pennsylvania!! I am 62 and I would guess you could call me semi-retired. I grew up in rural Butler County, 17 miles from town, and went to a rural school. My wife grew up in Butler. I lived about a half mile from the B&O mainline to Pittsburgh, and there was lots of F-unit traffic in those days. I just missed the last of the Mallets that used to make that run. Dad said a train set was too expensive for a gift, so I saved money and bought an HO set when I was about 12. I build HO and N scale layouts, but in 2012, I decided to move to O gauge 3-rail because of my eyesight, and the great detail and sounds of modern O gauge trains. So I have had a lot to learn too, and this Forum and the magazine have been my number one source for help and inspiration.
I would like to meet up with you someday. Maybe we can pick a day to meet at Mercer Junction. I haven't been there in a while.
Here is the link to the layout Dave and others here helped me plan. Blackwater Canyon Line I started construction in January, then my wife saw how cramped my space was, so she gave me use of most of the family room. Since our girls are grown and married, we really don't use that space. That started us pack in the design mode all over again. We actually just expanded the previous plan. I want to get some updated thoughts on that layout topic soon.
Yes, I have been slowed a bit. At first it was helping 4 elderly relatives, but now I have a medical problem of my own. The chiropractor helped, but it looks like I have a disk problem affecting my right sciatic nerve. I'm getting PT and in the process of getting tests to see the full nature of the disc problem. I'm hoping to have some improvement so I can start moving what I started to build into the other room, and continue construction.
Thanks for the warm welcome! Sorry to hear about your back, the back is terrible but today's' science there are many options more so today than ever before. I worked as an engineer in the health care field since 1979 and was involved with the development of the first Cat Scan Machines and Mri machines. So I have seen many drastic improvements in these areas.
Meeting up sounds great, maybe after the holidays. I am pretty handy when it comes to wood working. That will be the least challenging part of my build. If you need any tools or assistance please don't hesitate to ask. I am fully retired, and my wife suffers from RHS retired husband syndrome. LOL The house is almost the way she wants it, there is only one small bedroom that needs carpet ripped up and laminate put down. I turned a large shed into a She Shed for her. Taking out the old swing doors and installing patio doors and replacing the siding to make a nice finished look. Of course I am still not finished unpacking my stuff and setting up the out building/second garage yet. ![]() But wife comes first!
But wife comes first!
Your plans look great!
Starting to read your thread tonight!
DoubleDAZ posted:Here is a site for accessories that are compatible with SCARM. The drawing are somewhat crude and I don't know how close to scale they are, but they're helpful in determining footprints, etc. They are regullr SCARM files, so downloading is the same as what you do to download a SCARM file, right-click and Save As. If you just click the Download link, you'll end up with a text file that won't mean much. To make it easy to locate and use them, I created an Accessories folder in the SCARM folder. I then downloaded any of the objects I thought I might use (most of them). Using them is a bit cumbersome. You have to open the file and Copy the contents, then open your layout file, Paste them and move them where you want them. It's too bad the Paste command doesn't paste objects below the cursor, but that's another subject. Some of them are Grouped as a single object, but some are not, so make sure you copy all the elements. If you find one that isn't a Group, it's easy enough to make it a Group and using it will be easier.
On a side note, view one in 3D to see the full object. Then you can learn how it's assembled and make your own. You can find some general footprint specs, like length, width and height, online, but you won't find specs for individual elements, so it's hard make much more than a 3D box unless you know someone who has the accessory to measure things.
Thanks Again Dave!
Aegis21 posted:Mark Boyce posted:Aegis21 postedHi Mark,
I hope I can keep up!
I have moved to Hadley this past year from Ct. about 500 miles away. I am not familiar with the area yet but I have been in Butler once this summer. Do you have postings of your layout here? Love to see them and learn so more!
Looking forward to some new friendships.
Thanks
John
John, Welcome to Western Pennsylvania!! I am 62 and I would guess you could call me semi-retired. I grew up in rural Butler County, 17 miles from town, and went to a rural school. My wife grew up in Butler. I lived about a half mile from the B&O mainline to Pittsburgh, and there was lots of F-unit traffic in those days. I just missed the last of the Mallets that used to make that run. Dad said a train set was too expensive for a gift, so I saved money and bought an HO set when I was about 12. I build HO and N scale layouts, but in 2012, I decided to move to O gauge 3-rail because of my eyesight, and the great detail and sounds of modern O gauge trains. So I have had a lot to learn too, and this Forum and the magazine have been my number one source for help and inspiration.
I would like to meet up with you someday. Maybe we can pick a day to meet at Mercer Junction. I haven't been there in a while.
Here is the link to the layout Dave and others here helped me plan. Blackwater Canyon Line I started construction in January, then my wife saw how cramped my space was, so she gave me use of most of the family room. Since our girls are grown and married, we really don't use that space. That started us pack in the design mode all over again. We actually just expanded the previous plan. I want to get some updated thoughts on that layout topic soon.
Yes, I have been slowed a bit. At first it was helping 4 elderly relatives, but now I have a medical problem of my own. The chiropractor helped, but it looks like I have a disk problem affecting my right sciatic nerve. I'm getting PT and in the process of getting tests to see the full nature of the disc problem. I'm hoping to have some improvement so I can start moving what I started to build into the other room, and continue construction.
Thanks for the warm welcome! Sorry to hear about your back, the back is terrible but today's' science there are many options more so today than ever before. I worked as an engineer in the health care field since 1979 and was involved with the development of the first Cat Scan Machines and Mri machines. So I have seen many drastic improvements in these areas.
Meeting up sounds great, maybe after the holidays. I am pretty handy when it comes to wood working. That will be the least challenging part of my build. If you need any tools or assistance please don't hesitate to ask. I am fully retired, and my wife suffers from RHS retired husband syndrome. LOL The house is almost the way she wants it, there is only one small bedroom that needs carpet ripped up and laminate put down. I turned a large shed into a She Shed for her. Taking out the old swing doors and installing patio doors and replacing the siding to make a nice finished look. Of course I am still not finished unpacking my stuff and setting up the out building/second garage yet.
But wife comes first!
Your plans look great!
Starting to read your thread tonight!
Thank you for the concern about my back and sciatic nerve. Hopefully I'll be getting an MRI soon. I have an EMG scheduled for Friday. In the meantime, I finally was able to get sent to PT.
I'm glad you are taking a look at my design topic. Not so much because it is mine, but more so for you to see how we went about it, and how new ideas made for radical changes. I'm hoping you will see that folks are willing to go a different direction if you think you don't like what you see.
Yes, after the holidays for sure. There is too much going on in December, and since you are still unpacking, that leaves you more busy than normal. I';; look forward to meeting up with you.
Aegis21 posted:rtr12 posted:DoubleDAZ posted:RTR12, you know I love the challenge and these days there's not much to challenge the old noggin. It brings up memories of when I wrote computer programs in the Air Force. It was always the challenge of doing things that hadn't been done before and doing them with minimum code, something that has been lost today with bloated coding.
Thanks for the tip on curved/numbered switches.
You're welcome and I think your old noggin has absorbed quite a bit of the layout planning software and layouts too! In the mid '80's I started dabbling in MS QuickBasic (it's structured, not like the built in DOS versions) as I got better at it I moved up to MS Basic Pro Development System with some add on libraries written in ASM. It could do about everything the fancier Prog languages could and yes we always tried to optimize the code. PCs were a lot slower back then. It was a lot of fun! Anyway, Windows became usable, MS discontinued development of the DOS based programming stuff (Basic PDS) and went to Visual Basic. To me it was just not the same after that and that ruined my interests in all of it. And so it goes for the old dinosaurs and program language documentation in book form.

I am learning a lot (finally) about what I might 'actually' want in a layout by following along with the design process you guys use to develop plans for others. For me it's still a learning experience. What I thought I wanted earlier on has changed quite a bit.
Apologies for the interruption. Now back to our regular scheduled topic here, the OP's layout...

We are old dinosaurs for sure. I think I still have my MS Basic book and code for testing gaming systems. I did get into visual basic but I too have left those dino days behind. I work with arduino and esp8266 micros and will try to incorporate them into railroading. Lots of neat stuff to do with these micros for sure.
I think I may still have the MS Basic PDS 7 5-1/4 floppies and manuals around here somewhere? Not sure about the QB stuff or my old ASM libraries? It was a fun time. I have dabbled with Arduinos, but I know nothing about C or C+ or whatever they use? Python is supposed to be easier and is becoming popular, some micro boards are now using it as well I think. There is a lot of neat train stuff you can do with the Arduino stuff, some of the forum members here have done some neat stuff with their layouts.
Good Luck with your layout too, Dave will be a lot of help with your layout design, he's good at it and I think he enjoys it too!
Aegis21 posted:ok back to real railroading chit chat
How much room should be planned for a small town or industry? Are there typical building sizes for O Gauge? Any guidelines at all?
Attached is a list of common Lionel and MTH accessories and structures with their dimensions that may be of help to you in designing a layout.
I believe this was originally created by Susan Deats.
Attachments
rtr12 posted:I think I may still have the MS Basic PDS 7 5-1/4 floppies and manuals around here somewhere? Not sure about the QB stuff or my old ASM libraries? It was a fun time. I have dabbled with Arduinos, but I know nothing about C or C+ or whatever they use? Python is supposed to be easier and is becoming popular, some micro boards are now using it as well I think. There is a lot of neat train stuff you can do with the Arduino stuff, some of the forum members here have done some neat stuff with their layouts.
Good Luck with your layout too, Dave will be a lot of help with your layout design, he's good at it and I think he enjoys it too!
I am not sure if you can run and load any of that software on a newer computer any more. I have picked up on C++ and have a robot that I built with my daughter that is an object avoidance robot. Looks like there could be some good applications for it on the Railroad.
Thanks for the words of encouragement, I need them!
Richie C. posted:Aegis21 posted:ok back to real railroading chit chat
How much room should be planned for a small town or industry? Are there typical building sizes for O Gauge? Any guidelines at all?
Attached is a list of common Lionel and MTH accessories and structures with their dimensions that may be of help to you in designing a layout.
I believe this was originally created by Susan Deats.
Thanks in advance for the pdf! I am sure it will be extremely useful.
Thanks
John
Aegis21 posted:rtr12 posted:I think I may still have the MS Basic PDS 7 5-1/4 floppies and manuals around here somewhere? Not sure about the QB stuff or my old ASM libraries? It was a fun time. I have dabbled with Arduinos, but I know nothing about C or C+ or whatever they use? Python is supposed to be easier and is becoming popular, some micro boards are now using it as well I think. There is a lot of neat train stuff you can do with the Arduino stuff, some of the forum members here have done some neat stuff with their layouts.
Good Luck with your layout too, Dave will be a lot of help with your layout design, he's good at it and I think he enjoys it too!
I am not sure if you can run and load any of that software on a newer computer any more. I have picked up on C++ and have a robot that I built with my daughter that is an object avoidance robot. Looks like there could be some good applications for it on the Railroad.
Thanks for the words of encouragement, I need them!
I think I have the last release version of MS DOS around here somewhere as well. I have a couple of older PCs (maybe 10 years or so) that could probably be brought back to life as well. If the urge ever strikes. Of course I have forgotten most of what I knew back then. For the C++ stuff I'm luck that there is so much pre-made code out there so I can usually find something and 'hack it' into something I can use. You are lucky you were able to pick up on the C++ and continue on. Wish I would have stuck with it myself...too old now!
You are welcome on the encouragement. We all need that sometimes! We are also close to the same age, I'll be 66 next week. There is a lot of good help around here in all areas of the OGR forum, they cover all areas of toy/model train and anything you can think of to do with them. Great bunch of folks too!
rtr12 posted:Aegis21 posted:rtr12 posted:I think I may still have the MS Basic PDS 7 5-1/4 floppies and manuals around here somewhere? Not sure about the QB stuff or my old ASM libraries? It was a fun time. I have dabbled with Arduinos, but I know nothing about C or C+ or whatever they use? Python is supposed to be easier and is becoming popular, some micro boards are now using it as well I think. There is a lot of neat train stuff you can do with the Arduino stuff, some of the forum members here have done some neat stuff with their layouts.
Good Luck with your layout too, Dave will be a lot of help with your layout design, he's good at it and I think he enjoys it too!
I am not sure if you can run and load any of that software on a newer computer any more. I have picked up on C++ and have a robot that I built with my daughter that is an object avoidance robot. Looks like there could be some good applications for it on the Railroad.
Thanks for the words of encouragement, I need them!
I think I have the last release version of MS DOS around here somewhere as well. I have a couple of older PCs (maybe 10 years or so) that could probably be brought back to life as well. If the urge ever strikes. Of course I have forgotten most of what I knew back then. For the C++ stuff I'm luck that there is so much pre-made code out there so I can usually find something and 'hack it' into something I can use. You are lucky you were able to pick up on the C++ and continue on. Wish I would have stuck with it myself...too old now!
You are welcome on the encouragement. We all need that sometimes! We are also close to the same age, I'll be 66 next week. There is a lot of good help around here in all areas of the OGR forum, they cover all areas of toy/model train and anything you can think of to do with them. Great bunch of folks too!
I'll be 66 this Saturday! LOL Happy Birthday in Advance
This is my first attempt at adding a second reverse loop. It maybe tending towards spaghetti, and I think an S curve needs to be broken up. Just looking for possibilities that can be done with this set up. I am tending on having an under layout track for subway which will only be point to point.
Attachments
John, Your first attempt at something in SCARM is better than mine was. ![]() My thinking is if there is one reversing loop, then a second is needed to reverse back again, otherwise, why bother. However, other folks see it differently and are quite happy. My plan is a loop to loop, with the loops folded on top of each other.
My thinking is if there is one reversing loop, then a second is needed to reverse back again, otherwise, why bother. However, other folks see it differently and are quite happy. My plan is a loop to loop, with the loops folded on top of each other.
I downloaded your plan and I see track level 1 which I take it is the subway route. It makes sense. I'll leave more analysis to the big guns. I'm a cap gun or pop gun when it comes to track planning even though I have run trains for 50 years. ![]()
Hi Mark,
Thanks for the encouragement on my attempts. My intuition was two loops or none, however I haven't set trains up or made layouts (other than a Christmas oval) The scary part of this project is the sheer lack of knowing what the final product will accomplish. Since I have only seen large layouts on display, the functioning and use/control of a large layout for fun and entertainment is an unknown for me. My other obstacle is imagining different track heights and using tunnels and bridges. I like your layout with the different heights and layers. I am reading as much as I can and hoping to garner some inspiration along the way.
Thanks
John
DoubleDAZ posted:John, that's a good attempt, but the "S" curve should be avoided and the tracks across the opening appear to be too close, but that will be determined by your bridges. There is a 2nd "S" curve to the left, but it's smoother and might be okay.
Anyway, I cut an O42 curve in half (close anyway) and inserted a straight to avoid the"S", then lined everything up to close the loop. One thing to avoid is using too many flex tracks and bending them too tight. I don't know what size curves your equipment is or will be rated for, but that flex is awfully close to O32. Even though my equipment is rated for O31, I use O36 for a minimum. When designing, I try to get close with as large of curves as possible, then I either cut them or delete them and close the gap with a flex. That way I know it won't end up being too tight.
John,you are on th right track with a program like Scarm. You can also use their module to place a train on your layout to see it work. I spent about 6 months planning before I ordered track.
Also, remember to create a theme (s) or a storyline in your plan. If you don't, you will get bored and use your new layout to test new engines and shut it off. I would also consider a trip to York to see what is available for you to incorporate.
One more piece of input. Consider adding a 4 way or something to park about 3 or 4 engines or locomotives. They are heavy and sometimes delicate. Best to minimize handling.
like others on the forum, I could go on and on. One more thing. Do not ballast until your layout wiring is complete, dead nuts sure. Run your layout without ballast do r a f e will months to m a key sure you are satisfied. It is your layout and creativity. "To thine own self, be true". Good luck. You will be a kid again. It's fun.
John, I don't see any "S" curves, but then my eyesight isn't what it once was. An "S" curve is where there are 2 curved tracks connected together that go in opposing directions. The solution is to add a straight track between them, usually a 10" or longer track. This eliminates the stress on the cars and couplers from getting pulled in opposite directions at the same time. It appears you'e done that.
I would like to take this opportunity to remind you that by adding the O54 curves, you are limiting the size of engines you will be able to run. That means you won't be able to run anything that requires curves larger that O54, like the MTH Premier 4-8-8-4 Big Boy steamer. Personally, I don't have a problem with it because anything I buy will run with O31 curves, but I felt I needed to point out the limitation you are imposing with the tighter curves.
I'd also like to take a moment to discuss grades. I noticed some of the elevations got changed to 3" and that just won't work, so I changed them back to 6.5". Then I fiddled with the subway grade at the top of it's run. You can see I moved the beginning of the grade (Blue track) which changes where it will appear (Orange track). It also increased the grade to 4.7%. Have you considered an auto-reversing trolley instead of a subway?
Mark Boyce posted:My thinking is if there is one reversing loop, then a second is needed to reverse back again, otherwise, why bother.
Good catch Mark, I completely missed it. I knew something wasn't right, but just didn't see it, too early here. ![]()
John, here's the latest. I didn't spend any time cleaning things up because I'm not sure this is anywhere close to the final plan once you've taken the time to think about all the things you've been mentioning when it comes to something for trains to do. I'm looking at this as simply a way for you to get proficient with SCARM, so you need to tell me if I'm wrong to think that way.
Attachments
Bryant Dunivan 111417 posted:John,you are on th right track with a program like Scarm. You can also use their module to place a train on your layout to see it work. I spent about 6 months planning before I ordered track.
Also, remember to create a theme (s) or a storyline in your plan. If you don't, you will get bored and use your new layout to test new engines and shut it off. I would also consider a trip to York to see what is available for you to incorporate.
One more piece of input. Consider adding a 4 way or something to park about 3 or 4 engines or locomotives. They are heavy and sometimes delicate. Best to minimize handling.
like others on the forum, I could go on and on. One more thing. Do not ballast until your layout wiring is complete, dead nuts sure. Run your layout without ballast do r a f e will months to m a key sure you are satisfied. It is your layout and creativity. "To thine own self, be true". Good luck. You will be a kid again. It's fun.
I did go to the York show this past Oct. I was just overwhelmed at all the trains, displays and such. Too much to take in without knowing what I will be doing or wanting to do. I went Friday and stayed overnight and went Saturday morning then headed home. (long trip for me)
Yes I am working on a theme/storyline for the past couple of months. Although it appears to me as a chicken/egg thing. Of course I want a million things, however space and design dictate how many of those things are possible. I originally wanted the following:
1. Freight Line with industries
2. Passenger line with stops
3. At least one Small town and other scattered buildings
4. Major passenger station (thinking Grand Central Station in NYC)
5. coal mining and industry
6. Subway with end stop Coney Island in Brooklyn NY
7. Some Mountainous area (Coal mining area Scranton/Wilkes Barre Pa. )
I know the Grand station is probably out as it would require a major skyscraper area. And yes a yard would be nice also to have. I pictured Sunnyside Yards in Long Island City where my Dad worked for the Pullman company. I will remember about not ballasting till totally satisfied with layout! So many wants, so little space and time.
Thanks for the input
DoubleDAZ posted:John, I don't see any "S" curves, but then my eyesight isn't what it once was. An "S" curve is where there are 2 curved tracks connected together that go in opposing directions. The solution is to add a straight track between them, usually a 10" or longer track. This eliminates the stress on the cars and couplers from getting pulled in opposite directions at the same time. It appears you'e done that.
I would like to take this opportunity to remind you that by adding the O54 curves, you are limiting the size of engines you will be able to run. That means you won't be able to run anything that requires curves larger that O54, like the MTH Premier 4-8-8-4 Big Boy steamer. Personally, I don't have a problem with it because anything I buy will run with O31 curves, but I felt I needed to point out the limitation you are imposing with the tighter curves.
I'd also like to take a moment to discuss grades. I noticed some of the elevations got changed to 3" and that just won't work, so I changed them back to 6.5". Then I fiddled with the subway grade at the top of it's run. You can see I moved the beginning of the grade (Blue track) which changes where it will appear (Orange track). It also increased the grade to 4.7%. Have you considered an auto-reversing trolley instead of a subway?
I wasn't sure about the "S" thanks for clearing that up. As far as large trains small curves, at present the largest I have are 4 - 18" passenger cars Lionel 19079 heavyweights and a Diesel set K-Line K28701H which are 17.5" long. They are huge compared to the rest of my collection and although they look fantastic, if they won't work or look out of place I might sell them and get a smaller replacement. Not sure on how that will pan out yet. I did get a good deal on them at the time a couple of years ago. I still haven't taken them out of the box to run or test. ![]()
The 3" elevation was me playing with scarm table depth and valley terrain. I think adding the "subway" threw things off so to speak. And yes you are correct, this is by no means a final layout, but scarm practice and getting an idea what is possible in the space I have been given. Again which came first Chicken (design wants) or the egg( actual room size and layout constraints)
I picture the subway will be it's own layer under the table and then at the end elevate up to end at Coney Island. So it will skirt the edge of the table as much as possible with stations along the way. Not sure how far below main table it will/should be yet. The subway will probably be last part of the build, if it gets put in the end design at all.
Again Thanks Dave.
John,
Yes, it is hard to know what you may want on a first layout that is more than just circles around a Christmas Tree or on a sheet of plywood. Some folks like a lot of switching cars at industries and in the yards. I find a little of that okay, but not a steady diet. I am more of a railfan, wanting to see a train run through multiple scenes Some people like a number of independent loops and have several trains running at a time. Of course like most of us, you want to replicate scenes and train movements like you have seen in the real world; ie the subway. You are ahead of many since you realize you can't have it all, Grand Central Station would look odd without a whole set of skyscrapers and how do you fit that into your space with Anthracite Mountain running?
I had two large passenger engines and two sets of long passenger cars I thought I could run on wide 072 loops while having other track for mountain hauling. Well you may have seen in my topic where I discarded that idea, sold the big engine and long cars, and am going with just the small ones. Nothing larger than a 2-8-0 Consolidation and first generation diesels, with 15" passenger cars.
Yes, the trip to York is a long trip for me too. I have gone twice, but didn't go this past October. We should join up and go together sometime.
Mark Boyce posted:John,
Yes, it is hard to know what you may want on a first layout that is more than just circles around a Christmas Tree or on a sheet of plywood. Some folks like a lot of switching cars at industries and in the yards. I find a little of that okay, but not a steady diet. I am more of a railfan, wanting to see a train run through multiple scenes Some people like a number of independent loops and have several trains running at a time. Of course like most of us, you want to replicate scenes and train movements like you have seen in the real world; ie the subway. You are ahead of many since you realize you can't have it all, Grand Central Station would look odd without a whole set of skyscrapers and how do you fit that into your space with Anthracite Mountain running?
I had two large passenger engines and two sets of long passenger cars I thought I could run on wide 072 loops while having other track for mountain hauling. Well you may have seen in my topic where I discarded that idea, sold the big engine and long cars, and am going with just the small ones. Nothing larger than a 2-8-0 Consolidation and first generation diesels, with 15" passenger cars.
Yes, the trip to York is a long trip for me too. I have gone twice, but didn't go this past October. We should join up and go together sometime.
Hi Mark,
Grand Central Station in the middle of the mountains would take more than imagination to be plausible. Yes I did read your letting go of those large items and scaled down the trains to fit the space/layout design. Your space is similar to mine and I do like your layout. Lots went into it and wow the transitioning from the smaller 12x12 to what you have now is fantastic. Going to York together sounds like a great idea and lots of fun. I am so ignorant of Model railroading terms it is pathetic. You wrote:"Nothing larger than a 2-8-0 Consolidation" 2-8-0 are the wheels on the loco I assume, how do you get length or size from that? Or is it just a look it up and read the dimensions.
2-8-0 and the like are "Whyte notation" for locomotive wheel arrangement and generally indicates the size of the engine.
Thanks Bill!
I learn something new everyday! Appreciate the help in understanding this hobby and railroads.
Bill, Many thanks for the diagrams of the Whyte notation.
John, the manufacturer will give the length, but perhaps more important, the recommended minimum curve for each engine in its documentation. My MTH engines have this information right on the label on the box, and online. Other manufacturers do the same. It is something to keep in mind with passenger cars and long modern freight cars as well.
Here is an example using my largest engine: https://mthtrains.com/20-3166-1 Now, I bought this engine used for a little more than than half the original MSRP from a member of this Forum. All but one of my engines were bought used. The new one was an inexpensive small diesel.
Aegis21 posted:I'll be 66 this Saturday! LOL Happy Birthday in Advance
Happy Birthday to you too! We are pretty close, mine's a week from tomorrow.
Mark Boyce posted:Bill, Many thanks for the diagrams of the Whyte notation.
John, the manufacturer will give the length, but perhaps more important, the recommended minimum curve for each engine in its documentation. My MTH engines have this information right on the label on the box, and online. Other manufacturers do the same. It is something to keep in mind with passenger cars and long modern freight cars as well.
Here is an example using my largest engine: https://mthtrains.com/20-3166-1 Now, I bought this engine used for a little more than than half the original MSRP from a member of this Forum. All but one of my engines were bought used. The new one was an inexpensive small diesel.
Hi Mark,
I looked up the curve for my largest diesel and it is 0-72 minimum Shame I will now e-bay this unit with passenger cars. However it will be a better looking fit with smaller size engines in this space. I have acquired several engines and freight cars from a local auction in Ct. when I lived in that state. I did get some real good deals and will at least break even I hope. These were new in box as they came from a bankruptcy. We will see how they do on e-bay. I may wait till next fall as I do not have the time to list and ship. Plus it is so close to Christmas I might do better next year.
Thanks for the Info! Extremely helpful as always!
rtr12 posted:Aegis21 posted:I'll be 66 this Saturday! LOL Happy Birthday in Advance
Happy Birthday to you too! We are pretty close, mine's a week from tomorrow.
Thanks! I don't know if I should celebrating anymore... lol
John, I like listing trains for sale on the OGR Forum For Sale section. You have much better chance of working a deal with an honest person here than on EBay. I do not mean to criticize EBay, it is just that the comradery here is better
Mark Boyce posted:John, I like listing trains for sale on the OGR Forum For Sale section. You have much better chance of working a deal with an honest person here than on EBay. I do not mean to criticize EBay, it is just that the comradery here is better
Well noted! Thanks
I took a couple of hours this evening to work on our plan, Momimum mainline and revering loop curves is O63.

Jan
Attachments
Wonderful job Jan. I like it, but am concerned about the reach to the double crossover, unless John adds an access hatch by the spurs.
Jan posted:I took a couple of hours this evening to work on our plan, Momimum mainline and revering loop curves is O63.
Jan
NICE work Jan! I was playing around a bit with a yard on the left side which put the purple curves back to a larger size. Again I was just playing around so to speak. This layout has no purpose as of yet, (except to run trains) But it is a great start and gives a great indication of what can be done in this area.
DoubleDAZ posted:Wonderful job Jan. I like it, but am concerned about the reach to the double crossover, unless John adds an access hatch by the spurs.
Thanks for the heads up on the dreaded reach factor. I would like to avoid an access hatch if at all possible. Could possibly move the left crossover to the left until it becomes reachable. The other crossover could be moved towards the right as far as the Bridge??? Again Thanks Dave for picking up on that!
I like having a purpose for my railroad, such as hauling coal or logs from point A to point B. Some folks are quite happy with the purpose of just running trains. Either is great! It depends on what you want to do.
Mark Boyce posted:I like having a purpose for my railroad, such as hauling coal or logs from point A to point B. Some folks are quite happy with the purpose of just running trains. Either is great! It depends on what you want to do.
I would like to have a purpose for the railroad. Not totally sure yet what that maybe, but coal is definitely on the short list of mine. And sometimes just having a train run is nice, kind of like setting on the porch and hearing the diesel horn off in the distance and anticipating the train coming past the neighborhood.
I agree about the reach problem, that any of us over 60 should make sure we don’t design something we can’t maintain. Just since we designed my layout I now that I have a disk and sciatic nerve problem. I am glad my plan provides for easy access to all points.
That said, I don’t know how to fix the problem other than taking a different approach to that area. I guess I could put on my thinking cap, but I don’t know where I left it!!!
Aegis21 posted:Mark Boyce posted:I like having a purpose for my railroad, such as hauling coal or logs from point A to point B. Some folks are quite happy with the purpose of just running trains. Either is great! It depends on what you want to do.
I would like to have a purpose for the railroad. Not totally sure yet what that maybe, but coal is definitely on the short list of mine. And sometimes just having a train run is nice, kind of like setting on the porch and hearing the diesel horn off in the distance and anticipating the train coming past the neighborhood.
I always have a continuous run ability to use on occasions I want to break in a new engine or just run trains. You may have seen that discussion early on in my topic. A true point to point only layout was suggested. Most people don’t go for that.
Mark Boyce posted:Aegis21 posted:Mark Boyce posted:I like having a purpose for my railroad, such as hauling coal or logs from point A to point B. Some folks are quite happy with the purpose of just running trains. Either is great! It depends on what you want to do.
I would like to have a purpose for the railroad. Not totally sure yet what that maybe, but coal is definitely on the short list of mine. And sometimes just having a train run is nice, kind of like setting on the porch and hearing the diesel horn off in the distance and anticipating the train coming past the neighborhood.
I always have a continuous run ability to use on occasions I want to break in a new engine or just run trains. You may have seen that discussion early on in my topic. A true point to point only layout was suggested. Most people don’t go for that.
Hi Mark,
I did read your entire layout planning topic. My preference at this time is the double loops. I am not sure if that will change in time when I get to see more layouts in a functioning setting. At this time I am wondering, and questioning the two main line set up. I know it adds a lot of long runs and track, however the loops get messy and cluttered and limits other aspects. I hope you and others with more experience than me (which would be almost everyone) will chime in with comments and any reasons one way or the other.
Thanks John
The double crossover does not have to be there. Is there any reason why there can't be an open window in that wall above the crossover? The wall doesn't exist yet, so this would be a location for viewing.
In western Pennsylvania you wou;d have slow-moving iron ore unit trains running between Lake Erie and the steel mills in Pittsburgh.Also coal/cole for the furnaces. The Pittsburgh and Lake Erie operations would be a starting point. You also have the NYC and PRR to study.
Jan
Aegis21 posted:I would like to avoid an access hatch if at all possible. Could possibly move the left crossover to the left until it becomes reachable. The other crossover could be moved towards the right as far as the Bridge?
Here's an alternate design where I believe there's sufficient access to the switches. Note that I replaced the 11° switches with O72 switches located on the curves for a smooth transition. I also moved the rightmost tracks in a bit to get them away from the edge and give the lift-up bridge structure more room. When you get to planning for the bridge, take a look at this thread of Mike G's, especially the 2nd video of the bridge in operation.
I placed a yellow access hatch just for information to show where it might go. What you do is place some landscaping on it and make it removable. That way it's there if you ever need it. Many modelers place they accessories on removable platforms whether they be access hatches or not. It's a lot easier to work on animated accessories if they can be moved to a workbench for repair.
Attachments
Jan posted:The double crossover does not have to be there. Is there any reason why there can't be an open window in that wall above the crossover? The wall doesn't exist yet, so this would be a location for viewing.
In western Pennsylvania you wou;d have slow-moving iron ore unit trains running between Lake Erie and the steel mills in Pittsburgh.Also coal/cole for the furnaces. The Pittsburgh and Lake Erie operations would be a starting point. You also have the NYC and PRR to study.
Jan
Hi Jan,
There isn't a reason why there cant be a window there, other than my wife possibly not wanting one there. I will have to propose that to her and get her feedback. Good Idea!
We currently live in western Pa. where my wife is from, however I spent most summers in eastern Pa. with coal all around. There was a train that went behind my Uncles house and we would "walk the tracks" with my Aunt and pick up pieces of coal that fell off the trains. We would have a bucket and bring them back to the house for the coal bin. We did this all summer and it was amazing at the pile we had by labor day. I haven't a clue what railroad ran through there at the time 1962 ish time frame. Being from New York City we took passenger trains from Grand central station to upstate NY to visit my other Aunt & Uncle. Great rides and fun times. Grand Central station was bigger than life for a 10 year old and seeing the rolling hills of upstate NY and the foothills of the Adirondack mountains was awesome.
Thanks for the ideas and getting my memory active.
DoubleDAZ posted:Aegis21 posted:I would like to avoid an access hatch if at all possible. Could possibly move the left crossover to the left until it becomes reachable. The other crossover could be moved towards the right as far as the Bridge?
Here's an alternate design where I believe there's sufficient access to the switches. Note that I replaced the 11° switches with O72 switches located on the curves for a smooth transition. I also moved the rightmost tracks in a bit to get them away from the edge and give the lift-up bridge structure more room. When you get to planning for the bridge, take a look at this thread of Mike G's, especially the 2nd video of the bridge in operation.
I placed a yellow access hatch just for information to show where it might go. What you do is place some landscaping on it and make it removable. That way it's there if you ever need it. Many modelers place they accessories on removable platforms whether they be access hatches or not. It's a lot easier to work on animated accessories if they can be moved to a workbench for repair.
Great Job as always Dave! Thanks for the link to Mike's Bridge and the access hatch advice. Since I haven't tackled scenery and diorama's the hatch is scary from that point of view.(how to hide it and make it easy to remove) I am sure this is not the first hatch on the forum and probably a wealth of knowledge on here to help calm my fears. Your pic is not visible to me "Image not found" Message where pic should be, so I opened the scarm file and snipped it for this reply.
Attachments
Weird, I fixed the photo and it fixed your quote too. Not sure what happened, so I just reattached it. ![]()
I was wondering about a door to the crossover, but then I remembered you only mentioned the green and red walls at one time. I assume the wife will not want to see through to whatever will be on the other side of the wall, but curtains can take care of that. I'd be inclined to consider a picture on a section that swings into the room.
If you're up to the challenge of adding a lift up or lift out bridge, you can handle a removable access hatch, you just have to plan for it when you design the framing. There are plenty of techniques available to hide seams, but that all depends on your choice of landscaping. Oftentimes it's a sidewalk, road or parking lot.
DoubleDAZ posted:Weird, I fixed the photo and it fixed your quote too. Not sure what happened, so I just reattached it.
I was wondering about a door to the crossover, but then I remembered you only mentioned the green and red walls at one time. I assume the wife will not want to see through to whatever will be on the other side of the wall, but curtains can take care of that. I'd be inclined to consider a picture on a section that swings into the room.
If you're up to the challenge of adding a lift up or lift out bridge, you can handle a removable access hatch, you just have to plan for it when you design the framing. There are plenty of techniques available to hide seams, but that all depends on your choice of landscaping. Oftentimes it's a sidewalk, road or parking lot.
Asked my wife and she would prefer no windows or doors on that wall. She wants to place sofa and furniture along that wall so that preference is a Hard no ![]() Building hatch is doable, just would have rather not, however after reading your post on servicing and or building on it on a bench makes it appealing. Always a different look at hings is good. Thanks
Building hatch is doable, just would have rather not, however after reading your post on servicing and or building on it on a bench makes it appealing. Always a different look at hings is good. Thanks
As far as the bridge is concerned, I will ask Mike for any info rather than reinvent the wheel. He did a fantastic job!
Mike G has quite a bridge as Dave pointed out! That is very impressive. (Mike's pretty good at layout building too.)
I completely understand about the wall and didn't think access would fly. ![]()
I believe Mike got a lot of help from someone who had built a similar bridge, so there is help available.
Mike,
Sent me his plans already, and I could not thank him enough! That is some bridge and great plans to boot! Everyone here has been so helpful it is amazing!
Thanks Everyone!
Aegis21 posted:Mark Boyce posted:Aegis21 posted:Mark Boyce posted:I like having a purpose for my railroad, such as hauling coal or logs from point A to point B. Some folks are quite happy with the purpose of just running trains. Either is great! It depends on what you want to do.
I would like to have a purpose for the railroad. Not totally sure yet what that maybe, but coal is definitely on the short list of mine. And sometimes just having a train run is nice, kind of like setting on the porch and hearing the diesel horn off in the distance and anticipating the train coming past the neighborhood.
I always have a continuous run ability to use on occasions I want to break in a new engine or just run trains. You may have seen that discussion early on in my topic. A true point to point only layout was suggested. Most people don’t go for that.
Hi Mark,
I did read your entire layout planning topic. My preference at this time is the double loops. I am not sure if that will change in time when I get to see more layouts in a functioning setting. At this time I am wondering, and questioning the two main line set up. I know it adds a lot of long runs and track, however the loops get messy and cluttered and limits other aspects. I hope you and others with more experience than me (which would be almost everyone) will chime in with comments and any reasons one way or the other.
Thanks John
John,
Double loops is always a good choice. I grew up near the B&O double track main line, and it was really exciting when I occasionally saw two trains came through in opposite directions! The same is true on a layout!! Since I am trying to sort of replicate the Elkins line in West Virginia, which was single track, I wanted to go with that for the scenic effect. As to the double track with a passing siding, two crossovers, I think it will look much less messy in real life than on the drawing board. It is the reversing loops that balloon out into the aisle space that I think make it a bit messy. I wish I could think of another way of doing it that would flow better. All of us hear will say the choice is yours, but as you saw on my topic, I needed some suggestions to get the creativity to flow. I'm sure it is the same with you. I do like this last plan the best so far though! Dave and Jan are doing a great job.
John,
By the way, when Christmas and New Years are over, and I get into working on my layout again, I will invite you down so you can see what you read about actually taking shape. Though I am no woodworking craftsman, I do have some experience in building a layout. I think it would be very beneficial. ![]()
My only comment about dual mains is that they don’t need to be parallel around the entire layout. Obviously they need to be at the bridge and crossovers, everywhere else they can meander, go over/under, etc.
And crossovers don’t need to be close to each other either.
The wrinkle I see is the subway and I’m still not sure how that’s going to run. I assume it will eventually run close to the edge on a shelf with viewing stations at various points. It’s hard to design the run though without knowing what the min curve size needs to be, etc. if you hide most of it, it’s just a waste of track and money.
Mark Boyce posted:Aegis21 postedHi Mark,
I did read your entire layout planning topic. My preference at this time is the double loops. I am not sure if that will change in time when I get to see more layouts in a functioning setting. At this time I am wondering, and questioning the two main line set up. I know it adds a lot of long runs and track, however the loops get messy and cluttered and limits other aspects. I hope you and others with more experience than me (which would be almost everyone) will chime in with comments and any reasons one way or the other.
Thanks John
John,
Double loops is always a good choice. I grew up near the B&O double track main line, and it was really exciting when I occasionally saw two trains came through in opposite directions! The same is true on a layout!! Since I am trying to sort of replicate the Elkins line in West Virginia, which was single track, I wanted to go with that for the scenic effect. As to the double track with a passing siding, two crossovers, I think it will look much less messy in real life than on the drawing board. It is the reversing loops that balloon out into the aisle space that I think make it a bit messy. I wish I could think of another way of doing it that would flow better. All of us hear will say the choice is yours, but as you saw on my topic, I needed some suggestions to get the creativity to flow. I'm sure it is the same with you. I do like this last plan the best so far though! Dave and Jan are doing a great job.
I also like the last plan and agree Dave and Jan are doing a fantastic job. Not only do I need some creativity flowing but general railroad knowledge and how real railroads ran and sorted cars and got goods from point "A" to point "B". I agree on the reversing loops being congested and changing elevations like your layout has is something that may clean that up. Although it is cleaner now with this last revision.
Mark Boyce posted:John,
By the way, when Christmas and New Years are over, and I get into working on my layout again, I will invite you down so you can see what you read about actually taking shape. Though I am no woodworking craftsman, I do have some experience in building a layout. I think it would be very beneficial.
I would love to stop by and see your progress and learn all I can. I'll also lend a hand if needed.
Thanks for the invite.
DoubleDAZ posted:My only comment about dual mains is that they don’t need to be parallel around the entire layout. Obviously they need to be at the bridge and crossovers, everywhere else they can meander, go over/under, etc.
And crossovers don’t need to be close to each other either.
The wrinkle I see is the subway and I’m still not sure how that’s going to run. I assume it will eventually run close to the edge on a shelf with viewing stations at various points. It’s hard to design the run though without knowing what the min curve size needs to be, etc. if you hide most of it, it’s just a waste of track and money.
Thanks for the dual mains help and tips, same with crossovers. The subway will run close to the edge on a shelf with station stops along the way. At one point I hope it will elevate to main level for the last stop. I am not sure how and if that will work at all, however this is the dreaming stage. As far as a waste of track and money, well I can not argue that at all at this point. It will be the last part of the build and if funding runs out then so be it.
Thanks again for all your help!
Here's an alternative to reverse loops.
Jan

Attachments
Jan, That is certainly cleaner and provides for easier reach if John doesn't mind a second lift up bridge in the middle.
Yes, it's cleaner. I wondered about the additional bridge, but them I discovered the subway layer...
I didn't mention that all curves are O72 or larger.
Jan
Jan posted:Here's an alternative to reverse loops.
Jan
That certainly cleans things up. Not sure about the second bridge, I'll have to ponder on this one for sure.
Thanks Jan!
Jan posted:Yes, it's cleaner. I wondered about the additional bridge, but them I discovered the subway layer...
I didn't mention that all curves are O72 or larger.
Jan
I like the 072 minimum curves. The subway layer is a last wishful thinking item that should be a point to point, without bridges. Not sure why you mentioned addition bridge and discovering the subway layer?
Wouldn't second bridge inhibit following trains around layout? Just putting this question out there for discussion.
Thanks
John
John,
Check out Susan Deat's Bridges.
Any moveable bridge will affect operations, You can see to operate your layout from either opening. Since you live in western Pennyslvania you'll find that there are plenty of engineers, brakemen, and conductors to operate the trains with you.
To men, a layout this size means operations:
- Through freight and passenger trains;
- Local passenger trains;
- Way freights and industries from them to serve;
- Yard operations; and
- Station operations.
But you'll also want continous operations to keep you company while you work on various activities of this hobby.
This hobby can be as simple as running a train in circles to realistic railroad enterprise. Your decisions now on what you want will determine where you go from here, The Forum is here to help and confuse you.
Jan
Jan posted:John,
Check out Susan Deat's Bridges.
Any moveable bridge will affect operations, You can see to operate your layout from either opening. Since you live in western Pennyslvania you'll find that there are plenty of engineers, brakemen, and conductors to operate the trains with you.
To men, a layout this size means operations:
- Through freight and passenger trains;
- Local passenger trains;
- Way freights and industries from them to serve;
- Yard operations; and
- Station operations.
But you'll also want continous operations to keep you company while you work on various activities of this hobby.
This hobby can be as simple as running a train in circles to realistic railroad enterprise. Your decisions now on what you want will determine where you go from here, The Forum is here to help and confuse you.
Jan
I certainly agree with the Help and confuse you ability in this forum. Although I was confused way before I got on this forum, and the forum has cleared up more than it has muddied. I do really appreciate all the help from yourself and others on this forum. I would like to have "operations" as it seems as though it would keep the layout interesting for a much greater time frame. Wondering now if I am making this too big???
John, I don’t think you are making the layout too big or complicated. I think to have some reasonable amount of operations in O Gauge you have a nice sized space. It’s just a matter of coming up with a workable plan.
Mark Boyce posted:John, I don’t think you are making the layout too big or complicated. I think to have some reasonable amount of operations in O Gauge you have a nice sized space. It’s just a matter of coming up with a workable plan.
Thanks for the support Mark and You and your family have a Merry Christmas.
And Merry Christmas to everyone on this forum!
Merry Christmas to you and your family, John!!
Hi All!
Now that the holidays are over I can once again get back to my layout. I have to admit I was researching Train Electronics over the holidays and unfortunately started playing around with DCC. I don't have any tracks set up or engines that are DCC to run on them, however as DCC seems to be an open system, it caught my electronic eye. Part of planning for me is to learn what is available and what works or maybe more importantly, what doesn't work with what systems. I should probably take this discussion over to another area, but just wanted all to know what has my attention. Also my track plan needs a vision which is eluding me at this time. Spending time working on a general theme and putting together that list of wants and really wants, needs to happen soon.
Hope everyone had a Merry Christmas and are enjoying the new year.
John
John, you mentioned DCC. The newer MTH engines run on DCS or DCC. There is a little switch on the under frame to make the selection. I use MTH's DCS system so know very little about DCC except as you said it is open sourced and there are many manufacturers that are compatible with on another in the HO market. I don't know if Lionel is doing this or not. Since Williams by Bachmann aren't command controlled, you would have to install a decoder.
We had a great Christmas and New Year. Thank you!
Hello All,
I have been working on the train room via my wife's wishes for a room to be finished off for our daughter and friends to use. That is in the basement, and the other side of the basement is for trains and storage. So I have some walls up complete with taping, mudding, sanding and painted. Still have about sixteen feet of wall to go, to fully finish my wife's side, so I will be working on that first. Good news for trains, the walls are up around the train area and now real measurements can be taken and used for making a track plan. I am still floundering around the theme and reason for the railroad. Personally being torn between penn. coal industry which I spent summers in the Wiles-Barre Scranton area and growing up in NYC and riding the trains from Grand Central station and the NY subways for years. Which way will provide more long term interest and excitement are the questions I have to answer.
Thanks for all the help from everyone.
John
John
Just caught up with this thread. Looks like a fun layout is coming.....looking forward to seeing your progress......I'm a Bronx kid transplanted to central Virginia....I rode the 6, 5, 4 & 2 many times into Grand Central.
Peter
I have to admit I am looking forward to progress also... lol Have to finish one side of basement before I can start on the train side. That is ok, as I mentioned, My concept is still undecided and is elusive. I have been reading many books and articles on layout planning and design. The more I read the more conflicted I get between having loops and running trains to point to point railroading. I am blessed with a fairly large area to work in, but it seems to shrink with the reach limitations and my inability to vision different configurations. At one point I totally stopped thinking about it and focused on finishing the extra basement room. That was probably the best route at the time. Now I can see only a couple of weeks and I won't have that excuse. ![]()
Thanks for the interest.
John
John, I had exactly the same problem with my room shrinking as we moved along with the design process! Reach was a major issue. I’m not up to crawling under or on top of a layout!
Hi All, Another handicap I have uncovered through this process is my inability to plan in 3D. I would like trains on bridges going over another track and or road way, however, between keeping grades to a reasonable pitch and visualizing the track layout is (at this point) close to impossible for me. I am a hands on person, so maybe if I ever get that area cleared out I can lay track on the floor and figure it out hand over hand so to speak.
Hello All, I still am wrestling with space, reach, amount of track and walking room. I have included jpeg's of two ideas for train table layout. One with a walk around the outside and an isle inside and the other against the walls with access panels and an interior isle. The black lines are hard walls and the blue lines are dimensions or table top area out line. I know people here have seen/have many layouts and a ton of experience. Yes everyone has an opinion, which is what I am looking for, opinions based on experience.
I hope the pics show up ok
Thanks
John
Attachments
Well, you'll find the walk-around will be a ton more convenient when you're building and working on the layout. Since we're talking about O-gauge, I'd grab that extra ten feet right now, I suspect you're going to want it! ![]()
I am starting to lean in that direction, since reaching will be harder and harder with age. Also using access holes isn't too appealing. I wonder how often they are used once set is up and running?
Thanks
John
I’m for around the walls layout. No place with track out of arms reach. I’m younger than John, but enough over 60 to want no other.
Mark Boyce posted:I’m for around the walls layout. No place with track out of arms reach. I’m younger than John, but enough over 60 to want no other.
Hi Mark,
It seemed to me with a walkway along one wall as well as isle, things would not be out of reach or longer than need be.
And as far as age, it is the mileage that really matters. I think I have about worn down my knees to join your quest in knee replacements. ![]() Being new in area I haven't a clue about the surgeons out here and their reputation. And there can be huge differences between technique and materials used.
Being new in area I haven't a clue about the surgeons out here and their reputation. And there can be huge differences between technique and materials used.
Hope your wife is doing well!
Thanks
John
Looks like this thread has come full circle and we're back to square one. ![]()
Your examples are skewed though and are not fair comparisons. In the 1st one, you expanded certain sections and added access hatches that are only needed if you design a layout that needs them, such as some of those that were offered earlier in the thread. In the 2nd one, you shrunk the area where you had access hatches and moved the upper section down away from the wall.
Photo 1 shows the approximate space available for decking for an around-the-room design. It has a min 36" reach all the way around.
Photo 2 shows the approximate space available for a walk-around design. It also has a min 36" reach and the upper aisle is 30" wide, the lower 36".
Photo 3 is just a sample.
The only reason previous designs included access hatches was your desire for reversing loops when you don't really need them. You have more than enough room for double mains that can cross over/under each other (Photo 4).
Attachments
DoubleDAZ posted:Looks like this thread has come full circle and we're back to square one.
Your examples are skewed though and are not fair comparisons. In the 1st one, you expanded certain sections and added access hatches that are only needed if you design a layout that needs them, such as some of those that were offered earlier in the thread. In the 2nd one, you shrunk the area where you had access hatches and moved the upper section down away from the wall.
Photo 1 shows the approximate space available for decking for an around-the-room design. It has a min 36" reach all the way around.
Photo 2 shows the approximate space available for a walk-around design. It also has a min 36" reach and the upper aisle is 30" wide, the lower 36".
Photo 3 is just a sample.
The only reason previous designs included access hatches was your desire for reversing loops when you don't really need them. You have more than enough room for double mains that can cross over/under each other (Photo 4).
Photo 1
Hi DoubleDaz,
I have not abandoned original ideas. Just at this point, all options are still open and train table space, accessibility and usability are things that could use a second look.
Yes my examples are skewed and are only there to give a visual of what I would not do a good job of explaining. (you get my point from the last sentence lol ) I do not see your pics on this post, so I cannot comment on them at all. Please repost those pics as they certainly will help.
Thanks for bringing my maybe foolish idea of reversing loops to light. Love to hear other opinions on reversing loops as I am certainly not steadfast on that idea. I have actually redesigned the layout with trying to incorporate track over and under ideas with the reversing loops, I had a great bowl of spaghetti when done. I did post I am having trouble with 3d design, meaning a flat surface with not tracks crossing I can visualize to a degree. Taking a design and then having different levels eludes me and may be a mountain of a road block, I could live initially with a flat layout to test my equipment and decide which control system to use and finalize the Railroad's purpose. It's purpose may only be to run trains and include various industries and move passengers from place to place. So prototypical operation may or may not evolve.
PS I am sure over thinking everything!
Again Thanks for the help
Always Appreciated
John
John, photos should be there now. I have no idea what went wrong.
DoubleDAZ posted:John, photos should be there now. I have no idea what went wrong.
Hi DoubleDaz,
I do see the photos and lean towards #1 around the room. I guess all that middle room seems "wasted" It is 4'x17' of added walking space. It may very well lend itself to a more comfortable overall experience. But since I have no experience I cannot pass that judgement. Now to incorporate passing sidings and spurs to service. Thanks for adding the elevated area's as that may help wrap my mind around those kind of ideas.
Further studying will hopefully shed some more light on my weaknesses.
Again Thanks
John
It's around the perimeter for me (just opinion/personal preference) for reasons:
(1) Curves viewed from the inside appear less sharp to the mind's-eye than do curves viewed from the outside.
(2) I don't like spaghetti-bowls and sans that the maximum route-mileage is obtained by using the perimeter.
(3) Around-the-perimeter minimizes the real estate required for isles and thus maximizes the square footage available for the railroad.
(4) I want a model railroad to go from one place to another and for me that works best with around-the-perimeter because the sight-line is limited and keeps changing as the train moves along.
Lew
John, I don't think you're overthinking. It's not easy to visualize the over/under if you haven't mastered elevations and grades. As you can see, I use colors to differentiate things. The blue track is obviously the outer main with an elevation of 0". The bottom gold track is the inner main, also with an elevation of 0". The upper gold track is the elevated track with an elevation of 7". The purple tracks are the grades going from 0" to 7". The reason I color code them is so I can double-click to select a given segment when I need to make changes. I've attached the SCARM file so you can play with it.
Elevation editing can be a little tricky until you get the hang of it.
- Zoom in to see mostly the upper gold track.
- Turn on the Height icon (red h) and Input icon (red I). You should now see that the elevation for each track is 7.
- Click on the left one and change it to 9. To do that, you have to delete the 7 and then enter 9.
- Click on the right one and change it to 9 also. You should see all of them change to 9. If you don't, try again. If you really mess up, simply open the file again (without saving changes).
Grade editing is even more tricky.
- Zoom in on the right purple segment.
- Make sure the Height and Input icons are still on. You should see that the track close to the gold track is 7 and the one far away is 0.
- Click on the one that says 7 and change it to 9. You should see it display the % of incline.
- If the incline is too steep, add another track to the far end, change its color and re-select the segment.
- This time you can change the 0 to 0 or the 9 to 9 again and that will recompute the % of incline.
Good luck.
BTW, you'll see I added a small Wye to let you turn engines.
Attachments
John, If I had more room/didn’t have to contend with 4 doors and a wall of windows that needed to keep full access I would have not bothered with the turnback loops. On the other hand the door and window access made for access on three sides and no pop up hatches.
geysergazer posted:It's around the perimeter for me (just opinion/personal preference) for reasons:
(1) Curves viewed from the inside appear less sharp to the mind's-eye than do curves viewed from the outside.
(2) I don't like spaghetti-bowls and sans that the maximum route-mileage is obtained by using the perimeter.
(3) Around-the-perimeter minimizes the real estate required for isles and thus maximizes the square footage available for the railroad.
(4) I want a model railroad to go from one place to another and for me that works best with around-the-perimeter because the sight-line is limited and keeps changing as the train moves along.
Lew
ALL Excellant reasons, especially #1, 2, 3 and 4
Thanks
DoubleDAZ posted:John, I don't think you're overthinking. It's not easy to visualize the over/under if you haven't mastered elevations and grades. As you can see, I use colors to differentiate things. The blue track is obviously the outer main with an elevation of 0". The bottom gold track is the inner main, also with an elevation of 0". The upper gold track is the elevated track with an elevation of 7". The purple tracks are the grades going from 0" to 7". The reason I color code them is so I can double-click to select a given segment when I need to make changes. I've attached the SCARM file so you can play with it.
Elevation editing can be a little tricky until you get the hang of it.
- Zoom in to see mostly the upper gold track.
- Turn on the Height icon (red h) and Input icon (red I). You should now see that the elevation for each track is 7.
- Click on the left one and change it to 9. To do that, you have to delete the 7 and then enter 9.
- Click on the right one and change it to 9 also. You should see all of them change to 9. If you don't, try again. If you really mess up, simply open the file again (without saving changes).Grade editing is even more tricky.
- Zoom in on the right purple segment.
- Make sure the Height and Input icons are still on. You should see that the track close to the gold track is 7 and the one far away is 0.
- Click on the one that says 7 and change it to 9. You should see it display the % of incline.
- If the incline is too steep, add another track to the far end, change its color and re-select the segment.
- This time you can change the 0 to 0 or the 9 to 9 again and that will recompute the % of incline.Good luck.
BTW, you'll see I added a small Wye to let you turn engines.
Love the orgainization of colors and how you use them to your advantage in Scarm
Big thanks on the height and grading in scarm, that has been a sore spot. This should be a big help. I did spend time reading the scarm info but just lost track (no pun intended) of which was which as far as height verses grade.
I can't wait to see the wye too!
Mark Boyce posted:John, If I had more room/didn’t have to contend with 4 doors and a wall of windows that needed to keep full access I would have not bothered with the turnback loops. On the other hand the door and window access made for access on three sides and no pop up hatches.
I do like you setup and was taking your turn back loops as a mini goal as it seems to have some added interest in operation. Again I do not know, as I have never built a large layout. Only a 4x8 ovals when I was a tot.
Thanks for your input as always
John
DoubleDAZ posted:BTW, you'll see I added a small Wye to let you turn engines.
You are a Scarm Wizard for sure! Love the fill for bench work and you did sneak in a WYE LOL
That he is, John!
It’s a small Wye just to show it’s possible to include one, even with O-72 curves. I also did a version with a 28” turntable, no roundhouse though.
The thing about reversing loops is a lot of times the same effect, trains going in both directions, can be achieved with dual mains. Mark’s design could be done using dual mains instead of reversing loops, but the Parson’s area would have to be expanded and then reach might become a problem for him.
DoubleDAZ posted:It’s a small Wye just to show it’s possible to include one, even with O-72 curves. I also did a version with a 28” turntable, no roundhouse though.
The thing about reversing loops is a lot of times the same effect, trains going in both directions, can be achieved with dual mains. Mark’s design could be done using dual mains instead of reversing loops, but the Parson’s area would have to be expanded and then reach might become a problem for him.
Makes a lot of sense for sure. Curious on the turntable without roundhouse. I do worry about reach both during the build and then running trains.
Again Super Thanks
John
Aegis21 posted:Makes a lot of sense for sure. Curious on the turntable without roundhouse. I do worry about reach both during the build and then running trains.
John, bear in mind that these are just samples to show you what an around-the-room layout might look like. Here are some photos with a 28" turntable instead of the Wye. Note that I added 2 bridges, raised them to a flat 3" and adjusted the grades on both sides. All grades are 3% or less. I even added a storage yard for rolling stock,though it's quite far from the turntable.
You can have 2 or more trains running on each track in opposite directions so they pass each other and go over/under each other. You get all the visuals you'd get from reversing loops without the added expense and limitations, the biggest being a single mainline between them.
Attachments
DoubleDAZ posted:Aegis21 posted:Makes a lot of sense for sure. Curious on the turntable without roundhouse. I do worry about reach both during the build and then running trains.
John, bear in mind that these are just samples to show you what an around-the-room layout might look like. Here are some photos with a 28" turntable instead of the Wye. Note that I added 2 bridges, raised them to a flat 3" and adjusted the grades on both sides. All grades are 3% or less. I even added a storage yard for rolling stock,though it's quite far from the turntable.
You can have 2 or more trains running on each track in opposite directions so they pass each other and go over/under each other. You get all the visuals you'd get from reversing loops without the added expense and limitations, the biggest being a single mainline between them.
Great ideas abound for sure with these possibilities. Love the bridges and actually have a Pratt Truss Bridge that can make that span. I think it is for two tracks, but not sure. Like the turntable idea and yard possibilities. I see your point and others that have pretty much agreed on the around room layout. It does give better distance impact and overall visuals.
Thanks
John
DoubleDAZ posted:
Looks perfect! I have plans on making it swing up if the ceiling height allows. It has been so long ago now, but I got them from mike_g on this forum. BIG SHOUT out to Mike!
I can't wait till my knee feels good enough to finish the other side of the basement and finally clear the train area out!
Thanks
John
http://www.scarmhirailers.com/
The 2-track model isn’t in there though, I just put that together using the single track model for a start. You can copy it to a new file and save it as just another object. They don’t show up as part of a library. You have to open the individual file, copy the object, then open your file and paste it in.
DoubleDAZ posted:http://www.scarmhirailers.com/
The 2-track model isn’t in there though, I just put that together using the single track model for a start. You can copy it to a new file and save it as just another object. They don’t show up as part of a library. You have to open the individual file, copy the object, then open your file and paste it in.
Dave,
You lost me at save it as just another object LOL
You did a great job!
John,
Select the 2-track bridge in my design and copy it. Now open a New Layout and paste the copy into it. I suggest moving it closer to the upper left 0,0 location on the page. Then save the file with an appropriate file name.
If you want any of the other objects from the link I posted, you have to right-click on the Quick Download button and use the Save File As option otherwise all you’ll see is a text file that won’t mean much to you. For each one you’ll get a separate SCARM file. If you open the files, you need to use the 3D view to see what’s there otherwise it won’t look like much.
DoubleDAZ posted:John,
Select the 2-track bridge in my design and copy it. Now open a New Layout and paste the copy into it. I suggest moving it closer to the upper left 0,0 location on the page. Then save the file with an appropriate file name.
If you want any of the other objects from the link I posted, you have to right-click on the Quick Download button and use the Save File As option otherwise all you’ll see is a text file that won’t mean much to you. For each one you’ll get a separate SCARM file. If you open the files, you need to use the 3D view to see what’s there otherwise it won’t look like much.
Finally Sucess! Again THANKS Dave!
Results...............
Attachments
Good deal, John!! That is something I never tried when Dave was helping me in SCARM!!
It pays to be VERY ignorant in a subject as you tend to follows directions closely and have them explained as simple as possible. Again thanks to Dave's patience and simplifying the directions!
I hope my helplessness helped others. LOL ![]()
I am still trying to get the optimum deck, in the space I have to work with (which I am grateful is as big as it is) so I would like to throw this idea out for discussion. (some will want to just throw it out ![]() I am convinced an around the room design will give the most entertainment and interest in using the layout. My desire to have more than three feet in width is the driving force to find a way to accomplish that self imposed requirement. This proposal will move the south wall deck off the wall by 30 inches for an aisle and expand the deck to five feet wide.
I am convinced an around the room design will give the most entertainment and interest in using the layout. My desire to have more than three feet in width is the driving force to find a way to accomplish that self imposed requirement. This proposal will move the south wall deck off the wall by 30 inches for an aisle and expand the deck to five feet wide.
One bad piece of news is the "10 foot expansion on that wall is only a 6 foot expansion" Have a heat pump unit that needs service access in that area. The north wall could go the extra 10 feet. 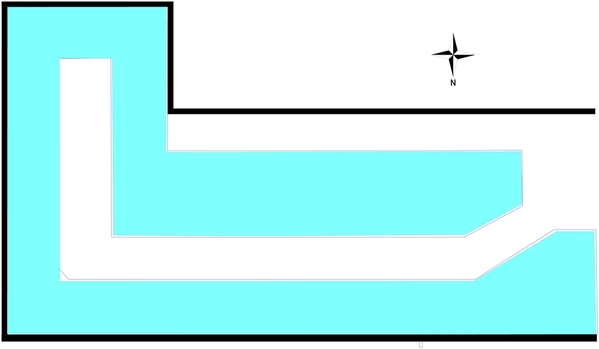
Attachments
John,
That is in effect what we had to do in my room. I don't understand where the heat pump unit is.
Mark Boyce posted:John,
That is in effect what we had to do in my room. I don't understand where the heat pump unit is.
Hi Mark,
Heating unit is on the south wall and if decking went the ten feet, that would give only 8 inches to the front of the heating unit. so a four foot service clearance in front of unit is needed. That makes the total length only 30 feet instead of 34 feet. I originally was only going 24 feet with a future expansion of an additional 10 feet. So this is not the "end of the world" type issue. 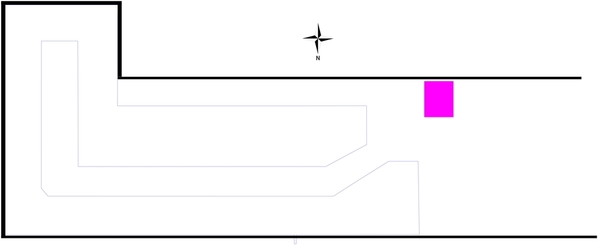
Attachments
John, I was wondering if that was why the benchwork was shorter there, but didn’t know where the wall was until after I posted the question and then looked back a page or two. Four feet clearance sounds good! Maybe I can take a look at your room in person soon
That would be great Mark, Although it is full of boxes that are still unpacked and I do not know where they will go. Hopefully under the bench work! ![]()
![]() We have been here 8 years, and there is stuff I have been told will move blocking me building any more benchwork. It doesn't really matter. I don't have time or money to do that right now anyway.
We have been here 8 years, and there is stuff I have been told will move blocking me building any more benchwork. It doesn't really matter. I don't have time or money to do that right now anyway. ![]()
John, if I understood the change, the bottom is still 34', but the upper section is only 30' to allow access to the heating unit. If that's correct, then here's a new rendition. I had to alter the entrance a bit to make the bridge perpendicular and I tried to fit a yard and turntable just to give you some ideas.
Attachments
DoubleDAZ posted:John, if I understood the change, the bottom is still 34', but the upper section is only 30' to allow access to the heating unit. If that's correct, then here's a new rendition. I had to alter the entrance a bit to make the bridge perpendicular and I tried to fit a yard and turntable just to give you some ideas.
Yes you totally understand the change for the heating unit. Totally amazing what you can do in such a short period of time. Let alone the imagination or ability to see the layout possibilities. What are your thoughts on the aisle on the south side and the five foot wide section? Thanks for all the help!
That's a real nice plan as a starting point, Dave!
John, a 3-foot wide aisle is often considered to be optimum, but 2 1/2-foot wide aisles are enough if you aren't planning on having a number of people visiting and wanting to pass each other. The 5-foot wide table is fine since it is only a 2 1/2-foot reach from either aisle. The only each problem may be in the corner but probably nothing to worry about.
Thank you John & Mark.
John, I think the baseboard was fine, but I altered it a bit anyway to give you a wider lower aisle and a little more reach in the upper left. If it were mine, I'd also round out the upper left like the circle shows. When you settle on a plan, we can adjust the baseboard for best fit and reach.
Just so you know, the turntable is only the Atlas 26" that's in the SCARM library and nothing larger is going to fit there. I haven't worked on the grades yet, so this configuration may not work the way it is.
Attachments
Thanks Mark for your input. I am hoping the five foot wide area gives me a better idea on building industry or towns or yards etc. Although I question losing the ability for a backdrop giving depth to the area in general. Since I haven't met anyone interested in trains out here yet, there isn't plans for gangs of people coming over to run the rails. Although ya all are welcome to stop by anytime.
And has anyone done a double deck in O gauge? What heights would be optimum and top width? Yes I am going crazy with foolish ideas.
If you want to try a double deck, you'll need at least 12" and 18" is preferable. Take a look at this video of TrainRoomGary's layout.
You could put a backdrop on the wall across the aisle anyway, it would still work. You could also put a backdrop down the middle of the 5-foot table dividing it into separate scenes.
Yes I thought you didn’t know many people here yet, especially people who like trains. Most of the train enthusiasts I know live down in Allegheny County. I usually only see them when I go to the Greenberg shows.
DoubleDAZ posted:If you want to try a double deck, you'll need at least 12" and 18" is preferable. Take a look at this video of TrainRoomGary's layout.
That is definitely some set up for sure. WOW! I would keep it at two and I like the way he did his top deck, as an elevated line. Great IDEAS!
Thanks!
Mark Boyce posted:You could put a backdrop on the wall across the aisle anyway, it would still work. You could also put a backdrop down the middle of the 5-foot table dividing it into separate scenes.
Yes I thought you didn’t know many people here yet, especially people who like trains. Most of the train enthusiasts I know live down in Allegheny County. I usually only see them when I go to the Greenberg shows.
I hope a backdrop on the wall would benefit the area. Not sure I want to divide up the 5 foot space, however that is an option worth looking into for sure.
Being retired and working around the house doesn't lend itself to meeting model railroaders. I have only been to Mercer Junction twice in the time I've been out here. Dave is a great guy. Very knowledgeable and not pushy with sales. I will definitely be supporting his business as much as possible.
I agree, I don’t want a backdrop down the middle either, but a lot of folks make good use of it.
Dave is very knowledgeable and is not pushy for sure. It is great you are so close. After a while you will run into other modelers not far away.
Great Day today! I'd like to thank you for the invite and I had a wonderful time meeting new people and making new friends. Throw in trains and the day could not have gotten better!
Thanks Mark
also Thanks to Mike who hosted and all that attended.
John,
I am glad you were able to go with me! It was good to get to know you better, since we only live an hour's drive apart! Thank you for driving from your house to to The Nifty Fiftys Diner, Mike Wyatt's house to see his neat layout, and on to Corner Field Museum to see the Elesh's wonderful, huge layout! It was good to see Paul, Bryan, Nick, Dennis, and all who I apologize I'm forgetting names.
Dave (DoubleDAZ),
I saw the room John is planning to build the layout in! A smidgen wider and a few feet longer than mine! It will be a great room for a layout once John gets the walls and electric finished! Yes we got the creative juices flowing! Too bad our bodies aren't as young as our aspirations!! ![]()
Mark, sounds like you all had a good time.
We did, Dave! Thanks!
Well after crunching through the honey do list and getting caught up with maintenance around the house, finally got time and energy to put up the sheet rock on the train side of the basement. Still need to tape seams (UGH!) However it gives me final dimensions and a better feel for the space. Thinking about trying to bump out sections around/near ends of layout. Also I have been going over the general theme and what to plan for industries, towns, cities etc. Now, if I could think in 3d and use tracks at different heights for crossings and or loops. Mark I am admiring your layout and love the grades and elevation changes. So back to scarm and tighten up the room dimensions.
John, I’m glad you are making progress on the room. The grades are a little tricky especially at the top getting a smooth transition to level. I can see why many folks lay track on the level only. Please keep us posted!
Looks good and lots of info.
Hello All,
Have been busy with finishing up the train room walls and lots of stuff outside as it is summer time. I have been blessed with many great ideas for track layouts and ALL are appreciated. Once I move some of the boxes out of the train area I maybe able to draw out bench work and aisles. Before doing that, is the possibility of taking the 12 foot width dimension of the room (which can go 25' to 30' long ) and splitting it up to three four foot sections? Having a 4' by 25' track layout section, then 4' by 25' walking area and then a last 4' by 25' track layout area. These four foot sections of layout would have one side against the wall and only be accessible from center aisle. Thinking of using top creeper to make the four foot reach. Is this doable? pros/cons
btw I switched to a mac laptop so scarm is on other laptop or I would have posted the scarm layout anyone using mac os with a track program? I believe scarm is windows only which I will stay with if I have to and adjust to using two laptops.
Thanks in advance
John
here is a pic
Attachments
Even a hand drawn sketch would be helpful to see what you're planning.
John, I'm glad you are getting to the point of thinking about the track plan again. I remember from our personal messages you were making good headway on your wife's room first.
So it looks like the last plan (which was last August) had an aisle between the wall and one side of the layout. I have seen photographs of lots of modelers using topside creepers to access parts of layouts that are farther than arm's reach. I have also read where modelers say they use them and like them. I have never used one myself. It is certainly better than the idea of climbing up and crawling around on a layout for guys our age and older. The idea never appealed to me when I was younger, perhaps because I had to do too much crawling on the floor at work to access electronic equipment and wiring. Looking at the drawing you just posted, I'm thinking you would need narrower table top for the alcove in the upper right so you can have an aisle wider than what looks like 2 feet. Otherwise It sounds like a good idea.
If you don't get some feedback here from some modelers who have used topside creepers, I would suggest starting another topic with topside creeper pros and cons as the subject title.
I am certainly glad to see you ready to get back at it.
Hi John, welcome back.
I'm a little confused because I thought the width was around 13', not 12'. Has it changed? Either way, here's the earlier design squeezed down a bit with 4' top and bottom bench work. As you can see, there's no real need to extend the nook to 4' and make reaching into the corners more difficult. If you want more scenery, you can easily put that on a removable platform. I also didn't do much with the turntable area or the bridge other than to make things connect for a new starting point.
Attachments
@Richie C. posted:Even a hand drawn sketch would be helpful to see what you're planning.
You are so right, that is why I posted a jpeg after that post without a scarm drawing.
Mark thanks for the sound advice as always. I will start another topic for the creeper/4 foot reach question. Looks like you are doing great with your layout! Great job and keep up the good work.
DoubbleDaz, Sorry for the confusion with dimensions, in the future it will be exact measurements as the room width is 12' 5" overall. Your drawing and advice are always Fantastic. I like the big sweeping curves for sure! Also the room length is more dictated by the furnace location and having my work benches fit in somewhere near the area. So length can be 25' to 30' max at this point.
Again thanks everyone!
John, I think the separate topic on the creeper will get some responses. I see you posted it. I hope you get the information you need to make the best decision!
Thanks Mark for the separate topic on creeper idea. Lots of solid advice and experiences from members.
Here is the room dimensions that are final with the yellow area available for train layout. This is what I will be working with and need to maximize train/scenery area. I am inclined to follow your advice on doing track layout first and seeing where I will need to put decking. Sorry for the inaccurate measurements prior, as things were in a state of flux.
Attachments
John,
That's okay about needing to correct the dimensions. I know you were working on how to divide the basement and with putting in new wall board, etc things changed. I gave erroneous measurements to those who were looking at my layout planning topic too. But I had no excuse. I just measured wrong when our daughter still had some of her things in the room. ![]() The saying 'measure twice, cut once' doesn't work for me. I have to 'measure at least thrice, and maybe I'll get it right on the first cut'.
The saying 'measure twice, cut once' doesn't work for me. I have to 'measure at least thrice, and maybe I'll get it right on the first cut'. ![]()
John, something still seems to be off. When I enter the coordinates for the baseboard using those dimensions, I get the result shown in the 1st photo. As you can see, the width does not match the yellow area. However, if I change the 12'8" dimension along the top wall to 18'8", I get the result shown in the 2nd photo and it pretty well matches the yellow area. Perhaps you transposed some numbers and it should be 18'2"?
Attachments
Dave,
Thanks for picking up on that gross error. The total dimension should have been 25' for the top and 30' for the bottom dimension. Those are self imposed limits to accommodate a three foot furnace service area at top and work bench and other furniture at the bottom. I could get away with a couple feet either way, however this is a present goal/limitation I and more importantly my wife would like to keep.
Not sure we're that 12' 8" came from? Too many revisions without triple checking changes I would imagine
again Thanks!
John
John, you just gained some space; well not really, but will help on design!


