
Replies sorted oldest to newest

TB15,

A few thoughts:

Most wifi cameras transmit to a phone/tablet, etc. so the HDMI hookup is the hard part. 

Does your TV also have a composite input? If so, there are lots of radio transmitting cameras (not necessarily wifi) that have a receiver that has a composite video output.

If it has to be HDMI, you can get a composite-to-HDMI converter for under $25 (amazon).

If you can live without "live" video, you can also get lots of small, inexpensive video cameras that take a microSD card, and will record a much better (in most cases ) video that radio transmitting cameras... why?... our layouts have lots of noise generating circuits in the area.  Recorded video will be a perfect picture (with sound), but will not be live!

Just a few cents' worth!

This is probably the most expensive option, but if you have an Apple device and an Apple TV, you could buy a GoPro (the 1080p HD Hero3s is about $115 or thereabouts nowadays), and stream the camera feed to your TV using Airplay Mirroring and the GoPro app (using the camera's built-in Wifi). Aside from expense and a small degree of complexity, the only downside is that the GoPro has about a 2-3 second lag in showing the live feed. Probably not worth it, unless you already have the Apple TV and want to use the GoPro in other applications. 

Last edited by pittsburghrailfan

Recording HD video and displaying a live HD feed on a nearby screen are at different ends of the complexity spectrum. As GRJ posted earlier, there are plenty of compact devices that do a great job of recording an HD video to an SD card for an affordable price.

Broadcasting a "reliable" full frame HD image will prove to be a more expensive venture. Lionel's new theater care will do about 20 FPS with an excellent Wi-Fi signal. That FPS drops off quickly as the signal drops and minor freeze frames with image blemishes also occur. Generally, the car works perfectly within 30 feet of the device that receives the signal. 

Also as mentioned above, broadcasting that to a large TV also becomes a hurdle.  HD broadcasts take considerable data bandwidth, and for an iPad to receive one HD broadcast and then re-transmit it to another HD display would probable produce less than desirable results. Lionel also has software that can be installed on a PC which would be the better way to rebroadcast for their camera to a large TV display. 

I have a scratch built wireless FPV analog camera car that I built using widely available drone equipment: https://ogrforum.ogaugerr.com/...35#72805549098596735

I have also tried many of the cheapo wifi backup camera systems that are used as and add for your car with mediocre results. The Wi-Fi video broadcast abilities of the go-pro is also underwhelming.


When it comes to live HD broadcast on a TV it boils down to these three features, but you can only pick two:

1) Great Frames per second (FPS) with low latency
2) Reliable & easy to use / setup
3) Affordable

Last edited by H1000

Rich,

My home brew camera system that I posted a link to above is an FPV designed for use on drone. A high definition FPV system (that is affordable) has yet to be made for use on a drones (which makes it small enough for use in O gauge).

I have since upgraded the camera on that camera car to respond better in low light situations. The newer camera is rated for 700 TVL which is close to a 720p feed. The video I shot later in that thread is done in reduced resolution to reduce the upload size of the video. The goal was to demonstrate the low latency, and minimal amount video blemishes that occur during operation, not the clarity of video feed.

My stumbling block is a quality camera that can do WiFi, the computer and network is covered.

I have the heavy duty computing covered for rebroadcast, my computer is next to the train layout.  I also have really strong WiFi as I'm sitting next to the router and WiFi AP as well.  My computer is hard-wired to the network, but here's the WiFi speed for the phone.

The computer certainly shouldn't have any bandwidth issues.

Attachments

Images (2)
  • mceclip0
  • mceclip1

Another idea to consider (although slightly off this thread's track) is to set up stationary video feeds at various locations around the layout.

At our club (BMRS in Stratford Ct), we are installing a 4 camera system the feeds a 55" TV.  So far we only have 1 camera set up but will be adding 3 more soon.  We will put them at high action locations on the layout.

We're using (under $20) 12VDC car backup cameras (1080p) and they will connect to an under $100 video switcher that allows us to set an auto rotation with the cameras... like a surveillance system.  So visitors get to see trains coming and going  at different locations around the layout.  Even with one camera, we've received lots of positive comments on the great picture on the big screen.  It's only using composite video wiring, but the quality is very clear with the cameras we are using.

I have a few cameras on my home layout with a TV mounted on the wall directly behind the layout.  Everyone loves to see a train headed straight for them, only to turn at the last minute!

Here's a project that I just completed:  my own version of the upcoming Lionel caboose camera. I use a camera system designed for FPV drones, the Runcam Split 2s.

The neat thing about the Runcam Split is it simultaneously transmits a live tv signal and records HD on an SD card. The live feed isn't HD, but looks pretty good.  I watch it with a pair of FPV goggles, so you get live caboose virtual reality!  You can see a sample of the recorded video here.

The system is entirely self-contained and track powered. I used a 1F supercapacitor and boost regulator for the power supply.  It can sustain the system for 3 or 4 seconds, so momentary interruptions in track power are no problem.

You can configure and control the RunCam over wifi with a dedicated app, although downloading the videos can take quite some time.

 IMG_1689IMG_1691IMG_1694

Attachments

Images (3)
  • IMG_1689
  • IMG_1691
  • IMG_1694
Last edited by Professor Chaos

The RunCam Split was by far the best wi-fi system that I had tried. The FPS was good, and the system was able to compensate well between light and dark.  The drawbacks that I found were the 480p live image and the difficulty you have getting that live image from your tablet to a large TV. The live image from the RunCam is designed for calibrating the image vs providing a 1080p live feed. The live feed from the app has a slight delay (latency) but it's better than any other wifi camera I've seen yet. Again it's designed for drone use which makes it small, lightweight and also ideal for O Gauge. I just wish the WI-fi live feed would be a higher resolution than 480p.

So first off Professor Chaos did a WAYYYYYY better job than I did so I am not trying to even compare that system to mine.

I work in the CCTV industry and know that it is extremely difficult, and borderline impossible, to get a LIVE 1080P stream without any lag.

I first designed this system using a Raspberry Pi Zero and the 8MP camera @ 1080P and the delay to my tablet was almost 3-5 seconds at times. I have a Linksys MU-MIMO router in the next room over from my layout so I know it is not my WiFi.

I have seen $500+ AXIS cameras hardwired to a switch give similar lag, its part of the encoding/decoding process and bad WiFi can make the issue even worse. With that said, I decided to go for good-ole analog 960H and a cheap FPV system to cure my latency issues.

Here is what I designed:

IMG_20190122_092455IMG_20190122_092555IMG_20190122_092604IMG_20190122_092620IMG_20190122_092627

I still need to wire the leads to the powered trucks I added to the Husky Stack. I had not thought about the loss of power so I didn't add a huge Capacitor but Prof. Chaos does make a great point and if I see it becomes an issue I will address it as he did with a super cap.

My plan is to wire the receiver to my homes CCTV system (its HD-Over Coax/Analog compatible) and Live View it on the Display/Phone APP.

I think so far in parts I am less that $35 in as I asked the manufacture of the camera for a "DEMO UNIT" lol (Perks of my job) and I had the powered trucks from an old Caboose I picked up at a garage sale.

I will post a video when I finally finish this project up.

P.s. I have seen these recently on eBay and Amazon, might also be another option:

https://www.amazon.com/dp/B07G...909791_t3_B0762MB2TD

Thanks!

Attachments

Images (5)
  • IMG_20190122_092455
  • IMG_20190122_092555
  • IMG_20190122_092604
  • IMG_20190122_092620
  • IMG_20190122_092627
Professor Chaos posted:

Here's a project that I just completed:  my own version of the upcoming Lionel caboose camera. I use a camera system designed for FPV drones, the Runcam Split 2s.

The neat thing about the Runcam Split is it simultaneously transmits a live tv signal and records HD on an SD card. The live feed isn't HD, but looks pretty good.  I watch it with a pair of FPV goggles, so you get live caboose virtual reality!  You can see a sample of the recorded video here.

The system is entirely self-contained and track powered. I used a 1F supercapacitor and boost regulator for the power supply.  It can sustain the system for 3 or 4 seconds, so momentary interruptions in track power are no problem.

You can configure and control the RunCam over wifi with a dedicated app, although downloading the videos can take quite some time.

I a few years back produced a 5.8GHz cam system for our Kids run trains group. I posed my adventure here: https://ogrforum.ogaugerr.com/...driving-a-real-train
This has been updated to now be a track powered version and operates quite well.

Just please keep in mind that ANY usage of drone FPV equipment requires you to hold a HAM Technician license. Many places now will NOT sell you the gear if they find out you are in the US. Apparently many are not getting the FCC certification and the companies are being fined for distribution.

Wifi based systems seem the way to go until the FCC puts the kibosh on that too.

Wow.. lots of info. Got tied up at work this week.  I have a mobius mini 1080 that records to SD card. I use it on a car for various shots. I do not have go pro, or any apple products.

I think my TV still has at least one composite cable input. I bought an Ebay kit many years ago, and it was useless.  Thought stuff would plug into an HDMI port. Doesn't have to be 1080..

But since I will not have clear line of sight  on r/x to t/x at all times.. I would need to run multiple antennae for clean signal, or something lower than the 5.8ghz... My furthest point from base would be 20ft, and 2 walls.


Just a heads up, the RX units tend to run a non-spec signal. I have an older plasma tv that doesnt seem to care about the composite, but some of the newer tv's I connect to seem to have a problem.

Again, I would like to advise everyone that the 5.8GHz Rx/Tx kits are NOT FCC certified.

For the sake of information:

I have a 25mW and 650mW units. I find the 650mW punches through a lot of scenery, but because it is analog it bounces and reflects everywhere. 5.8GHz is more likely to reflect off a surface than to penetrate. If you have the option, use a lower wattage first. 

I ran into some of the same problems with the Receivers not working on some TV's. Some would scramble the signal, others would work but the image seemed slightly distorted. My best luck as been with an old school 32" CRT (it was one of the last CRT's that you could buy) that my brother gave me.

For public displays, I am using a converter that will convert composite & SVHS to VGA. This converter is then feed to a Tripp-Lite VGA four way splitter that feeds up to four computer screens of my choice.

H1000 posted:

I ran into some of the same problems with the Receivers not working on some TV's. Some would scramble the signal, others would work but the image seemed slightly distorted. My best luck as been with an old school 32" CRT (it was one of the last CRT's that you could buy) that my brother gave me.

For public displays, I am using a converter that will convert composite & SVHS to VGA. This converter is then feed to a Tripp-Lite VGA four way splitter that feeds up to four computer screens of my choice.

You can find Composite to HDMI converters all over ebay. I remembered I used one of these to get around the incompatibility for my Atari 2600 (*cough*).

A second option is using an older PC LCD Screen. Composite/S-Video to VGA adapters are also quite reliable but more expensive.

Atari 2600 (*cough*) 

I work in IT and older 19 & 20 inch 4:3 screens surround me (Everyone wants 24 inch wide screens now), some even have a composite port right on them. Those worked okay with mixed results. I wanted to be able to split the image to multiple locations because one screen was getting too crowded. The VGA adapter was around $20 online and the Tripp-Lite splitter was bought at online auction used for about the same. It works pretty good, but I haven't tried it with a wide screen monitor yet. It should work but most people don't like having their normal body shape at 4:3 stretched to 16:9 on screen...


H1000,

Your video you recorded from your unit was practically flawless on the other thread. I've switched to higher power, diversity receivers, better antenna, and even isolated power. Mine looks like I'm trying to induce a seizure.

At 600mW, the image discolors and rolls horribly in a relatively open layout. Trying to figure out the difference between your setup and mine.

Since that I post I've upgraded the camera and now use a Foxeer camera, it gives slightly better clarity with better light to dark transition response. it also features and OSD system that can display other information like voltage and time.

The transmitter board is also by Foxeer, a TM25 Switcher. It allows me to choose between 25 / 200 / 600 mw broadcast power.  I've only used the 25 mw setting as I have found that more than sufficient for distances up to 100 feet.  I dumped the cheesy stick antenna almost immediately and went to omni direction antennas which make a huge difference in reception quality.

I've added another receiver and both have worked very well.  The second receiver (not pictured in my post) has an OLED display that indicated the Channel, voltage input, and signal reception strength. Neither are diversity receivers. 

I'll upload some new photos of the setup later tonight.


RJR posted:

While slightly off subject, I could use some stationary cameras around the layout to depict areas not quite visible, like to see if my turntable's tracks are perfectly aligned where I can't see them through the loco.

Here is a system that I currently use, it supports up to four cameras. This one has outdoor cameras but smaller indoor models are also available. The video quality is okay when in 4 screen mode but clearer in single screen mode. The out door cameras have night vision which may be useful if you run your trains in the dark.  The monitor is rechargeable and portable or it can be mounted stationary and includes a kickstand.  Latency is usually about 2 to three seconds which is good for your purposes but not great for live video. Oh, it also has a video out port so the small display can be output to a much larger display with a composite video in port.

Uniden camera

Also, many of the cheapo wifi camera systems available from Amazon will also work. They'll come with a nice app that will allow you to monitor a single feed (some will allow multiple feeds) at a time.  They might be a little harder to setup but they are cheap, usually anywhere from $20 to $50 per camera.

Last edited by H1000

Here are the images of my latest revision to my CabCam (V2.1).

Yeeco Buck/Boost adjustable regulator

Yeeco Buck/Boost adjustable regulator with integrated bridge rectifier.

2F Supercap [2 Series + 2 Parallel) stuffed neatly in the fueltank cavity.

1F Supercap (2 Series + 2 Parallel) stuffed neatly in the fueltank cavity.

Modular design so any component can be replaced.

Modular design so any component can be replaced.

The business end. Aomway 9.2v 650mW TX with 5v 900TVL CMOS camera

The business end. Aomway 9.2v 650mW TX with 5v 900TVL CMOS camera

Attachments

Images (4)
  • Yeeco Buck/Boost adjustable regulator: Yeeco Buck/Boost adjustable regulator
  • 1F Supercap (2 Series + 2 Parallel) stuffed neatly in the fueltank cavity.: 1F Supercap (2 Series + 2 Parallel) stuffed neatly in the fueltank cavity.
  • Modular design so any component can be replaced.: Modular design so any component can be replaced.
  • The business end. Aomway 9.2v 650mW TX with 5v 900TVL CMOS camera: The business end. Aomway 9.2v 650mW TX with 5v 900TVL CMOS camera
Last edited by Stone Rhino
H1000 posted:

650 mW is a lot of power! My Foxeer unit can be switched between 25 / 200 / 600 mW. I find that 25 mW is more than enough for the short distances that my TX has to reach my RX.

I went with the 650mW because it had a better camera, but realized afterwards that the two camera's I have are not compatible with each other.

Also the logic behind the 650mW is that dealing with 5.8GHz WiFi equipment at work, it has poor penetration of walls. After two walls and only 45ft of distance, the 5.8GHz drops in bandwidth dramatically compared to the same equipment running 2.4GHz.

TheDude23112 posted:
Big_Boy_4005 posted:

I shoot all my videos with a GoPro mounted to a special car. You can monitor and control the recording from a phone or tablet.

I haven't tried my theater car yet, but I don't think the picture quality will beat the GoPro. The cabooses will be the same.

Which gopro, please?


This video was shot with a Hero5. Earlier versions were shot with a Hero2.

Stone Rhino,

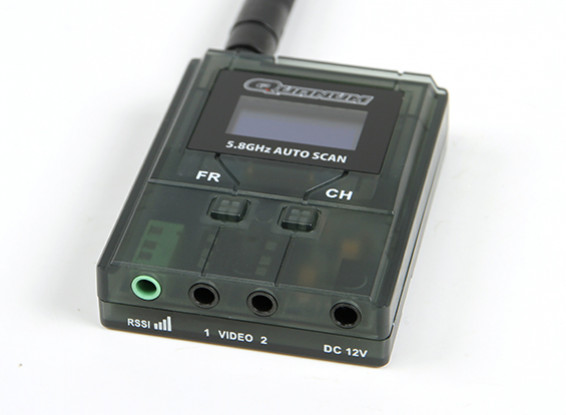
I mention earlier that I had purchased a newer receiver that gives me more detail about my connection, that unit is the Quanum 5.8GHz Auto Scan (non Diversity model) picture below. It gives me a signal strength readout in the top left corner of the OLED display which is very handy.

I did some testing with my FPV system this evening at different power levels. I place the FPV car about 75 feet from my receiver. The signal needed to pass through the floor, two walls and a closet door. Here were my signal readout for each power level along with what I observed on the screen.

25 mW - Signal was 25% - 30% - image was slightly better than poor with vertical white lines being fairly noticable and some static.

200 mW - Signal increased to 30% - 40% - image didn't improve much from the previous setting, fewer lines but the same amount static.

600 mW - Signal improved to 55% - 60% - Image improved greatly, an occasional white lines and slight static but the image is good quality.

I also did test at 600 mw in close proximity to the receiver (about 6 feet) and the image was crystal clear with a signal at 79%. Only when I placed the FPV car within 2 feet or less from receiver did the image begin to go crazy.

In my normal operating conditions I run at 25 mW and the receiver is usually no further than 45 feet away at any time with the occasional scenery obstruction. The signal ranges from 68% - 77% during these sessions.

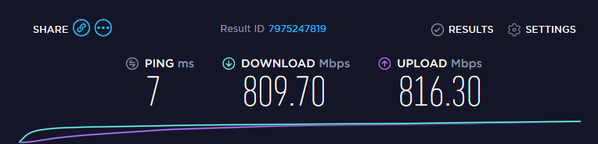
While I do agree that 5.8 GHz doesn't have the penetrating power of lower frequencies, an unit running at 25 mW still has a fair amount of power to get the job done. Consider this, my home WiFi router has a 5.8 GHz transceiver that operates at 75 mW and it has more than enough power to reach about 125 feet just outside of my garage door when it is closed. Two walls may present an issue, but a 200 mW transmitter should be able to get the job done quite well.

A couple more ideas. Depending on the placement of your receiver, if the camera unit is always going to be operating on one side (the receiver is not centrally located to your layout), you may want to consider a directional dish antenna. Or placing the receiver at the most central location of where the camers car will operate and running a long video cable back to your screen (this maybe less than idea in most cases though).

I hope you get it working, I really want see a nice video of that engineer view!

Attachments

Images (2)
  • mceclip0
  • mceclip1
Last edited by H1000

So here is our layout. The first is via drone before the event started. It had to be grounded before customers came in for safety concerns.

Yes! Those are LCCA Modulars.

IMG_0753

The display you see just to the left of the yellow and black storage bin, is the view.

IMG_0351

A slightly less busy view of the screen. On most occasions, it behaves quite nicely.

VCJJ4056

The equipment is attached to the back of the screen. Running a longer video cable is probably a better idea but location of power is not to my advantage. These large, open events have much better signals than say a meeting/community room.

I will see about some video of its operation.

Attachments

Images (3)
  • IMG_0351
  • VCJJ4056
  • IMG_0753

That's a nice layout, very well done and it's nice to see that you let the kids get involved, very important theses days!


I noticed that you are using a Dell computer monitor that I assume has a direct composite input, so you don't need any type of converter. How does the system react with with other displays? The reason I ask is at one time I used an HP computer monitor with a direct composite input on it and as soon as the signal blipped the monitor would exaggerate the signal interference and seemed to take longer for it to recover than my 32" CRT TV. Not that you want to carry a 90 pound TV to each show!

Now when I used my composite to VGA converter with that same HP monitor it worked flawlessly.

Last edited by H1000
H1000 posted:

Well, I found a live HD FPV camera system that is "somewhat" affordable. You get 720p at 60 FPS and 1ms of latency.  The downside is obviously cost, the system will set you back just over $400. I'm sure that time will eventually bring that cost down.

Check it out here: Connex Prosight

Yes, that. There are some sites that have it under 300$.

These are still classified under normal 5.8GHz equipment and still require HAM Technician class license (Because you have the potential to transmit copyrighted material). Several websites refuse to sell to me as I live in the US.

So digging around, I have found the FCC's filed "Notice of Violation" with distributors. I can at least give the link.

https://docs.fcc.gov/public/at...ents/FCC-18-71A1.pdf

An interesting read in honesty, but its a shame this had to happen.

For those who want the nitty-gritty, you will want to scroll down to Appendix A and verify that your transmitters are NOT on that list.

I see both my 25mW and 650mW are on this list... Thankfully I just need to not operate them in the bands specified.

Last edited by Stone Rhino

In my on ongoing quest to build an HD quality FPV camera car that will output to any TV with an HDMI input has yielded a new project.

The Goals in this project were:

1) HD 720p or 1080p output
2) No image delay (Zero latency)
3) Eliminate static interference found in analog wireless cameras
4) Wireless range of 50 feet or better
5) Conceal the entire project in a dummy locomotive and camouflage the camera as best as possible
6) Keep the operation and connection as simple as possible

This is the end result:
KIMG1401KIMG1399KIMG1405

Everything in the dummy is battery powered but I do plan to add a track powered charging system for the battery system. Mounted to the frame is the Camera and Wireless transmitter. In the Shell is a 3000 mAh battery back with 12 Volt and 5 volt outputs. To separate the shell the from the frame two power connectors (12v barrel & 5v mini USB) need to be unplugged. There are three warm LED lights for forward lighting that turn on when all components are powered up with a slide switch mounted on the side of the shell for easy access. There is also a charging port on the back of the shell so that the batteries can be charged externally.

KIMG1396KIMG1397KIMG1398KIMG1402KIMG1404

Lastly there is the external receiver.
KIMG1400

Between the bright LEDs and the very dark opening on the front of the shell, the camera is very hard to see:
KIMG1399


Now the major component Build list with MSRP prices:

Camera: AIDA HD100a (https://aidaimaging.com/hd-100a/) -- $280
Wireless Tranmitter / Reciever : NYRIUS ARIES Pro (https://www.nyrius.com/aries-p...transmitter-receiver) -- $250
Battery: TalentCell Rechargeable 12V 3000mAh Lithium ion Battery Pack -- $25
Dummy: MTH F40PH dummy --$80 (estimated)
MISC. Supplies -- $10

This thing has handily exceeded my expectations! The rated range of the Wireless HDMI ARIES Pro is 100 feet with line of sight. I have tested it to work reliably at 70 feet through scenery, tunnels and one interior wall. There was absolutely no latency and no loss in image quality at that 70 foot range. The camera is performed very well in low light (with night mode & color enabled) and it has many ways for your to customize the the output of the image. It handles the transition from dark to bright situations very well. The battery pack can easily run the whole system for 4 hours and my last test yielded 4.5 hours before the battery shutdown. It takes about 6 to 7 hours to fully recharge the battery pack with the included charger.

It checks all of the right boxes except price. I listed MSRP prices above but the NYRIUS ARIES Pro was bought used for $150 and there are cheaper versions available with less range for $200 (MSRP).  I have already researched alternatives for the camera and one stand out item was the Hawkeye Firefly Split camera (Hawkeye FPV Camera) for $77. It's much smaller than the AIDA, has onboard recording to an SD card and has a Micro HDMI output port which could be adapted to work with the NYRIUS. With this camera and the lower cost NYRIUS systems, it may be possible to build this into something smaller and reduce the cost considerably.

The operation and setup of this system is so simple. Plug in the NYRIUS receiver and connect it to a TV with an HDMI cable, next slide the switch on the "camera engine" to power up all of the components inside. In about 10 seconds or less, the Wireless Transmitter & Receiver will find each other and the live image is displayed on the TV at 1080p 30FPS

I'll get some video of this posted soon, it been outstanding to see how clear the image is and the reception quality it absolutely amazing!

Attachments

Images (9)
  • KIMG1399
  • KIMG1401
  • KIMG1405
  • KIMG1396
  • KIMG1397
  • KIMG1398
  • KIMG1402
  • KIMG1404
  • KIMG1400
Last edited by H1000

That's quite an impressive project. Also take a look at the HD picture quality of the $20 Wyze V3 WiFi Camera that can be powered off the tracks with basically a bridge rectifier, resistor, 5.1V zener (or voltage regulator), and supercap. Picture below. The Wyze is a bit large to fit in an engine unless you can hack the case. It also has a very wide field of view but very good close-up focus.  Curious how it would compare to the AIDA camera with ARIES transmitter.

2CAA8E88F165_1615866265 [1)

Attachments

Images (1)
  • 2CAA8E88F165_1615866265 (1)

@Bruce Brown

Hi Bruce, I looked up the specs on the Wyze and it appears to be more of a home security solution rather than a real time zero latency live video feed provider.  The 20 FPS is the real hurt with that unit and then on top of that it had the overhead using WiFi protocols which only adds more latency, error correction and the occasional "skip & jump" in the video feed. I looked 24 FPS solutions on a real time feed but wasn't really impressed. For fluid responsive video it got be 30. I checked out a couple of YouTube reviews of the device and while it is sound home security solution I just don't think it will make leap into the quality level I'm looking for. With the Wyze, is there a way to broadcast the image on a TV? I'd be curious to see what a live image on TV or live stream on the internet would look like.

The NYRUS nor the AIDA camera have any video recording or still image capture abilities. The AIDA does offer interchangeable lenses to allow a wider or narrower focus. I have ordered an HDMI pass-thru capture device to allow me to directly record the video output from the receiver directly to my laptop and will post some better footage when that arrives.

For now I did record some beta test footage on my phone captured from another screen. Keep in mind you are watching a recording of another screen so the image quality will suffer considerably especially as my phone compensates for changes in lighting. The idea is to demonstrate the smooth video and the lack of video artifacts cause by signal interference.

(Be sure to change the player settings to 1080P for best visual results)

This layout is in a very "blue" room and the camera does it's best to compensate. It also doesn't help that the room is lit with 3000K lighting. This is a beta test video and I am still tweaking the camera setting to get better performance.

Last edited by H1000
@Bruce Brown posted:

Here is the video using the Wyze V3 powered by 3 Alkaline AAA batteries. Obviously much more choppy with the lower frame rate but just represents a $25 total investment. (I forgot to turn off the camera audio.)


For $25 that's pretty dang good! Most of the stuff I tested in that price range wasn't nearly as nice. That camera did an excellent job of showing a clear image in dark areas and transitioning to bright situations! Do you have a way to broadcast that image on a large flat screen or is the live image available on an app/device only?

@H1000 posted:

For $25 that's pretty dang good! Most of the stuff I tested in that price range wasn't nearly as nice. That camera did an excellent job of showing a clear image in dark areas and transitioning to bright situations! Do you have a way to broadcast that image on a large flat screen or is the live image available on an app/device only?

There is no easy method to put the Wyze picture on a Mac or PC screen. It can be put on a TV but you typically need to employ an additional hardware device like a Firestick or Apple TV box to mirror off your smart phone, ipad or Galaxy. If you search "put Wyze on a TV screen" you'll get tons of advice! The price of the V3 camera (indoor/outdoor use) has just gone up in price to $23.99. It includes the AC power supply.

This is good looking stuff guys. Been curious what to throw the stimulus check at!

I havent touched my system in a while and frankly I think its time for a refresh. Truth be told, I think isolated power is the smarter (and cleaner) choice. This eliminates any interference that any system could potentially add.

The Lionel camera caboose:

  • Is decent for what it is
    • Compared to my 900TVL analog system, the quality was decent
      • Very little chop
    • Higher quality settings requires clearer line-of-sight and more bandwidth
    • Medium quality is going to be what it is for now
    • You can turn the lights off/on
    • Okay picture
      • Built in night vision (Manual control only)
  • It struggles to keep connections in a conventional environment 
    • Instructions say it was intended for command operation only
    • There are no buffer caps for any kind of direction changes or brief stops
    • I'd have happily paid an extra 20$ for that to have been built in Lionel... Shame!
  • The amount of time it takes to connect can be up to five minutes!
  • Have to reset the caboose back to defaults after an hour or two of continuous operation
    • This has been a reccurring problem for me as it will just stop transmitting. To boot you have to reset it from scratch, so all of the stuff it requires you to setup the first time, you have to do it again.
  • The app is prone to freezing. There have been few updates and its more so intended to be paired directly with your phone via Ad-Hoc Wi-Fi.


H1000, the ARIES Pro looks like the ticket for a solid picture. I think I will get one of those to dissect.

Some of the goPro's have Micro HDMI's you can connect and view live.

@Bruce Brown posted:

Many of the more professional train-perspective videos use the GoPro. The problem I had with the Lionel Caboose camera was the distorted thick lens in the cupola. They used a similar type WiFi camera in the UP 21" Fox River inspection car which performed better because it peered through a thin clear plastic sheet.

I agree with the Lionel Caboose Cam. I had high hopes but it was a real let down. The thick plastic windows distorted the image so bad on mine that I returned it for a refund. I know it's possible to remove the window but that is delicate process and I wasn't willing to void warranty on a product that wasn't right from the factory. Overall the Lionel camera was a mediocre performer and I think the Wyze is a much better value.

A while back I borrowed a Go Pro 7 to test for a potential live FPV camera and it was great for recording video to an SD card but really fell short when it came to broadcasting a live image to device and TV.

The hard part has always been getting a device that can transmit HD video without latency all the while keeping it simple and affordable. The Nyrius shines in this department and I think that if the cheaper Hawkeye Firefly split camera pans out, the cost of a system like this can also be much more reasonable.

Thanks Bruce for your input!!

@Stone Rhino posted:

This is good looking stuff guys. Been curious what to throw the stimulus check at!

I havent touched my system in a while and frankly I think its time for a refresh. Truth be told, I think isolated power is the smarter (and cleaner) choice. This eliminates any interference that any system could potentially add.

The Lionel camera caboose:

  • Is decent for what it is
    • Compared to my 900TVL analog system, the quality was decent
      • Very little chop
    • Higher quality settings requires clearer line-of-sight and more bandwidth
    • Medium quality is going to be what it is for now
    • You can turn the lights off/on
    • Okay picture
      • Built in night vision (Manual control only)
  • It struggles to keep connections in a conventional environment 
    • Instructions say it was intended for command operation only
    • There are no buffer caps for any kind of direction changes or brief stops
    • I'd have happily paid an extra 20$ for that to have been built in Lionel... Shame!
  • The amount of time it takes to connect can be up to five minutes!
  • Have to reset the caboose back to defaults after an hour or two of continuous operation
    • This has been a reccurring problem for me as it will just stop transmitting. To boot you have to reset it from scratch, so all of the stuff it requires you to setup the first time, you have to do it again.
  • The app is prone to freezing. There have been few updates and its more so intended to be paired directly with your phone via Ad-Hoc Wi-Fi.


H1000, the ARIES Pro looks like the ticket for a solid picture. I think I will get one of those to dissect.

Some of the goPro's have Micro HDMI's you can connect and view live.

Something I found out about the Lionel Camera app was that it is a canned app provided by someone else. For better performance, I used the BVCAM app, it works with Lionel camera systems and app is much more reliable. I agree with the isolated power source. There is absolutely no chance for power interference and no chance of voltage surge damaging expensive equipment.

I will have to revisit the GO Pro for the HDMI output as a possible candidate. Thanks for the input!

@H1000 posted:

@Bruce Brown

Well buyers remorse hits after doing some more research. I just found an HD camera with an HDMI port for $109. It has great reviews, looks to be of good build quality and much more affordable than the AIDA...


MOKOSE HDMI Camera:
https://www.mokose.com/collect...riant=32132980047927

The thing I am going for is looking out the window which gives you that "I'm in the driver's seat". Would prefer not to punch holes in the nose. You have no idea how long it takes people to figure out where it is.

I'll check out that cam later today and see.

@Stone Rhino posted:

The thing I am going for is looking out the window which gives you that "I'm in the driver's seat". Would prefer not to punch holes in the nose. You have no idea how long it takes people to figure out where it is.

I'll check out that cam later today and see.

I agree completely, it's a lot of fun watching everyone and guessing where it is! I always thought if one could get a camera small enough that it could be mounted to (or replace) the front coupler, it would at least turn with the truck and the image would follow the rail pretty closely around curves.

The camera's you suggested are 12vDC. That is a bit harsh to match in a conventional control layout. I can easily get a boost/buck to maintain 5-9vDC. My super cap array will is already maxed out and running at its maximum safe voltage of 9.5vDC. Would be nice if the requirement was lower. Are you track powering your's H1000?

I have LiPoly batteries that average 11.2v (3S 1.5C class) and shut off at 10.5v. While at 2200mAh, this usually would last an entire day event, if not the whole convention weekend. But as you know, most people turn their nose up at the LiPoly gel packs due to their frail nature and strict charging requirements. LiFePoly's seem to be the ticket (The venerable 18650's for example). Larger than an AA, but still require special charging systems.

Last edited by Stone Rhino

Regarding the BVCAM app comments...I'd like to see an open source solution that would allow me to integrate the Lionel IP Camera videos into my layout controller.  I do know these cameras allow for a basic mp4 stream over http but I haven't figured out how to send the auxiliary commands to increase resolution etc...

@H1000 posted:

I agree completely, it's a lot of fun watching everyone and guessing where it is! I always thought if one could get a camera small enough that it could be mounted to (or replace) the front coupler, it would at least turn with the truck and the image would follow the rail pretty closely around curves.

Very kewl H1000, Thats the same configuration I use for FPV  on my R/C Drones and planes. Nice install. <s>

Some time ago I wanted to do a couple of video clips of the carpet empire to share with family.   My first attempt was using what was available,..   added some weight and rubber banded my cell phone to the back of a passenger car.   The results were good since cell phones have really nice cameras.  Only problem was it couldn't fit through the bridges and tunnels due to height.      My next was using a small handheld video camera with a mount made to sit on a flat car,..  this could be pushed by the train and fit through the tunnels but I like a view where I can see the train.     My daughter gave me a 90degree periscope adapter for the cell phone (cheap) but still a bridge clearance problem.     

My final solution came at a RC hobby shop where they have high quality video cameras in very small packages.   Look at some of the FPV used for racing and flying, there are many types that come in component levels.   A tiny camera lens unit (or several) can be placed anywhere and wired to the a control unit that records, broadcasts, takes still shots, etc,..    For my purposes I just obtained a RunCam2 4k version which is fully self contained and only 3/4 inch high.    Using their app I can live stream the view to my phone.   I paid $100 for the camera which I could have obtained for 70 or 80 online, but anytime I can I fully support the local shops. 

@Stone Rhino posted:

The camera's you suggested are 12vDC. That is a bit harsh to match in a conventional control layout. I can easily get a boost/buck to maintain 5-9vDC. My super cap array will is already maxed out and running at its maximum safe voltage of 9.5vDC. Would be nice if the requirement was lower. Are you track powering your's H1000?

I have LiPoly batteries that average 11.2v (3S 1.5C class) and shut off at 10.5v. While at 2200mAh, this usually would last an entire day event, if not the whole convention weekend. But as you know, most people turn their nose up at the LiPoly gel packs due to their frail nature and strict charging requirements. LiFePoly's seem to be the ticket (The venerable 18650's for example). Larger than an AA, but still require special charging systems.

So yes the Camera does state 12v but the operating manual for the AIDA camera does indicate a voltage range from 9 to 15 volts. I did test my camera down to 9 volts and worked just fine.

My camera vehicles are not track powered but I am looking into using track power to recharge the batteries on my latest build.  The battery pack (link to product) I dissected for this latest project does use 3 of the "venerable" 18650 batteries that have a charging and over current protection circuit built in.  The pack also included a separate board the has the 5 volt regulated output, 12v direct from battery output, 5 led battery level indicator, and an ON/OFF switch.

My battery pack will shut down when the system drops to 9.5 volts and the entire camera system in the dummy engine will draw about 525ma @ 10 volts. The pack is rated for 3000mAh so I predict I should get 4 to 5 hours of constant usage.

Some of my first trials with cheap FPV cameras running on track power yielded poor results due to interference from track power, command signals, chopped sine waves and other unknown variables. I notice improved quality and less frustration when I went solely to battery power, but I do want to revisit a track power solution.

Add Reply

Post

OGR Publishing, Inc., 1310 Eastside Centre Ct, Suite 6, Mountain Home, AR 72653
800-980-OGRR (6477)
www.ogaugerr.com

×
×
×
×
Link copied to your clipboard.
×
×