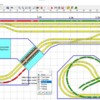
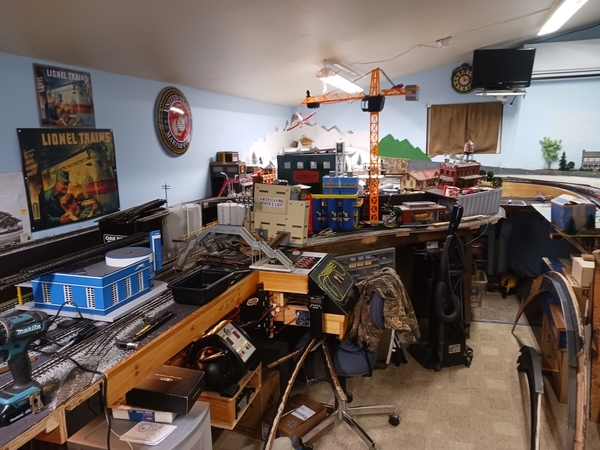
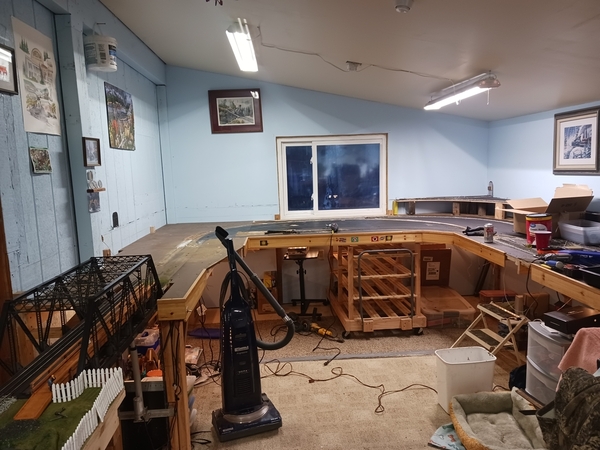
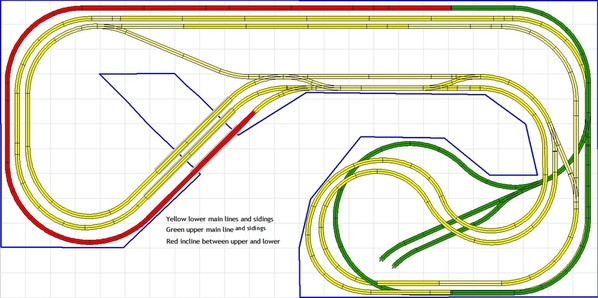
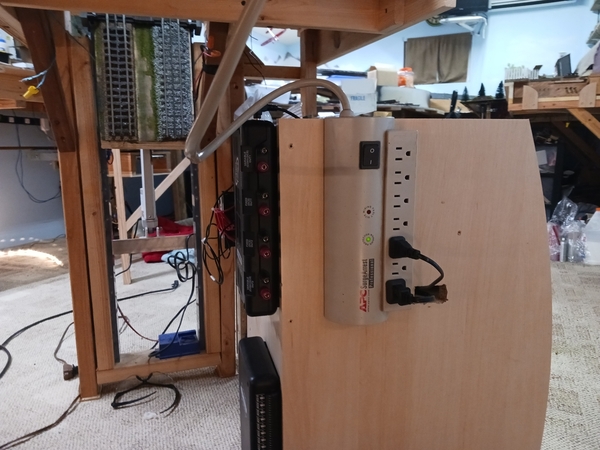
Hi guys and gals, I have been running my trains around the layout and realize that I have building under the layout that I would like to have on the layout. The problem is there is no room, also it is hard for kids to see the city, so I am thinking about lowering it.

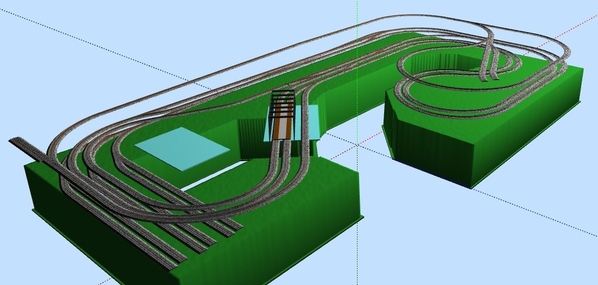
I found a layout from James Long from Ga. that I really like, the only problem is there is no way to turn a engine or train around to go in the other direction. I have been beating my head on the keyboard trying to figure something out.

Here is the layout I have know. There is so much track there is no room for building or scenery. But I have a boat load of ballast down! LOL

current layout#1

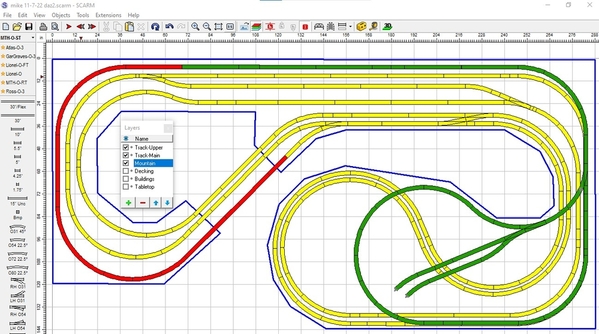
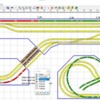
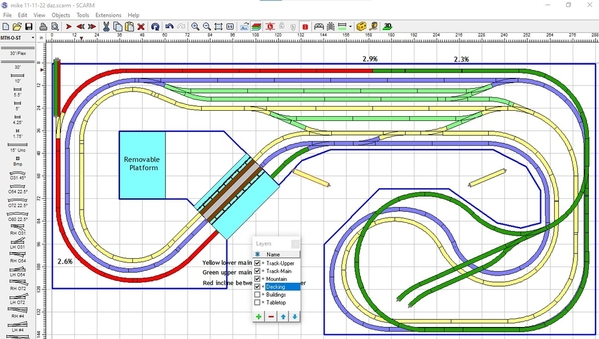
Here is the layout I am thinking about. The other problem is I have an engine with fixed Piolets which does not like anything less then a 0-72 curve at the cars behind it flip right over. The inner loop on the right is 0-54 so I have to try and figure out how to make that loop bigger. Also as I stated before there is no way to turn an engine around.               scarm 11-7-22                                          I have attached the scarm file for the second layout.
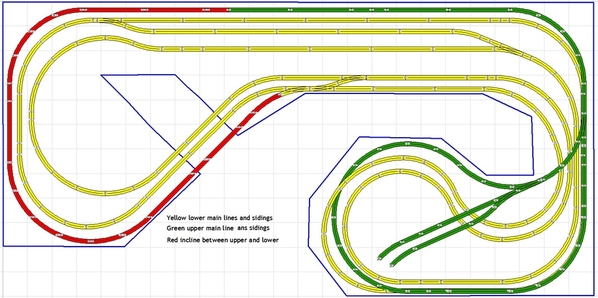
I look forward to hearing from you all and your ideas!

Attachments

Images (2)
  • current layout#1
  • scarm 11-7-22
Files (1)
Last edited by mike g.
Original Post

Replies sorted oldest to newest

@Mark Boyce posted:

Mike, it seems John must mean the section in the middle where you want to have buildings.  A crossover out front would only let a train change tracks, not direction.

How old are all the kids?

The oldest grandson is 13 and the youngest out of 4 just turned 5. They love the trains, but I pick them put to see everything else or bring chairs for them to stand on.

@mike g. posted:

The oldest grandson is 13 and the youngest out of 4 just turned 5. They love the trains, but I pick them put to see everything else or bring chairs for them to stand on.

Yes you will be picking up the youngest for some time with the present height.  In my case, I’ll have modified my layout several times and then be in the senior center before I would have to worry about helping a grandchild see the trains.

Thanks Dave, I didnt think there was a way. I just thought I would throw it out there looking for a miracle! LOL Guess I will have to see if I can switch my engine back from a fixed piolet, something I will have to think ab out!

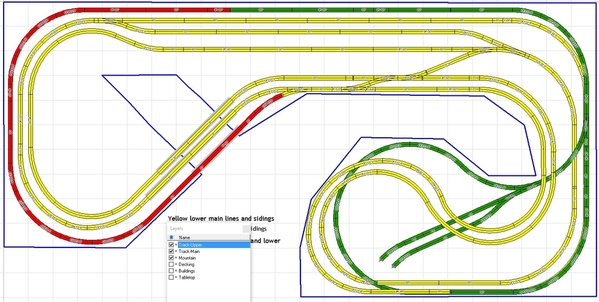
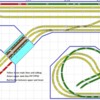
Hi John, here is what I have come up for a crossover, I put it all the way at the end to leave as much room for buildings! LOL

Scarm 11-8-22

Attachments

Images (1)
  • Scarm 11-8-22
Files (1)
@Mark Boyce posted:

Yes you will be picking up the youngest for some time with the present height.  In my case, I’ll have modified my layout several times and then be in the senior center before I would have to worry about helping a grandchild see the trains.

LOL Mark you never know! One of your daughters could come over tomorrow and ask how you would like to be a Grandpa! LOL

@mike g.  Mike - if you placed a double crossover where the single is, you would get your engine reversing option.

It continues to be mind boggling to me that 12 x 24 is not enough room to do all you want considering 072 dia curves. I never thought I would have that much room and with the present situation that is not going to happen.  My 9x13 left a lot of wants impossible, my new available space at max 12x16 is not much better. A real head scratcher, lots of compromise in the future.  Maybe I just have to buy a larger house and move again. The thought gives me a headache.   

Morning Jeff, Thanks for your comment and I am with you as my head hurts also! LOL

We thought about moving to get out of our state and the tax burden, but the wife decided she can't leave her grandbabies too far away. So, I decided to change things up for the grand kids as I was going to if we had moved so they can see it better. Plus, the layout I have now is nice but takes up a large amount of space. This new one will give me a little corner to have a small workstation. Here is what I came up with this morning. Screenshot 2022-11-09 080919

As you can see, I fixed the spacing between track using flex track.

I have attached the file if you would like to make some suggestions.

Hope you're having a good day and getting ready for the big move!

Attachments

Images (1)
  • Screenshot 2022-11-09 080919
Files (1)

@mike g.  Mike - Illinois has one of the highest tax burdens in the country. Champaign/Urbana is particularly bad.  Go out for dinner 10.75% tax, buy prepared food at the grocery store 10.75% tax, own a house 3% of the value ( a $400,000 house gives you the privilege of paying $12,000/yr and few services) and no property tax increase cap. Michigan is not cheap but 1.5% is way better than 3% and has increase limits. I voted with my feet.  Our grandkids were in Michigan so it was an easy decision to escape Illinois. Illinois is a great place to live, just not for paying taxes, and unmanageable in retirement.

I'll noodle over your scarm file.  What purpose does the green loop serve?  I see access to a couple of short spurs but not much else. (I assume that is on a lower level - my scarm is rejecting the recent upgrade so I cannot open anything at the moment.)  Jeff

BTW Dave you are a magician with these track plans.   

Jeff, thanks for the comment, but I haven’t had much to do with this design other than show Mike that O-72 loops won’t fit. 🤣 The green line is the upper level. It provides space for the spurs and presumably a town, industry or something as well as a reversing loop.

Mark, we’re 2,000 miles away from our oldest daughter and 2 grandsons. It’s definitely a struggle to see them at least once a year, especially since the youngest now lives 3 hours further. But, having been military, we’re used to it and you just adapt.

Mike, good job on the redesign. I’ll download it and take a closer look. The only thing I don’t like is the red grade track that will block the view a bit along the aisle and require a multi-level lift-out, assuming you’re not going with a duck-under. I’m interested to see if Jeff comes up with any more ideas.

Hi Jeff, as Dave has stated the green line in the upper loop and the 2 spurs are up for grabs right now. I am leaning towards moving my tank farm up there but not sure!

Dave, I see what you're saying. I have no problem moving the start of the grade right before the first curve going up.

Dave Ripp,I am in the same boat you are talking about, less track and better scenery!

Greg, sounds interesting just don't know where I would even start!

Thanks for all the input!

Mike - TPRR was 30 inches to the plywood sheeting. It made it very easy for my grandson to reach the track and play on the layout. Was not too bad working under the layout and my reach was pretty good, but did at times have to climb on the track. The only negative was at 30 inches it was quite a challenge to crawl under and twist around to get through the pop-ups (in my case pop-up was not an accurate terms - nothing quick at all about it). In a couple of corners I had to put my back against the wall and slowly wiggle my way up. Once there I could stand easily. Of course I am 6'2" and no where near as flexible nor thin as I used to be. I considered it my railroading yoga.  For TPRR2 I may use 40 inches just to have duck-unders and eliminate lift outs where possible. 

You have to decide on deck height. More from how you want to see the layout and how you will be able to operate. For the GKs I would build short risers (10 inches deep and 3 feet long) they can stand on (2x6s work fine for this.) Just make sure the legs at floor level are outside the edges of the platform - like below - to avoid tipping.

Attachments

Images (1)
  • mceclip0
@ScoutingDad posted:

Mike - TPRR was 30 inches to the plywood sheeting. It made it very easy for my grandson to reach the track and play on the layout. Was not too bad working under the layout and my reach was pretty good, but did at times have to climb on the track. The only negative was at 30 inches it was quite a challenge to crawl under and twist around to get through the pop-ups (in my case pop-up was not an accurate terms - nothing quick at all about it). In a couple of corners I had to put my back against the wall and slowly wiggle my way up. Once there I could stand easily. Of course I am 6'2" and no where near as flexible nor thin as I used to be. I considered it my railroading yoga.  For TPRR2 I may use 40 inches just to have duck-unders and eliminate lift outs where possible.

You have to decide on deck height. More from how you want to see the layout and how you will be able to operate. For the GKs I would build short risers (10 inches deep and 3 feet long) they can stand on (2x6s work fine for this.) Just make sure the legs at floor level are outside the edges of the platform - like below - to avoid tipping.

Thanks for the information Jeff, I have been thinking 30" as I am only 5'9" I don't plan on t many popups but just a couple. This new build is for not only for the GK's but ease on me! LOL Not to be mean but I thought about the short risers, but I have this one grandson that no matter what you do he would find a way to fall off it and hurt himself! Then I would be in the doghouse! It's easier for me to spend more time under the layout trying to get things done then it is in the doghouse!

Right now I am on my SCARM file trying to lower the main deck top and 30" and the top and 39" just for extra clearance!

@Mark Boyce posted:

Oh, the current layout is lower than I thought. Too low and you will have trouble with your reach.

I agree, but the way it sits now if I want to reach something in the back of the narrow area, I still have to get the stepstool, or my belly will surely crush something! LOL I was thinking with this new layout I am going to concentrate on doing mostly scenery. Sure, I still want to run a lot of trains, but I want it to look good and interesting like many others!

Since were no longer thinking about moving I want to make this my little masterpiece in our little world!

So, I was able to get the track lowered to 30" and 39". But I can't figure out how to lower the tabletop! LOL so in 3D you don't even see track! LOL

Last edited by mike g.

We used 44” and got several benches from Lowe’s that the kids stand/stood on. A rolling stool worked perfectly for me and wiring was relatively easy. There is a lot of it.

Three  years later, the grandkids are tall enough to see the first level and run trains by themselves. One can see level 2, the ten year old uses the bench. And I am 74 with two knee replacements in three years and can still roll underneath.

How about designing the layout so that legs can be adjusted as the grandkids  get taller. Bet you will be glad that you did so.

Last edited by Bill Webb

Mike, you might not want this version, and that’s okay, but I figured I’d post it anyway. I checked the flex track curves and they seem to be okay. One curve appears to be very slightly tighter than O-54, but adjustments will be needed during the build anyway, so I was mainly just checking to see if any were way off. If you build this, just be sure you do a lot of planning so you don’t over-bend and get curves tighter than O-54. I’m not sure which is easier, bending flex and cutting sectional curves.

I also moved the grade starting point after the entry gap. The numbers along the top show the percentages at those points if you decide to move the end point more toward the right to get closer to 2%. Mind you I think 3% is okay, just make sure to you consider easements at both ends for smooth running.

I also change some if the red tracks through the bottom loop to eliminate the very small fitter near the switch. I placed 30” tracks across the entry gap and changed the trash’s leading up to them I assume you’ll add a lift-out of lift-up, maybe a bridge, across the gap. The MTH dual bridge is 30”, so that’s why I chose 30”.

I also squared off the baseboard so you’ll have better access to the tracks on the left without need a pop-out. If you want more landscaping area, you can simply put a pop-out panel to fill some of that space. I did the same on the lower section to add landscaping space without hindering access.

I saw your comment about height, so I used the Height tool to lower everything 10”.

2E5D065E-2853-46A0-857F-60BADBEA8040

Attachments

Images (1)
  • 2E5D065E-2853-46A0-857F-60BADBEA8040
Files (1)

Here you go Dave!

The scale-sized double-track bridge is 40.5 inches long, 10 inches wide, and 10 inches tall. The tracks are spaced 4.5 inches apart, center to center; vertical clearance for rolling stock is 6.75 inches measured from the tops of the railheads. The railheads are 1.625 inches above the bottom surface of the deck. So the largest O gauge steamers should roll right on through – but you dreaming Standard gauge guys … well, keep on dreaming.

Right from Atlas!
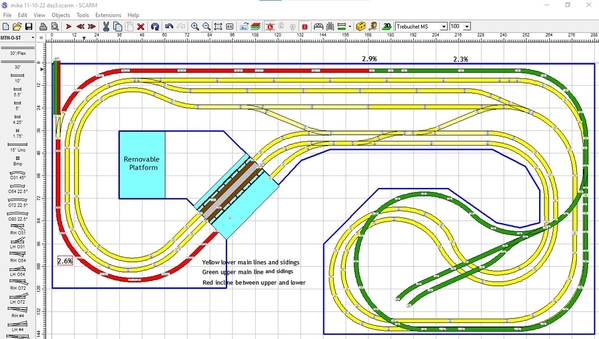
@DoubleDAZ posted:

Here's the latest version with the bridge. I had to expand the gap platform to 40" and I added the removable platform for landscaping that can be removed for access. The grade changed a bit and added 1% to a couple of places for the end.

mike 11-9-22 daz2mike 11-9-22 daz2-3d

That's pretty neat Dave. Are the sidings really elevated? If the bridge is a lift out it may be possible to do a 2-inch foam lift out that starts at the bridge. I guess that depends on what scenery mike has planned for that area.

Sorry about the image, Dave, it’s fixed.

Anyway, the green spurs are elevated, as is the reversing loop. I just haven’t added decking for the loop. That way Mike can see what’s below that will ultimately get covered.

And, yes, that entire side of the entry could be a series of lift-outs. I thought about adding them, but figured Mike would get the idea from the one I did add. I know he’s concerned about landscaping space vs track.

Last edited by DoubleDAZ

Hi guys, Dave that looks great and I like the idea of the lift out scenery section.

Dave Ripp, I plan on using the same setup I have right now for the bridge when I enter the room. I use an actuator like Mark, and it lifts that Atlas double bridge, a single-track girder bridge and a road bridge. If you haven't seen it or forgot here is a video of it.

Attachments

Videos (1)
VID_20220216_094226
@mike g. posted:

Hi guys, Dave that looks great and I like the idea of the lift out scenery section.

Dave Ripp, I plan on using the same setup I have right now for the bridge when I enter the room. I use an actuator like Mark, and it lifts that Atlas double bridge, a single-track girder bridge and a road bridge. If you haven't seen it or forgot here is a video of it.

I like it, I just thought if you could lift it the walk into the pop out area it would be easier on your body.

ok guys and gals, I just posted on another thread, I found something I missed and forgot about when planning the new layout. It is the opening going from inside the train room to the outside for the future runaround the back yard. I have to talk with Dave and see if there is some way, we can make it work! Here are a couple of photos. The first is of the outside and the second is where it is on the inside behind the power building.

20221110_08552120221110_085925

I will have to break out the Lazer level to find out the exact height!

Attachments

Images (2)
  • 20221110_085521
  • 20221110_085925

Mike, what kind of track will you be using outside? I always thought a outdoor ogauge layout would be really cool.

Jeff

Hi Jeff, to be honest I am not sure yet, some folks say Atlas is the way to go and some say GarGraves. I just don't know yet. I am waiting till I get to that point. For me as I am on a fixed budget the $$ is going to be a big factor!

Mike, the old design I have says the height is 46", but I don't know how far it is from the wall or if that's the latest file for your current layout. Copying a track from the old file and pasting it into the new file shows it's 2" from the wall, so there are 2 ways to connect. One is to use flex track, but that introduces something close to an O-80 S curve. The other is to move the tracks on the right closer to the wall and use a straight track from the added switch. Here's a version using the flex track with heights adjusted to 37" and 46".

mike 11-10-22 daz

Attachments

Images (1)
  • mike 11-10-22 daz
Files (1)

Mike, I knew I shouldn’t have relied on the compass in your designs. Bith we’re pointing north, so that’s what I went with. 🤣 Either way, you got the idea, so that’s all that matters.

BTW, is that left side far enough away from the wall? If it is, then your overhangs must not be too all that much, which is good.

Mike, I have file "mike 6-08-21.scarm". I rotated it 180° and the track through the wall is closer to the left wall in that file than in the one you just posted. It only matters if you want to use the same hole and just lower the bottom of the opening. The center rail is 2" from the wall in my file, but it might not be the current file or distance.

test

Attachments

Images (1)
  • test

Hi Dave, I think I am going to have to lower the hole as I don't see any way to gain 9" in less than 30" of track. As I posted earlier the hole with the track going out right now is at 44 1/2". That would be one heck of an incline! LOL

As far as the alinement goes, with having to move the hole I think that is no problem.

Last edited by mike g.

Mike - that turnout will be on an incline. Be careful with the lead ins and outs.

If you really want a reversing loop, looks like you could use a Ross double crossover. You probably would want to move the inner loop tracks together to mate with the Ross easier. There are a couple used ones out there for less than 4 switches and a crossover. Either way the option is not cheap. Maybe install the track so you could lay one in if you can get a deal on one.  You could move it anywhere along the parallel track.

Attachments

Images (1)
  • mceclip0

Ok, Mike, here's a version for your review. As you can see, I just added the left crossover because the placement for the one on the right lets a train go from the lower yellow track up to the next and then to the next. If you use or create a double-crossover together and move the single crossover to the right, you lose that option and the train will have to go all the way around to change tracks.

I added the Green track on the upper left corner to show where I think the current track through the wall is. I then put the switch flat and separated the grade into 2 sections. As you can see, the lower grade would be 2.6% and the upper grade 2.9% or 2.3% depending on where you locate the end.

mike 11-10-22 daz3

And just to clarify, below is a version that shows one set of reversing loops in Blue with both ends on the main level. I believe that is how Mark dealt with a switch on a grade on his layout, so you can check with him to see how it turned out.

mike 11-10-22 daz3a

Below is another version that shows the current set of reversing loops in Blue and Green with the Blue end on the main level and the Green end on the upper level.

mike 11-10-22 daz3b

Attachments

Images (3)
  • mike 11-10-22 daz3
  • mike 11-10-22 daz3a
  • mike 11-10-22 daz3b
Files (1)

@DoubleDAZ  Dave.  Any way to get a yard worked in? Perhaps along the top wall with 3 or 4 tracks? Or maybe pinch the reversing loops closer together to fit in the extra track.  A yard loaded with freight cars can be a point of interest in itself. I know Mike is trying to reduce visual track, but lack of a freight yard can be a real issue. 

The extra turnouts to get the reversing loops look good. Especially the ability to jump tracks. 

I might think about flipping the levels so I could get the yard at a lower level and out of visual sight. That would yield a lot of space - I would probably plunk a passenger station on the upper level with track below with the lower portion visible through a concrete valley. Chicago Union Station is at and above street level but the track is all below grade. Several approaches to the city are similarly built. I did something similar with TPRR when I realized I needed yard space. Visually it was interesting watching trains pull through that area.

Chicago rails Google earth example of below grade commuter rail --  Just west of the river are the commuter rails feeding Union Station.

Mike, just went through all of the posts. Glad you’re starting a separate build thread. It’s a good choice to stat near the grandkids. Always lots of fun and memories for you and them. Like in Mark’s case, it’s better to work this out on software first. It’s great that you’re able to make this big change to the layout, how it looks and operates. You’re in good hands with Dave and Jeff, that’s for sure. I’m with Bob, I’m cheering you on from Long Island. Take your time with these decisions they will pay off for you and the grandkids in the end. Great idea about the outdoor layout!

Andy

Jeff, I guess the short answer is I’ll have to defer to Mike. He already has some storage tracks in his current layout, but has elected to take them out in this new design. Obviously, they can be added, but something will have to give, mostly space for building, etc. If his goal is to entertain grandkids, then storage tracks don’t really do that, being able fir them to run trains does. Part of the problem with designing is no one takes the time the measure building footprints and add them to the design in the form of rectangles and polygons. It’s easy enough to add storage tracks, but I have no way of knowing what that means for other things Mike wants. Maybe if I get some time today I’ll see what I can come up. Bear in mind, I didn’t create this design, I’ve just helped Mike with a few SCARM related things.

Jeff, I had some time, so I played around a bit and think I was able to add some storage in 2 different places. I changed some of the colors to make the loops easier to keep separate. The upper set of storage tracks in green simply built on the 1 siding Mike already had there and adjusted some of the tracks a little to get enough clearance. I added the lower green tracks for a little added storage, but left the yellow filler tracks in the aisle in case Mike wants to use this file but not both sets of green tracks. I don't really know if you gain much with the 2nd set, but I threw it in anyway.

I've also changed my mind about having both crossovers because I can see the value of letting trains on the yellow line change directions when 2 trains are running on it and the blue line. Otherwise both trains just go in circles until they work their way to the upper reversing loop.

None of the changes look out of place and I think they add some play value.

mike 11-11-22 daz

Attachments

Images (1)
  • mike 11-11-22 daz
Files (1)

Dave i am travelling again and cant get to the SCARM file.  Designing a track plan is always an exercise in compromise.

For me, i want my passenger cars on tbe layout. I have too many to do that but at least 6 sets at any one time. I also have about 30 engines about 8 are of the size once on the layout i do not want to take them off hence engine storage. Then the grand kids and me like to see several trains running at the same time. And on and on.  I need to buy a bigger house.   Jeff

Jeff, we all need bigger houses, but they still won’t be big enough. 🤣 I don’t know if Mike is going to like the changes I made, but I was surprised how easy they were to make. There’s still not a lot of storage. The yellow tracks could be squeezed closer together to get more, but I think that would really be pushing Mike’s goals for landscaping.

Hi guys, some interesting thoughts, I will have to do some thinking on this. It kind of puts me back to what I have now, no room in the middle for buildings.

Sorry I haven't got back sooner; I have been busy taking things down and by the end of the night I am beat! I wish I know an easy way to get the cork back up! LOL

20221113_14561420221113_145625

Attachments

Images (2)
  • 20221113_145614
  • 20221113_145625
@mike g. posted:

Hi guys, some interesting thoughts, I will have to do some thinking on this. It kind of puts me back to what I have now, no room in the middle for buildings.

Sorry I haven't got back sooner; I have been busy taking things down and by the end of the night I am beat! I wish I know an easy way to get the cork back up! LOL

Mike, an oscillating tool works great for removing glued down cork and ballast.

m5

Attachments

Images (1)
  • m5
@mike g. posted:

Hi guys been out taking up track again this morning, Oh what fun it is! LOL

@Dave Ripp. Dave, what kind of blade do you use?

@DoubleDAZ Dave, I have to check but the buildings that I want in the center I think are 10"-12". So, I don't know what that would leave me. Might be room for one siding for car storage.

Similar to this one, my son buys contractor packs, so I never really paid attention. Anyone with a little step down 1.5 or 2 inches wide.

A1

Attachments

Images (1)
  • A1

Hi guys, I hope your all having fun!

Today I took up some more track and cleaned it, used @Dave Ripp. Dave's method for removing the cork which works great! Heck a lot better than a putty knife! LOL Now I have to work on getting some of the glue up, was thinking of a belt sander, we will see!

I also was able to get the first section of elevated track area removed and hope to get the bridge removed tomorrow. At least that is the plan! LOL Here is a photo of that area.

20221115_135544

@DoubleDAZ Dave, I check the width of the biggest building and it is 12" that I want to fit between tracks. I found 4 MTH #4 switches if that helps!

Attachments

Images (1)
  • 20221115_135544
@mike g. posted:

@DoubleDAZ Dave, I check the width of the biggest building and it is 12" that I want to fit between tracks. I found 4 MTH #4 switches if that helps!

I hope you realize that 12" means none of the designs so far will work because the yellow tracks are closer than 12". So, I've been working on this idea, but didn't tweak it until you've had a chance to look at it.

mike 11-15-22 daz

Attachments

Images (1)
  • mike 11-15-22 daz
Files (1)

Mike you need to add space so Dave can get the buildings in.  BTW - I think most of my buildings are no more than 7x9.  Most of the WoodlandScenics fall into that range as well. Maybe this 12 incher is a special case???  Seems to me you can get a whole town into the space between the yellow and green track. If not then the green siding needs to go.  This is where a yard on a lower level begins to make sense ... lack of space.  Is the window on the right side of the proposed layout as I look at the layout photo?

Dave looks like you worked in over 16 inches between the track for Mike's buildings. 3.8 slope on the lower level feeder. maybe a little steep but not intended for running.

That's the one thing about HO Scale vs Scale 3-rail. You can get away with the 072 curves but still are limited by the height of the cars, so we need twice the run for the same grade. 

Morning guys, I just had a chance to look at the latest drawing. It looks like it would be a possible build would take some thinking on how to go about making an open channel in my framing for the lower track.  Something I am going to have to consider.

Jeff you are correct I went back out and measured the Menards Seed and Feed building and it is 11 1/2", then the next one down is 10 1/2" which is the train station. The 16"s will help with a place to puta road! LOL

Hi Dave and Jeff, I went out and looked around to see if this was doable and it is with some work. so, I started measuring things out and the marrow bench width is already at 36" so I would just leave that alone and build off of that.

Now here is where I really screwed up. when I build the room about 5 years ago, I built it as a 12' X 24'. Here is the problem and I am so sorry for being such a fool, I didn't take into account the wall width, so it is really 11.58' X 23.66'. I know I am going to really change things as the door opening is right at 129" or 10.75" from the right side of the drawing.

If you guys wish to quit, I understand!

Quit? No way would I abandon you! Unfortunately, I’ve got too many things to do today and I’m about to leave, so I won’t be able to see what that does to the design. It should just be a matter of shortening everything in the middle, but “should be” is non-commital for a reason. 😜

EDIT: Forgot about the door, so that could be a problem.

Last edited by DoubleDAZ

Thanks Dave. the door is to the left of the right big loops. it measures 129" from the right wall.

The door is 33" wide and the wall on the left side of the door is 10' or 120"

I am in no hurry Dave I am just glad you're sticking with it!

I think I am going to have to move one of the cars out of the garage, so I have a place to store all this stuff! LOL

Wow, I am shocked to hear your changing your nice layout, however I see the logic. I admire those that can utilize computer programs to draw track plans for serious review. When I built my model railroad, in 1999, with really no good computer program, we built a nice around the walls layout, leaving a 30 inch walk in isle…. This was a year and a half project that just was not user friendly, I tore the entire layout down, my wife and friends were totally shocked, and I explained that the plan was a big mistake. (We we’re and will be using the all new Lionel TMCC command control system) We then made a large Island type layout, built in grid construction, and made a similar copy of the Lionel showroom layout with enhancements. The upper level actually utilizes the walls therefore allowing 0120 circles. So, I can understand the major layout changes you plan to make. One thing that really helped when we tore the first layout down was we hadn’t started scenery or track ballasting. So, I can see the issues that can occur trying to clean up the track and begin again. I wish you good luck, and thank you for allowing us to share in your new adventure, it’s going to be fun. It’s nice that your friends are able to make computer generated track plans, that’s so cool. This will be a fun thread to follow. Happy Railroading Everyone

Mike, I made the same mistake when we started planning my layout almost 6 years ago, and Dave didn't leave me either.  I knew the addition my in-laws built was 12x12, so I went with that in planning.  Once I got planning, it dawned on me that 12x12 had to be the outside dimensions.  I measured and the room and it is 11' 4" x 11' 6".  I just call it 11x11 now for sake of simplicity.

@mike g. posted:

Thanks Dave. the door is to the left of the right big loops. it measures 129" from the right wall.

The door is 33" wide and the wall on the left side of the door is 10' or 120"

I am in no hurry Dave I am just glad you're sticking with it!

I think I am going to have to move one of the cars out of the garage, so I have a place to store all this stuff! LOL

Well that leads to the natural expansion of the layout through the wall into the garage Mike! Just tell your wife you mistook the portal for the extension into the back yard.....

Bob

Hi guys thanks for looking!

@leapinlarryLarry thanks for checking in, it is going to be one heck of a project! All my track is ballasted and most of it will be coming up and getting cleaned up. It doesn't have to be perfect as long as it lays flat and connects, it will all get ballasted again!

@Mark Boyce Mark, I should have known better! I built the darn thing! LOL

@RSJB18 Bob that is a great idea, but when I told the wife I was moving a car out to make room to store some train stuff while I redo the train room, she said make sure it is your car! CAUSE MINE STAYS IN!!!!! LOL

Greetings Mike,  We have been out of country so I have been out of touch with much of the forum chatter regarding your layout dilemma.   One thing not noted is that "grandkids grow taller".   I would think that you would begin with the hole in the wall for the outside addition and then work down from that point to determine the workable height and grades for your layout.   Sounds like a very ambitious project, but remember, your first priority is "Your enjoyment".   My observation is that most people tend to overdue trackage.   Hope you can find a good balance and arrive at a point that makes you happy.   Sorry that I cannot give more insight or advice.   Do what makes you happy!   Good luck, have fun and I look forward to your progress posts!

Cheers, Dave

Mike, to add on to what Bob said,

”OK GUYS....PROBLEM SOLVING IN FOUR WORDS....

LOWER LEVEL STORAGE TRACKS” 👍

I have a return loop and four 10’ long tracks to turn and store trains under my yard. It allows me more flexibility without expanding the footprint of the layout. My benchwork is simple L-girder. Very easily modified to suit any expansion or change in layout. You can adjust the height to suite your needs.

Andy

49A94C40-AF9F-40F3-A977-53CCD273CEDC0D6782E5-A2EB-41F9-81C9-6BC51CCFDFE4

Attachments

Images (2)
  • 49A94C40-AF9F-40F3-A977-53CCD273CEDC
  • 0D6782E5-A2EB-41F9-81C9-6BC51CCFDFE4

Mike,

11.58' = 138.96", so I called it 138" to be safe.
23.66' = 283.92", so I called it 283", again to be safe.
If the door is 129" from the right, 120" from the left and 33" wide, that makes 282", so I placed it at the 129" point (154) on the right to be safe. If it opens to the left, then it's back to the drawing board.

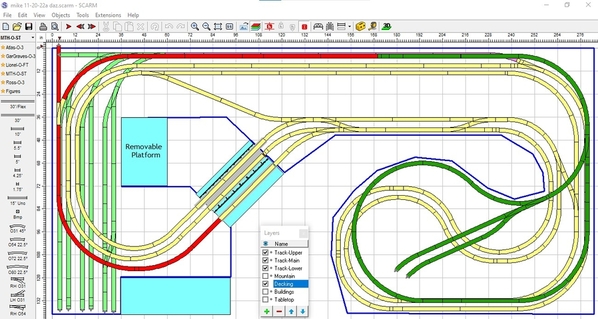
As you'll see, I removed a bunch of O-72 curves and flex track to make the loops fit, though they still don't really fit, so maybe you can live with not being to open the door all the way. I also used more layers to keep things straight. The main level is 30", the upper level 39" and the lower level 23" with a 3.8% grade. Because of the O-72 curves on the upper level, the aisle shrunk quite a bit, so that might be a deal breaker, but it's the only way O-72 curves fit without shrinking the space for buildings.

mike 2022-11-17 daz

Attachments

Images (1)
  • mike 2022-11-17 daz
Files (1)

Hey Dave, maybe you or someone else can tell me how long of a hole I am going to need in the main level to have clearance for the ramp going down to the lower track storage yard?

The layout redo has been put on hold for a little while as the CEO thinks the Christmas lights should be put up first! LOL

Last edited by mike g.

Mike, the grade down from 30" to 23" is 184" (almost 16'). It reaches the 5" mark around 134" (a bit over 11').  Depending on the height of the equipment you'll be running, you can probably get away with 5" plus the thickness of the decking, but it would probably be easiest to just make it the full length of the grade. If it were me, I'd probably just go all the way to the left wall. The problem I see is supporting the track and decking above the yard. With only 7" of clearance, you won't have room for crossmembers, so you'll have to use some pylons thin enough to fit between the yard tracks and hefty enough to support the main level decking, tracks and buildings.

I also noticed that the grade track is close to the main level track, so I moved it closer to the wall. Hopefully, that will give you some room for a thin wall along the main level track to avoid a train rolling into the opening for the grade track.

mike 2022-11-19 daz

Attachments

Images (1)
  • mike 2022-11-19 daz
Files (1)
@E-UNIT-79 posted:

Dave, your amazing with the way you calculate your dimensions.  I can build Anything but have zero foresight to design something.  Lol.

Thank you. I guess it comes from designing computer programs in the Air Force based on what folks needed/wanted. The thought process is pretty much the same, just different visual tools. It helps to be comfortable with computers too.

Mike,

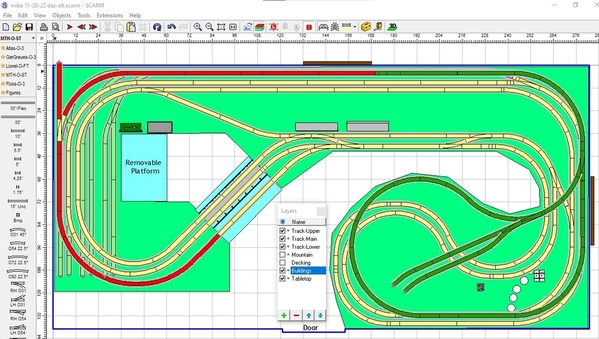
Here's a version using the latest room measurements and your recent changes. I added the lower level, moved all tracks to their correct layers and moved the start of the grade to the upper level to AFTER the entryway. I doubt you want to have a grade on the lift out/up platform. I also changed all the yellow tracks to the same shade of yellow, you used at least 2 of 3 shades depending on when you made changes. I also cut tracks so everything joins. However, but I didn't change them so they're all from 30" tracks like I usually do.

Anyway, I think it strikes the right balance between track and space for landscaping. The 1st photo includes tabletop and the buildings you had in the file. The 2nd photo excludes those.

mike 11-20-22 daz-alt2

mike 11-20-22 daz-alt

Attachments

Images (2)
  • mike 11-20-22 daz-alt2
  • mike 11-20-22 daz-alt
Files (1)
Last edited by DoubleDAZ
@DoubleDAZ posted:

Mike,

Here's a version using the latest room measurements and your recent changes. I added the lower level, moved all tracks to their correct layers and moved the start of the grade to the upper level to AFTER the entryway. I doubt you want to have a grade on the lift out/up platform. I also changed all the yellow tracks to the same shade of yellow, you used at least 2 of 3 shades depending on when you made changes. I also cut tracks, so everything joins. However, but I didn't change them so they're all from 30" tracks like I usually do.

Anyway, I think it strikes the right balance between track and space for landscaping. The 1st photo includes tabletop and the buildings you had in the file. The 2nd photo excludes those.

mike 11-20-22 daz-alt2


I like this version much better. Reversing loops, storage, the ability to transverse lines and best of all real-estate for scenery.

Last edited by Dave Ripp.

@DoubleDAZ  Dave, I love what you have done with Mike's Layout plan. Can you rebuild my train area and double the space without moving walls?

Dave is there anyway to add a run around on the slope leading to the lower level yard?  Presumably anything going down there will be a switcher which can take 032 turnouts or something larger at 042?  If Mike is always backing down no issue but if he leads with an engine then there is a problem.

Mike - I've never really understood the function of the upper portion. Trains have to come down and potentially interfere with the trains on the double mainline. Well maybe that's the art of operations. I like running 3 trains at once, maybe close a O42 loop on the upper section so you could run a local on the upper area.

All this depends on what industries you want to model and where the runway goes.

Just thinking out  loud.  Jeff

Jeff, sorry, but can't double your space and I don't think a runaround siding will fit, the tracks there are too close. What I did was steal some space in the lower left, if Mike agrees, and added an escape track to one of the slots in the yard. I also added a parking track in the upper left for a yard switcher.

FWIW, the upper level is simply to give the layout some height, room for a raised town or industry and maybe a mountain scene.

temp

mike 11-20-22a daz

Attachments

Images (2)
  • temp
  • mike 11-20-22a daz
Files (1)
@VJandP posted:

Love this.  I’m going to incorporate it into my planning.  I think this will nicely solve 1/2 dozen design quandaries I’ve been trying to reconcile.   👍🏼 🙃

An engine escape can be added to all 3 legs, I just added it to 1 to save money on switches. It makes dead-end yards more useable. It’s not just for trains pulling in engine first either, yard switchers can use it too. A runaround track would have been nice, but you can’t park cars on a grade, they’ll have a tendency to roll, so even if there were enough space, I didn’t think it was feasible.

Mike, it just lets trains pull in engine-first. It drops its cars just before the switch, then the engine moves past the switch and crosses over to “escape”. It can then pick up a different set of cars on one of the other spurs and go back up to the main level. The only thing is the engine would then be running “backwards”, not a big deal for diesels. Without the escape, you’d have to always back trains in to drop off. If you plan to always back in to use all 6 spurs for storage, then the escape is not needed.

Because I’m not really into switching, I’d always back in so I could maximize storage. Since the layout allows for unattended running of 2 trains, you could have 7 consists available for variety; 5 in storage and 2 running. If you use the escape, then those 2 spurs have to be empty. The engine would take a consist from 1 of the other 4 spurs and the yard switcher would then clear the arrival spur.

Having the escape though gives someone the option of playing in the yard moving cars around reconfiguring consists while the other trains are running on the main level. Grandkids might find it fun to do that, especially if you task them to put together specific groups of cars.

More storage could be added in that open space to the right, they’d just be smaller spurs. They could be used to store more engines.

For me, the escape tracks will be great for an engine storage area.  This will allow me to stack three or four engines on one siding but can sneak them out to use them without having to pull everything out and juggle their positions.  Two long sidings with escape tracks up against an edge of the layout will take up much less space than a full blown yard with shorter sidings.  

Morning guys I hope your all doing well.

Dave thanks for the updates and everything looks wonderful. As for the escape route I like the idea, I guess I will have to see how many extra switches I have left over after this! LOL

@Steamfan77 Andy I really like your photos of your lower storage yard, can you explain how you they get down there and maybe some photos of the area.

@ScoutingDad Jeff the upper loop area with the sidings is going to be the refinery and maybe one of the power company buildings.

Thank you all for your great ideas and help with everything so far! I hope you all are able to have a wonderful Thanksgiving with your families!

Here's my contribution for today (so far ). I added the engine storage I mentioned earlier. I also added some semi-transparent decking for each level for the 3D view. And I added the gold color to some main level tracks to make it easier to see the separate runs for unattended running of 2 trains. The gold track is the outer run and the yellow the inner. A 3rd train can be run using the upper reversing loop, but the engineer will have to be careful not to interrupt the others when he/she brings the train down to the main level. A 4th engine can be run in the yard to switch cars around. That means there is enough operational capability for 3-4 engineers.

In place of the engine yard, a turntable or reversing loop (limited to O-31) could be added to turn engines. Turn on the Decking layer to see those options.

mike 11-21-22 daz3d

mike 11-21-22 daz

Attachments

Images (2)
  • mike 11-21-22 daz3d
  • mike 11-21-22 daz
Files (1)
@mike g. posted:

@ScoutingDad Jeff the upper loop area with the sidings is going to be the refinery and maybe one of the power company buildings.

Oops! I need to raise the refinery. 🤪 As for the switches, I  just filled the lower level space with the goal of getting more equipment on the layout itself to minimize you having to manually swap cars and engines too often. None of the extras are needed, they just make some things easier. You can always back trains down to the lower level.

Only if you paid for the Power Edition of the simulation feature.

BTW, here's my latest version. I'm not happy with the lower reversing loop because there are reach issues for some of the tracks. I tried to put the switch closer to the edge for access, that's why the loop is kind of cockeyed. I incorporated the current yard with the new expanded yard. I offer it purely as food for thought.

mike 11-21-22 daz2

Attachments

Images (1)
  • mike 11-21-22 daz2
Files (1)

Great work on the plan Dave, you are a wizard.
Mike, here are some pictures of the layout and the track plan. The staging tracks are below the yard are in red.
The staging tracks are actually the same height as the Mineola area on the layout. I start to elevate the branch line when it comes off the main, and continue as the branch line proceeds into Locust Valley. In effect, the branch line is raised not the staging yard if that makes sense. It was the only way for me to have the extra track and maneuverability without increasing the footprint of the layout.The first few pictures show the staging area before it was covered by the yard.

Andy

Attachments

Images (6)
  • mceclip0
  • mceclip1
  • mceclip2
  • mceclip3
  • mceclip4
  • mceclip5

Mike, the first and second pictures are the storage tracks before the yard is built on top of them. In the third and fourth pictures I’m showing how the branch line and yard are elevated to be higher than the storage tracks.
The storage tracks are on the same level as Mineola on the layout as you can see in the back of the second picture. The branch line comes off the main in Mineola, and starts up grade from there. That’s what gives me the height to have the yard over the storage tracks.

Andy

@mike g.  Mike for what my 2 cents are worth - I kept thinking about this section and how the upper and lower track relate and then to whatever you want on each level.  I kept thinking it would be decked over. Maybe a partial deck to support the higher level track and the extra yard track you want with room for industries, but then the other portion would be elevated track to allow access and positioning of lower level industries.  Transition walls could be fairly steep, maybe only a small section with stone walls.  Footprint can be moved around to meet your needs.

Attachments

Images (1)
  • mceclip0
@mike g. posted:

Hi guys, here is the final plan I am going with. I hope you all like it and thank you for all your help Dave!New layout plan

Looks like a Grand Plan!    Good storage and continues loops with reversing opportunities.  What is the minimum radius and elevation?  Glad that you will be able to get outdoors with this plan.    Good luck with the rebuild!   Looking forward to your progress!  

Cheers, Dave

Well guys I already started and now have to rethink the plan! I went out and took inventory of all my engines and found out they will all run on O-54 curves but one. The 4-8-4 that I got earlier this year, it requires O-72 curves!

Not sure what the next move will be, but will keep moving forward.

@mike g. posted:

Well guys I already started and now have to rethink the plan! I went out and took inventory of all my engines and found out they will all run on O-54 curves but one. The 4-8-4 that I got earlier this year, it requires O-72 curves!

Not sure what the next move will be, but will keep moving forward.

Hi Mike, Your lasted plan looks perfect.  I have a similar situation with all engines except one, can run on 054 curves or less.   For some odd reason, I purchased an engine that can only run on 072 curves, knowing full well that it can't run on my layout.  I justified the purchase by thinking that I will just run it on a carpet central railroad, at Christmas time.  So, I bought some 072 Lionel Fastrack, but have not told my wife the plan yet, so I may have to go to plan "B".  I think keeping your layout as designed would be the best option and would make you think twice about the larger engines.  There are so many engines that run on 054 curves, so no worries about lack of options. 

All the best, Dave

@Mark Boyce posted:

Mike, wow!  Thats a lot!  😉  I will check after I get home from my 3-year checkup on my knee replacement!  Hard to believe it has been that long.  😊

I know tell me about it! I didn't check till today as I know I just liked the plan. It might be a while before it is done as I have a feeling it's going to take a fair amount of money to get all of them! LOL

Mike,

There are bigger problems with the design. I went over it a bit more thoroughly and found the loops on the left going to the bridge are less than O-72. Initially I had just checked the curves at the top of the loops and they're O-72. I should have remembered that they tighten going to the bridge because I had checked them earlier to make sure they weren't less than O-54.

The other problem is that the upper reversing loop is off kilter because of the cut tracks. They join in SCARM until you disassemble them and try to put them back together or, in this case, try to make changes. The interesting thing is they fit properly using all sectional O-72 tracks and only cutting 1 straight track at the switch, so I'm not sure how you ended up with cut curves and tiny fitters.

At any rate, here's what I've come up with as a possible compromise. The gold, red and green tracks are O-72 and the yellows are O-54. The grade up is 2.9% and down is 3.8%, but should be doable, even if you need to use a yard switcher to push some extra cars up to make a long consist for the Big Boy. BTW, the switch to the grade down is O-72, so the Big Boy can back down and pick up some cars as long as the lead car is past the O-54 switches. The bridge can also be moved up the the NE a bit and the decking adjusted accordingly if needed so the Big Boy can clear the switch and not hit the bridge, but I don't think it'd be a problem either way. You can probably adjust the lower right yellow loop to be more concentric, but I'd add landscaping for some interest and separation.

Oh, and I know you plan to use FlexTrax, but this at least shows how O-54 and O-72 would fit/look. HTH

mike 12-15-22 daz

Attachments

Images (1)
  • mike 12-15-22 daz
Files (1)

Hi Dave, thanks for giving it another look. I am just wondering why you moved the switch from the right of the bridge to the left for the upper loop?

I already have the grade loop going up laid and the cork for the outside lower loop laid, with the plan of 3 tracks going across the opening where the bridges are.

@DoubleDAZ posted:

Mike, that was just to widen the aisle because the size of the main and lower decks had to be increased to accommodate the O-72 loop.. If you think you can squeeze through, you can leave it the way it was. I’m not a big fan of wide aisles unless operations are going to take place inside.

Thanks for getting back to me so fast Dave! I think I will leave it with 3 tracks going over the bridge opening as I already have the upper and lower outer loops on that end laid! LOL Plus the doctor said I have to lose 20lbs and the wife has already changed my eating habits! LOL

@Steamfan77 posted:

Mike, I like the plan modifications. I’m with Bob, lots of nice mid sized engines out there to accommodate the O-54. The plan has lots of storage and nice running opportunities. Best of luck on the knee repair. The recovery is fairly quick.

Andy

Thanks Andy, I just got an order of 0-54 Curves yesterday. If I get time today I'm going to lay some out so I can mark the center line for the cork when it gets here.

Just a little side note, I guess I am going to have plenty of cork as I bought a case plus off the forum and the CEO told me the kids bought me a case also.

I might try left-over for auto roads.

I think the knee thing should be easy,  doc said 3 days off the knee

@mike g. posted:

Sure is Mark, if I don't get into one of the cases I might sell it for layout funds! The knee is just s snip off a ripped section that is floating around. If it was a total repair it would really suck!

Good idea.  However it gets used up fast, just like track.  A friend was moving this summer and had some HO track and power supplies laying around.  Since his grandson is grown he asked me to take the HO stuff off his hands.  I had forgotten how small and flimsy HO track is when compared to O.  Of course the cost difference is immense.

Mike, I am glad for you.  My meniscus was more damaged and left we without a lot of it.  I wonder if that is why I needed that knee replacement 10 years later.  The other knee is fine.

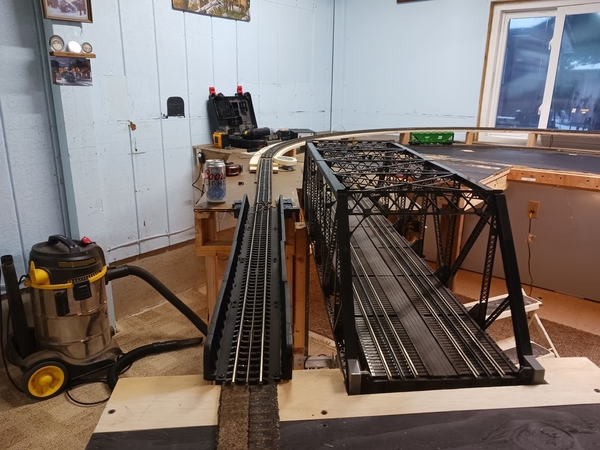
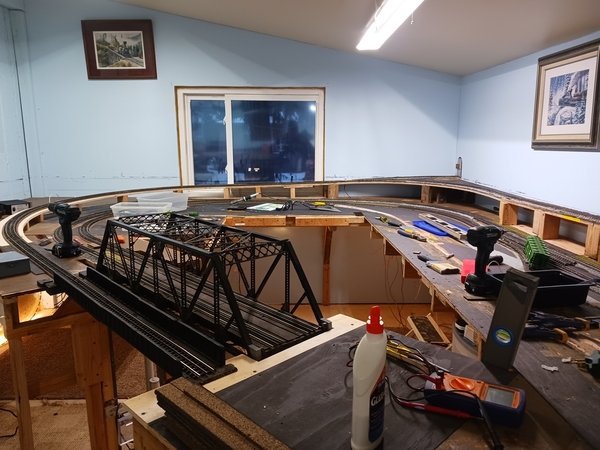
I posted.it.on what did you do on the layout today. I was able to clean part of the train room, marked out for the inner loop,  and got all the bridges installed.

Then about an hour ago I got.my cork, so I hope to get more track laid tomorrow. 

Here are a couple photos for you guys.

20221220_12362220221220_12355120221220_123543

Attachments

Images (3)
  • 20221220_123622
  • 20221220_123551
  • 20221220_123543

Question, @Mike g., taking a look from this side of your bridges, looking at the glass sliding doors, in the picture on the right, the tracking going up to the higher level, Is there a slight dip in the grade in the middle of the large door? I am simply wondering if this is correct, or should there be a slight dip? On my layout, when there’s a slight dip, train cars can come loose. Your plan is really nice. Pictures tell a lot and we look at our pictures to see if there are any issues. This could be an illusion and I’m just askin…Happy Railroading Everyone

Hi Mike, I was looking at the different pictures of the risers in that area and possibly could be mistaken. Your frame work, and table work is great. I love seeing your BNSF trains on your layout. One day I plan to visit your part of the country and might like to pop in.  
Thanks for the reply and Merry Christmas to you and your family. Happy Railroading Everyone

@Mark Boyce posted:

Now I see the possible sag too.  Sometimes a photograph points out a problem we don’t notice with our eyes and sometimes it is an optical delusion. 😉  I’m deluded often building my layout!  🥸

I agree Mark, and have made this same observation in the past.

A number of times I've seen things that need fixing in pics of Warrenville that I didn't notice when taking them nor on a day-to-day basis.

Hi guys you have some great eyes! I did go out and checked the dip and up it was there! it was about a 3/16th dip I just added an extra block and repositioned the other 2 to make it better. Put the level back on and dip is gone. I even rolled a longer car over it and it looks good.

Thank you so much guys for catching that! If you see anything else please let me know!

Hi guys I hope your all having a Merry Christmas! Thanks again for all your help!

I was able to get the rest of the track laid in the area to the left, but now I have to relocate the control station. Then I am going to work on getting everything wired up as for right now there is nothing under the table! LOL I just ordered 200' of red and black 18-gauge wire to rewire everything. I had been using 18G speaker wire, but it too hard with my aging eyes to tell positive to negative. Then I will put in 20G drops every 13 sections. Once I get that done then I will move everything under the right side and start dismantling that section and rebuild! LOL

Here are a couple photos of the left-hand section.

20221224_12120620221224_121219

Again thanks for your help and Merry Christmas!

Attachments

Images (2)
  • 20221224_121206
  • 20221224_121219

Afternoon guys and gals!

Thanks for the nice words Mark!

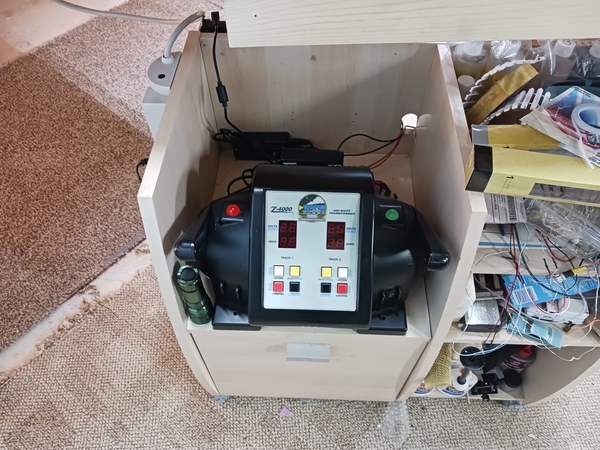
Well I was able to get out to the train room this morning and got my new control station put together. The only thing I have to do is try to remember how to wire in the GRJ Watchdog into the system! LOL Here are a couple pictures. I used an old rolling cabinet I had in the train room. Thinking it will be easier to roll it out to wire everything else up to it! LOL

20221226_10415120221226_10420320221226_104216

As you can see the AIU is not connected to the TIU, I bought it from a forum member that posted it new in original package, but it is missing the AIU to TIU cable. I am waiting to hear back from him about it. It could be a simple mistake as he was selling it for someone else.

I hope you all had a great Christmas and found time to share your layout and trains with all your family and friends!

Attachments

Images (3)
  • 20221226_104151
  • 20221226_104203
  • 20221226_104216
Last edited by mike g.

Hi guys thanks for the nice words, I am sorry I haven't been on here for a couple of days but between having a late Christmas with the kids and grandkids and trying to find time to get more work done on the layout is a little tough! LOL

I did get a chance to get to the train room and was able to get the track on the left side of the room wired 3/4 of the way around the right side. Which is fine considering I have to remove the rest of the old track plan before I move on with wiring.

Well once I got that done, I once again had to do a lot of cleaning. Then I had to move everything from under the layout on the right side to the left side. What a chore! LOL Yesterday I was able to get the upper and lower track and cork removed. I plan on getting the upper deck plywood removed along with the mountain today and maybe some more if I have time.
Here are a couple of photos for you all to admire! LOL

Before cleaning up.

20221230_114032

Then after Cleaning up.

20221230_11404420221230_114039

And last but not least the right side ready to be taken down.

20221231_135747

I hope you all are having a great weekend and looking forward to a fun filled new year with your trains and layouts!

Attachments

Images (4)
  • 20221230_114032
  • 20221230_114044
  • 20221230_114039
  • 20221231_135747

Hi guys, Thanks Mark and Nate,

I was able to get back out to the train room yesterday and was able to get the top level off and removed all the track and cork from the lower level.

20230101_153248

Today I hope to get some of the track planning done for the lower level and check things on the upper level. It was funny I received my 18G black/Red wire on Saturday and thinking it would come on a roll, I was totally wrong! LOL here is how I got 200' of wire and it doesnt even look like 18G but the printed cover states it is.

20230101_112017

I hope you all have a great week!

Attachments

Images (2)
  • 20230101_153248
  • 20230101_112017

Add Reply

Post
The Track Planning and Layout Design Forum is sponsored by

AN OGR FORUM CHARTER SPONSOR

OGR Publishing, Inc., 1310 Eastside Centre Ct, Suite 6, Mountain Home, AR 72653
800-980-OGRR (6477)
www.ogaugerr.com

×
×
×
×
Link copied to your clipboard.
×
×