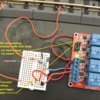
I have a multi-relay module that is use to control my crossing accessories. The relays each handle up to 10A. However, I am limited to only 1 power bus to power all of the crossing accessories (thru the relays). I supply the flashing light device with 12 VDC and installed LEDs and that works fine. However, the crossing gates and gateman have very low internal resistance and my only power bus is at 18 VAC. At that level, it would not take long to cook the solenoids in these devices if on too long. I looked up high power/low resistance pot's (to limit the current to the on threshold level), but they are very expensive. Are there any new devices on the market that operate at a much lower power level so I could buy cheap pot's to adjust current to threshold-on level?

Or any other ideas or suggestions.

Ken

Original Post

Replies sorted oldest to newest

An option to those expensive high-power pots for lowering AC (or DC) voltage is the venerable string of diodes or bridge rectifiers.  This has been written up extensively in OGR threads.  Here's a photo showing a string of 4 bridge rectifiers hi-jacked from this thread.

diode ac drop using bridge rectifiers

The bridge shown above goes for about 30 cents each and a screw-terminal strip for about $1 each on eBay (free shipping from Asia).  Of course available from US mail order sources for a bit more.

Untitled

To your point about high-power, note that each bridge (4 diodes) drops the voltage by about 1.5V or about 3/4V per pair of diodes.  You don't get the variability or adjustment resolution of a high-power pot, but at 8 Amps this amounts to a 12 Watt (Power = Voltage x Current) pot that has a fixed drop.  I am confident that 3/4V resolution will be suitable - that is, you will be able to find a tap that works for your various crossing accessories.

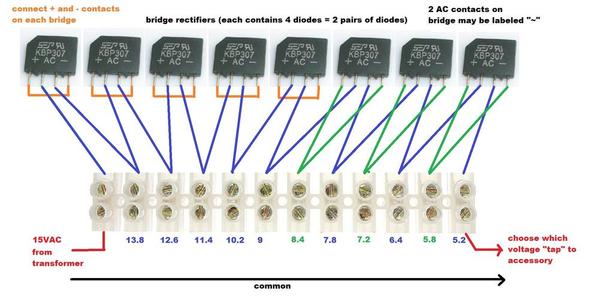
In your application, it sounds like you need multiple outputs.  What's nice about the diode method is you can simultaneously use different taps.  I found this picture (but unfortunately could not locate the OGR thread) to illustrate how this might help you.  This photo shows the starting voltage at 15V but yours would be 18V.  The point is you are probably looking for voltages at 14V or below.  If you allow soldering, you can configure the first few dropping bridges so that you get just the ~1.5V drop since you don't need the 3/4V resolution at the higher voltages.  Then at the voltage range of interest you access the 3/4V resolution via the screw-terminals as shown below.  The idea here is if you only have a 12-position strip, you can manage the terminals to advantage.

ac bridge dropping array with terminal strip

So one accessory can use one voltage tap, another accessory can use a different voltage tap, a 3rd accessory can use yet a third voltage tap, and so on.  Or multiple accessories can use one tap if it turns out they work best on the same voltage.  Note that if going with the pot method, you would typically need one pot for each accessory.

Attachments

Images (3)
  • ac bridge dropping array with terminal strip
  • diode ac drop using bridge rectifiers
  • Untitled

Thank you for your responses. First John. A new power bus won't work since each of those accessories has a different internal resistance and thus a different 'on' threshold voltage. Also, because of the complexity of my layout, I already have 8 AC buses and 2 DC buses running around most of the layout.

Second Stan. I will do the research as to the previous posting on this subject (didn't know what to put in the search criteria) and then will check out parts prices/availability on ebay. By the way, of the 8 AC buses, the only one that is a constant voltage level is at 18 volts (yes, it is a variable output, but the switch action is best at the higher voltage level)-- I use that bus to power my 35 switches.

Also, can I assume from the no comment on 'newer' accessories that they still have the same problem if operated too long at a high voltage (power) level?

Thanks again,

Ken

ken's trains posted:
...Also, can I assume from the no comment on 'newer' accessories that they still have the same problem if operated too long at a high voltage (power) level?

I think you need to be more specific.  The poster-child of conversion from solenoid "technology" is probably the turnout/switch.  Now you can apply voltage continuously and even if the mechanism stalls the geared motor will not burn out.  The current draw is 10-100 times smaller and operates at more prototypical speeds than the slam-bang solenoid.

If you're talking about crossing accessories, modern gates also use a relatively (vs. solenoid) low-current DC gearmotor to smoothly raise/lower the arm rather than some kind of spring-loaded solenoid that snaps the arm up/down...similar story for the semaphore signal mechanism.  Crossing wig-wags using the AC vibrating motor can be finicky to fine-tune the operating voltage but again you can find lower-current DC gearmotor equivalents.

OTOH I am not aware of a modern crossing gateman who is not on steroids. 

In general, considering the small size of the market I think manufacturers have done a good job embracing the new technologies that both lower operating power while providing more realistic/prototypical movements.  Just my 2 cents.


Stan, again, thank you as always. And yes all of the crossing accessories you have mentioned are part of my problem. Is there a specific company that makes the more modern of these accessories (or do they all)?

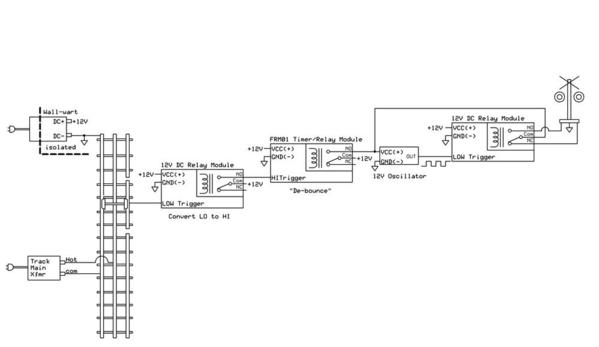
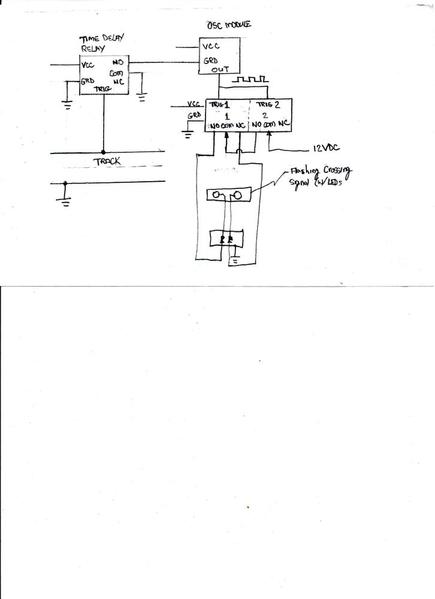
In the meantime, a new issue has arisen after experimenting with crossing control. If you remember, you provided me with the circuits to do opto-detection. I built a couple and I liked, but the circuitry got a little out of hand for such a small task. Soooo, I took the low road and used a section of Gargraves track to provide crossing detection. I initially just used the Oscillator module and 2-ch relay module you had recommended some time ago. The diagram I have attached shows the circuit I used with the track, with the exception of the Time Delay Relay that I did not use. When I placed a car on the track, the accessory flashed perfectly at the rate set in the Osc Module. However, when I ran a train over that track, the intermittent contact provided constant re-triggers to the Osc & Relay modules and the result was a mess. So, I thought maybe adding a time delay such that once triggering occurs, even if the trigger goes on and off, the time delay holds the secondary trigger for the delay period until after the last trigger.

The included diagram shows my approach. It's not very big, so I hope not too hard to read. If this is a reasonable approach, the problem I have is finding a time delay relay on ebay, where the description explains that the delay is to hold the relay in the triggered state for the selected time, starting after the last trigger. I also thought about maybe a capacitive-Crossing Signal Control001resistive circuit to provide an ON delay, but I would probably set the house on fire.
Any help would be appreciated.

Ken


Attachments

Images (1)
  • Crossing Signal Control001

Ken, do you have a link to the thread showing the oscillator and 2-ch relay modules you have?  Also, I assume in your diagram that VCC is connected to +12V?  And, is the +12V supply a wall-wart with the minus supply connected to track outer rail?

With the modules I think you already have in-hand, I figure some simple re-wiring with addition of a resistor and capacitor should solve the problem.

BTW, in your diagram, you show TRIG2 on the right relay module driven by the oscillator.  I believe TRIG2 should be driven by the insulated rail?  No matter - confirm what you have and I'll re-draw the diagram with the R and C to mask the intermittent contacts.

OK, new issue---I need to get a life. I rummaged thru my old electronics and came across the famous FRM01 Relay Module. I gave up on it months ago when the instruction manual was 5 pages long. Pulled it out and found Mode 10 does the following:

-upon power on, it waits for a CH1 input (a high). When detected (3 -30 VDC) the relay closes and remains closed for the selected time duration. If at any time during the delay period CH1 disconnects and re-connects, count-down starts over and the relay remains closed. At the end of the delay the relay opens.

Problem is, using a track for detection, all I have available is GRD and that is not an acceptable trigger for CH1 in any mode.

Arthur, thank you but the insulated rail is AC GRD.

Stan, your assumptions are correct. VCC is 12 volts and it is a wal-wart with DC GRD connected to AC GRD (as you had shown me some time ago as OK to do--and of course it works).  And yes, I drew the diagram in haste. TRIG 1 should be shown connected to the OSC output allowing the relay to toggle, and TRIG 2 should be shown connected to the insulated rail to apply 12 volts to relay 1 COM via relay 2 NC contact.

Thank you, and I will await your input.

Ken

Ken, still need to know the exact relay module you have.  Specifically, most of those you buy now can be configured for either HI or LO triggering...whereas some earlier versions were HI only, or LO only.  Kind of like the situation with the FRM01 which is HI only.

Arthur is correct in that since you're using a wall-wart which has essentially floating DC, you can choose to make the outer-rail either DC+ or DC-.  Presently you have DC- tied to AC GRD.  He is suggesting tying DC+ to AC GRD.  I suppose if you have the FRM1 in-hand that would be the lowest out-of-pocket method to implement a delay to mask the intermittent triggers from dirty wheels, tracks, etc.

I was going down the path of a 5 cent resistor and 10 cent capacitor which would be placed on the trigger input of a LO triggered relay module.  This would filter/mask the intermittent triggers without the FRM01.

With a 5 cent resistor and a 10 cent transistor, you can convert a FRM01 module to support a LO trigger.  Same circuit to convert a HI-only relay module to support a LO trigger.

Many options.  Kind of comes down to what components you have lying around, if you want to experiment vs. just get the job done, whether you have too much time on your hands, etc..  I'm pretty sure I've drawn diagrams for all these options in previous OGR threads (including tying DC+ to AC ground) so let me know your interest and I'll hunt down the diagrams or just draw them up again.

Last edited by stan2004

Arthur sorry about my error, but I still don't think I can do what you suggested in that I have a DC bus that powers all of my 34 Lionel post-war switch lamps which have been converted to LEDs. The GRD contact for the lamps in those switches is tied to the frame and thus AC GRD.

Stan, as to your question on the relay module, the one I used in my experiment is actually a 4-ch relay module and yes it does have a configurable trigger (H or L). However, it was convenient to tie the OSC module GRD & relay trigger 2 together (which I didn't correctly show in my sketch). so that the OSC module did not come on till the track connection was made. The relay module would always be powered waiting for a trigger(s).

Also, I just ordered a 8 Channel 5V Relay Shield Module Board Optocoupler module for Arduino ARM AVR FS which appears to only have LO trigger. I did this so I could control many gates with one module.

Ken

Here's one way using components you already have.  Not the most economical since the FRM01 is over $5 but you can probably get this running in a few minutes.

ken frm01 flasher

This uses the method of tying the Wall-wart 12V DC- to the AC GRD (outer rail) so generates a LO trigger.

The leftmost relay module simply behaves as an "inverter" to convert the LO trigger to a HI trigger as required by the FRM01.  The FRM01 performs its timing/delay function to provide a clean "debounced" signal that turns on and stays on without interruption from intermittent triggers.  The FRM01 relay provides +12V of un-interrupted power to the oscillator modules and the rightmost relay module with steers the +12V to the alternating crossing LEDs/lamps.

Attachments

Images (1)
  • ken frm01 flasher

Stan, thank you. When I bought the FRM01's, it was some time ago and they were cheap so I bought five. As I explained before, I didn't know how to program at that time, so they got put away.

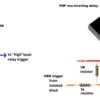
Also, while I was on the PC last night, I googled switching with transistors. I found a sight that explained how to use a PNP to control a device with the base triggered by a ground. Can I assume that the PNP could replace the first relay in your diagram?

Also for info to anyone following this thread; even if you don't have 'bouncy' wheels or poor contact track, if you don't debounce, then you must make the control rail length longer than the largest wheel span you have (I had missed this issue). I can now go with very short control rails.

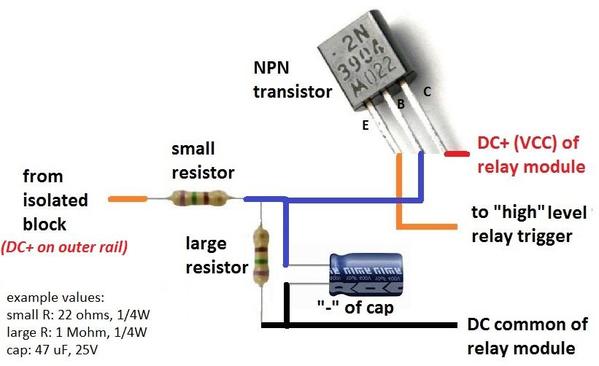
Yes, a PNP (transistor) can perform the inversion from LO to HI - probably need a resistor or two to surround it.  Maybe 25 cents of parts but probably requires firing up the soldering iron.  And, yes, it would replace the 1st relay (inverter).  But with the addition of a 10 cent capacitor, you could then replace the FRM01 and use the 1st relay.  I found this diagram in a folder of old stuff but couldn't find the OGR thread that describes it :

isolated rail rc filter with transistor

This was a non-inverting (using an NPN) transistor with DC+ on the outer rail and a HI trigger relay module.  I even have a video of this in action on a relay module showing this leads to a 30 second delay (delay time adjusted by the capacitor value).  Driving me nuts I can't find the OGR thread!  Anyway, if you're interested I will re-draw this for an inverting version using a PNP transistor.  That would replace the 1st relay module. 

But if messing with adding discrete components anyway (transistor, resistors), why not add a 10 cent capacitor so that you can essentially convert the 1st relay module to a time-delay relay module.  This would eliminate the FRM01.  The key is the transistor which provides current-gain that essentially amplifies the effectiveness of the capacitor to keep the relay closed during loss of trigger.  This allows delays (hold times) of seconds using reasonably sized/priced capacitors.

Attachments

Images (1)
  • isolated rail rc filter with transistor
Last edited by stan2004

Stan, yes please do the PNP circuit. I would very much like to limit the no. of modules due to the no. of accessories I plan to operate. That is why I purchased the 8 ch relay module. They even have a 16 ch version. And I will always be using AC GRN/DC- for the isolated tracks. The multi-ch relay module will always be on and I need separate trigger and hold circuits for each section of isolated track operating an accessory. 

Just one other thing (for now). I can provide the part no.s, but off the top of your head, when they describe the modules as 5V is it ok to operate them at 12V. I know the OSC module says good for both. However the 1 ch & 4 ch relays I currently am playing with are labeled as 5V. I am powering them all with 12V and there doesn't appear to be any smoke at this time???

Thanks, I will wait for the PNP circuit. The transistor shown in the biasing instruction I read was a 2N3906.

Ken

I see the 2N3906 transistor you mention is a wallet busting 2 cents each on eBay. 

2n3906 for 2 cents on ebay

So here a 2 simple circuits that address what we've been discussing.

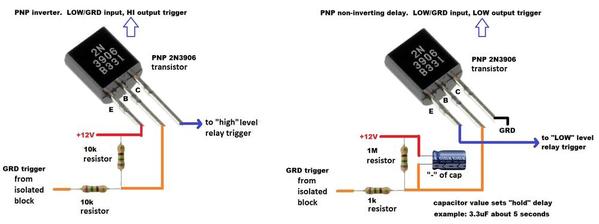
PNP r and rc input to relay module

The left circuit is a simple inverter so that the a GRD outer-rail trigger can trip a HI-only module such as the FRM01...or a relay module that only has HI input trigger.  Resistors can be any wattage - 1/8W, 1/4W, whatever you have.  10k value is not critical and is a very commonly found value.

But if you're looking to reduce module count...the addition of a low-cost capacitor as shown in the right circuit can add a multi-second hold delay to your relay modules.  Since this would/could replace the FRM01, I chose to revert to a LOW trigger into the relay module. 

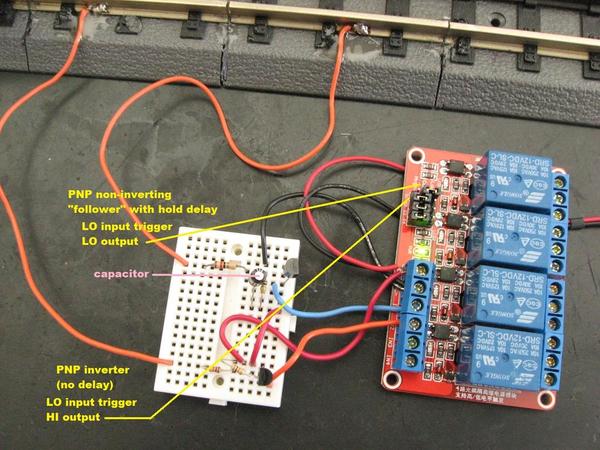
Here are the 2 circuits hooked up simultaneously to 2 channels of a multi-relay module.  Note that the relay module has been configured using the programming-jumper for HI-trigger on the left block and LO-trigger on the right block.  This is a 12V relay module and the DC power supply is 12V.

ken PNP relay options

Here it is in action.  Note that the video starts with the capacitor removed from the hold-delay version.  Since the capacitor value sets the hold delay, without the capacitor the 2 circuits behave the same with intermittent/noisy triggering.  You can see the flickering red LED trigger indicators on the relay module and hear the chattering relays.  Then I add in the capacitor and Ta da!

The "hold" delay is roughly proportional to the capacitor size.  10uF would about triple the hold time.  Of course if for whatever reason you must have a precision hold delay, then use the FRM01 with the simple PNP inverting circuit.

Attachments

Images (3)
  • ken PNP relay options
  • 2n3906 for 2 cents on ebay
  • PNP r and rc input to relay module
ken's trains posted:
...

Also, I just ordered a 8 Channel 5V Relay Shield Module Board Optocoupler module for Arduino ARM AVR FS which appears to only have LO trigger. I did this so I could control many gates with one module.

A bit confused here.  Are you saying you will be using an Arduino?  In which case the Arduino can perform all the de-bouncing and hold delays.  The Arduino could also perform the 1 second timing function for alternating the crossing lights rather than using the separate oscillator module.

Stan, no, I never mentioned an Arduino. But I have a friend who has written code for the Arduino to drive a stepper motor to run my turntable. I have purchased an Arduino, but am struggling with learning C for Arduino. So at this time, I will be using the devices you have described.

Again, Stan, I can't thank you and the rest of the great people on this forum for all of your help. Anything I can provide, please ask.

Ken

Stan just an update. I bread boarded your setup. Then I made a couple of mods. I am currently running 2 DC buses on my layout--5V & 12V. I did this because I have mostly 5V modules and I could eliminate multiple voltage regulators. With your setup, I can use the 5V bus to power every thing except the LEDs on the crossing signal (I will use the 12V bus for that). The setup you provided worked fine when I was just triggering the 4 ch relay. It held for about 2-3 sec. But the mod. I made was to use the emitter LO output to complete the GRD for the OSC module.  In this case the 4 ch relay is always powered on and the OSC out provides the trigger to that relay. With this setup, I got almost no delay when the track grd was removed. I upped the capacitance to 22uf and that solved the problem.  I also dropped all of the transistor & module voltages to 5V (eliminating the need for a voltage regulator) and every thing still worked fine.

Thank you again for your help.

Ken


Wow, that was fast!

The reason you need a larger capacitor to effect the same delay at 5V (vs. 12V) is two-fold.  First, there's a diode drop (about 0.7V) in the transistor when configured as a so-called emitter-follower.  Then the relay module itself has an opto-isolator input which is an IR LED that is about a 1V drop.  The 2 voltages combined are a substantial % of the available 5V the cap charges up to (and discharges down from).

Thanks Stan, I figured that might be the case.

But now to an issue that makes no sense. I think my circuit may have slipped into a different time/space dimension (or so it seems). I decided to put the circuit on a PCB. Soldered everything in place and used those little screw-type PCB connectors to do most of the wiring. Applied power and nothing worked. I traced every connection and they were all good. My VOM showed the trigger level holding at VCC no matter what I did. Thought maybe I had damaged the transistor, so replaced it. NO change. Tried applying 12V. NO change. So I went back to bread boarding again with all new components. Same problem. Could not trigger the transistor--E out stayed at VCC level with both 5V & 12V as VCC.

I cannot understand how something that worked perfectly before stopped working.

Frustrated & Confused

Just to be clear, exactly which circuit are we talking about?

And you do have a load on the output?  Since there are only a few "nodes" in the circuit can you measure each voltage relative to ground?  There are some, if not many, circuit configurations that require a load on the output...otherwise the voltage measured at the output using a 10 Mohm meter is essentially floating/undefined.

Stan, so sorry. I need new glasses. Apparently I somehow got the bread board to work with the wrong resistance value. I had a couple of 10K resistors in my 1K bin and that's what I used for the breadboard and the PCB. Then both stopped working. I finally got out my digital VOM and found the error. I put in the 1K resistor and all works fine. And by the way, I did think about the floating output, so I connected it to the Oscillator module grd. Still didn't work with the 10K in the grd trigger. Now all good.

Till next time.

One more thought. I do have a couple of Arduino's, but I am just starting on C for the controller. Does anyone have a link to folks that have posted the code for doing the above crossing control with delays using an Arduino?

By the way, my friend in crime with the 3-D printer, modified some existing Arduino code to drive a stepper motor for my turntable. It has 18 programmable positions (9 forward & 9 reverse). We installed a limit switch and upon power up, the 'bridge' rotates till it hits the limit switch, stops, backs slightly, and then hits again slowly--that is zero position. Then any (of 9) button pushes sends it to that position. If the reverse button is pushed 1st, the next button sends it to 180 deg from the selected position. I would post the program if anyone has a use. Also, if someone has crossing control code, my friend might be able to modify it for my application.

I'm a beginner myself, but I might be able to help if I knew exactly what you were expecting the Arduino to do. Pretty sure I could get you started anyway. There are other forum members that are very good with the Arduino code and could probably cook up something in a matter of minutes. If one of those folks comes along you would be all set, probably in about 15 minutes or so.

Hi RTR12,

What I would like to do with the Arduino is the following:

1. Detect a train crossing an insulated track section (completing a ground), and if detected, provide an output to close a relay (relay would operate a crossing accessory) until train passage is complete.

2. For Lionel 152 Crossing Signal (modified with LEDs), 2 outputs should be provided: one output should cycle at a predefined rate to close/open a relay; a 2nd output should close a 2nd relay (which provides 5-12VDC to the common of the 1st relay.

3. Continue to monitor the insulated track input (allow for wheel bounce by providing delay in decision that train has passed).

4. Upon absence of detection of 1st track (train has passed), continuously check a 2nd insulated track (which is on other side of crossing accessory) to see if train has completely passed.

5. When train passage is complete, change output to open relay(s).

6. Provide small delay after final track is cleared before opening relay.

I printed this out for further study tomorrow. Sounds doable, but will have to do a bit of thinking about it.

One question, have you considered using something like GRJ's train detection relays? That might be a good input to the Arduino for train detection. I have some I am going to use for similar stuff on my layout. If not did you have something else in mind? Apologies if this has already been discussed here.

Also, I am not sure what a Lionel 152 is, will have to look that one up and see.

Maybe I should also just go back and read the whole thread here. Play a little catch up.

As Arnold said, "I'll be back"! 

Hi all. While on this subject of controlling crossing accessories, I have measured the minimum AC source voltage required to activate several different types (gateman, crossing gate, semaphore, etc.) and it varies all over the map (even for the same type of device--age, wear etc.). I did however, play with both AC & DC with a gate and a semaphore. It seemed as though they operated a lower voltage and in a more 'positive' manner with DC.

Are there any problems using DC to operate devices that use solenoids. It would seem that DC would be more efficient, but are there any other draw backs?

Ken

Add Reply

Post

OGR Publishing, Inc., 1310 Eastside Centre Ct, Suite 6, Mountain Home, AR 72653
800-980-OGRR (6477)
www.ogaugerr.com

×
×
×
×
Link copied to your clipboard.
×
×