I mainly collect pre&postwar "O" gauge trains, but recently acquired a #8 Electric and three passenger cars.  I want to take on the project of restoring but upon taking the engine apart I discovered how different they are from O gauge motors.  

As this would be my first tinplate restoration in standard gauge, I was wondering if there are any suggestions on literature or videos that assist in rebuilding these motors.  Yes, the wheels are dry-rotted and need to be replaced.  I am considering purchasing a "Hobby-Horse" press...would that be a good tool for the job?  I am familiar with the "library" on the Olsen's Train Parts website, but would feel more comfortable having some "how-to" advice on hand besides a parts diagram.

Thanks in advance for your helpful suggestions.

Greg


Original Post

Replies sorted oldest to newest

The motor on the #8 is similar to other motors you may be familiar with in that the parts are the same, just configured a bit differently. Standard cleaning and repair techniques are used.

The Hobby Horse wheel press with the proper cups will come in very handy to press the new wheels on properly; however, unless you plan on doing many wheel replacements,  the cost is high for just one job. Perhaps a nearby Lionel dealer will do the job for you for a reasonable fee?

Here are a couple of videos to get you started

#8E Motor disassembly

#8E New Wheels


Larry

Greg you got this. It’s not a complicated process, especially for this engine. You don’t have to worry about steamer wheel quartering. I buy my wheels from Hennings. I did this same replacement a few months ago on several No 8’s.

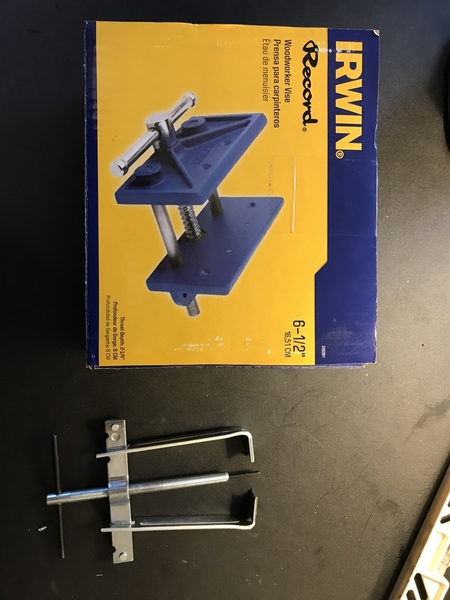
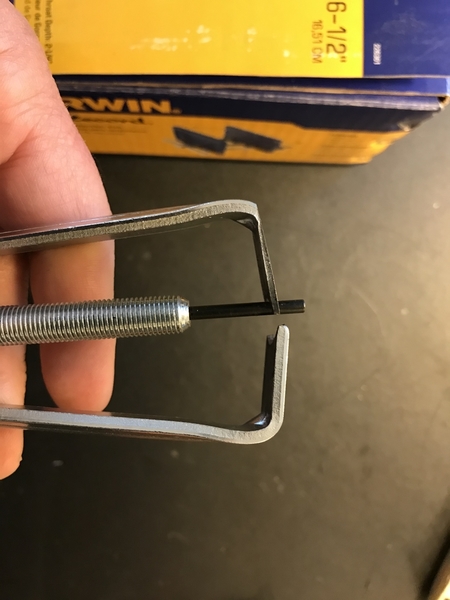
From the big box stores buy a faucet handle puller and a woodworker vise. (See pic#1) On the puller I had to grind down one leg to better fit between the motor frame and the wheel for O gauge engines. (See pic#2). As purchased will work fine with standard gauge. Just pull one wheel, remove axel from frame, pull other wheel from axel, punch the gear off of the wheel.

Use the Wood vice to press the gear on new wheel. Then set geared wheel into vice with axel perpendicular to it and press it on. Slide assembly through motor frame and use vice to press other wheel on. Check for spacing between wheel, frame and ensure gear mesh are all smooth. Than repeat and your done.

I have used this on 8s, 10s, 249 and 253 also. Just take your time and you will be fine

.7D0541C6-D6C4-444C-B916-E7564200B202CA33634F-8EAF-4220-93E5-6F0561261E42


Thanks for all of the advice so far...I am having fun with the process.  The videos are quite helpful.  

I would like some advice on replacing the wire.  All of the insulation is rotted and I prefer stranded wire to replace, but notice the original wire is solid.  Is it better to stick with solid wire for these engines?

Greg


@Gregcz1 posted:

Thanks for all of the advice so far...I am having fun with the process.  The videos are quite helpful.  

I would like some advice on replacing the wire.  All of the insulation is rotted and I prefer stranded wire to replace, but notice the original wire is solid.  Is it better to stick with solid wire for these engines?

Greg


I've preserved the original wires on several locomotives of that vintage..  If the insulation is dried out, I strip it just by rubbing between two fingers or scraping with a hobby knife.  Then I'll straighten it and slip a length of fabric insulation over it from on end.  I got the insulating sleeves from Dr. Tinker - other parts suppliers may have it.

I like to make my repaired engines as close to the original as possible.  With this method I'm usually able to have 100% original wires.

@Gregcz1 posted:

So I am having trouble locating the replacement wheels.  Olsen's has them listed as "SM-72".  I can not find wheels listed with that title.  The only thing I have found are red spoked wheels for steam engines.  Are those the ones I am supposed to use??

Greg

Look on eBay for "lionel standard gauge locomotive wheels" and you'll see several alternatives.  I'm looking at several right now

I looked but saw no reference to the type of whee/ regarding the wheel gear size. I believe that there are two type of gears a large one that is almost the size of the wheel and the small one that is not as large as the other. I believe Henning's has both (do not know if they are still making the wheel for the larger gear).  I do have the #8's with both size gears. Does anyone have input on this?

Harry,

Thanks for the info as about a year or two ago you were selling of the large gear wheels and did not know if you were going to reproduce these. Good to know. 
I just wanted to make sure that the fellow ordering wheels was going to order the correct ones as there was no mention of the older/newer #8 gear type on this post.

Also thank you for all of the post you do on the forum👍

Things are going along smoothly with the rebuild.  I do have a question about the placement of the nylon and steel washers that go on the axles of the driving wheels (picture attached).  I know the nylon washers go in between the non-geared wheels and the motor case, but I did not recall where the thin metal washers go as I discovered them after dismantling the old wheels.  Do the metal washers also go on the same side, and if so, are they placed closest to the motor, or the wheel?

Thanks for your help!

Greg

Attachments

Images (1)
  • IMG_4798

Greg,

      Evidently somebody replaced or removed the wheels. Lionel, as far as I know, did not use axle washers. When re-installing the wheels, put the gear side wheel on the axle, place into the motor and check to see that the gears line up without 'rubbing' against the compound gear. There should be 10 - 20 thousandths play between the gears. If they are tight up against, then use a washer or two to eliminate possible binding. The plain wheel will install with just about  10 thousandths clearance.  Some of the MTH wheel production runs needed washers for spacing.  

 Harry 

Well Everyone, it is done!  I am experiencing a "proud Papa" moment as I just got the #8 and its passenger cars up and running!  I have such a feeling of accomplishment refurbishing my FIRST Standard Gauge set!  Special thanks to all of you who sent words of encouragement on getting over my fear of replacing the wheels and also thanks to Henry of Henning's Trains for helpful insight and delivering great products for the restoration!

Now I just have to find room in the house to keep this beast running! LOL!

Enjoy the video.

Greg

Attachments

Videos (1)
#8 - 2020-08-02

Gregcz1 - Great video Greg!  Well Done!!  I also think the foot visible in the left part of the screen during the first part of the video adds realism to the scene (lol).  Seriously though, I can relate to your 'Proud Papa' moment when one's done some engine work and then enjoys watching it run smoothly afterwards.

Enjoy!  

Add Reply

Post

OGR Publishing, Inc., 1310 Eastside Centre Ct, Suite 6, Mountain Home, AR 72653
800-980-OGRR (6477)
www.ogaugerr.com

×
×
×
×
Link copied to your clipboard.
×
×