Hello all!  I have some non brand name signals with just wires for the leds and I’m trying to figure a way to trigger them when my crossing is activated.  Im looking for a pre built relay board to do it.

i want red led on when my train approaches but when it hits the insulated rail, I want it to turn green along with my crossing to to turn on.  The crossing will turn on with its own circuit so I’m not concerned with that, but I’m looking for a relay to turn on my signal and then go back to red once the train leaves the Insualted rail

Original Post

Replies sorted oldest to newest

dangerwildmike posted:

Hello all!  I have some non brand name signals with just wires for the leds and I’m trying to figure a way to trigger them when my crossing is activated.  Im looking for a pre built relay board to do it.

i want red led on when my train approaches but when it hits the insulated rail, I want it to turn green along with my crossing to to turn on.  The crossing will turn on with its own circuit so I’m not concerned with that, but I’m looking for a relay to turn on my signal and then go back to red once the train leaves the Insualted rail

Lots of choices out there but I use a relay from these guys to activate my Lionel #153 block signal in the manner you describe.

http://www.azatrax.com/track-power-relay.html


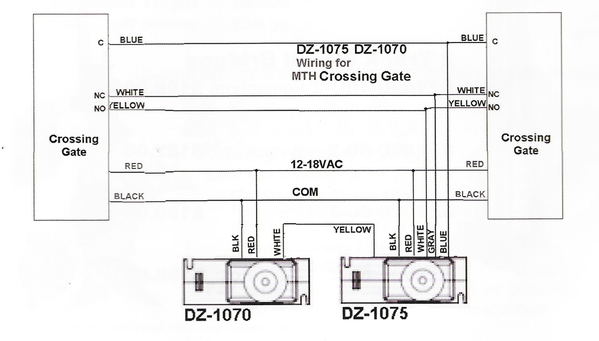
IMO, the simplest way to activate a crossing gates or block signals is with a DZ-1075 Sensor from Z-Ztuff for Trains (http://z-stuff.net/trackside.html) ~  $30+/-.   They are very easy to install, wire and adjust.     I have three on my layout used to activate a double and a single track bridge signal.  There is an internal time delay, green to red when the train breaks the infrared beam and a 5 second hold on red before returning to green after the train passes.    

IMG_8685IMG_8684IMG_8688

I do not have any crossing gates but that would also require pairing with a  DZ=1070 sensor w/dual output.

z-stuff 1

Hope you get it working the way you want!

Cheers, Dave

Attachments

Images (4)
  • IMG_8685
  • IMG_8684
  • IMG_8688
  • z-stuff 1
Last edited by darlander

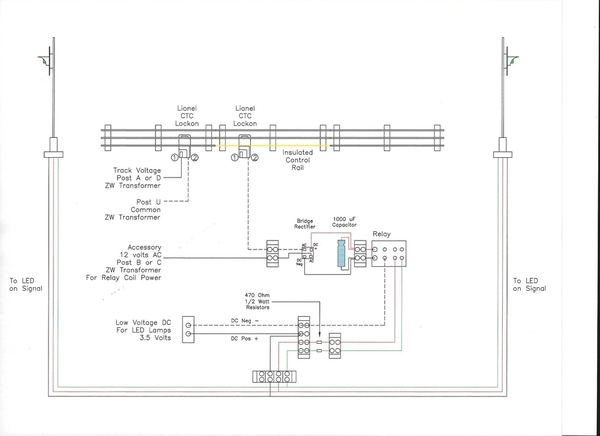
Here is how I have set up signal blocks using outside third rail and relays.

Diagram below shows schematic of how to wire a simple relay set-up for a Lionel 153 Block Signal.  The same set-up can be used for crossing signals.  Such as a Lionel 252 crossing gate.

Bridge rectifier to convert track AC to DC.  The capacitor smooths out the voltage to prevent relay chatter.

Block Signal

Below shows basically the same, but with 2 signals and using low voltage for LED Lamps.

Signal-Block

I make up a wood shelf that I mount below the bench work to hold the relay set-up.

IMG_1764

IMG_2320

In the above photo, I use telephone wire from the signal and a telephone wall jack to make connection from the signal to the relay set-up.   The relay in the photo is a radio shack.  I used to buy lots of stuff at Radio Shack, until they closed.  I have also used Potter-Brumfield relays.

I have scratch built my own signals with LED Lamps.  The 2 head Searchlight signal in the background is a Rail King by MTH.

IMG_0206

IMG_0207

Steve

Attachments

Images (6)
  • Block Signal
  • Signal-Block
  • IMG_1764
  • IMG_2320
  • IMG_0206
  • IMG_0207
Last edited by Steve24944
dangerwildmike posted:

Hello all!  I have some non brand name signals with just wires for the leds and I’m trying to figure a way to trigger them when my crossing is activated.  Im looking for a pre built relay board to do it.

i want red led on when my train approaches but when it hits the insulated rail, I want it to turn green along with my crossing to to turn on.  The crossing will turn on with its own circuit so I’m not concerned with that, but I’m looking for a relay to turn on my signal and then go back to red once the train leaves the Insualted rail

I have re-read your post.  I am confused. When you say "crossing"  Are referring to a road crossing, with crossing gates ?  Or where one railroad track crosses another RR track ?   Also you say you want the signal green when train is in the block and red when it leaves the block.    Usually when a train is in a given block, the signal displays red to show that the block is occupied. 

Steve

Steve24944 posted:
dangerwildmike posted:

Hello all!  I have some non brand name signals with just wires for the leds and I’m trying to figure a way to trigger them when my crossing is activated.  Im looking for a pre built relay board to do it.

i want red led on when my train approaches but when it hits the insulated rail, I want it to turn green along with my crossing to to turn on.  The crossing will turn on with its own circuit so I’m not concerned with that, but I’m looking for a relay to turn on my signal and then go back to red once the train leaves the Insualted rail

I have re-read your post.  I am confused. When you say "crossing"  Are referring to a road crossing, with crossing gates ?  Or where one railroad track crosses another RR track ?   Also you say you want the signal green when train is in the block and red when it leaves the block.    Usually when a train is in a given block, the signal displays red to show that the block is occupied. 

Steve

I’m referring about a road crossing.  The reason why I want it green while the trains in the block is because I’m using it as if it’s telling the loco engineer “ok signals are on you’re clear to come through” similar how a small rr where I live uses it.  They don’t have crossing signals rather a stop light for traffic in town and they use the green light to tell them when the traffic has a red light

The circuit is pretty simple for a relay triggered by an insulated rail.  If you use a totally isolated relay, you can just add a resistor and diode to protect the LED's and power them from AC.

I made these, and you can totally isolate the contacts to power the LEDs. 

Here's a wiring diagram from the insulated rail powering everything from the aux power supply.  This shows bulbs, but the LED's would be the same except you'd add a resistor and diode as indicated.

Attachments

Images (2)
  • mceclip0
  • mceclip1
davidbross posted:

Nice stuff.  Anyone have a diagram that would allow for yellow in between green and red. 

One way to keep-it-simple is to simply have a timer to turn on yellow for several seconds when going from red-to-green.  Keep-it-simple in this case includes just having a single section of insulated-rail trigger.

So green would instantly turn red when the insulated-rail section is triggered...but when un-triggered would turn yellow for several seconds before green.  This is how some of the off-the-shelf 3-aspect signal heads "work".  The concept is illustrated in this video (albeit of a PRR style signal head) but only a few bucks in relay modules.  See this OGR thread.

The linked thread shows how a relay implementation gets much more complicated if you have multiple block or trigger sections that "look-ahead" such that yellow for 2-blocks ahead occupied, red if 1-block ahead occupied.  And then there's the matter of bi-directional operation.  Etc.  This is where some kind of microcontroller smarts is required - and of course there are several off-the-shelf suppliers with sophisticated signaling/CTC systems.


Last edited by stan2004

Here is a signal at a road crossing like you are talking about.  Located in Grand Junction, Colorado.  This is an industrial spur off the UP mainline, crossing a road.  The road has traffic style traffic light.  The RR signal has two aspects, red and green.  There are signals for the RR spur on both sides of the road. 

IMG_2953

Here is the train pushing into the spur.  The signal goes dark as soon it passes the signal. Note the green insulator on the rail adjacent to the signal.

Steve

Attachments

Images (1)
  • IMG_2953
Videos (1)
IMG_2954

If you don't mind waiting a couple weeks for free shipping from Asia, you can cobble together a solution for about $3.50 shipped using inexpensive eBay modules...and no soldering required!

insulated rail relay for 2-aspect signal using cheap ebay modules

An AC-to-DC voltage module converts the AC Accessory Voltage (e.g., 14-16V AC) from the insulated trigger rail and converts it to 12V DC when occupied.  This 12V DC drives a 12V DC relay module.  Both modules have screw-terminal inputs and outputs so no soldering is required.

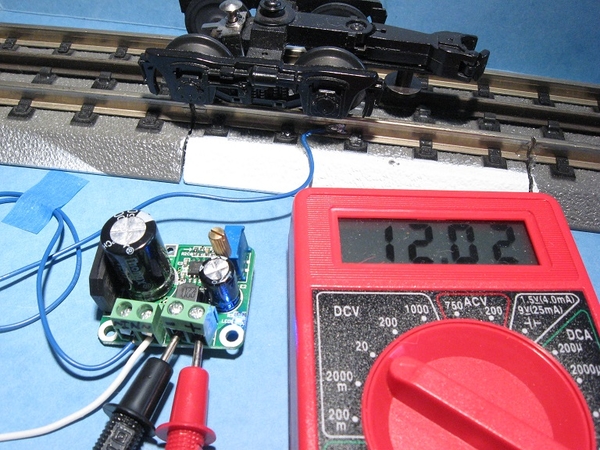
You do need to set the AC-to-DC voltage module to operate at 12V DC using the screw-driver adjustment which requires a DC voltmeter.  But it doesn't have to be a fancy/expensive meter - the "free with coupon" meter from Harbor Freight Tools works fine:

dc voltmeter sets ac-dc converter to 12v DC output

And here it is in action!

This method provides relay "chatter" protection from intermittent wheel-axle contact.  When the metal-conductive axle loses contact notice how there is a slight delay until the relay drops out.  This masks the flickering red-green-red-green-etc. when a consist enters or leaves the insulated-rail section.

I have not seen the off-the-shelf Azatrax relay module suggested earlier so I don't know if it has "chatter" protection and of course flickering aspects isn't the end of the world and just personal preference.  But in addition to $9.50 for the relay module, it appears their shipping charge is $8 albeit from within the U.S. and time is money! 

Attachments

Images (2)
  • insulated rail relay for 2-aspect signal using cheap ebay modules
  • dc voltmeter sets ac-dc converter to 12v DC output
stan2004 posted:
davidbross posted:

Nice stuff.  Anyone have a diagram that would allow for yellow in between green and red. 

One way to keep-it-simple is to simply have a timer to turn on yellow for several seconds when going from red-to-green.  Keep-it-simple in this case includes just having a single section of insulated-rail trigger.

So green would instantly turn red when the insulated-rail section is triggered...but when un-triggered would turn yellow for several seconds before green.  This is how some of the off-the-shelf 3-aspect signal heads "work".  The concept is illustrated in this video (albeit of a PRR style signal head) but only a few bucks in relay modules.  See this OGR thread.

The linked thread shows how a relay implementation gets much more complicated if you have multiple block or trigger sections that "look-ahead" such that yellow for 2-blocks ahead occupied, red if 1-block ahead occupied.  And then there's the matter of bi-directional operation.  Etc.  This is where some kind of microcontroller smarts is required - and of course there are several off-the-shelf suppliers with sophisticated signaling/CTC systems.


Hey Stan....

Would you please show a schematic or post a link (if there was posting some place else) that shows how these 2 modules are connected together and to the signal itself.

Junior, that demo was in a thread with an infrared-optically triggered occupancy detector (e.g., MTH ITAD or Lionel 153IR).  The yellow-to-green time delay uses a 12V DC "delay on" relay module.  What is/was not shown in the video is the need for a 12V DC power source.  Additionally, optical triggering provides "free" electrical isolation between the DC voltages needed to run the timing electronics and the AC voltages on the track insulated rail trigger section.  So all this techno-babble means it's a bit more complicated than 2 modules.

But in the DIY hobby spirit, I cobbled together the following.  Short video first!

And here's what's under the hood.  I don't know exactly what kind of signal bulbs/LEDs you have but I found I have a mock-up of a 4-wire common-anode LED signal with a 1000 Ohm common resistor.  As I recall this is what you get from eBay seller "we_honest".  Of course we_honest sells signal controller boards including one with timed-yellow.

3-aspect timed yellow using relays

What I came up with starts with the 2 modules I showed earlier to drive the 2-aspect red/green signal.  So there's the AC-to-DC converter (far left) set to 12V and the 12V relay module (bottom).  The 2 modules function pretty much the same as before.  That is, when the insulated-rail section is triggered, the relay turns on and applies power to the RED LED.

The modification is when untriggered, rather than powering the GREEN LED, a "Delay-ON" relay module is powered.   When you apply 12V to a Delay-ON module, it waits some settable time-delay then turns ON.  So during the delay, the YELLOW LED is powered.  After the delay, the GREEN LED is powered...and stays powered until the insulated rail is triggered again.

The 4th module is a second AC-to-DC converter.  In this case I show one that has a fixed 12V DC output.  It could have been a second adjustable converter (set to 12V) but I didn't have one handy for this demo.

So while there's still "no soldering required", the cost has jumped to 2 AC-to-DC converter @$2.39, a 12V relay @ 97 cents, and a 12V delay-ON relay @ $1.17 so about $7 (free shipping from Asia).  But it does seem a bit complicated considering there are off-the-shelf solutions.   

But, if you'd like to pursue this if for no other reason than to mess around with relays, learn more about LEDs or AC vs. DC interaction, or whatever then I will gladly draw up exact wiring instructions and/or discuss alternatives!

Attachments

Images (1)
  • 3-aspect timed yellow using relays
Last edited by stan2004
stan2004 posted:

Junior, that demo was in a thread with an infrared-optically triggered occupancy detector (e.g., MTH ITAD or Lionel 153IR).  The yellow-to-green time delay uses a 12V DC "delay on" relay module.  What is/was not shown in the video is the need for a 12V DC power source.  Additionally, optical triggering provides "free" electrical isolation between the DC voltages needed to run the timing electronics and the AC voltages on the track insulated rail trigger section.  So all this techno-babble means it's a bit more complicated than 2 modules.

But in the DIY hobby spirit, I cobbled together the following.  Short video first!

And here's what's under the hood.  I don't know exactly what kind of signal bulbs/LEDs you have but I found I have a mock-up of a 4-wire common-anode LED signal with a 1000 Ohm common resistor.  As I recall this is what you get from eBay seller "we_honest".  Of course we_honest sells signal controller boards including one with timed-yellow.

3-aspect timed yellow using relays

What I came up with starts with the 2 modules I showed earlier to drive the 2-aspect red/green signal.  So there's the AC-to-DC converter (far left) set to 12V and the 12V relay module (bottom).  The 2 modules function pretty much the same as before.  That is, when the insulated-rail section is triggered, the relay turns on and applies power to the RED LED.

The modification is when untriggered, rather than powering the GREEN LED, a "Delay-ON" relay module is powered.   When you apply 12V to a Delay-ON module, it waits some settable time-delay then turns ON.  So during the delay, the YELLOW LED is powered.  After the delay, the GREEN LED is powered...and stays powered until the insulated rail is triggered again.

The 4th module is a second AC-to-DC converter.  In this case I show one that has a fixed 12V DC output.  It could have been a second adjustable converter (set to 12V) but I didn't have one handy for this demo.

So while there's still "no soldering required", the cost has jumped to 2 AC-to-DC converter @$2.39, a 12V relay @ 97 cents, and a 12V delay-ON relay @ $1.17 so about $7 (free shipping from Asia).  But it does seem a bit complicated considering there are off-the-shelf solutions.   

But, if you'd like to pursue this if for no other reason than to mess around with relays, learn more about LEDs or AC vs. DC interaction, or whatever then I will gladly draw up exact wiring instructions and/or discuss alternatives!

Holy Cow Stan!....you are amazing ! Thank you for doing this.

I would LOVE to see your workshop. I'll bet if eBay gets low on stock they contact you ! But seriously...you are the best.

Add Reply

Post

OGR Publishing, Inc., 1310 Eastside Centre Ct, Suite 6, Mountain Home, AR 72653
800-980-OGRR (6477)
www.ogaugerr.com

×
×
×
×
Link copied to your clipboard.
×
×