For this years Christmas layout, my son really wants an elevation change in the mix, meaning adding a trestle.  I set up a test track and even with Lionchief engines, the down hill section really picks up speed. ( the last car of the Polar Express went for a real wild ride!)

I have read in the past, before all of our fancy control systems, that folks used to add resistance to the down hill leg of an elevation change to slow down trains with out having to constantly manipulate the throttle.  

Can someone give me an idea of how much resistance would be commonly used as a starting point for this exercise?  Additionally, I am assuming that only the center rail would be isolated and have resistance added, and the outer rails would still be grounded together as usual.  

Lastly, is there any reason why having added resistance on the down hill leg would affect things if say, I dragged my dcs system up to run command control on the elevation changing loop?


Thanks in advance to all you very smart experienced people!


John Z.

Original Post

Replies sorted oldest to newest

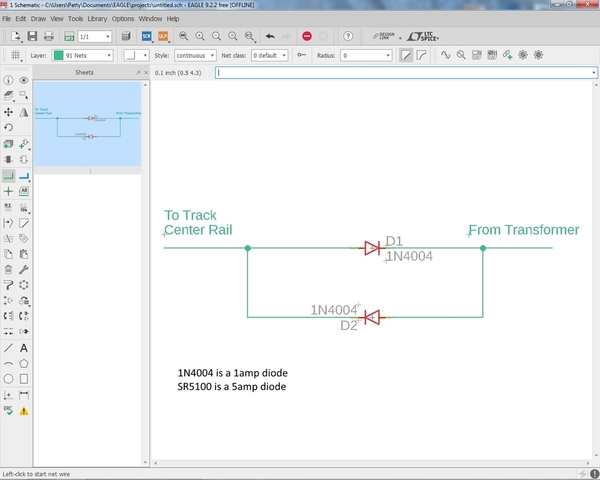
One common way to drop some voltage is to use two diodes, in parallel, and reverse to each other. See schematic attached. I would suggest 5amp or 10amp diodes - 5 amps would probably suffice for Lionchief. Downside to diodes is possibly that a short between center rail and an outside rail could blow one or both diodes. If one pair doesn't drop enough voltage, you can put another pair in series with the first pair, so you would have transformer to first pair of diodes to second pair of diodes to center rail.

Here is an amazon link a 5 amp diode   https://www.amazon.com/20-Piec...amp+diodes&psc=1

diode ac drop

Attachments

Images (1)
  • diode ac drop

A Lionel rheostat is the easiest way to adjust your down slope on the fly and to adjust for different loads. It is a current limiting device, not voltage, so it will need fine tuning for each different train, but at least you have that option because with the diode method it gets very clunky to change the voltage drop values easily without constructing a large bridge device with diodes(and then you still need to switch around jumpers).

#88 Battery Rheostat is the simplest, with speed control only, & "off" to the far left.

#81 Controlling Rheostat has speed control and an on-off switch on the slider, & does not go to "off" to the far left(you use the switch).

#95 Controlling Rheostat has speed control and a direction(press to interrupt) switch on the slider, & "off" to the far left.

They can all be used with batteries or transformers, AC or DC.  They are all of otherwise similar construction, & I use them for short duty cycles in block control applications similar to the slope application, so they are all equal as far as I'm concerned.  The #81 has a wider control range for running trains, so between that and the on-off switch on the slider it's probably the most versatile.

ADCX Rob posted:

A Lionel rheostat is the easiest way to adjust your down slope on the fly and to adjust for different loads. It is a current limiting device, not voltage, so it will need fine tuning for each different train, but at least you have that option because with the diode method it gets very clunky to change the voltage drop values easily without constructing a large bridge device with diodes(and then you still need to switch around jumpers).

#88 Battery Rheostat is the simplest, with speed control only, & "off" to the far left.

#81 Controlling Rheostat has speed control and an on-off switch on the slider, & does not go to "off" to the far left(you use the switch).

#95 Controlling Rheostat has speed control and a direction(press to interrupt) switch on the slider, & "off" to the far left.

They can all be used with batteries or transformers, AC or DC.  They are all of otherwise similar construction, & I use them for short duty cycles in block control applications similar to the slope application, so they are all equal as far as I'm concerned.  The #81 has a wider control range for running trains, so between that and the on-off switch on the slider it's probably the most versatile.

Rob,

the tune-able solution sounds great.  Are these rheostats all lionel parts, or are these commercial pieces like something I would have to source through digi-key?


JZ

jhz563 posted:

Okay some quick research shows these rheostats are prewar items... I would rather not use an 80 years old piece of electrical equipment if I can help it...

I have a box of them and they all work perfectly and as designed. 

I will be running my 80 year old 177W set on Super O track with a 70 year old ZW tonight - same thing - all run perfectly and as designed.

The "modern" equivalent is alive and well.  Not saying this particular part is what you need, but many choices on eBay, Amazon, etc. like this if you pick and choose the key words to search on:

Untitled

There have been several threads on the rheostat vs. diode such as:

https://ogrforum.ogaugerr.com/...04#70129856229668204

https://ogrforum.ogaugerr.com/...ter-for-downhill-run

I know I posted this photo of the diode dropping method in one such thread but can't seem to find the actual thread.  In any case, the idea is the terminal strip allows you to pick and choose the correct tap.  This DIY module has from 0 to 8 drops.  Less than $5 in parts - but obviously more assembly/wiring hassle than a rheostat.

diode ac drop using bridge rectifiers


Attachments

Images (2)
  • Untitled
  • diode ac drop using bridge rectifiers

I would pass on the #88 rheostat. They were meant for 6 volt car batteries. The windings may get a bit toasty on AC track voltage. The picture that Stan posted of a modern rheostat is rated at 25 watts..............way too low unless you are running a 2-4-2 scout engine without smoke. A 736 with a e-unit and headlight and smoke is going to consume about 40-45 watts of power.          

Last edited by Chuck Sartor

with different voltages in the 2 blocks ,how would the engine react when the rollers are in different blocks.would the electronics ,say in a cab 1 engine be damaged ? also I see in the picture above how the bridges are wired for down ,level and up .if you were to use, just one block for down ,how would you wire them?

rich

Appears several conversations now in progress.  As to comment that 25W rheostat is inadequate, them search on a, say, 50W power rating for the rheostat.  For example:

Untitled

There have been a couple comments about the "load" Wattage which I interpret as being the engine itself.  In a certain sense it doesn't matter what the load Wattage is.  When choosing the dropping mechanism (whether it be diodes, bridges, or rheostats) you're interested in the Wattage capability of the dropping mechanism itself.  Practically speaking it is a your-mileage-may-vary scenario.  But if I were to toss out a number for the specific scenario proposed (downhill speed control on an O-gauge layout), I'd say the dropping mechanism might draw away no more than 1/2 the power (Watts) of the engine/load to maintain a reasonably constant speed.

Unfortunately, diode/bridges are typically rated in "Amps" or current capability whilst the rheostats are typically rate in "Watts" or power capability.  It's theoretically a simple conversion, but that's just the geek in me talking.  Practically speaking, I'd say if you're messing around with this technique of speed control you ought to have a basic multimeter (even the freebie you can get at Harbor Freight with coupon) to measure the track VOLTAGE that works for you on the level and the downhill.  Then post the results here and one of use will suggest suitable voltage-dropping mechanisms.

Stated in the other linked threads, but as Rob posted the diode method allows more than 2 "zones" so that you can have a different voltage for uphill, flat, and downhill.  As shown in the photo I posted, the diode method allows more than 2 "taps" into the voltage dropping ladder.  

Either method (diode or rheostat) works equally well in terms of the engine straddling two zones.  That is, an engine typically has two pickup rollers on the hot/center rail.  When the different roller straddle two voltages, the engine will draw on the higher voltage zone without any untoward/damaging effect on the other roller connected to the lower voltage.  To be clear, this refers to a single power source (train transformer) using the diode or rheostat method.  If you have two train transformers power the two straddled zones, then other considerations come into play such as insuring "phasing" of the transformers.  But that's really a separate discussion.

Attachments

Images (1)
  • Untitled
romiller49 posted:

You can now get a good rebuilt ZW for very little money. Use one of the other channels for the down slope. Don’t forget to create the seperate block for the downslope.

Not a bad idea, for all conventional, but the rheostat can be had for under $20, and will still work for command operation from a single power source, just a wiring block needed.

thanks to all for posting, as long as this stays basically on topic, a little side track conversation never hurt anybody.  I will be trying on of the prewar 81 rheostats, simply because I found it quickly.  If I need to incorporate something for a long term layout I will probably use a more modern device.  I intend to stay away from the diode system.  Derailments are a fact of life when dealing with toy trains on the floor and kids of all ages.  My daughter gets scared enough if she sees "sparkles", I don't need anything to go pop, and I don't need anything that I will have to replace after nearly every derailment.   

The 81 should be her this weekend, and the Christmas trains should be going up, an outer loop with the elevation change, and an inner loop that is flat.  Before testing in the living room we will test the rheostat on the test track in the basement.  Assuming it works the plan will stay the same, if not, the elevation scheme will have to wait until next year.

With a zw trans it's easy. Make your blocks. Then use other controls a.b.c.d .to adjust the down hill speed. 

1 long block. Or multiple. To step down speed.  You'll have 3 taps with zw. 

All you need is 1 block.  

Tap A. Main voltage.

Tap b.  For down hill . Adjust to any voltage. 

Using a zw don't have to deal with phasing.

FireOne posted:

Stan, I don't want to hijack the thread, but could use some advice on what you described on diode "blocks".  Running G Scale 22v DC which is a little different than most of the applications in this thread.

Same issues/tradeoffs apply whether AC or DC.  A DC engine always goes in the same direction downhill for the voltage dropping scheme to work...and hence you only need half the number of diodes since you only have to deal with one voltage polarity. 

But I figure there's a negligible cost penalty to "wasting" (not using) half of the diodes in a DC application given the widespread availability of bridge rectifiers.  Note that when talking 8 Amps or whatever, you absolutely need some kind of heatsink method such as the metal plate I showed in the earlier photo.  While you can buy suitably rated individual/loose diodes with mounting capability, I'm confident you'll save money and assembly hassle using bridge rectifiers.

As an aside, I suppose one might argue you need to reverse DC polarity on the track to reverse direction.  Sure.  But for the application at hand, this wouldn't work since the downhill block would become an uphill block and the diodes (or rheostat) would starve the engine of voltage when reversing up the hill!   IIRC, there was an OGR thread about a method to detect whether an engine is entering a grade from the top or from the bottom...and apply the voltage dropping mechanism appropriately.  Seems it was a pretty complicated arrangement but it's out there for anyone interested.


CAPPilot posted:

Tried to follow Stan’s discussion but got lost.  Would even the 100 watt rheostat be enough for a conventional train with lots of lighted passenger cars since our transformers can put out up to 180 watts?

I'll confuse matters even more.    I guess I should clarify my earlier comment about the Amps or Watts capability of the dropping device (rheostat or diode) vs. the load (engine with or without lighted passenger cars).

The instruction manual warns never operate trains unattended.  Yet, presumably one reason to add a downhill speed dropping mechanism is so you don't have to tend to the throttle on each loop.  So as discussed earlier one needs to consider the case of a derailment or other mishap which shorts the track when the voltage dropping mechanism is in play.  In this case the rheostat or diode string takes the full transformer voltage/power which of course can be hundreds of Watts!  So then you need to consider what kind of fuse, breaker, whatever protection you have other than your watchful eye.

But as to normal operation, note Rob's specifications on the Lionel rheostats - they are not 100 Watts.  There's always the oddball case, but I'd think a 25 Watt rheostat with a relatively low (5 or 10) Ohms value would do the trick.

Last edited by stan2004
stan2004 posted:
FireOne posted:

Stan, I don't want to hijack the thread, but could use some advice on what you described on diode "blocks".  Running G Scale 22v DC which is a little different than most of the applications in this thread.

Same issues/tradeoffs apply whether AC or DC.  A DC engine always goes in the same direction downhill for the voltage dropping scheme to work...and hence you only need half the number of diodes since you only have to deal with one voltage polarity. 

But I figure there's a negligible cost penalty to "wasting" (not using) half of the diodes in a DC application given the widespread availability of bridge rectifiers.  Note that when talking 8 Amps or whatever, you absolutely need some kind of heatsink method such as the metal plate I showed in the earlier photo.  While you can buy suitably rated individual/loose diodes with mounting capability, I'm confident you'll save money and assembly hassle using bridge rectifiers.

As an aside, I suppose one might argue you need to reverse DC polarity on the track to reverse direction.  Sure.  But for the application at hand, this wouldn't work since the downhill block would become an uphill block and the diodes (or rheostat) would starve the engine of voltage when reversing up the hill!   IIRC, there was an OGR thread about a method to detect whether an engine is entering a grade from the top or from the bottom...and apply the voltage dropping mechanism appropriately.  Seems it was a pretty complicated arrangement but it's out there for anyone interested.


Thanks Stan, any recommendations on what value/part number diodes I should use to build the multi-tap setup you have in your pic?  Running 22v max at 10a max.

Chris S.

On eBay (or Amazon, or wherever) search on 25A 1000V bridge rectifier which on eBay will bring up a gaggle of options with the 2 main types being as shown:

Untitled

I suggest 25A (instead of 10A or whatever) simply because it's in the sweet spot of "value" and availability - a.k.a. bang-for-the-buck.  Likewise, the 1000V rating (instead of 50V or whatever which is all you'd need for your 22V system).  I show a different package type that uses the so-called Faston or quick-connect plug on connectors that you see in, say, automotive applications.  A lot of guys seem to have bags of these connectors and the crimp tools sitting in the tool box.  Otherwise the other type is the wire-terminal style as I showed earlier.  In either case you're talking easily less than $1 per bridge.

Both styles have a mounting screw hole to fasten it to a heatsink.  Note that the actual diodes (4 per package) are a tiny fraction of the total package.  It's all about getting rid of the heat!  I show a piece of scrap stock aluminum sheet.  

So to be clear, you're using 2 diodes per bridge package.  Each diodes drops ~3/4V.  So with a set of 5 bridges, that's 10 diode drops which allows you to adjust/choose your drop from 0, 3/4V, 1-1/2V, 2-1/4V, etc. up to 7-1/2V.  This range should be suitable for downhill speed balancing.  And while the rheostat method gives you infinitely-variable adjustment, I'm confident that 10 steps will be more than enough resolution to find a workable setting.

Looking ahead, I can imagine you might discover different engines or perhaps an engine with several heavyweight trailing cars might need a different "tap" to achieve the desired effect.  In this case you might want to invest in a rotary switch to select from 2 or 3 taps to allow you to adjust the drop.  Of course a rheostat would simply be a matter of turning the knob.


Attachments

Images (1)
  • Untitled

Of course "straightforward" is a matter of opinion!  But I'd say yes.  Each bridge has 4 terminals that are always clearly labeled AC, AC, +, and -.  Some of the photos earlier in the thread show the wiring but I dug up this photo from a previous OGR thread showing one bridge.  The 2 AC terminals are interchangeable.   In your case (DC), "AC IN" becomes "DC IN". 

The "output" of one bridge feeds the input to the next bridge.  Lather, rinse, repeat for additional bridges to achieve as much drop as you want with taps all along the way. 

bridge rectifier as two pairs of diodes


Attachments

Images (1)
  • bridge rectifier as two pairs of diodes
riki posted:

With a zw trans it's easy. Make your blocks. Then use other controls a.b.c.d .to adjust the down hill speed. 

1 long block. Or multiple. To step down speed.  You'll have 3 taps with zw. 

All you need is 1 block.  

Tap A. Main voltage.

Tap b.  For down hill . Adjust to any voltage. 

Using a zw don't have to deal with phasing.

Easiest Solution.

SPSF posted:
riki posted:

With a zw trans it's easy. Make your blocks. Then use other controls a.b.c.d .to adjust the down hill speed. 

1 long block. Or multiple. To step down speed.  You'll have 3 taps with zw. 

All you need is 1 block.  

Tap A. Main voltage.

Tap b.  For down hill . Adjust to any voltage. 

Using a zw don't have to deal with phasing.

Easiest Solution.

And most damaging to the transformer and sensitive electronics from the huge spikes/surges by making & breaking the dead short between "A" & "B" when a pair of loco rollers or a Polar Express passenger car is straddling/traversing the gap(s) from one district to the next.

stan2004 posted:

Of course "straightforward" is a matter of opinion!  But I'd say yes.  Each bridge has 4 terminals that are always clearly labeled AC, AC, +, and -.  Some of the photos earlier in the thread show the wiring but I dug up this photo from a previous OGR thread showing one bridge.  The 2 AC terminals are interchangeable.   In your case (DC), "AC IN" becomes "DC IN". 

The "output" of one bridge feeds the input to the next bridge.  Lather, rinse, repeat for additional bridges to achieve as much drop as you want with taps all along the way. 

bridge rectifier as two pairs of diodes


Perfect Stan, you have answered all my questions.  Thank you!

Chris S.

RICH B posted:

...if using the #81 rheostat ,is it recommended to use a push to reset circuit breaker ,before or after the rheostat ,or where ,as I run tmcc  ,with a lockon breaker ?thanks to everyone for their suggestions !!if so ,what size breaker?

The breaker is to protect the transformer & wiring, so I don't add any additional breakers beyond what I have already(and usually it's just the transformer or PowerMaster PM-1).

Add Reply

Post

OGR Publishing, Inc., 1310 Eastside Centre Ct, Suite 6, Mountain Home, AR 72653
800-980-OGRR (6477)
www.ogaugerr.com

×
×
×
×
Link copied to your clipboard.
×
×