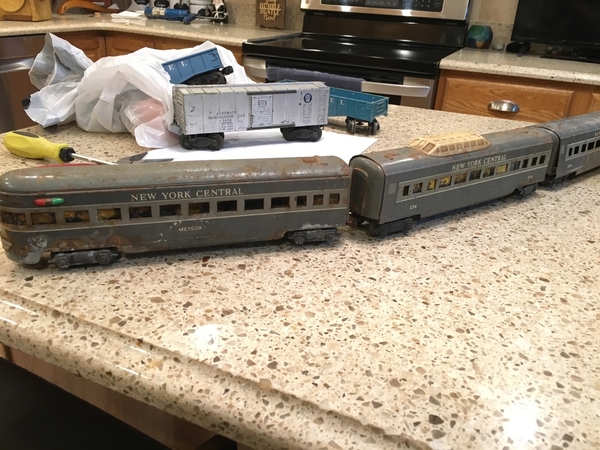
Over the weekend  you've been to a train show and turned someone else's junk into treasure; or you've fixed a problem with your layout and now you're trains are running flawlessly like a Swiss watch.

Now is your chance to share with the World what happened this past weekend (or recently) that you are excited about related to our hobby.

If this Post goes well, maybe every Monday will be Resurrection Monday.

I will start us off by sharing what I am excited about that happened this past weekend. Arnold

Original Post

Replies sorted oldest to newest

For 20 years, since the time I built my layout, my trains have slowed down as I run them on the far left side of my layout as I face it sitting at my transformer.

I know the basics of providing feeder wires to provide power at every few track sections. 

I thought my problem was related to the fact that I have 4 crossing gates activated by insulated rails where 2 reverse loops are. The crossing gates draw their power from a ZW that powers my accessories, not from an MTH Z 4000 that powers my 2 main lines.

Here's a video showing how the train slows down at this spot on my layout:

Last night, my train doctor came over and solved this 20 year old layout problem in 5 minutes. All he did was connect 2 lock-ons, and wires between them, at 2 points near where the mainline power drops off. 

I will post another video later this morning showing the improvement in the performance of the train at this location. Arnold

Attachments

Videos (1)
20181105_200422

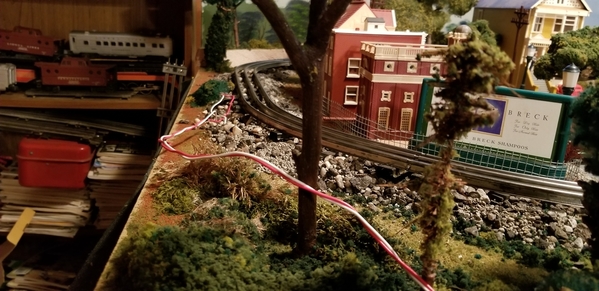
Above shows the problem (voltage drop), below is the solution (feeder wires), and the video below shows the result:

20181119_072052

20181119_072102

I can't believe I could not figure out how to solve this problem for 20 years. I feel like an idiot.

My confusion had to do with the fact that I thought my crossing gates caused the power shortage to the track, and that was irrational. The gates are powered from a separate transformer from the one powering the track.

My train doctor logically solved the problem step by step in a few minutes. First, he had me turn off the power to the crossing gates and ran the train. No difference. Still had same power shortage.

Then, he placed the lock-ons and 2 short feeder wires, first where the power was still strong, and next where the power was starting to weaken on the track sections with the insulated rail. Problem solved.

Then, we ran the train again with the power supplied to the crossing gates. They worked fine and the train still ran well without slowing down.

So today is Resurrection Monday for my layout.

We would all love to hear of any Ressurrection stories you may like to share. Since we are just starting this thread, don't limit your story to something that happened this weekend; feel free to share any such story whenever it happened. Arnold

Attachments

Images (2)
  • 20181119_072052
  • 20181119_072102
Videos (1)
20181119_072645

I have been posting on the "Buy anything cool lately" thread about my experiences resurrecting the American Flyer 312 I bought at a train show on Nov. 4, so I won't bother repeating all that here.  But I can report on my current progress.

With the reverse unit installed in the tender, I have turned my attention to my least-favorite part of restoration: painting.  I put a coat of Krylon Flat Black on the tender, though it's actually more like Semigloss than flat.  Then I tried to put a "Pennsylvania" dry transfer on it before sealing the whole thing with clear flat finish.  Unfortunately, it seems that my PRR transfer sheet -- which is pretty old -- has dried out, because the lettering won't stick to the tender at all.  I'm going to have to send for some new transfers.  And yes, I know I could use decals, but I don't like decals and have always used dry transfers in the past and that's what I prefer, so I'm going to stick with them (no pun intended).

The locomotive boiler shell itself doesn't need repainting, except for a couple of tiny spots near the rear of the cab that can easily be touched up with a fine brush.  So the only remaining painting to do is the PRR keystone on the boiler front.  My eyes aren't what they used to be, so I've been doing it with a jeweler's loupe.  I finished the red background last night, and will probably do the yellow edging tonight, if I have time.

When the Flyer shoulder screw arrives from The Train Tender, I'll attach the NOS trailing truck that I got from eBay last week to the locomotive frame.  Then I'll wire in the LED headlight and put it all back together (I've already cleaned and polished the rods and valve gear).

Meantime, I'll be ordering some MV lenses for the marker lights on locomotive and tender.

I'm waiting till I get the locomotive reassembled to take any more photos, but here are a couple I took in the early stages of restoration.  This is the tender, just after I installed the reverse unit (the previous owner had ripped the original unit out):
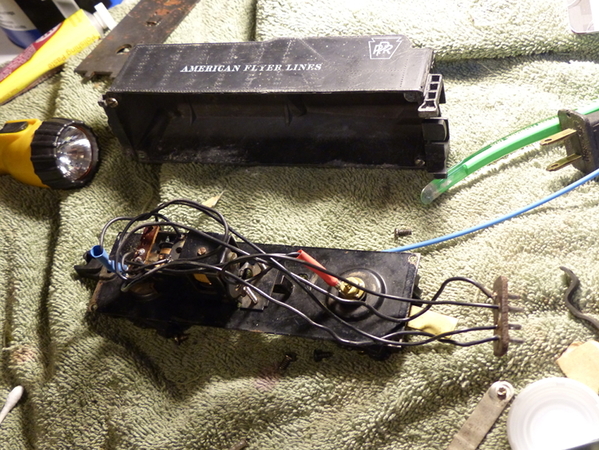
Flyer1

I know the wiring looks pretty sloppy, but I wanted to be sure everything was long enough to reach the locomotive when I put the tender shell back on.

This is the rest of the 312, sitting on a DVD shelf in my basement, waiting for attention.  At this point, I hadn't yet done anything to it, though you can see the new trailing truck sitting just behind the cab:
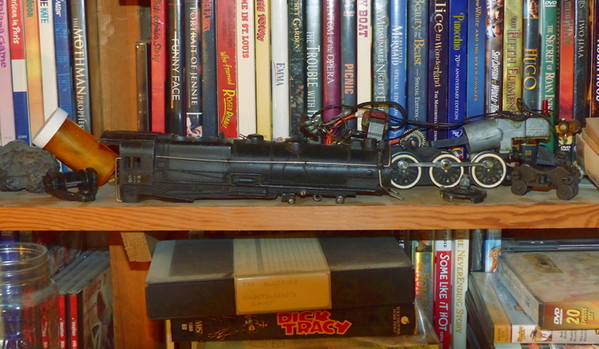
Flyer2

If this thread survives that long, I'll post updates to this project here.

Attachments

Images (2)
  • Flyer1
  • Flyer2

Arnold - thanks for posting. Good topic. When I got into O Gauge, my dad bought me portable voltmeter. Were you ever able to measure the voltage at the point where you had the power drop? 

I had all kinds of similar problems with my first layout. I was such a newbie and didn't know how to wire power-hungry, track-side accessories to separate transformers. I remember trains coming to a crawl when the Automatic Gateman would pop out because I had wired to track power.  Much better with my new layout.

Last edited by raising4daughters

What is particulatly impressive are the before and after photos.

Very good idea when you obtain a junk train to take photos of it. Then, after you fix, restore and resurrect it, to take additional photos.

The same can be done taking before and after photos when any problem with a layout gets resolved, or any improvement to a layout occurs.

You can then attach the photos to your posts on this Resurrection Monday thread explaining exactly what you have done.

Great work, my fellow train miracle workers!

Arnold

Last edited by Arnold D. Cribari
Arnold D. Cribari posted:

What is particulatly impressive are the before and after photos.

Very good idea when you obtain a junk train to take photos of it. Then, after you fix, restore and resurrect it, to take additional photos.

The same can be done taking before and after photos when any problem with a layout gets resolved, or any improvement to a layout occurs.

You can then attach the photos to your posts on this Resurrection Monday thread explaining exactly what you have done.

Great work, my fellow miracle workers!

Arnold

Thank you for creating this post.
There is a lot to learn from people posting the before and after photos as someone may be working on the same train or layout problem. 

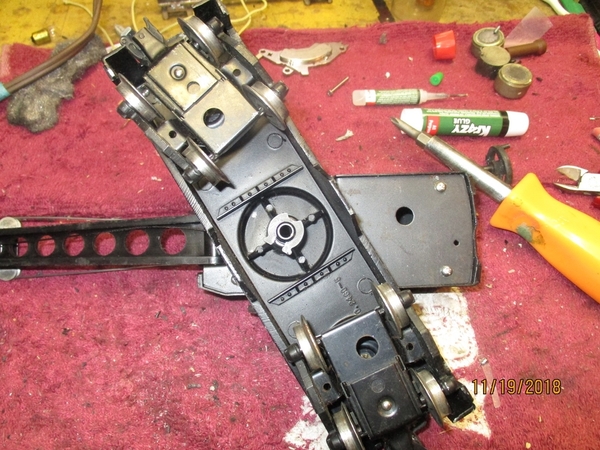
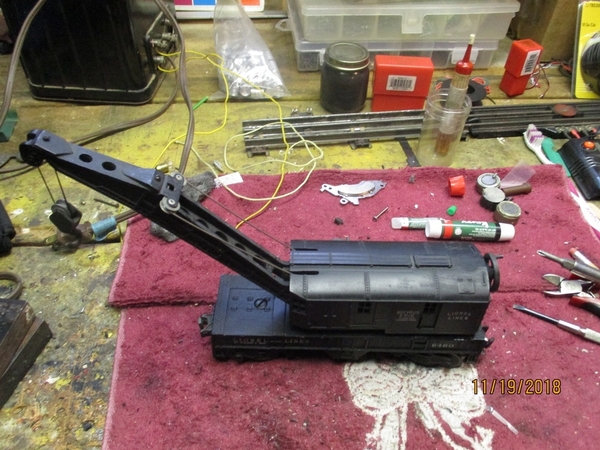
Hi Kids, this is one of the resurrections that I recently did. A few weeks ago I purchased three pw 6460 Bucyrus cranes. Two were in real nice condition, but the third had the plastic screw sleeves w/ the holes that hold the cab on the frame were stripped and broken.

Here's what I did to resurrect this Bucyrus crane.

Material: tube of Krazy glue.  #3 phillips head screws 1" lg. (not sure screw size, but I know they're smaller then #4).   drill bit #48, .076 .

Pic 1: filled broken sleeves w/ stripped screw holes w/ Krazy glue. Let set over night to completely set up.

Pic 2: drilled new holes using #48, .076 drill bit. Cleaning drill bit off after drilling each hole.

Pic 3: slow and easily thread new screws (#3 phillips head) approx. 1/4" - 3/8" into the newly drilled holes. Estimate the excess amount to cut off of the screw to keep it at the total length you need. Re-thread screws back into the hole to make sure you have the proper length. 

Pic 4: Set cab on frame and thread screws into new holes til snugged.


Bucyrus repairs [2) crp


Bucyrus repairs [4) crpBucyrus repairs [8) crpBucyrus repairs [9) crpBucyrus repairs [12) crp

Attachments

Images (6)
  • Bucyrus repairs (1) crp
  • Bucyrus repairs (4) crp
  • Bucyrus repairs (8) crp
  • Bucyrus repairs (9) crp
  • Bucyrus repairs (12) crp
  • Bucyrus repairs (2) crp

This crane tender has been knocking about my workbench for literally years with no trucks or chimney and with a hole in the roof.  Fabricated a replacement chimney from Plastruct tubing,  filled in the hole with Squadron Green,  pulled a couple staple end trucks from my truck box and painted the repair areas black to simulate a hot tar repair!  

GEDC1294

Mitch 

Attachments

Images (1)
  • GEDC1294
franktrain posted:

Picked up this B&M 6464 shell for a $1.00 at a train show and did a patch roof repair and used parts laying around parts bin. 6464 boxcars run great. 


Still need to get door rails


Frank, it looks as though you cut a piece from a (junk, I presume) donor car to replace the damaged section of the B&M's roof.  Could you give us some details about how you're going to color-match the new section?  I'm always open to advice, since painting is my least favorite part of any restoration project.

--John

Balshis posted 

Frank, it looks as though you cut a piece from a (junk, I presume) donor car to replace the damaged section of the B&M's roof.  Could you give us some details about how you're going to color-match the new section?  I'm always open to advice, since painting is my least favorite part of any restoration project.

Actually, I'd leave the patch and mismatched doors as-is.  Like with my crane tender,  it adds character to the car. 

Mitch 

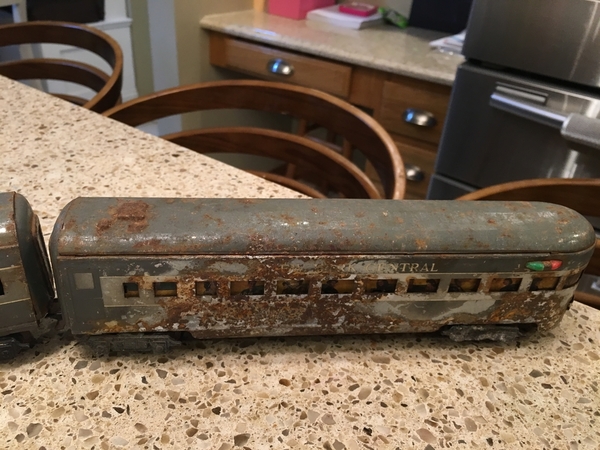
Here is my little resurrection project I am about to start. I picked these up from the forum’s for sale section. These are Marx 3/16 scale tin passenger cars that need a little TLC. I originally thought I was going to replace the Marx trucks with Lionel, but after seeing how these cars sit nice and low on these trucks, I will just make a transition car with a knuckle coupler on one end and a Marx coupler on the other.  

C43987BC-4872-4AF9-BF90-70ACD2706575CDFB42C5-2B71-40F2-ADBA-AC6094782674934CEAD2-20A8-4195-B070-0C5A03E5905D

A9A76693-F55D-48E0-A7BD-3AD38162F278

Given that they are all in pretty rough shape, I decided I wanted to paint them as the Norfolk and Western ‘Powhatan Arrow’ ... in case I ever come across a NW J that isn’t cost prohibitive. Goal is to disassemble the cars, remove the rust, reattach or recreate the window silhouettes, paint, decal, and reassemble. I had to order some new wheel axles yesterday as well. 

Attachments

Images (4)
  • C43987BC-4872-4AF9-BF90-70ACD2706575
  • CDFB42C5-2B71-40F2-ADBA-AC6094782674
  • 934CEAD2-20A8-4195-B070-0C5A03E5905D
  • A9A76693-F55D-48E0-A7BD-3AD38162F278
JD2035RR posted:

Here is my little resurrection project I am about to start. I picked these up from the forum’s for sale section. These are Marx 3/16 scale tin passenger cars that need a little TLC. I originally thought I was going to replace the Marx trucks with Lionel, but after seeing how these cars sit nice and low on these trucks, I will just make a transition car with a knuckle coupler on one end and a Marx coupler on the other.  Given that they are all in pretty rough shape, I decided I wanted to paint them as the Norfolk and Western ‘Powhatan Arrow’ ... in case I ever come across a NW J that isn’t cost prohibitive. Goal is to disassemble the cars, remove the rust, reattach or recreate the window silhouettes, paint, decal, and reassemble. I had to order some new wheel axles yesterday as well. 

Looks like a fun project, keep up updated on your progress

Add Reply

Post

OGR Publishing, Inc., 1310 Eastside Centre Ct, Suite 6, Mountain Home, AR 72653
800-980-OGRR (6477)
www.ogaugerr.com

×
×
×
×
Link copied to your clipboard.
×
×