
I'm working on a new layout that has an O-72 outer loop, elevated 7" where I'm thinking a mountain with tunnel would be very appropriate.  What have you guys done for mountains in corners in these instances?  Show me what you got!

Mountains with cliffs and some flat sections to mount smallish structures like a rotating beacon would be awesome to see.  I'm envisioning something like 2.5'x2.5' and being 2.5' high for my layout.

Below is the corner of my layout.  The yellow is elevated 7".  The curve inside that is O64 and not sure if that should be included in the "mountain" or just add a retaining wall behind it, curved and connecting 7" platform to table.  Thoughts here would also kindly be helpful.   

V3.6, layout corner for OGR post on corner mtns. Grid is 1' x 1'

Attachments

Images (1)
  • V3.6, layout corner for OGR post on corner mtns.
Last edited by Kirk R
Original Post

Replies sorted oldest to newest

Hey Kirk. Here is one example on my new layout. 

I will add a few comments about your plans. If your upper level is 072 and your adjacent lower level is 064, that leaves 4" center to center between these adjacent tracks. As your plan shows, that is really tight. The dimension between the 064 and your inner circle look even tighter. The NMRA standards gauge gives a clearance dimension of 2.25" from the center of the track to any obstruction. Please keep this in mind if you choose to build a retaining wall between the two levels of tracks. You do not want your engines or rolling stock to "hit the wall", so to speak, going around the lower level. Do not under estimate the "side clearance" required for a train to go around a curve.

You also may have some issues with trying to find tunnel portals to work in that tight space. I had to modify mine in order for them to clear everything.

To make everything work if you want to go with a tunnel, you may have to incorporate all (3) of the corner tracks "in the tunnel" in order to avoid clearance problems and then fabricate your own tunnel portals. 

A retaining wall may work but it will need to be tucked back under the upper level for needed side clearance. That would work with 7" of vertical separation.

Just my thoughts, hope that helps to give you some ideas.

Donald

IMG_9209IMG_9212IMG_9397

IMG_0022

Attachments

Images (4)
  • IMG_9209
  • IMG_9212
  • IMG_9397
  • IMG_0022

Hi Kirk R, Here's a corner mountain with its tunnels on one of my layout projects.IMG_5119 It was placed on this far-corner section of the plywood real-estate...IMG_4301IMG_4322

I thought for a while about the aspect of having the "mountain" as a backdrop to the track(s), occupying the far-left rear corner of the layout, or as a feature containing a tunnel, and decided to go for including both tracks inside the mountain feature rather than have one or both tracks pass in front of the hillside.

I decided to use the real-estate at the base of the hill for a maximum of landscape interest, crafting this little suburban neighborhood at the forward base of the hill....IMG_4958

.. as well as using the top of the hill for another vignette , a camp site for kids......IMG_4856IMG_4860IMG_4866IMG_4871IMG_4887

IMG_4889IMG_5118IMG_5124

FrankM

I hope you like the view.

Attachments

Images (12)
  • IMG_4301
  • IMG_4322
  • IMG_4856
  • IMG_4860
  • IMG_4866
  • IMG_4871
  • IMG_4887
  • IMG_4889
  • IMG_4958
  • IMG_5119
  • IMG_5118
  • IMG_5124
Last edited by Moonson

Not a complete picture but here's my corner mountain.  Two parallel tracks on lower level, far right, 72 and 64.  Hard to see, but if you look through the tunnel portal just past engine on far right you can see a blue wall.  I kept the mountain hollow and have a pop-up at corner to service track and mountain top.

20180428_153127

Attachments

Images (1)
  • 20180428_153127

I will also have a large corner where I need to put in a mountain.Frame 11

At the Amherst show I saw some of the work that the people at Woodland Scenics did in creating mountains with their shaper sheets and I may try those. Certainly more expensive, but seems like a great time and work saver and is ultra light and readily moveable if the need ever arises.

Attachments

Images (1)
  • Frame 11

Hey guys, GREAT FEEDBACK!  To give plenty of side clearance I've decided to cover all three tracks (thanks for the idea 3RAIL 2!).  This'll give a larger footprint to the mountain so I could have more gradual slopes, add some structures (eg, cabins).  AVANTI you sure do have a knack for this!  I think I'm many years off from that if I even get the urge/have the time to try that (have no skills a that yet).  Maybe the kids can help somewhat.

So my version two is below.  Even though this is in a walled of corner the layout stops about 2 feet from the wall so I can get back there and pop up.  The back of the mountain will be totally open in case I need to get in there.  The portals may be a challenge when I get around to them... one might need to be at an angle which I guess won't look to terrible... they may both have to be double portals to allow for clearance in between the O64 and O31 curves.


 V3.6, layout corner for OGR post on corner mtns.


Attachments

Images (1)
  • Version 2, corner mountain pre-planning: Version 2, corner mountain pre-planning
Kirk R posted:

Hey guys, GREAT FEEDBACK!  To give plenty of side clearance I've decided to cover all three tracks (thanks for the idea 3RAIL 2!).  This'll give a larger footprint to the mountain so I could have more gradual slopes, add some structures (eg, cabins).  AVANTI you sure do have a knack for this!  I think I'm many years off from that if I even get the urge/have the time to try that (have no skills a that yet).  Maybe the kids can help somewhat.

So my version two is below.  Even though this is in a walled of corner the layout stops about 2 feet from the wall so I can get back there and pop up.  The back of the mountain will be totally open in case I need to get in there.  The portals may be a challenge when I get around to them... one might need to be at an angle which I guess won't look to terrible... they may both have to be double portals to allow for clearance in between the O64 and O31 curves.


 V3.6, layout corner for OGR post on corner mtns.


Hey Kirk. Just got back home after a long day in the field. I like your new design,,,,.....changing out the curve radii is a good thing and enclosing all (3) tracks will look pretty neat and should solve a lot of problems with clearance.

As far as the portals, look at the ones Scenic Express (forum sponsor) have. They make "xtra-wide" ones in either concrete pattern or stone. They are made from foam so they are easy to cut and modify it necessary. I did that to the concrete one that shows on my upper level.

You can also make your own from either Masonite, MDF or insulation foam. The foam should be either the pink or blue stuff. It is easy to cut to whatever shape you need and then you could carve your own stones in the face using just a pencil or a rounded off stick and then paint.

As far as clearances, I would run that Centipede around the curve, watching where the front or rear overhang is the greatest. This would be your clearance line that you will need to maintain to avoid any operation issues.

Hope that helps. Please posts some pics when you get started. We all like to see pics!

Have a good weekend and Holiday.

Donald

Kirk- here's mine on my 027 layout. I did the back cliff first and recently finished the front.  The stone retaining wall is printed on paper and mounted to thin cardboard. My tunnel portal it T-111 and the cliff/ hills are carved blue foam.

If you want to check clearances take the Centipede and run it around the curve while holding a pencil at the front and rear corners and scribe a line on the base board. Do the same in the inside at the center of the engine. Then you will have a permanent mark and won't have to check constantly.

Bob

2017-01-02 08.12.532017-01-02 11.40.292017-01-07 16.52.252017-12-16 17.15.292018-01-05 15.07.512018-01-05 15.07.58

Attachments

Images (6)
  • 2017-01-02 08.12.53
  • 2017-01-02 11.40.29
  • 2017-01-07 16.52.25
  • 2017-12-16 17.15.29
  • 2018-01-05 15.07.51
  • 2018-01-05 15.07.58

I only have one tunnel on the southwest corner of the layout, it's 10 feet long on the inside.

Photo312100_1931CIMG2504100_1869

In the northwest corner I have this setup.

100_1865CIMG2510

Under the west end of my layout I have 2 mainline tracks also. My mainline tracks are 072 and larger.  West end of layout is 19 1/2 feet wide.  Also behind my grandson is a emergency exit full door to the outside, train building only has windows and the main door in the east end of building.


Attachments

Images (6)
  • Photo312
  • 100_1931
  • CIMG2504
  • 100_1869
  • 100_1865
  • CIMG2510
Last edited by CBS072

 Still a "work in progress ".   I used boxes used for the main structure with newspaper wads taped on top. Then I laid Woodland Scenics plaster cloth over it and once dry, colored with Woodland Scenics pigments diluted with water.

I also left the back open for cleaning the track etc., but pinned some fabric over the opening to keep the tunnel dark.

001003004


BTW.....no mountain is complete without a Yeti!


006


Attachments

Images (5)
  • 001
  • 002
  • 003
  • 004
  • 006
Last edited by RickO

My layout has a large tunnel reaching upward to  about a foot from touching the ceiling I call Mt. Randolph.  Mt. Randolph covers the southeast corner of my layout. 

Mt. Randolph is made with 1x2s and 2x4 supports, mechanics wire, chicken wire, and layered plaster cloth dipped in water.  The single track line of the Mountain Division runs through Mt. Randolph.  There is a vehicle tunnel inserted in the side of Mt. Randolph as well.  The vehicle tunnel was needed so that I could access  the interior of the tunnel, when needed, for fixing derailments, track cleaning, etc.  I made the vehicle tunnel out of stryrofoam.  The tunnel roadway is a standard selling item which can be purchased at most hobby shops/train shows.   I made the tunnel entrance slightly higher than the intersecting roadway so that it would be easier to slide the tunnel forward for gaining inside tunnel access.  The roadway protruding from the tunnel entrance looks sort of like the tunnel is sticking out it's tongue.  This tunnel actually slides forward ( pretty much the same as a file cabinet drawer ) for removal.  See photos showing how I made the vehicle tunnel. The vehicle tunnel portal is a HO scale portal.  The bottom photos show the finished vehicle tunnel with a mail jeep exiting  as the tunnel portal sits in the side of the mountain.  

Photos four - eight show the construction of the vehicle tunnel.  Photo eight, sideways ... sorry bout that, shows where the tunnel slides in/out of the side of mountain.  It also shows the Mountain Division track.  Photo nine, again sideways, shows the vehicle tunnel in place and the chicken wire/ newspaper wads stage of the mountain construction.  

I've included photos of the finished Mt. Randolph as well as some showing the construction phase.  I apologize for the sideways photos, however, they will give you an idea of how the mountain was constructed.   I did use real stone at various places... hence the rocks climbers and above portals.   In the first photo, the walls behind/below and to the right front of the bridge are made with heavy gauge aluminum foil.

IMG_0504Above - Mt. Randolph showing lake Christopher and surrounding scenery. Below - shows vehicle tunnel portal/entrance behind bridge and wooden portal of Mt. Division track.
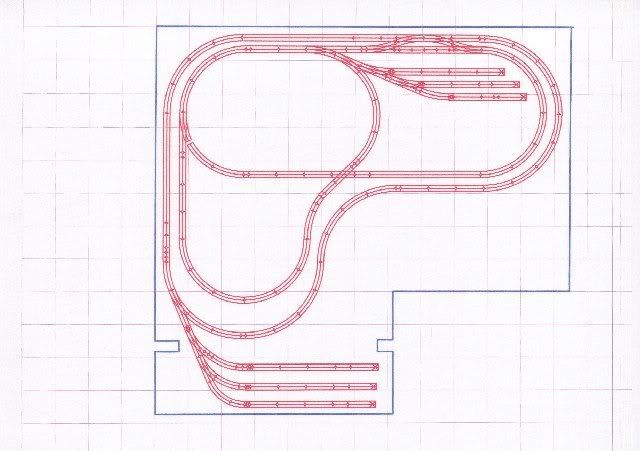
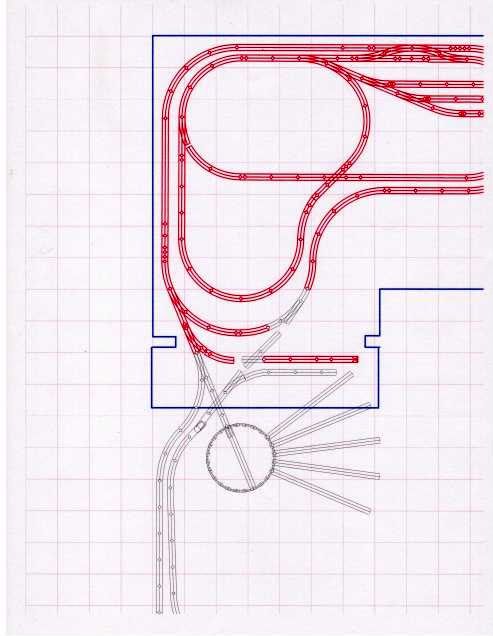
                                                                                                                                                                                                                                                    IMG_6387

IMG_6402IMG_0039IMG_0036IMG_0040IMG_0041IMG_0112IMG_0105IMG_0134IMG_0122IMG_6412IMG_0139IMG_0095IMG_0689IMG_4822

Attachments

Images (17)
  • IMG_0504
  • IMG_6387
  • IMG_6402
  • IMG_0039
  • IMG_0036
  • IMG_0040
  • IMG_0041
  • IMG_0112
  • IMG_0105
  • IMG_0134
  • IMG_0122
  • IMG_6412
  • IMG_6412
  • IMG_0139
  • IMG_0095
  • IMG_0689
  • IMG_4822
Kirk R posted:

Terry, is that strips of cardboard that you use in the beginning to make a skeleton structure?

Love the access panel.

Hi Kirk:

Yes, I used strips of cardboard to get started. I haven't had to use the access panel yet. So far I have been able to clean the rails and retrieve a derailment through an access hole underneath in the hidden corner. But, when it becomes necessary, the access panel can be removed. 

Kirk, Thank you for asking the question and everyone else for posting photographs and suggestions!  Every mountain and tunnel is unique and terrific looking.  If you take a look back at the last 2 or 3 pages of my topic in my signature, you will see I need to rethink my mountain and tunnel because I have been given access to a larger room.  My wife saw me trying to cram an O gauge layout into a 130 square foot room and decided that empty nesters do not need three sitting rooms.  Here is where the mountain will go.

2018-05-31 20.42.06

That area is the upper left hand corner of this plan we have been working on in my topic I mentioned above.


Attachments

Images (2)
  • 2018-05-31 20.42.06
  • mceclip0
Moonson posted:

Hi Kirk R, Here's a corner mountain with its tunnels on one of my layout projects.IMG_5119 It was placed on this far-corner section of the plywood real-estate...IMG_4301IMG_4322

I thought for a while about the aspect of having the "mountain" as a backdrop to the track(s), occupying the far-left rear corner of the layout, or as a feature containing a tunnel, and decided to go for including both tracks inside the mountain feature rather than have one or both tracks pass in front of the hillside.

I decided to use the real-estate at the base of the hill for a maximum of landscape interest, crafting this little suburban neighborhood at the forward base of the hill....IMG_4958

.. as well as using the top of the hill for another vignette , a camp site for kids......IMG_4856IMG_4860IMG_4866IMG_4871IMG_4887

IMG_4889IMG_5118IMG_5124

FrankM

I hope you like the view.

Very nice layout. I do have one question though. What did you use for you vines on the retaining wall? I too want to model a retaining wall with vines and can not find anything that looks like a vine except one at scenic express.

Add Reply

Post

OGR Publishing, Inc., 1310 Eastside Centre Ct, Suite 6, Mountain Home, AR 72653
800-980-OGRR (6477)
www.ogaugerr.com

×
×
×
×
Link copied to your clipboard.
×
×