Darren,
Do you like something functional for the control panel, like a prototype CTC view? SCARM does this.
That's really all you need - areas named and switches numbered with indicator lights.


|
|
Carl,
I didn't know this was available, but I'm definitely going to start researching it now. I purchased a few toggle switches in order to have the ability to power on/off tracks. Having indicator lights for the switches would also be a nice feature. After I get some more work done on the roundhouse area and the trackwork for the trestle section, I might have to course correct and make the Control panel/remaining wiring priority, and set other projects aside. Let me see what I can come up with.
Thank you,
Darren
Darren,
Here's the SCARM files when you want to play with it. It's in the objects library>Symbols-Square tiles. At the bottom of the library there is a transparent tile. It's hard to see-it's transparent-LOL! I have only used it to close the frame. Don't know if you can use it for the fillers.
Drop me line if you have any questions when you work with it.
there's some good threads on the control panel wiring with LED indicators.
Moonman posted:Darren,
Here's the SCARM files when you want to play with it. It's in the objects library>Symbols-Square tiles. At the bottom of the library there is a transparent tile. It's hard to see-it's transparent-LOL! I have only used it to close the frame. Don't know if you can use it for the fillers.
Drop me line if you have any questions when you work with it.
there's some good threads on the control panel wiring with LED indicators.
Hi Carl,
Just an Fyi. The only thing I see when I open the Scram files are code, no photos.
Seacoast,
You have to download them to your machine an open them on SCARM there. They default to a text when you open them in a browser. They are not browser based. Right-click-select "save target as"- land it and open it with SCARM.
It's only the design that I made for Darren. I may have turned off some settings to remove the block outlines.
AFAIK, when someone saves a photo (menu/export) of a layout and then closes/saves the SCARM file, the next time someone opens it, SCARM looks for the photo (bmp/jpg). If the photo is not uploaded/downloaded with the SCARM file, it can't find the photo and SCARM pops up an error notice. Just close the popup error window and let SCARM finish opening. At that point, you can use the menu/export option yourself to save a photo (bmp/jpg) to your PC. The photo is the same as what you see in SCARM, just without the squares and is what you'd use to print a clean version to mount on your control panel.
If you don't need the photo yet, just resave the SCARM file and the next time you open it, there won't be an error because it will no longer be looking for a photo file.
WOW!!!
Really nice. I wish I had that kind of space.
Darren,
I was certain that I had posted comments on your excellent layout way before now, but after going through the entire thread, I cannot find my posts - I must have not posted! What first caught my attention on your layout was how you made the legs, which are exactly as I did mine such that the frame 2x4's bear directly on top of the leg, and not on the bolts that attach the legs to the frame. Later on, Moonman mentioned the method of connecting the power wires to the track, as I shared back in 2011.
Although perhaps a bit late now, I would like to share how I did my control panel, in case it may be of help.
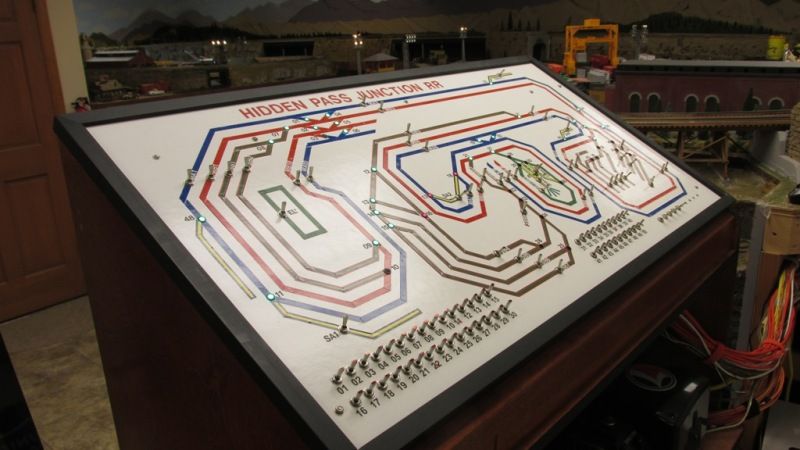
I used 1/4" mylar tape to represent the track, and did the best I could to have all four levels readily visible. I used toggle switches (On/Off) to control the power to each main track district, each siding, and each spur. I thought about adding LED's to indicate whether the tracks were on of off, but it was too much. Instead, I mounted the switches right on the panel tracks, and let UP indicate ON, and DOWN indicate OFF, and this works fine. By the way, the toggle switches actually control relays that are mounted in close proximity to the tracks.
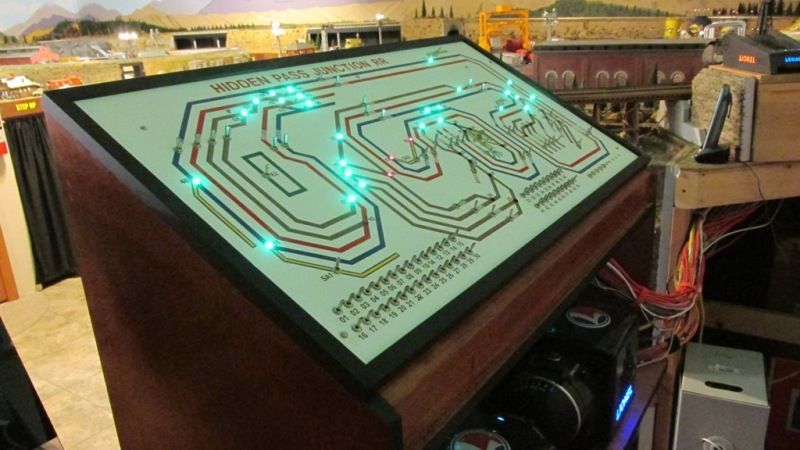
Momentary ON-ON with center off toggles control the switch tracks or turnouts. I did not want to crowd the track area with yet another switch, so I numbered the turnouts and mounted the switches at the bottom of the panel. To indicate the position of the turnouts, I use bi-color LED's - GREEN indicates straight-through track (even if the turnout points are actually curved), and RED means diverging track. These LED's are driven by my Non-Contact True Position detectors, and they work better than I ever expected.
Here are two images of the control panel, first with the all the lights on (fluorescent and others), and then with just the lights I normally have on when I run the trains. With the latter, the room is not quite as bright, and the LED's are almost a bit too bright. (The camera makes up for the brighter and darker room, and makes the area behind the control panel appear opposite of how it really is.)
Good luck, and congratulations on your layout and your progress! Make sure to keep us posted.
Alex
Alex,
Thank you, I really appreciate your input. How you constructed your layout greatly influenced how I built mine, especially the leg construction. Also thank you for taking the time to explain how you built your control panel, its not too late, that project is still in the planning phase and I appreciate the information you provided. I'm still unsure of how big or small I want it, type of material, etc. But the wiring is holding me back at this point, once I have a blueprint of how I need to wire it, then I'll be a little more confident.
It is actually ironic that you posted when you did, two nights ago I was reading your article about the trestle bridge construction and commenting to my wife about your layout (the trestle bridge is the next major project so I am trying to gather as many ideas as possible).
Again, thank you,
Darren
Darren,
One detail about the control panel: In the past, I had used aluminum sheet for the panels themselves, and this made it easy to mount most switches, annunciators, etc. For this current panel, I used 1/4-inch masonite, and it worked OK.
However, if I had to do it again, I would opt for 1/8-inch masonite, and add stringers for rigidity, as needed. The reason is that a lot of the through-the-panel mount toggle switches and LED's barely accommodate the 1/4-inch panel thickness. Just a minor detail.
Alex
Darren,
I went through the entire thread, and have really enjoyed this build, you're very talented, and I look forward to more. Great job!
Andy
Steamfan77 posted:Darren,
I went through the entire thread, and have really enjoyed this build, you're very talented, and I look forward to more. Great job!
Andy
Yes Andy, I couldn't agree more!
One of the best build threads on OGR and one I always check each time I log on.
Thanks for the great reading Darren.
Thanks everyone for the kind words, cut A LOT of wood the last two days, basically piecing together left over 3/4" plywood and 2x4's for the city area/mine site, and trestle extension. If I get anything accomplished tomorrow evening I will post some pictures, Monday at the latest. I'm trying to get the woodwork completed, Homasote cut and pieced together, trackwork installed, and paint whatever needs painted with the flat black I have.
Darren
Well, I got a few things done, never seems like you make any progress until you go back and look at the previous pictures, this evening or tomorrow I will work on the trackwork. Hopefully, I will have the trains back to running.
I raised up the base of the trestle gorge, painted some areas that needed to be painted, including the base to the roundhouse and the base I made for the sandhouse, and tacked in the cork roadbed.
Darren


Nice work Darren and team! Darren what is the black under layment? Is it Roofing paper? And are you using cork road bed?
The trestle area is going to be awesome! I can't wait to see more!
George,
The black areas are just Homasote painted, same with the grey areas. The first gallon of flat black paint I asked for at Home depot came out dark grey, the employee stated this was the darkest she could get it, the next gallon I bought, I asked for the same thing, flat black, and I got flat black, needless to say, it was a different employee. But I like both colors, nothing wrong with a little contrast, its going to get covered in the end anyways. I am also using cork roadbed.
I'm about 40% done with the trackwork this morning, possibly after lunch it will be completed enough to run a test train or two.
Also on my "to-do" list is making a jig for the trestle bents.
Darren
Darren,
Your Layout looks great! The black/grey gives it a great contrast. I like your trestle area too, I am sure that will look cool when your done. Man, You work FAST! I like the way the Gargraves track with wooden ties and Ross switches came out ( track brand I am guessing you are using). The more I look at your layout I am tending to like the Gargraves look better than my Atlas &, making me rethink my track selection. Your giving me inspiration I need to get going on my layout as my 11 year old says what's with the trains in the attic aka the "carpet central".
Did you use Gargraves Flex for the curves or Gargraves sectional curves?
Darren,
Can't wait to see pictures of the progress on the gorge!
Thanks guys, I got the mainline track completed this afternoon. I used flex for the large curves and some sectional track for the 0-63, 0-72 and 0-80 curves. And, Yes, my kids are a big inspiration to me as well, especially the little one.
Darren


Looks great, Darren! Look at all those Waddel Coal cars! I have one.
I don't want anyone thinking I'm not working on the layout, just focused on finishing the roundhouse. I posted these pictures on the Electrical forum, it shows the LED's I installed in the roundhouse. Once I get the wiring to my liking I will begin working on the roof. Its snowing here, so painting the remaining floor pieces and roof might have to wait to a warmer weather day.
Darren


I see you figure it out.
Nice job.
Good Luck,
NYC,SUBWAY TRANSIT SIGNAL posted:I see you figure it out.
Nice job.
Good Luck,
+1 !
Just curious, what % grade did you use for the elevated roadbed near the trustle? Trying to figure out minimums for planning my layout.
Nice progress
I m not familiar with SCARM - Where would I get it and is it difficult to use.
PSU1980 posted:I m not familiar with SCARM - Where would I get it and is it difficult to use.
http://www.scarm.info/index.php
If you're not familiar with layout design software, it will take a little time to get used to how it works, but there are plenty of tutorials to point you in the right direction and there are plenty of layout files you can borrow to help you get the hang of things. It's well worth the time/effort and will save you countless hours over paper and pencil. Just like putting track together on the fly though, it's not without it's frustrations trying to figure out what works and what doesn't. The difference is you're not buying track just to find out things won't fit. If you aren't already sold on a particular brand of track, it will let you compare the ones you're interested in to see what can be done with the sectional track each offers. And, if you can't figure something out, just post the SCARM file and someone will help fix things.
Sorry guys, been away at training classes for a few days.
ATANZ: Honestly I have no idea what the grade % is. That curve is made up of 0-63 Gargraves track + sectional track, from the start of the curve to the end of the climb is approx. 18-20' in length and it is 6.5" in height.
PSU 1980: SCARM is free, you can find it by typing SCARM into any internet search, and it does take some time to get used to, depending on how you wish to use it. I like to hand draw A LOT of things, but I did mess around with it just to get an idea of how much track I needed, and to make a nice picture for my future control panel.
The weather is trending towards above freezing points today so I am hoping to get some wood cut so I can complete the work on the upper area. Once I get a few more switches, the track work will be complete and I will start wiring the switches/blocks/etc, in additional to working on the Control Panel.
Darren
Thanks for the reply, it works out to be at max 3% not bad.
I'm in a phase now which I refer to as "Realistic Progress". There are 15 things I want to work on at the same time but I have to keep re-prioritizing. First and foremost is to get the trestle bridge area complete so I can get back to running trains. Everyday my little one asks "Daddy can we run the choo choo's today?' I am pushing for Christmas, we'll see how it goes.


Darren, You have made great progress. The trestle area is shaping up nicely. I can see that is a top priority if your child is asking about running trains. Do you have an area that you could run them back and forth in the meantime? Do you fave the trestle ready to put in place? I am assuming so, if you think it is possible to get it going by Christmas.
Mark,
I do have the trestle bents built and stained. Due to having little space between the bridge and the background area I want to complete that area, at least with the painting of the rock areas, before I start to build the trestle bridge into its place. Once I get that done, "I think" I should be able to construct the remaining portions of the bridge relatively quickly.
I've been working on the rock molds this morning, and I will continue with that tomorrow as well. Maybe by the start of next week I can begin the bridge.
Darren
That sounds good Darren! Looking forward to seeing the results
Looking awesome !!
I always check for updates on this thread. Really enjoy watching your progress.
Can't wait to see more-especially the trestle!
Congrats your layout is looking good.
Thanks all, I was able to make some more progress the past few days and get the trestle completed so I can run trains again, plus some additional work on the Roundhouse roof.


Access to this requires an OGR Forum Supporting Membership


