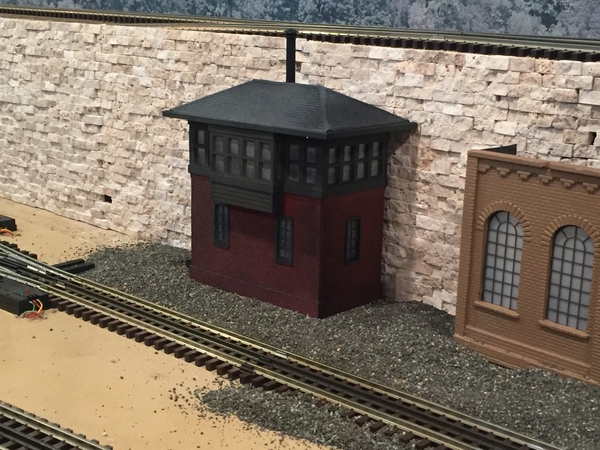
Good Morning Everyone. I will start off with something I have constructed in the past. Let's see what you have been working on.
Replies sorted oldest to newest
I scratch-built this structure from styrene to investigate working with plastic instead of basswood, which is my preferred material for models of buildings with wood exteriors. Pictured on my 12'-by-8' layout completed in 2004.
MELGAR
Attachments
MELGAR:
If you did not say styrene I would have sworn wood!
Joe
Starting on a new laser cut structure kit. First gave it a wood stain from Michaels and starting assembly. Still a little warped due to the stain.
Attachments
EMPIREBUILDERDAVE,
I go out of my way to avoid any warpage on my structures. On a building of this type I would have applied some bracing strips (say 1/8-inch square basswood) to the inside corners of the walls, around the insides of the window openings, and possibly elsewhere. I might also have added doublers (1/16-inch thick basswood sheet) to the insides of the front and rear walls extending all the way to the tops. (That could still be done on your model even at this stage if you think it's worthwhile.) I would then have assembled the walls and stained/painted them inside and out after the walls were assembled. Yes, there is a large front window so you want to be careful to have a realistic look on the interior bracing. My technique is certainly not the only way to do it, so this is just a comment, not a critique, and I hope you find it useful. And I don't think you will have a problem with this building. Please keep taking photographs during the construction process. I'm interested to see how you go about it, as well as the finished product. Who manufactured the kit?
Picture below shows a similar building that I completed in 2018 from a Bar Mills kit. It was difficult to preserve alignment and minimize warpage at the front due to lots of "glass" in the fragile front walls. And if you look carefully, you can see some warpage at the rear of the newsstand.
MELGAR
Attachments
Joe Fauty posted:MELGAR:
If you did not say styrene I would have sworn wood!
Joe
Thanks Joe. I just had a look at your website. Very impressive work.
MELGAR
At last I can post something here!
Here is a Coil Loading facility I am building it differs from my other buildings as this will have a fully detailed interior where my other structures don't.
It is 42inches X 18inches and will have a gantry crane among other things as well as all the track will be set in concrete (plaster, painted !). Roo.
Attachments
MELGAR posted:EMPIREBUILDERDAVE,
I go out of my way to avoid any warpage on my structures. On a building of this type I would have applied some bracing strips (say 1/8-inch square basswood) to the inside corners of the walls, around the insides of the window openings, and possibly elsewhere. I might also have added doublers (1/16-inch thick basswood sheet) to the insides of the front and rear walls extending all the way to the tops. (That could still be done on your model even at this stage if you think it's worthwhile.) I would then have assembled the walls and stained/painted them inside and out after the walls were assembled. Yes, there is a large front window so you want to be careful to have a realistic look on the interior bracing. My technique is certainly not the only way to do it, so this is just a comment, not a critique, and I hope you find it useful. And I don't think you will have a problem with this building. Please keep taking photographs during the construction process. I'm interested to see how you go about it, as well as the finished product. Who manufactured the kit?
Picture below shows a similar building that I completed in 2018 from a Bar Mills kit. It was difficult to preserve alignment and minimize warpage at the front due to lots of "glass" in the fragile front walls. And if you look carefully, you can see some warpage at the rear of the newsstand.
MELGAR
Thanks Melgar for the advice - I just saw this post and your building looks excellent! I plan to add some bracing to the false front if adding the roof does not completely work out the warping. My kit is an American Model Builders laserkit.
At this point I am not concerned about warp as I believe I can right it with some bracing. Thanks for the ideas!


