
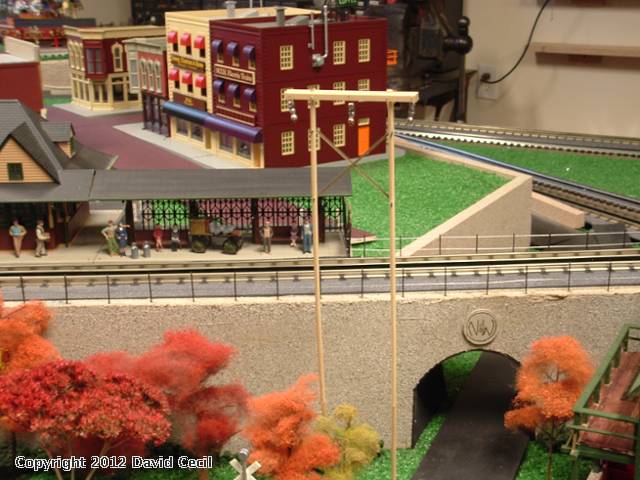
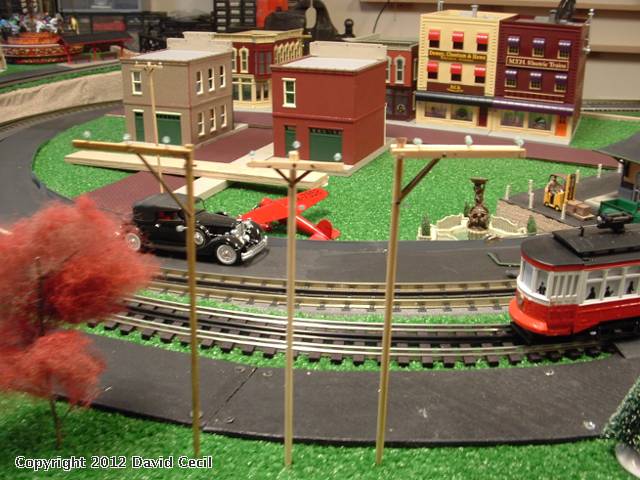
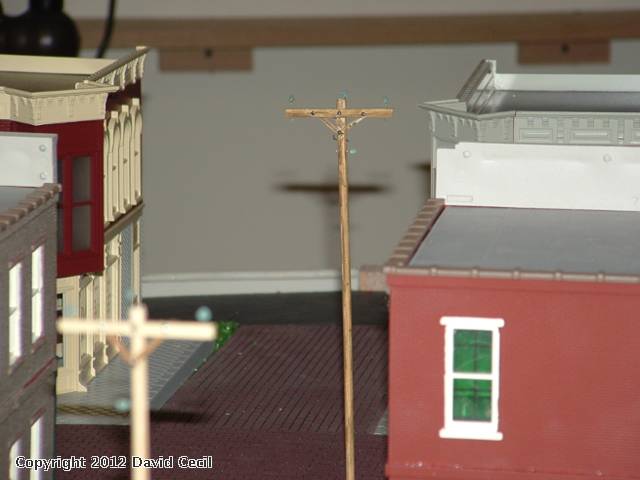
I'm trying to figure out where to put the poles. I've already decided on about 75-scale foot spacing (just a hair shy of 19"), but I can't decide where to place them. I have dual tracks (FasTrack) with about 6" track to track.

I know inside the inner track will keep them out of the way and allow for the best access to the track, cars, etc.

Between the tracks, at least, visually looks good to my eye and maybe more prototypical (if that matters).

Outside, while visually the most interesting, primarily due to the increased number of poles and the way they curve around the layout, offers the least access to the tracks.

Did I mention I was planing on also stringing 'wire' between the poles?

The poles are going to be set in holes drilled into the layout board, so it's not likely they're going to get easily knocked over, but track/car access has me a bit concerned.

Any thoughts or experiences that may help me will be appreciated.
Original Post

Replies sorted oldest to newest

In the real world City spans are typically 130 to 150 Ft. spans out in the country are 170 to 200 Ft. Poles weren't usually between the tracks as the lineman didn't want to have to wait for passing trains or get run over by them to get their work done so most poles are on the side of right of ways.

Now if you want to model poles in a town that will take much more explaining because in all the years as a model railroader I have never ever seen even the most detailed modeler ever get it right. I guess thats because unless your a lineman they'res no way.

One of these days I'm gonna put some diagrams up here and hopefully they'll make it a sticky of how to run poles for 1930's and 40's pre 1960's and modern era construction.

If you need something specific hit me up I'll be glad to answer.

David
quote:
Originally posted by DPC:
In the real world City spans are typically 130 to 150 Ft. spans out in the country are 170 to 200 Ft. Poles weren't usually between the tracks as the lineman didn't want to have to wait for passing trains or get run over by them to get their work done so most poles are on the side of right of ways.


Okay... so between the tracks is out. I saw a photo that showed it that way, may have been an European train and it seemed, at least in my mind, a good place to put them.

As far as spacing is concerned 30"-50" apart is a bit too far apart, the 19" spacing I've been playing with, while maybe not technically accurate, ascetically looks good on my small 10x16 layout.
quote:
Originally posted by Avanti:
quote:
Originally posted by George Lasley:
If you want to string wires the only way to go is Easyline. Get it from Senic Express.


Am I the only one who thinks that telephone wires don't look right unless they have a bit of a droop to them? I realize the practical advantages of the stretchy stuff. I'm just sayin'.


No, Pete, there's at least two of us. Smile
I'm # 3 and I agree.

You can install the stretchy stuff so that it droops, I suppose.

Real wire can never achieve a straight line when hung from two points. It will describe a curve called a catenary, regardless of how tightly you pull it. It's Mr. Gravity at work. click

Power and communications cables always have a sag to them, and in fact, the extra wire is figured into the engineering of installation, and the calculations of trouble-shooting, when dealing with copper telephone cable. Newer technologies, like coaxial (TV) and optical fiber cables do not weigh nearly as much as the old-fashioned stuff, so they will sag less, but they will never hang in a straight line.
quote:
Originally posted by Vulcan:
The lines are actually designed to sag. This is for expansion and contraction. If they were hung tight, when they contracted there would be a lot of lines popping.

Smile


Back when I lived in Wisconsin, those wires got mighty taut when it got down to 20 below. So I guess the stretchy stuff is correct in an extreme winter scene. Cool
David,

I would love a detailed response of setting 30's and 40's out west in California along the railroad especailly. Why are they always tilted?
They are short? Why, how short? Spacing?

Thanks,

ncng

quote:
Originally posted by DPC:
In the real world City spans are typically 130 to 150 Ft. spans out in the country are 170 to 200 Ft. Poles weren't usually between the tracks as the lineman didn't want to have to wait for passing trains or get run over by them to get their work done so most poles are on the side of right of ways.

Now if you want to model poles in a town that will take much more explaining because in all the years as a model railroader I have never ever seen even the most detailed modeler ever get it right. I guess thats because unless your a lineman they'res no way.

One of these days I'm gonna put some diagrams up here and hopefully they'll make it a sticky of how to run poles for 1930's and 40's pre 1960's and modern era construction.

If you need something specific hit me up I'll be glad to answer.

David
quote:
Originally posted by Vulcan:
The lines are actually designed to sag. This is for expansion and contraction. If they were hung tight, when they contracted there would be a lot of lines popping.

Smile


V your and arts conversation is good reading but funny.

Now All wires do have sag. Telephone even the new stuff is fairly heavy although the messenger that supports the cable is usually 1/4 inch guy wire(Steel)

Now with that said larger power wires 336 and 556 MCM do usually get sagged during construction using sag charts These charts are calculated to give each span the same amount of dip.

But the 4/0(Next wire size down from 336MCM) and smaller spans usually get sagged by us using a different method.Were the guys that are going to be fixing that junk with it swaying back and forth all over the place.

So 4/0 and smaller get sagged using the Linemans method and that's called

Come,Blister or Bleed. We use a 2500 pound rated nylon belt hoist and jack er till she won't jack no more.

Nothing worse than being in a high wind working 34,000 volts with the wire whipping around.

They don't pop because stranded wire will stretch quite a bit . most companys don't use copper anymore for overhead wire .they use a hard drawn aluminum and it's very strong.

On an O scale layout I wouldn't worry to much about sag.

David
quote:
Originally posted by Scrapiron Scher:
Could someone suggest a good source for wood O scale telephone poles?

Eliot


You,


With your modeling ability you can make em just as easy.
I use The Bamboo Skewers from kroger. The rail road typically uses 30 Ft. poles on the right of ways . Power poles(Yea all of em aint Telephone poles)
are typically 40 Ft. tall
Wooden cross arms are 8 Ft long and in special cases 10 Ft. long
Cross arms are 4 inches x 5 inches so I just try to get it so it looks right
It's hard to get wood that small and still be able to work with it
2 insulators go on the arm and one on top of the pole(If you need a reference look out the window LOL)

I just use Green beads with a straight pin in the middle don't push the pin all the way down leave a small gap(You can wrap your wire/string around it.
The cross arm braces I make out of brass but I was just wondering about paper match sticks Hmmm....might have to try that LOL.

So you have 3 wires on top for a 3 phase line and one wire below it 3 feet down for your neutral .If you branch off for houses and the like where the load is lower you just have a pole, no cross arm one wire on top and one 3 feet below it.
Once you've got a pole complete I just give a coat of rail brown and it looks pretty nice.

Guying:
Railroads typically use another pole laid against the pole with the wire on it.
This is called Push Brace construction.You don't see this very much with power in towns because it's ugly and takes up room.In towns you usually see guy wire.

ncng,

The poles tilt because they can't ever be set in a perfectly straight line and over a period of time the wire will make them move.
This is especially true in your climate where they did a lot of blasting
It's hard to get the poles tamped around tightly and when it rains that material around the pole loosens.

David
quote:
Originally posted by Scrapiron Scher:
David,

Many thanks for your tutorial.
Your poles must be winners !!

One of my issues is time and preference.
I need to complete a line of kits out the door and complete lots of scenery.
In between, I try to run the trains a bit, LOL.

Eliot

Elliot I know what you mean .I think it's safe to say that for most of us if a layout is ever done ....So are we

But until the time we're amongst the Dearly Departed it keeps us out of trouble and for the most part out of the wife's hair and gives us just a little something to do.
LOL

David
I thought I would post a few pic's as to what the Bamboo skewer pole looks like
And some explanations.

In this photo we have something called an "H" structure . These are usually for Sub-Transmission,meaning they carry power from one substation to another
The poles are 10-12 inches in diameter and usually 65 to 100 feet tall depending
This one in the pick is a scale 65 feet


In this pick we see two different kinds of poles . The one in the middle is a typical 3 phase pole that would be found most anywhere.The one to the left and right are called Alley Arm poles. These you'd find in towns that still had overhead wires and were/are used to get the wire away from buildings
The Alley Arm pole with the single arm is for where the wire is in a straight line but whenever the wire has more than a slight corner on it we use double arms to withstand the extra strain.


Hope this gave you guys some more ideas

David
quote:
Originally posted by willbacker45:
Great David!

I have a couple spots where the poles will need to cross the tracks? What are the rules on that?


Crossing railroad right of way the poles should be 65 scale feet tall,double arms and the wire dead ended on both sides of the arms.Both poles will also have down guys pulling the poles away from the tracks.

I'll try and post some pic's of what dead end poles look like.

They use an insulator that attaches to the poles horizontally not the "pin" insulator for the arms.

David
Remember that selective compression can be used for distances between poles as well as for height. Since our layouts are selectively compressed (think of scale miles actually covered), placing poles at prototypical distances apart or at the correct height above your tracks will spoil the illusion you're trying to create.
quote:
Originally posted by DennisB:

.... placing poles at prototypical distances apart or at the correct height above your tracks will spoil the illusion you're trying to create.


Exactly. This is one more instance of where it is more important to go for the "right impression" rather than exactly scaling the prototype.

Numerous "tricks" can be employed on a layout to give the impression of distance or to create a certain "feel", such as that of a busy city, for example, even if space is limited.

If you have a scene where the poles are placed along a road or track that goes away from the viewer, you could even gradually shorten the distance between poles and decrease their height as they recede into the distance. This forced perspective will increase the apparent depth of the scene.

Limiting the number of wires on a series of poles to fewer than called for on the prototype may also be necessary to make your poles fit in better with the overall scene and not overpower (sorry, bad one! Big Grin ) it.

Just as in the case of selective compression of large buildings, exact scale is not always the most realistic option for the typical layout if everything is to remain in balance with each other. Smile

Jim
I agree Jim,

I think if you wanted to do 1930's utility construction most don't have the room or most likely the clearance to do it right . They ran huge amounts of un bundled wires back then. It may not look right but thats the way they did it.
Most modelers wouldn't want that mess of spaghetti on their layouts.

David
Post

OGR Publishing, Inc., 1310 Eastside Centre Ct, Suite 6, Mountain Home, AR 72653
800-980-OGRR (6477)
www.ogaugerr.com

×
×
×
×
Link copied to your clipboard.
×
×