
A little while ago, I decided that what a layout really needs is a donut shop like Randy's:

Randys Donuts

For those not familiar, Randy's (up on Manchester, near LAX) is an LA landmark.  It appears in multiple movies (such as Ironman), and has even been visited by the Space Shuttle (en route to the Science Center).  The donuts are pretty good too.  I've seen Randys-esque donut shops modelled before, so I'm not being totally original here.  Here's a pretty darn good one at a layout at a train show in Orange County:

IMG_3069

I'm going to make mine using a dog toy and an MTH concession building... so it won't be an exact model, but it should be relatively easy and it should be fun.  I seem to have more fun on kitbashes and mods that I do on scratch-builds.  More to come shortly.

IMG_3101IMG_3805

-Dustin

Attachments

Images (4)
  • Randys Donuts
  • IMG_3069
  • IMG_3101
  • IMG_3805
Last edited by frizzinbee
Original Post

Replies sorted oldest to newest

mike g. posted:

After your last project, I can't wait to see how this one turn's out. I bet just like the last one it will be quite the buzz!

Thanks Mike!  Hope I can live up to your expectations

-------------------------------------------

I've made a little progress on the Donut Shop.  The Donut has been primered (Rustoleum 2x Double Coverage... great stuff!) , and the scale looks just about right.

IMG_3819

The roof detail is a little blah, and too shiny around the perimeter.  I'll paint up the vent and HVAC unit, and weather-up the vent.  The roof itself will probably get the rock coat treatment.

IMG_3829

I disassembled the concession stand.  I think I'll end-up replacing the frosted window shown below with clear window glass.  Interior lighting will go from a single incandescent to a small LED strip.

IMG_3831

The roof sign will be removed, as it would detract from the big donut.  I'll fill the holes before painting the roof.

IMG_3832

Here are the roof HVAC and vented painted silver.  I plan to weather them up a little next.  The round vents are for another project (see the Breen Building)

IMG_3899

Here's  a test fit of the big donut before I begin painting and detailing.  I drilled out holes and inserted dowels, then marked out where it should pop through the roof and drilled holes through there too.  I think the donut sits about 2-3 cm too high, so I'll correct that next time.

IMG_4011

-Dustin

Attachments

Images (6)
  • IMG_3819
  • IMG_3831
  • IMG_3832
  • IMG_3899
  • IMG_4011
  • IMG_3829

Thanks to everyone for all the compliments!  I don't have much progress to share, but here's what I've gotten done in the last few days.  First, I filled the holes in the roof that held the sign.  After this white wood filler dried I sanded it, then added/sanded a bit more to help keep it flush.  The advantage of the rock paint is that it should be pretty forgiving of any imperfections.

IMG_4061

I also "improved" the fidelity of the brick work by applying light spackle.  It's just like grouting a tile floor, but on a really small scale!  I spread it in, then went over it lightly with a damp cloth to clean up the surface some.  I'll chip away any remaining excess once it dries, then dullcote.

IMG_4066

Here's the new brick look, prior to any touch-ups.  I think it adds some depth and makes it look less plastic-y.

IMG_4078IMG_4080

Attachments

Images (4)
  • IMG_4061
  • IMG_4066
  • IMG_4078
  • IMG_4080
Last edited by frizzinbee

Made a little bit more progess on the Donut Shop today.  I masked the roof and painted with rock paint:

IMG_4077

IMG_4102

IMG_4104

IMG_4292 

We also scoped out a spot on the club layout for the Donut Shop when its complete:

IMG_4222

The Donut place will very likely go where the red brick building with the water tower currently sits on the Club layout .  That building, in turn, will be further detailed and placed in a different area of town.


-Dustin

Attachments

Images (5)
  • IMG_4077
  • IMG_4102
  • IMG_4104
  • IMG_4292
  • IMG_4222

Made some solid progress on the donut shop over the weekend!  The roof is pretty much done.  I re-did the border with semi-gloss black, detailed the HVAC and vent, and reinstalled them:

IMG_4292IMG_4325IMG_4327

I also cut out the floor of the donut shop and test-fit it.  I'll print and install the floor before I glue it in place:

IMG_4432

IMG_4434

Next I measured and cut the rear bulkhead (wall), which will serve as a place to mount some donut shop interior scenery:

IMG_4435

IMG_4437

The translucent windows that came with this stand will be replaced by clear windows.  I used the original windows as a pattern to create a replacement set.  I left the protective film over the plexi so as to minimize fingerprints (or at least not get the glass all fingerprinty before I have to):

IMG_4438

Test fit of the windows looks good!

IMG_4439IMG_4442


I trimmed down the GDSPs (Giant Donut Support Pillars) by 3cm so the donut sits lower, mounted them for painting, and painted them black.  My painted stand (where the pillar are mounted) is (surprisingly) on of my handier tools... it actually started out as a makeshift bridge support on my layout.

IMG_4444

IMG_4445

Here's a shot of the roof on the shop:

IMG_4457

You can see here I painted the outside counters in wood color.  I also finished covering over the original sign (in prep for a new decal), as ownership confirmed this donut shop will not be serving Italian Sausage.

IMG_4458

Oh, and the donut is painted tan!

IMG_4460


-Dustin

Attachments

Images (15)
  • IMG_4292
  • IMG_4325
  • IMG_4327
  • IMG_4432
  • IMG_4434
  • IMG_4435
  • IMG_4437
  • IMG_4438
  • IMG_4439
  • IMG_4442
  • IMG_4444
  • IMG_4445
  • IMG_4457
  • IMG_4458
  • IMG_4460
Last edited by frizzinbee

Morning Dustin,  You make things looks so easy and wonderful. You should do a how to video on here or the tube. I bet you would have tons of followers. The donut shop is looking great, now everyone is going to need one on there layout. Better be careful Menards might pick up on this! LOL

mike g. posted:

Morning Dustin,  You make things looks so easy and wonderful. You should do a how to video on here or the tube. I bet you would have tons of followers. The donut shop is looking great, now everyone is going to need one on there layout. Better be careful Menards might pick up on this! LOL

Thanks for the compliment, Mike.  I don't know about videos... I already stay up late to squeeze in a little layout work here and there!

Forty Rod posted:

I'm waiting to see how you make a few hundred doughnuts, crullers, maple bars, etc to fill your display cabinets.

Funny you should mention that... I'm trying to figure that out as well.  I made the interior below, but decided that I really didn't care for it.  The rear wall looks slipshod, and (even from a distance) a little too 2D:

IMG_4461

...so I ripped it off and did a little experimenting and pondering tonight.  Still not quite sure how I want to do that wall, but it will be more dimensional if nothing ele.

IMG_4485

I also gave the outside "wood" shelves some color variation (via some raw umber paint drybrushed on) and steel wooled (use 0000) the outside of the building.  One of our club members suggested this method to take off the plastic "shine" and clear-off any excess joint compound.  I think it worked nicely, and would recommend it also.

IMG_4486\

IMG_4487

I was also able to do the decals for the donut.  I'm pretty decent at decals - I've decaled a whole train with large, complex, multipart decals - and this was HARD. Putting waterslide decals on a textured rubber dog toy is no sure thing.  I had to apply most of these letters multiple times to get them right.  It's still not perfect, but in this case I am forced to settle for acceptable:

IMG_4489

Here I'm just applying a piece of square dowel (with holes pre-drilled) to help secure wires once lighting is installed.

IMG_4491

Here is the decal sheet I used for the donut.  This was the most affordable pre-made sheet I could buy with letters the right size.

IMG_4492

-Dustin

Attachments

Images (7)
  • IMG_4461
  • IMG_4485
  • IMG_4486
  • IMG_4487
  • IMG_4489
  • IMG_4491
  • IMG_4492

A little more progress today and yesterday.  Not much, but I'm closing in on the finish line.  I finished the "improved" interior rear wall.  This time I have a more 3D donut case, a view into the kitchen, better signage, and a black background.  I think this is much better:

IMG_4506

It looks better through the glass than it does from the top. ....which reminds me, I also got the clear glass windows installed and glued in place.

IMG_4509IMG_4510

I also put donut menus on the side of the building, where there were originally hot dog menus.  The donut menu is the actual menu from Randy's Donuts.

IMG_4513

...and here's a shot of my handy spray clamp

IMG_4514:

-Dustin

Attachments

Images (5)
  • IMG_4506
  • IMG_4509
  • IMG_4510
  • IMG_4513
  • IMG_4514

Very nice, indeed!!

Well, every time I see a donut shop...1:1 or 1:48, et al...I recall THE place to get donuts in my hometown, Washington, D.C.....back in the 40's-50's, anyway!  On every blue box of donuts was the following image/creed....

Donut creed

It's timeless, as well as pithy, methinks. 

Mayflower Doughnuts had its origin in downtown NYC, West 45th Street, a creation of Adolph Levitt.  All gone by early 70's.

Anyone else old enough to remember them??

(Sorry for the 'Tootle-like Daisy-Picking' here.....!)

KD

Attachments

Images (1)
  • Donut creed
Last edited by dkdkrd

imageHi Dustin . First let me tell you what a great job! Also let me say thanks !!!! I've been contemplating building one of these based on the Walthers HO kit, but had no idea what to use as the doughnut on the roof. What you came up with is brilliant ! Who would have thought to use a dog toy?!!Anyway, can you tell me what store you bought your dog toy at. Also when I do my building, I think I'll build it without lettering on the doughnut like in the Walthers kit. I also posted a picture of the Walthers model.

Thanks;

Mike

Attachments

Images (1)
  • image
Mike welkie posted:

imageHi Dustin . First let me tell you what a great job! Also let me say thanks !!!! I've been contemplating building one of these based on the Walthers HO kit, but had no idea what to use as the doughnut on the roof. What you came up with is brilliant ! Who would have thought to use a dog toy?!!Anyway, can you tell me what store you bought your dog toy at. Also when I do my building, I think I'll build it without lettering on the doughnut like in the Walthers kit. I also posted a picture of the Walthers model.

Thanks;

Mike

Mike,

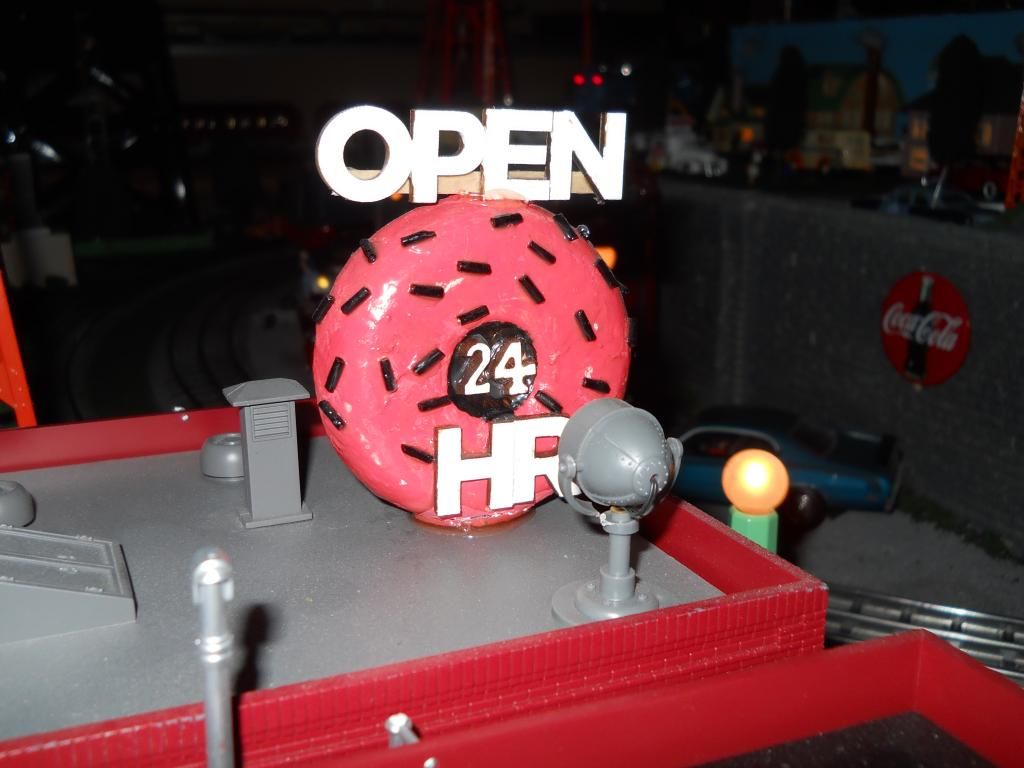
Per our conversation offline, we actually bought the donut several years ago and I just recently stole it from my dog for this project (he was compensated with treats).  I haven't seen one in a pet store for a while, but think you can find something similar online.  The donut is approx. 14.5cm in diameter.

-Dustin

------------------------------------------------

Over the past week, we've completed the donut shop!  It's ready to install on the AGHR club layout this weekend.  Here are the latest pics:


First, I installed the LED lighting up front, attaching it to the underside of the roof.

IMG_4584

Next, I re-worked the interior and we picked-out two workers for the interior (the manager, and a somewhat surly looking employee):

IMG_4586IMG_4587

I think it looks pretty good from this angle.  The menu on the side of the building (left) is the actual Randy's Donuts menu:

IMG_4589

Interior, from the top.  The marks on the floor are where the pillars will go.

IMG_4591

Assembly complete and lighted for the first time:

IMG_4744

IMG_4746

IMG_4747IMG_4750

The first customers arrive (or, testing how the surrounding décor will look with the model):

IMG_4762

First customer sampling the merchandise:

IMG_4764

IMG_4768

Second customer flies by to check out the new donut shop:

IMG_4769

IMG_4773

Added some light weathering for a bit more realism:

IMG_4791IMG_4793

Also added a power box and conduit on the back:

IMG_4795IMG_4798

...and finally, we took a victory lap over to the REAL Randy's:

IMG_4817

Model and prototype, together for a quick photo op:

IMG_4824


-Dustin

Attachments

Images (20)
  • IMG_4584
  • IMG_4586
  • IMG_4587
  • IMG_4589
  • IMG_4591
  • IMG_4744
  • IMG_4746
  • IMG_4747
  • IMG_4750
  • IMG_4762
  • IMG_4764
  • IMG_4768
  • IMG_4769
  • IMG_4773
  • IMG_4791
  • IMG_4793
  • IMG_4795
  • IMG_4798
  • IMG_4817
  • IMG_4824
mike g. posted:

Once again, great looking work. It must be nice to have the real thing to help out when modeling?

Thanks Mike!  Having the real thing nearby is certainly handy... and delicious.

Pat Kn posted:

Great work Dustin. It looks fantastic. 

Thank you!

sphillyj posted:

Boy, are we lucky to have you Dustin! Just a wonderful, as always, work of art.

Thanks again for your hard work.

Jeff

Thanks Jeff, I appreciate the compliment. It was fund to build, and hope our visitors enjoy it.

AGHRMatt posted:

Hey Dustin.

Saw the donut shop today. Sorry I missed you and your family. The shop looks fantastic, especially with the interior lit up (thank you Dave O'Connor)! Somewhere in one of my boxes, I think I have another 1950's police car to go with the ones you have parked in front. Great job!

No worries, Matt, and glad you like how it came out.  We couldn't stay too long on Saturday as we had a full slate of activities -including dying our Easter eggs - planned.  Many thanks to Dave for wiring it into the club layout the same day we dropped it by.  An additional police car would look good!

Chris Lonero posted:

Nice job! I did something on a smaller scale on top of my Maple donuts shop. 

That looks good Chris, I may borrow that idea someday if I build a donut shop for the home layout.

jrmertz posted:

Awesome work, where did the O Scale ironman come from?

Ironman is actually a Heroclix figure (which I understand to be some kind of role playing game).  Heroclix figures are available on ebay, and are pretty darn inexpensive. The scale out to be slightly large (some people/figures would be 7 feet tall in our train world), but all-in-all I think they work great.  I've even taken one of the figures (the Scarecrow) and converted it into a Waldo.  I learned about them from another discussion here on the forum, so if you search "Heroclix" some other info may come up.


-Dustin

Add Reply

Post

OGR Publishing, Inc., 1310 Eastside Centre Ct, Suite 6, Mountain Home, AR 72653
800-980-OGRR (6477)
www.ogaugerr.com

×
×
×
×
Link copied to your clipboard.
×
×