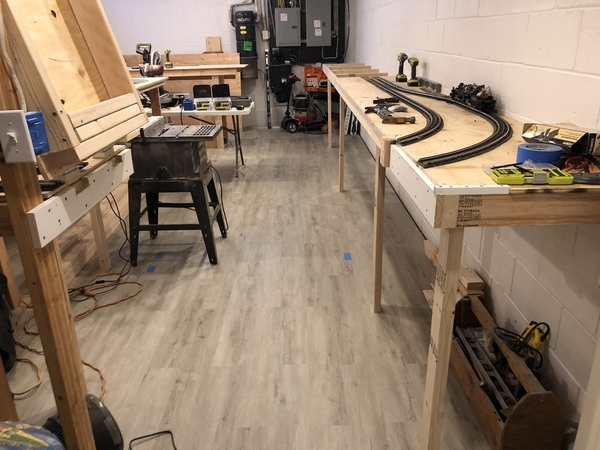
John, That is a very good point. Some rooms just aren't designed for around the wall layouts. What were these builders thinking????? ![]()
Mark Boyce posted:Alex, your father and uncle taught you well!
My dad started me out at that age or earlier, but I couldn't make a straight cut to save my life. He had no power tools, we did EVERYTHING with muscle power, sawing, drilling, even cutting up trees with a two-man crosscut saw. I have two cordless drills and a good hand power saw. I still can't make a straight cut!
Electrical is a different story, I worked 43 years in electrical/electronics.
Your photographs confirmed my idea for the around the wall benchwork is sound! Thank you!!!
Hi Mark,
I decided to go with around the wall layout to make things easier, only draw back is i have to have a swing up bridge of some sort. After thinking about either climbing on the layout or crawling under the layout and popping up through cut outs, i would much rather lift a bridge up and walk in. I'm hoping this coming weekend to start on some kind of pass through.
Thanks, Alex
gunrunnerjohn posted:I considered the around the walls idea, but there are so many openings in my space that it wasn't practical.
Yes i agree if it's not practical , there's no sense in doing it . There's only one way in and one way out of my layout room, so it was a perfect idea for me
Alex
I have to ask, are you taking up your work area building the layout, or is that somewhere else? ![]()
Alex, Yes I too am going to use a swing up bridge to enter the layout. Actually two bridges at one location because the tracks will be at different levels.
Well you know what they say Alex, running trains in any way is better than not running trains at all. Space is space. I still have only my tiny Christmas tree set up as there is no space or time currently. See what the future brings as always. As my late mother used to say, "have room for that in the next house."
It looks great! There's a lot to like about keeping things simple. Will you be wiring your switches or operating them manually?
Thanks for sharing progress.
-Greg
gunrunnerjohn posted:I have to ask, are you taking up your work area building the layout, or is that somewhere else?
My work area is located in my 2 car garage. One side is my repair shop the side is for a car or storage.
Layout room is in the basement , next to my mom's apt.
Alex
Mark Boyce posted:Alex, Yes I too am going to use a swing up bridge to enter the layout. Actually two bridges at one location because the tracks will be at different levels.
Hi Mark,
Do you happen to have any photo's of your swing up bridge , if yes can you post them here
Thanks, Alex
Greg Houser posted:It looks great! There's a lot to like about keeping things simple. Will you be wiring your switches or operating them manually?
Thanks for sharing progress.
-Greg
Hi Greg,
A very good question , Most will be manual throws , one or two will be remote. I actually enjoy throwing my only switches.
Thanks, Alex
ALex
Looks good if not for the home i'd volunteer for a few days to help out. Keep posting pictures and videos.
Stay well
Alex M posted:Mark Boyce posted:Alex, Yes I too am going to use a swing up bridge to enter the layout. Actually two bridges at one location because the tracks will be at different levels.
Hi Mark,
Do you happen to have any photo's of your swing up bridge , if yes can you post them here
Thanks, Alex
Alex,
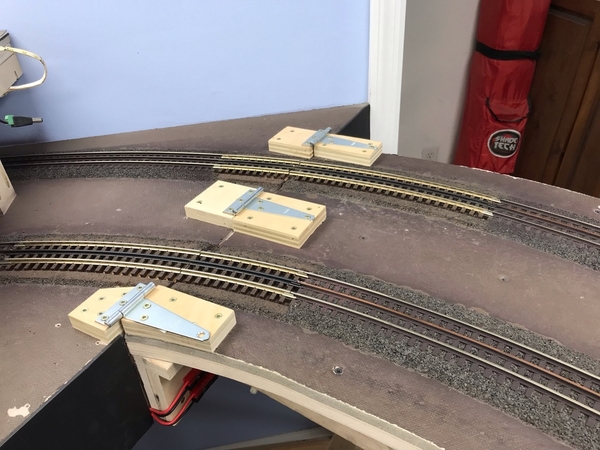
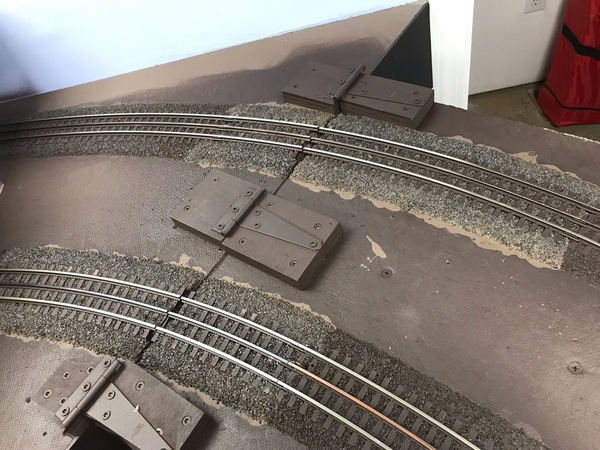
I have not built the swing up as only one side of the benchwork has been built. I have one of the bridges, The Menards 24" single track bridge, that I planned to use before deciding to use it for the swing up. I still have to figure how I will recess the hinge so it is below track level, and also how to make sure the track won't bind. I don't want to make them swing down because I will probably bump into the bridge while walking through.
Mark
Mark,
" I still have to figure how I will recess the hinge so it is below track level, and also how to make sure the track won't bind. "
The trick to making sure your track doesn't bind is to ensure that the hinge pin is above the top of the rail. That way when you lift the bridge, the first motion separates the rail. Mounting low, and the first motion closes the gap between the rails.
The hinge we used on Geezer Gorge is like:
My best suggestion is to use scenery or a structure to hide it.
Gilly@N&W posted:Mark,
The trick to making sure your track doesn't bind is to ensure that the hinge pin is above the top of the rail. That way when you lift the bridge, the first motion separates the rail. Mounting low, and the first motion closes the gap between the rails. The hinge we used on Geezer Gorge is like:
eBay item number:253001448111My best suggestion is to use scenery or a structure to hide it.
Tom,
I found it, copied the information, and printed. Thank you very much for the suggestions!!!
Mark
Attachments
Hello everyone,
First i would like to say thank you for all of your input and comments. Hope everyone is safe and healthy.
I made great progress this weekend, as you will see in the pictures and video.
Will post photos and pictures shortly.
Thanks for looking, Alex
Attachments
Looking Good Alex, you're really cruising along! ![]() You'll be running trains in a couple of days!
You'll be running trains in a couple of days!
Alex, Good work. Nice tips on the lift up section! I'll be doing one also. Thank you!!
Alex,
You're getting it done man! Things are moving along very nicely. I'm still new to terminology with certain aspects of the hobby, but what style of bench work would you consider this?
Dave
I see a visitation somewhere in the future, when its safe to travel again Nice work
Brilliant work Alex... keep the updates coming!!
Looking great!!!👍👍👍👍👍👍👍👍
Alex, thanks for another excellent update with info, photos, and videos, as well as future development.
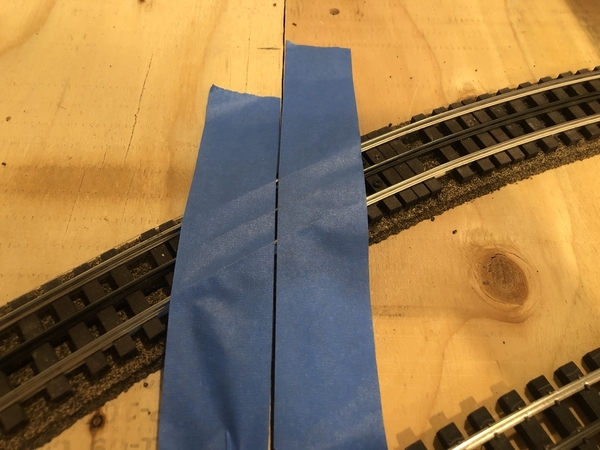
Question: how did you physically make the cuts for the lift bridge--at both ends. I saw and heard about hot gluing and many track screws; but, how did you make the cuts? I ask, in part, because the rail gaps/kerfs at the open end of the lift bridge seem to be quite small.
Thanks, again, for a fine update.
Alex, Man your moving fast! Your bench work looks top notch!![]()
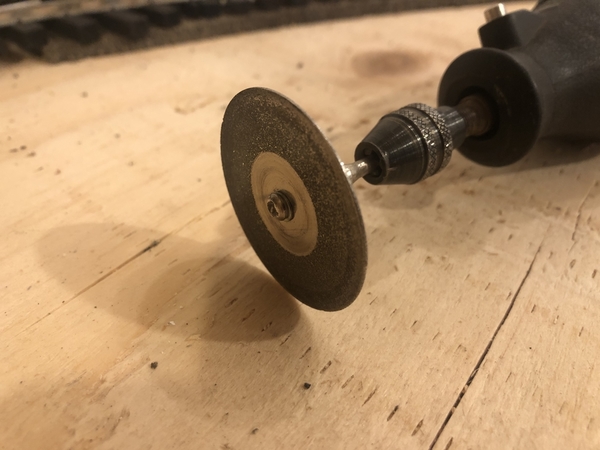
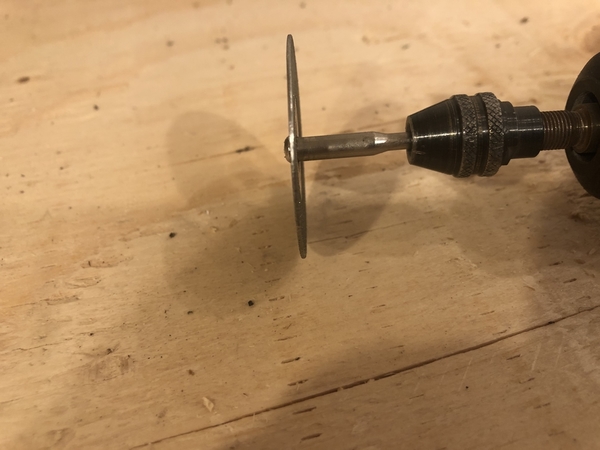
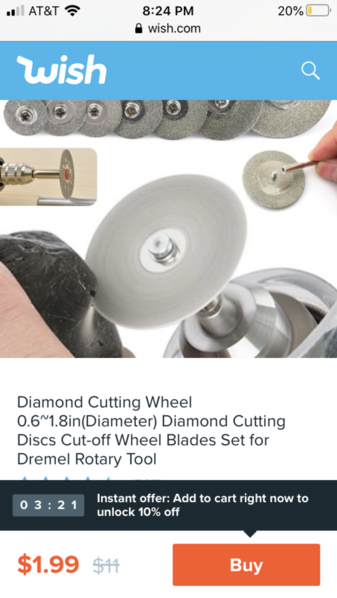
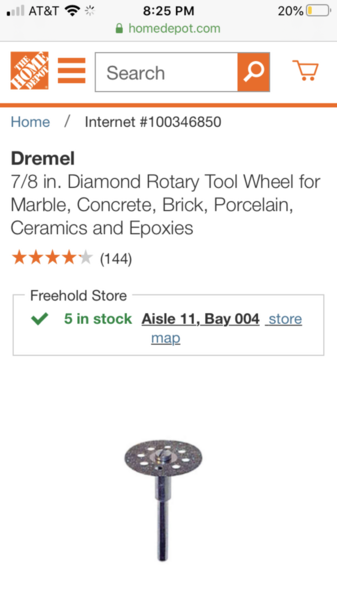
That's a big wheel Alex, what size is that cutoff wheel?
Looking great Alex!!!!
Alex, outstanding work. Nice to see you progressing on the new layout!
Very cool Alex. Lift bridges look great. Are you going to have tunnels, and bridges over water? I know that is maybe way to early to ask, but curious.
Nice neat work Alex. Glad to see you making progress again.
Andy
I'm liking that design Alex. Easy reach to everything. Manual switch throws. Simplistic. Great job buddy! I'll sure to stay tuned on your progress.
Alex,
I’ve been following but not posting much. Great looking work as usual! Hopefully when things settle down I can send you a couple upgrades to do for me if you are still taking on the work.
Be safe and take care,
Richard Gonzales
Richard Gonzales posted:I’ve been following but not posting much. Great looking work as usual! Hopefully when things settle down I can send you a couple upgrades to do for me if you are still taking on the work.
He will be needing money to continue the layout, so I think you probably are in good hands. ![]()
Hello all,
Was able to get a bit more complete last weekend and today.
QUESTIONS ANSWERED
DAVE , There will be a mountain and tunnel scene, also a possible trestle crossing.
Richard, you're welcomed to send me upgrades anytime.
Dave (luvindemtrains), there's not really a name for this benchwork. I call it it STRONG construction LOL. I build everything out of 2x4's with 1/2 plywood for the surface. I also use bracing.
Once again I thank all of you for your kind comments and input.
Thanks for looking,
Alex
Attachments
Hey Alex - Looks great
I love the layout so far - perfect manageable size - really going to enjoy watching you build this thing
Take care
Joe S
Looks great Alex... I’m def coming to you for some tips and tricks when I’m ready to build mine!
You're cruising along at a good pace Alex, you'll be running trains in no time!
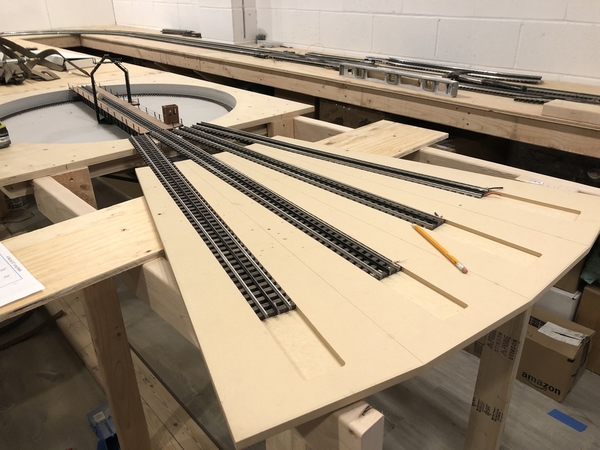
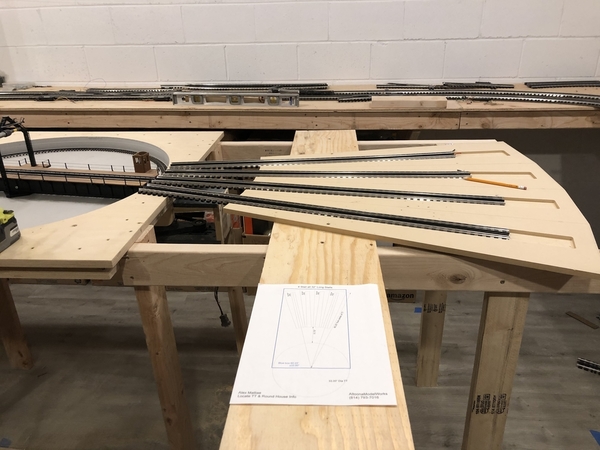
Alex, that is a really nice job you are doing. The turntable and roundhouse area will look great! The boards you put in place to hold the flipped up sections are neat, and thank you for showing how you make the ~65 degree cuts.
Looks great so far Alex! The room is a perfect size andI like the design. You can do a lot with that, which I'm sure you will.
LOOOOKING GOOOOOD
Thanks for another excellent and impressive update, Alex. The tips on supporting the lift-ups and providing support are most welcome.
QUESTION: I looked on Amazon and eBay and am not confident I've found the cut-off wheel you use for those very narrow kerf cuts. Please supply a vendor/product identification for the wheel you used.
Thanks, again, for the photos and videos--very generous of you to do so.
Alex,
As stated before nice, neat, and clean work you're doing. I envy the manageability of your set up. There's plenty of opportunities for scenery etc. Keep the wonderful progress coming.
Dave
Looks good Alex. Question. Did you lose your membership card to the human race
Say.....if you want a 65 degree cut, why don't you just set your saw to the "other side of 90"/your center and make a 35 degree cut in the opposite direction while keeping the 2x4 flush up against the saw's fence? ![]()
Well done Alex ! the framework is plenty heavy duty ! One suggestion I will make isto consider adding a radius to the outside corners of your benchwork! It really makes a nice smooth transition and you wont catch your hips or body on them when you walk around! Regards, Clifford.
Attachments
Great work on your lay-out, the speed you are working is unbelievable. Did miss your post last week glad you entered it in today's post. Will we see train running next week?
Redball342
Alex,
Speaking as a beginner, thank you(!) for taking the time to post all of these updates. I just spent the last 30 min reading the entire thread. I am inspired by the quality of the work and the ingenuity you’ve displayed. I’ve gotten so many ideas from your methods that will help solve some of my layout room issues. I will enjoy watching your progress!
Awesomesauce Alex. One heck of an update, everything looks great. Can't wait to see more, especially the Roadhouse work. Were you going to have coaling tower/coaling dock, sanding tower and any maintenance facilities if space is available to do so?
Your moving right along Alex. Thanks for the updates! Trains will soon be running.
gunrunnerjohn posted:You're cruising along at a good pace Alex, you'll be running trains in no time!
Not to highjack, Alex's thread informing us of the terrific progress he's making but, GRJ, you don't seem to be reporting lately on how far along your layout progress has gotten. Will we soon see a thread updating progress on your efforts?
Looking great Alex! Moving right along! Can't wait to see more progress ![]()
Hello all,
Thank you all again for the kind comment's and input.
Joe, thanks my friend.
Byron, welcomed anytime
GRJ, I'm flying, but soon the rough stuff begins. It will slow me down lol
Mark, thanks buddy.
Skip, thanks very much.
Steve, love that clip lol
Carl, I'll post pictures below, of the cut off wheel
Dave, thanks very much.
Ben, thanks! (you finally got me on a Honeymooner line ) LOL
Berkshire President, you got me on that one ! I can't understand what you mean lol. Would love to see how you do that? Can you post a picture or video ? In the past I've worked with master carpenter's and we've always cut greater than 50 degree angles by angling the 2x4 to the needed angle.
Cifford, Absolutely will ease all corners
Redball, most likely have trains running in three weeks
Scott D, I'm glad i could be of help , that's what makes this forum the best !!!!
Dave NYC, will have a coaling tower, Maintenance facilities
Johnny , thanks cakes LOL
Lancer, thanks ver much
Alex
Attachments
Thank you Carl for asking, and Alex for posting the cutoff wheels. In the past, I used the Dremel 'plain Jane' cut off wheels that aren't very large in diameter. These should make it much easier. Thank you both!
Short update this time around. Not to much done.
Attachments
You're speeding along Alex, trains running on time soon! ![]()
Looking good. Cant wait to see trains running.
Alex, your moving right along, I really like the roundhouse and how your going about building it! I also like to just sit back a listen to you talk and listen your East cost accent! Very cool!
Alex, thanks for the cut-off wheel info--I missed it earlier.
And thanks for another update; especially the parts for the Roundhouse--that's some project in its own right.
Looks very good Alex. Roundhouse will be dynamite I'm sure as well. I know I would get lost doing that, would take me probably 4 months to complete, lol(the roundhouse).
Looks great!
Peter
Looking good Alex!
Wow looks good. Beautiful work.
Hopefully, I'll have a chance to see it in person some day!
Dotty, I'll just bet you have an open invitation to visit Alex anytime you like. ![]() Nice to see you posting here.
Nice to see you posting here.
Thank you, John. My first time back on the Forum since the end of January. Part of the grieving and healing process. Back to friends, trains and, in these disruptive and scary times, back to as normal as we can be. What better place to start than JADA RR?!
What place indeed Dotty, Alex is one of a kind! I think we all miss Marty, he has left a void that has been very difficult to fill. I'm sure you know that only too well, and it is good to see you around again. We may actually catch up with you at York if that ever happens again.
Dotty - seeing you post here today definitely made my day! ![]()
-Greg
Thanks for the update Alex. Where did you get those switch throws?
Looking fantastic Alex.
Love seeing the progress on your layout and it is nice to see Dotty back on the board.
Great update and nice progress! Looking forward to the trains running as I’m sure you are too!!
Hello everyone ,
GRJ, yes I'm speeding along lol
Steve, thanks. Trains are running today
Mike G, Thanks very much. My accent is a brooklyn NY one LOL
Carl, Thanks
Dave , Thanks
Peter, Thanks
Doug N , Thanks
Gweedo, Thanks
Dotty, Nice to see you post , Also you're welcomed here anytime
Johnny cakes , Thanks Switch throws are Caboose ground throws , i bought them from Ross switches
Charlie , Thanks . Would love to see your layout progress too
Bob, Thanks
Big truck pete, thanks
THANKS AGAIN , Alex
Here’s another update
TRAINS ARE RUNNING !!!!
Also a shout out to Johnny Trainnut for helping me with the control panel a few years back.
And another shout out to the NJ-Hi Railers for a beautiful beer freight car consist.
Attachments
Looking good Alex. Those Caboose ground throws are great. I have been using them for years. Nothing like throwing your own switches manually & a lot less wiring & trouble shooting later. Your Round House reminds me of the time 30 years ago when I was building ours. I had to get my wife to help me. Through her patience we got it complete as I was ready to put a fire ax to it. LOL.
Good choice of background music with Bobby Darin.
Just saw the videos. Awesome. Your wiring is exceptional. Keep us updated.
Awesome Alex! 👍 Nothing like getting that first train running on a new layout!
"I gotta get back to a helluvua lotta repair work".....LOL! Thats because there are only a handful of good techs like yourself Alex.
Nice to see your inaugural run, looking forward to your progress.
Fantastic, you have to be thrilled to see trains running again, I have to get off my butt now! ![]()
Great steam run Alex. Looks really good, little scary on that one turn as it looks like you're close to hitting the wall. Of course you had the numbers figured out way before setting up, but it does look like a close shave in that corner with room to spare.
That beautiful set of cars with that ugly pu engine. Don’t you have anything good like Erie or lackawanna
Alex,
Great to see you running trains. Your layout is coming along nicely. I’m sure you’ve been having fun to finally getting around to building your layout. Thanks for the updates.
Alex, that is great seeing the Greyhound and neat train running around your layout! Congratulations!!
Alex, your wiring was obviously done w great care. As I am planning my first layout where I’d like to run both DCS and Legacy, can you tell me how you arranged to wire both systems so they are compatible? For example, DCS recommends using a “star” configuration. With
exact, Lionel recommends a loop-type buss. How did you resolve the two systems’ differing needs?
Scott D.
Wire it for DCS and it'll work fine for TMCC/Legacy.
Great start to a great layout. Wish you nothing but the best to you and your family.
Dave
Great to see you finally running your first train around your layout! Nice to see you using the control panel for this layout too.
Glad to see you running a train on your layout Alex!!!
Alex,
Congratulations on the first train run on your new layout. Hope you cracked open a bottle or can of the cargo.
JohnB
Alex, it is wonderful to see trains running in your home again! Exciting time!
Happy railroading,
Don
Great room. Good luck with the development.
Alex, looking great, I like the lift gate entrance.
Alex
Great to see the trains running.
Steve
Alex, What brand/maker is your turntable? I bought one identical at a trains how and have not been able to find out who made it.
Jesse TCA
Looks awesome Alex!! Congrats on getting some trains running and being able to enjoy the fruits of your labor!
Fantastic Alex. Congratulations!
When you said you would have trains running in three weeks I said to myself "if it were me I wouldn't want to weight that long, get them running" I see you fell into temptation and beat your prediction! Great to see your first run without any trouble. Schedule time each week to get a little bit done; your little bit is a lot in just about everyone else.
@bluelinec4 posted:That beautiful set of cars with that ugly pu engine. Don’t you have anything good like Erie or lackawanna
Hey Ben, I think maybe you had this engine in mind......![]()
Attachments
Alex, went back to see the video.. nice first run! Now, as John said, you are inspiration for us all to get moving and get more done on our own builds! I think that was what he said...….. Nice progress on a great layout plan. Shows how you can run trains without a lot of spaghetti track and can't wait to see more trains run as the scenery takes place.
Thanks for taking us all along on the trip....
Jesse TCA
Jesse, John, Yes Alex is an inspiration indeed. ![]() Although I would be farther along if I was building my track on a flat surface instead of introducing the grades. Though I'll be pleased when I get my trains running up and down!
Although I would be farther along if I was building my track on a flat surface instead of introducing the grades. Though I'll be pleased when I get my trains running up and down!
@Mark Boyce posted:Jesse, John, Yes Alex is an inspiration indeed.
Although I would be farther along if I was building my track on a flat surface instead of introducing the grades.
True, and I will have grades for the folded dog-bone, there will be about 50 feet of elevated track.
Yes, having grades to run and elevation changes are great and have their own challenges, as well as rewards. Alex's layout, like the NYC, being "waterline" is looking to be an anticipated success. Moving forward...…..
Jesse TCA


