


So here it is. Don't have a name yet although it could be called 'The Crowded and Specific Railroad'. haha
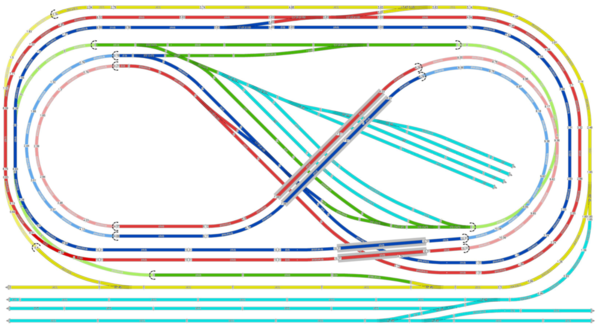
The concept is running passenger trains. The station in the lower goes around to the top and feeds into the outbound main line. After a few laps, switching to the reverse loop and onto the inbound mainline eventually heading back into the station. A second train from the station and the process starts again. A third loop (in yellow) for a short line freight or whatever. Still tweaking the center pass-through yard.
I am just getting started with the bench work, but progress should go pretty quick. Overall size is 22'-6" X 12'-4"
Bench work is 2x8 girder with 1x4 flange and 1x4 open-grid on 16" centers. 5/8" B/C plywood and 1/2" homestead.As an old carpenter, I couldn't resist overbuilding some.
I going with Atlas 3-rail as I like the solid rail.
Anyway, I crammed about as much railroad as possible into the space I have available! My sincere apologies to the hard line prototype guys for not adhering to strict operational protocol, but I just want to sit back with a cold one and watch the cool brass I've been collecting chug around the pike.
Looking forward to feedback.
DL


 Forced retirement. However, I don't have a magic sleigh to get me to wherever you live!!


