


Dave, the 2 green leads into the turntable allow an engine to move to the turntable while another engine is being turned to leave. Otherwise it would have to sit on the mainline until a single lead track is clear. As it is, there is no place to park a train while the engine gets turned or swapped, I haven't figure out how to fit that in. With so little space, it's hard to figure out what you need vs what will fit. Ideally the turntable would be close to a yard, so the engine only has to travel a short distance to get serviced and turned. As it is, the cars will have to sit on the mainline, so you won't be able to have another train running. Again, I haven't though that far ahead until we know what will fit and where. Just because the room is long doesn't mean the space above the office is big enough for O-72 tracks.
@DoubleDAZ I appreciate the O-72 wall fitment dilemma. If building for locos requiring O72, the track gets really close to these walls. But if you try to run a big articulated loco so close to the wall the front and side overhangs could wind-up scraping the wall. There are always trade-offs when planning a layout...
We don’t have to run O-72 in the office do we ? Will the bigger locos run without O-72 ? id we need to shrink track to get more things going in that room to tighter radius that’s is fine
Dave,
Off-hand I don't know of a current large engine, like the Big Boy, that will work with less than O-72 curves. MTH made a version that ran of O-31 curves back in 1996, but I don't know about others and I don't know if you'd want one because I doubt it has the details that make it impressive. However, if you are willing to keep any engine that needs O-72 in the Train Room, then we can do more with O-54 curves in the Office Room. I just don't want to tell you that just because I think we can get O-72 curves to fit that doesn't mean some engines won't hit the wall coming out of the curves.
Anyway, here's the last version for tonight. Even switching to O-54 curves, I think this kind of configuration will be the best bet. Note that I reworked the spurs on the left to make room for some buildings and I'm not sure that will work with what you mentioned.

Attachments
Images (1)

Files (1)
As always thanks so much i will open the drawing in the morning. You do have a point we probably should keep the main lines O-72 so the big engines can navigate.I may do something with the green box area to possibly get that out of the way IE move my desk elsewhere or make it smaller but then again i may not gain much from that. The closet door if i made that so it was a pocket door or something similar would that help anything ?
Your last statement you weren’t sure if it would work with what i mentioned, what did you think wouldn’t work i got lost in trying to figure out what it was we talked about
One thing i have to figure out is when i start getting a collection of train rolling stock and locos i have to figure out some type of storage for them.
What's the possibilities of multiple levels in the office and main train area if i ever want to run separate sections like different industries and no they don’t have to connect to this at all basically an upper level above this in both rooms with different layouts connected through the wall again and running separately. But lies the issues of accessing that upper level and navigating around to work on it. I have to figure that out in the main train room too. Maybe some type of customized benchwork were it’s not all covered with solid plywood maybe some open areas to navigate around. I realize in my main train room i made that mistake
I just need a warehouse lol. I have to sacrifice a lot of office stuff for this extended option in the office IE less storage for my tools and stuff and i have to get rid of some stuff IE computer stuff that i work on but it’s not a lot of stuff. I will have to learn to live a very minimal lifestyle with some of the other things i do to have my trains but it’s a sacrifice i am willing to make to get my train set big enough for what i want. I have had folks tell me just run HO gauge and that will solve slot of this but i told them when i started doing O gauge and seeing how much better the Locos look and the steam and lionel stuff etc i was sold on O gauge. If i can only have one then i am going O.
davehall83 I only saw your topic today. Your initial room is very close to my 11x11 room. I opted for Ross 054 curves with 042 on sidings. We worked on a plan early on with 072 curves, but it seemed like the layout plan was nearly circles with almost no straight track. My outer loop could have handled it, but I don't know that the inner loop could have. I have had doubts as I have built the layout, but am happy with it nonetheless. I had to leave an aisle on the right side to access a sliding glass door and the entry to the rest of the basement, so the layout approaches 11x8.

I like where you and Dave have taken the design. Dave also worked with me on my design. I'll go back and read the parts of your thread I missed, since I skimmed through just now.
Attachments
Images (1)

Dave,
The O-72 loop on the right side of the Office Room will fit, but may not be far enough from the walls/desk to allow a large engine like the Big Boy to run without hitting the wall, etc. If would help if you stood with your back to the closet door and took a picture of the opposite wall where the Green rectangles are shown in your room description.
Also, I assume there's no specific reason why the gaps are what they are in The Train Room, that just what they turned out to be when you placed the current bench work. If that is a good assumption, can they benchwork be moved closer to the top wall?

Attachments
Images (1)


Yes because i am not sure other than hatches everywhere how we would fix reach issues
one thing up for debate here is i have seen around the room layouts and they seem very reach friendly and you can have multiple levels
Dave, you essentially have an around the room layout, just that your sides are all too deep. That's because we started with your current table in the Train Room. Here's what an around the room would look like, more or less, with a 30" reach and O-72 curves for the Blue line, O-42 for the Orange line.

Attachments
Images (1)
So i didn't answer your question earlier the train room benchwork was connected to the office benchwork i didn't know how to remove the part that was in the office that was remnants of what you had made for me in earlier drawings. The train room bench work i had put those green blocks in or gave you those measurements since we already had benchwork there and i gave you the measurements of how far the benchwork was from the wall on both the back and right side so that we knew there were some gaps there and to be more precise about going through the wall and where that wall stud and track would be. However the office protion of the blue benchwork doesn't exist and can be deleted thats just because i didn't know how to delete it without deleting the whole train room benchwork too. The office and train room the red walls are precisely measured. In the office you can go as far back to the red walls you want the blue boundary has no deciding factor on spacing. I just need to make sure we dont have a loco hit the wall lol. So I want to keep the train room the way it is as far as track and spurs i cant really change the keyhole middle design since i already have that benchwork ready and built, i was more so looking at the around the room for the office i just wasn't sure what that entailed. I think the train room with the money invested in benchwork and all it would be a real task to modify whats there and cost too, i would have done it this way had i been more thoughful with the benchwork
Also here are the pictures i will be shortening the desk to either make it the size of the green area or reduce it completely. Also don’t worry about other stuff in the room other than the desks area that can all get removed
I really like your layout, actually your topic for your rail road some of it was one i looked at when deciding on this whole thing but i only skimmed it but it was one that others pointed out as well that was close to what i have, the only thing i have different is the expansion office where i got a bit lucky with and additional 17ft by 11ft room. My wife is eventually going to tell me my trains need a new house lol
Attachments
Images (4)


@Mark Boyce posted:davehall83 I only saw your topic today. Your initial room is very close to my 11x11 room. I opted for Ross 054 curves with 042 on sidings. We worked on a plan early on with 072 curves, but it seemed like the layout plan was nearly circles with almost no straight track. My outer loop could have handled it, but I don't know that the inner loop could have. I have had doubts as I have built the layout, but am happy with it nonetheless. I had to leave an aisle on the right side to access a sliding glass door and the entry to the rest of the basement, so the layout approaches 11x8.
I like where you and Dave have taken the design. Dave also worked with me on my design. I'll go back and read the parts of your thread I missed, since I skimmed through just now.
Mark one thing i like when i looked at your videos is how you did your elevations and tressles. How did you make them and the bridge?
Maybe i should be considering elevations in my trian room again and having multiple levels.......
I think dave may kill me lol if i change it up lol. He may tell me im on my own lol but i like what you done but i still like my layout dave did just the upper levels and maybe a lower level would be cool
Here are pictures of the hall way and train room and so you can see below and above space for multilevel stuff
Attachments
Images (6)


The 2nd photo says we really need to consider safety, I’d hate to see a train run off the left side.
When it comes to a 2nd level, that’s going to take some thought and depends on what you’re thinking.
I am pretty open to the second level and yes the left side is a safety thing i could just put a barrier up or something
Dont worry too much about that second level though that’s way down the road. You have done quite a lot for me.
I am just trying to get the most of what makes sense for the two rooms for now but i just want to make sure of any watch outs or gotchas before i start building everything so i don’t have to go rip up a bunch of stuff down the road when i want to expand to another level above or below.
Do you think the main benchwork in the train room needs to be cut back to the around the room setup ? I really like all the stuff we had on the last layout we had before we trimmed a bunch out for the train room area. It’s almost like a big give or take. You can make it more useable by having more in the space than around the room but you sacrifice that reaching distance. Right now i climb up on the train room table to lay stuff out and build but i can tell you that does stink it makes me quite sore afterwards. But that may be worth it with what i get out of the layout.
One thing i forget to mention here is my benchwork is modular so it can be moved and reworked easily. I’ll post the sections here shortly
So this is the sievers benchwork i have the bold black line sections are attached with carriage bolts and is module and can be unbolted and moved easily or removed.
Since the plywood is already sanded down and smoothed it would have to be unscrewed as it is also in sections just like the benchwork but it wold take some work and cutting to do.
Each section even the 1248 sections can be undone and moved or removed

Attachments
Images (1)
davehall83 since @DoubleDAZ survived all my changes from Plan 'A' through Plan 'D', he's up to the challenge to handle anything you throw at him. On past layouts, I used the old cookie cutter method of cutting the plywood and putting in risers to make any grade I wanted with automatic easy transitions from horizontal to the grade. On this layout, since the SCARM grades were near 4% and my carpentry skills are digressing, I copped out and used Woodland Scenics 4% foam risers. The problem with them is, you have to taper into the grade at the bottom of the grade and then back out to horizontal at the top. I had one steam engine that kept shorting out at the bottom of the grade, and front wheels would lift off the track at the top of the grade. I did so much cutting and shimming, it would have been easier to go back to the cookie cutter I learned back in the old Kalmbach Publishing book, 'HO Railroad that Grows' that I just about wore out when I was a teenager in the late '60s and early '70s.
I was going to lift the two bridges by hand one to the right and one to the left to get into the center of the layout. Another Forum member mike g. had a similar situation as me with two bridges to lift, one a number of inches higher than the other. He came up with the idea of using the linear actuator to lift the lower bridge, and then have a cross brace that hits the upper bridge as the assembly goes up. The upper bridge just rests on a 1x2 as it travels. I covered the contact points with sticky back felt used for hanging pictures so they don't scratch walls. So it was Mike's idea that he sent me the details, and I adapted it to my tables I had already built. I can go back and find the details in my Blackwater Canyon Line topic if you want to go that route.
I am in the same boat as you i am not a very good carpenter my skills stink. The problem i may have with trying the cookie cutter is the plywood is birch sanded plywood and its the $80 per sheet expensive stuff and i heard that the 3/4 inch kind like that is hard to bend. I am not sure on that but thats what i have so i may have to do some type of risers or foam or something like you did. I did have an issue similar to you with bottom out on my fast track layout i did with the bottom of the incline not being so even or at a gradual rise. I see you used the woodland scenic stuff on your video you had and that seemed like it would work but now i know the hurdle you have it sounds like alot of work put in to get it to work and maybe i should go with another method to get a rise if i decide to do this on my layout.
Yes please on the bridge, i would like to see the actuator you used and the materials parts information so that i can too see if this will work for me. Getting the tracks close enough and the electrical and having it raise easy or lower is the biggest thing for me.
As for having doubledaz make all these changes i figured he may be up for it, i just don't like to overstay my welcome but if he is ok with it, ill keep it coming. I see your post went back for a very long time and he was with you the whole time which is cool. Were you using ross track on your layout?
Dave, there is no need to change the benchwork in the Train Room. Here's what I've been working on. If you look close, you'll see I made a few changes to the original design in the Train Room to move the left side away from the edge for safety. This version has a Ross 33" turntable with an Altoona 4-stall roundhouse with 2 extended stalls for large engines. I have similar versions for a Ross 27" turntable with the Altoona roundhouse, a Ross 27" turntable with a Korber roundhouse and a 24" Ross turntable with the Altoona roundhouse. Most of the reach is under 36", assuming I have the space available for benchwork figured right. I should mention that the 3 entryways do not need to be large bridges. They can be simple wide drop-down platforms with some sort of wall along the sides for protection.
And again, these are only ideas.

Attachments
Images (1)

Files (1)
Dave @DoubleDAZ is right, you can just use a simple drop down platform instead of bridges. I see from your photographs you have the basic idea already in place. I used bridges just for a nice effect. However, I will look into where I posted the the key points on the lift up bridges and post links to those pages.
You do have a good point about the 5/8-inch birch plywood not being as flexible as the 1/2-inch plane jane plywood I used. The first time I did it was over 50 ears ago, and I bought the cheapest plywood available. I have never used birch, but it is an excellent choice. I do like the Sievers benchwork. Very nice looking and sturdy.
@DoubleDAZ posted:Dave, there is no need to change the benchwork in the Train Room. Here's what I've been working on. If you look close, you'll see I made a few changes to the original design in the Train Room to move the left side away from the edge for safety. This version has a Ross 33" turntable with an Altoona 4-stall roundhouse with 2 extended stalls for large engines. I have similar versions for a Ross 27" turntable with the Altoona roundhouse, a Ross 27" turntable with a Korber roundhouse and a 24" Ross turntable with the Altoona roundhouse. Most of the reach is under 36", assuming I have the space available for benchwork figured right. I should mention that the 3 entryways do not need to be large bridges. They can be simple wide drop-down platforms with some sort of wall along the sides for protection.
And again, these are only ideas.
Ade you able to restore the original train room track back without the left having been shortened and move for the safety space but include all other changes? I am going to design a catch on that left side that would stop a train from barreling over the side. I just don’t want to loose any of wider track radius we had or space for that. I understand the safety part so i am going to incorporate something that will allow a train at the edge not to barrel over the side
I would like to see the drawing with both version one where you made the changes to make it safer in the left side so make that one file and a new file with the old setup were we had the track closer to the left and incorporated the layout you made here in the office that way i can pull it up on my 60 inch monitors and compare the two layouts and decide on it but i probably will favor the one we had with it closer on the left side and just make a barrier or catch for the trains
Here's the latest FULL version with a 33" turntable and extended Altoona roundhouse. I added some stuff to the Office Room yard and I believe I put back what you wanted in the Train room.

Attachments
Images (1)

Files (1)
As far as the clearances needed for large locomotives from the wall on O72 curves, that would be 3.25" from the track centerline for all the stuff I have and have tested. This includes both the MTH scale Big Boy, the Lionel Vision Line Big Boy, the MTH Centipede A-A set, the MTH C&O Coal Turbine, and the Lionel scale TMCC T1 Duplex. Those seem to be the worst offenders in my stable, all make it past an O72 curve with 3.4" of clearance to a post with about 1/8" to spare in the closest encounters.
Thanks for the inputs and redoing the drawing this looks great! I couldn't ask for more lol. The upper and lower decks come later. I do need to figure out where to keep my trains stored to keep them looking good once i start stock piling locos and stuff. I think im ready to order parts, what do you folks think? The altoona extended round house is that the one located here http://rossswitches.com/6stall...efor33turntable.aspx
That will be an impressive layout, certainly an ambitious endeavor! ![]()
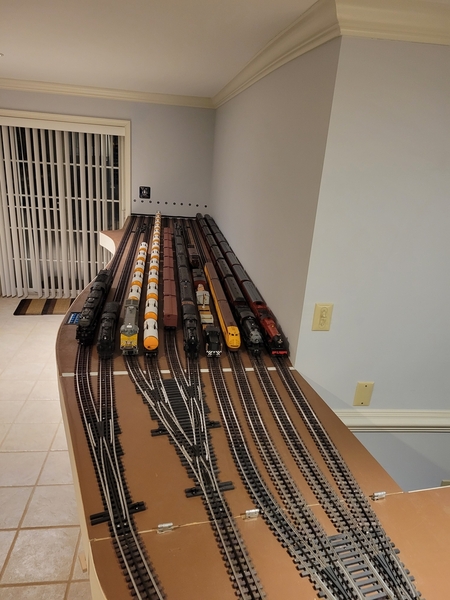
As for parking the trains, here's where I park some of mine.


A few currently on the "go" list get to stage in the yard.

Attachments
Images (6)


Holy Moly! that is one heck of a shelving system, i dont quite have the room you have lol, are those all shelves you made that is quite neat, its straight and cool looking. Now i want one of these
You give me way more credit than I deserve, those are Glenn Snyder shelving, I just hung them. ![]() From the looks of your layout plan, I'd say you have plenty of space! I will say, if I were building it, I'd be planning on more yard space. I started with three yard tracks all the way in the back, and I quickly realized that wasn't nearly enough!
From the looks of your layout plan, I'd say you have plenty of space! I will say, if I were building it, I'd be planning on more yard space. I started with three yard tracks all the way in the back, and I quickly realized that wasn't nearly enough!
With that realization, my freight yard extension was born, original on the left, new freight yard on the right. I wouldn't mind having even more yard space, but that's not happening at this point. ![]()

Attachments
Images (2)


Even still you made it look neat so its well deserved. Your probably right were would i fit more yard space though lol? Im sure its right under my nose but just from observation of what has been drawn, just curious. The only thing is the wall space usually is hard to reach once you start building the benchwork without some good reach lol, i started to find that out in my train room
Is this the shelving? This is really cool idea and not that expensive https://gsds.com/
He only takes checks though, im usually Leary of writing checks
Dave,
Give me a chance to see if I can reduce the number of tracks that need to be cut. I put this together rather quickly and cut tracks rather than spend time fitting sectional tracks. I also want to color-code the cut tracks, so you'll know where they are. There are some very small cut tracks where tracks should connect without them when you actually lay track.
Yes and no to the roundhouse question. It is an Altoona model, but it's not the 6-stall model in your link. They make various sizes. I did this one for another client with a 34" Millhouse Rivers turntable. It took me a long time and a lot of emails to get the combination right. The client would not accept the simple footprint from their site, he wanted a something more visual and SCARM didn't have any roundhouses. He had Altoona build the roundhouse and he picked it up at York. I still don't know for sure that it fits, I need to follow up with him to see how far along he is with the build. Here's the link to the Altoona site:
https://altoonamodelworks.net/o-scale-roundhouse/
Here's a small chart showing the different combinations I played with. Note that while the Korber is the shortest, it's wider with only 3 stalls. Also note that the 33" is the longest, but it will fit, I just don't know that you really need more than the 27" with 4 stalls. I have no idea of the price difference, etc. As it is, you probably have room for 5 stalls with the 33", but then all engines are inside, unless you make the roof removable so you can have it open.

Attachments
Images (1)
Dave, I know you've mentioned a lumber industry or something, but you barely have room for any buildings at all, especially in the Train Room, so you sure don't have room for more yard tracks. If you intend to have buildings and operating accessories, you can pretty much forget that idea, there too much track for them.

Will ihave room for scenary or any buildings at all? if not what has to be removed to make it work? I guess this is a toss up. I know O guage buildings and scenry are huge but if i can get some even like logging and coal it would be nice....I wouldn't necessary chop up the drawing to show that but if you have a layer that shows what that woud look like if i cut it on or off to show ok if i remove these tracks then i can have these buildings or have room here for buildings. Maybe i can fit some buildings lol? I like a mixture of both.
Would be nice for coal and maybe logging. It doesnt have to be a ton of buildings but i would like to get some in there especially around christmas when christmas houses go up. The only thing i can think of that means spurs have to go in some areas which i kinda cringe to that because i want more track but then i have to sacrifice one for the other. What to do lol. Maybe i evict that dang desk area in the green area in the office and have that for some of that and a pocket door for the closet to get rid of the issue with the door opening and being in the way. Just thinking of ideas of how i can do this and get some buildings in here. They dont have to be huge buildings either i can cheat and put smaller HO scale buildings in place but the ones that are meant for O for certain things over the track i do have to go with O on those.
Well, Dave, that was the point to removing some of the green spurs in the Train Room that you made me put back. 🤪 The biggest problem is there aren’t a lot of buildings for SCARM and I don’t know how accurate the ones I have are or how close they come to things you want. I’ll see what I have that might give you an idea, but before you finalize things, you at least need footprints for what you want.
@DoubleDAZ posted:Well, Dave, that was the point to removing some of the green spurs in the Train Room that you made me put back. 🤪 The biggest problem is there aren’t a lot of buildings for SCARM and I don’t know how accurate the ones I have are or how close they come to things you want. I’ll see what I have that might give you an idea, but before you finalize things, you at least need footprints for what you want.
Yeah im probably sure you have figured out the most indecisivie person you have met with big ambitions and small space lol. I guess i could always on my own remove spurs if i decide to add buildings since that wouldnt be hard at all. The spurs can be there and then if i remove them for a building i can that is one idea to approach it lol. I know what you mean about buildings especially in all of these programs it seems there isn;t alot of buildings listed for O scale but i have some ideas once i buy them lol then i can make them fit and if they dont i can use a dremel and hack saw lol (not really but its funny lol)
One day i may have to see your store hennings trains it was on my list last time i went to PA im not that far from pa. I like going up there because i like seeing all the train store even like nichlas smiths trains etc. I like to goto things like these. I heard there maybe some good train shows that come up to york PA that maybe better than the greenberg train show? I like to see the really big shows that have like multiple warehouses of stuff and if its all catered to O gauge even better, know of any?
That it’s true, you can always shrink them, etc., and you can build bas relief building fronts along the walls, etc. I’ll see what I have though and place some around the layout.
@DoubleDAZ posted:That it’s true, you can always shrink them, etc., and you can build bas relief building fronts along the walls, etc. I’ll see what I have though and place some around the layout.
Whats bas relief building fronts? Sorry working on my dictionary skills lol
Building fronts that are like only an inch or so deep against a paint background.
On the subject of gaining some space, @davehall83 you mentioned pocket doors. It may be possible to install one between the hall and the office, but given the available wall space on the closet door wall, it's unlikely based on the drawing that a pocket door could go there.
There are a couple of other alternatives that come tom mind for the closet: 1) a Bi-fold door shown below in the open position, or 2) a curtain across the door opening.
Note in the image below: the hall walls have been thickened to 4-1/2" towards the hall side, leaving the office interior dimensions essentially the same.

Attachments
Images (1)

The entrance to my room has no door at all, just the door frame with no door attached. That was the only practical solution to a door I thought, since I am really cramped for space. I don't really ever have a reason to close the door. If I had a cat who liked to come in and trash things or kids who got in mischief, that would have been another story.
I think all of us are indecisive at this stage, and even when we start building. There are just too many compromises that have to be made for those of us with small spaces. I can see where those with large spaces have compromises too. Do I have enough time, money, energy, to fill the space? If not, where do I stop on the plan.
Add Reply
Sign In To Reply

