A quick update. I found out drawing out a possible layout is a lot easier than figuring out how to actually assemble the supporting structure, especially when considering a modular style build.

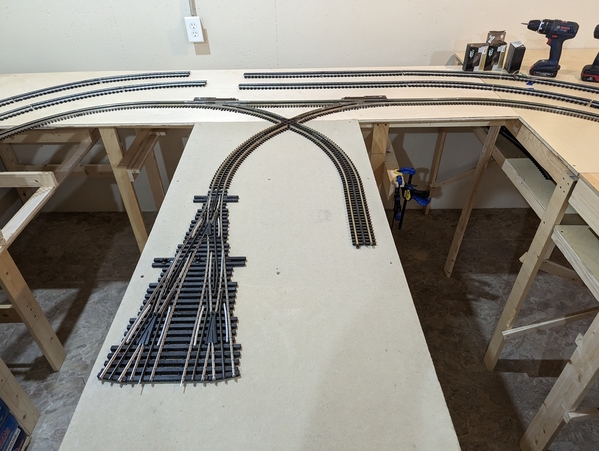
After laying down test track, i have a better Idea on how all this will fit together and will start the corner pieces this weekend.  This table is 3x8 and handles the town and lower level passenger station. The bottom panel completely slides out to make it easier to lay down the yard track. The front right corner will have to be trimmed to provide for a decreasing grade to access the passenger yard.  It also means adding a leg and cutting a portion of the L-girder.  I've also decided to use a slide out access just to the left of this section. This will have bridges and a water feature which one day will tie into the docks around the intermodal and grain terminals.  I may take a page out of Arnold C's book and use sheeting to simulate water in the planned open areas around the peninsula terminal.

TPRR2 e

Attachments

Images (1)
  • TPRR2 e

I was waiting to post pics when I got farther along. but getting farther along keeps being pushed out further and further.  You'll have to reference the tracks plans to get the full picture.  I have essentially a 12x12 space to work with. Wish it was bigger, but "c'est la vie"  (Also a terrific song by Emmerson Lake and Palmer.)

I am trying to build this in a sectional format, meaning I can take it out without destroying the layout.  In earlier posts Dave and I went round trying to figure out how to maximize the lower passenger station and freight yard.  I ended up using Ross curved switches in an effort to get as much length out of the space as possible. Where the upper deck starts is a full 8 feet of space going left.  If I do not mind fouling the lower switch - that will give me over 13 feet. Right now this will have 3 long passenger tracks and 4 freight tracks. I'll add a turnout to the top track.  You may notice there is only 4 inches of clearance at the L girder.  That will have to be cut and re-arranged.

lower curve

End view of the upper and lower sections. The upper section is attached to L girders to the extent I can remove a few screws from the legs and the whole assembly come off.  For now the lower yard is a dead end. Note the track in front beginning its long fall into the lower yard.  Total track length for the descent is about 36 feet along the outer edge of the layout - between a 2% and 3% grade.

Main section

The track will come across and turn along the wall to meet up with the yard track coming from the back right.  Not pictured (because that came down in the crash) is a center island which will host an intermodal terminal and grain terminal. The Ross 4 way will provide about 4 feet of track to hold the intermodal cars. To the right will be a 2 (maybe 3) track to support grain operations.  Since the center is an "island",  my wild dreams have it surrounded by water and some sort of freighter simulations.  I will have 2 feet on either side so I can easily reach any spot on the railroad.   

far end

Attachments

Images (3)
  • far end
  • lower curve
  • Main section

@Mark Boyce  LOL Mark when I think about the next steps - after I figure out how to support everything and finish off the decking. Then its lay the track and run for a while to see how everything works.  Then pull sections up to paint and detail roadbed and all.  Then build a hill/mountain to cover over the mainline leaving a water route for the inside track (left side of the layout).  Then build a point to point up on the mountain for my Shay to run a simple logging operation.  Then ...  well you know how its goes.  Every time I go down there I keep thinking about other things I could try. The only think I don't see for a while is a layout as "finished" as TPRR 1.

@mike g.  I realize most think I am moving along quickly, to me its a snails pace. I keep overthinking the whole process. But in reality this is much different than laying plywood down on a frame.  I decided to go ahead and build sections I may end up redoing.  My entrance to the center of the layout will be a "bridge" section about 24 inches wide. I want to have a valley floor beneath the bridges. That means a lift anything will not work unless it is one of the Mianne lift devices.  I will try a slide out section first as the floor is slippery tile.

I've used the cheap 1/2" 3 ply on the earlier layout and saw the stuff warp over time. Lots of reasons, but it was clear that stuff is really not very good if you want to have a flat roadbed. I cannot find baltic birch plywood anywhere in Grand Rapids. (that is the 1mm multi-ply stuff - dimensionally stable)  The 1/2 sheets I found has about 7 plies but has a cured finish on both sides. They retail at $80 a sheet. However if you can find damaged ones, the stores will often discount them 20% to 30%.  If I did not want to take the assembly down, I could use 3/4 ply, but that really adds to total weight, which I want to avoid.  @Tom Tee  has built sections with thin ply and framing much like guitar construction, strong but light weight. I do not know yet what the layout will be to go in that direction, but it is elegant.

Mike I have measured 3 times and still cut wood too short many times, so for me it more of knowing what not to do. My "vision" has been changing because my original vision was for a much larger space, the reality of the 12x12 forces me to adapt to reality.  The only way to fit more in, is to change levels and that requires a lot of track to get needed clearances or decide the layout will have track that does not interconnect.  My insistence on the long passenger yard creates lots of opportunities for compromise.

ScoutingDad...This is wonderful and thanks for sharing. I was considering making pullout lower decks for my new expansion portion of our layout. This has given me many ideas a few questions. IF you have time......

1) Can you tell me the specifications of your drawer slides used for the pullout section? ie weight bearing limits etc. I assume they need to be pretty heavy duty!

2) Is the descending portion of your layout (at 2-3% grade) all on a curve? The reason I ask, is that my plan was to have the large portion of my descending grade on a curve, but I am only going to be able to muster a 3.8% grade. Just curious if you have any experience with curved grades and what those experiences may be.

Again, it looks amazing and thanks for sharing!

Last edited by LT1Poncho

@LT1Poncho

Just to be clear,  the bottom section slides out.  Sliding out is meant to be used to install or maintain track as infrequently as necessary or to disassemble the layout.  The lower deck is 1/2" multiply screwed into 1x2s.  I'll add some cross bracing below as it will not interfere with anything and it will correct a slight bow to the panel 30x96.  At the 4 legs I attached a cleat (just above the cross brace) for the assembled panel to rest on. Once in place a screw secures the leg to the deck.

This is not meant to be used like a drawer. Once in place it will pretty much stay there.  If you want more of a drawer action, there are several options depending on load and extension.  The full extension drawer slides work pretty well. The better ones use ball bearings, at a price of course. Maintaining a clearance between the rails will be the bigger issue. Even the good slides will have side play which could rip out the train track if "racked" too much.

lower level detail

As far as curves go, the road bed will have to have a twist in order for the curve ends to align with the opposing ends which are at different elevations. @Tom Tee in his posts shows a way to laminate thin curve sections together forming a long continuous curve section.  To me this is cleanest, most problem avoiding way to lay in a curve at grade.  While you could cut the long curve out of a sheet of plywood, I think it will use up a lot of wood.  As planned the layout will have 2 90 degree curves on a grade.

The original TPRR was nearly all on some type of grade including curves and switches.  But nothing more than 3% and much at 2.5% and lower. I had no issues with running on the curved grades. The curves ranged from 042 to 072 diameter.

Attachments

Images (1)
  • lower level detail
Last edited by ScoutingDad

Jeff, I can’t see your latest photograph, but I think you drawer idea is great!  How many tracks will be at the gap when the drawer is opened and how will you get power to the drawer tracks?  Contacts that match up like my and Mike’s lift bridges?

LT1Poncho, I have approximately 4% grades on my layout in a room a little smaller than Jeff’s, 054 curves.  I haven’t had any issues at all, but I do not run trains fast either.  The fastest is 20 scale MPH as read on the MTH DCS remote.

ScoutingDad……thank you for your reply. I too only planned to use the pullout drawer idea for emergencies. I just felt it would be easier to spend some time engineering the pull out the drawer than crawling under as I get older.

Mark Boyce…..nice to hear that you are using a 4% as I will be very close to that. My descending curve for this portion will be O72 so that should help me out.  I too will be moving the consists slow as I plan my lower level to be mostly freight storage.

I assume the photo now shows up.  LT1Poncho the slide depends on how big and heavy the "drawer" will be.  I am trying to keep everything as light as possible and built in such a way I can take it apart if necessary.  I suggest using some sort of hard wood at the slide areas - they will slide easier.  Then you have to decide whether to support from the sides or from the bottom. Depends on the situation. I suggest using some sort of pinning arrangement to keep everything in alignment.

Mark I like using stereo banana plugs for anything that will be disconnected regularly.  Same style as what MTH uses, but far more robust and I can use 16 gauge stranded stereo wire. I like the gold plated ones where the wire feeds through the center and the strands fold over. A cap screws over the piece creating a solid connection. Many choices out there - there is even one similar to your favored Wago nuts, a little more expensive. 

Yes indeed, I see the photograph now!  Thank you, Jeff!  It looks like lightweight but strong construction to me!  I never heard of anyone using those stereo plugs on a layout, but I think that is a great idea!  They will make a positive connection when pushed in!!  Well done!

Oh, I don’t recall you mentioning the depth of your pullout shelf.  That would make a difference on construction too!  Let me say again, I really like your ideas that are coming to fruition!! 👍🏻👍🏻

Boy once a term gets used its hard to change it up. I can live with the "pullout shelf" term.  To answer Mark's question the lower shelf is 30 inches wide by 8 feet long. Even when the layout is complete, I will be able to slide the entire shelf out.  It will be a lot easier with two people but it is light enough for me to handle by myself. Once it has 6 tracks on top - not so sure.

The shelf has to be removed by sliding it out of the narrow end. This means I need 6 1/2 feet of clearance in order to get it completely out. Good thing that section pretty much looks into a hallway. 

When I get around to laying the track, I'll simply remove the upper section since there is nothing permanent in place.

I hesitate to say this pullout shelf is a novel idea. Many of you do the same for controls and have lift-ups and removable bridges. Having had to rip apart TPRR1, and hoping like heck we find our dream home on water up here, I want to minimize the total destruction and provide for flexibility should I decide to change things up.  I might call this a sectional build. Modular seems more like something intended to be taken apart and reassembled multiple times. Regardless there are lots of great ideas out there on those kind of builds. I will borrow good ideas from where ever I can.   

Sectional is a better term.  What term do you think is best for the “pull out “ shelf?  I was thinking it must be pretty long.  That is great you can pull it out to the hallway.  I agree, there are lots of pull out , lift up, swing out arrangements out there, mine included!  The thing I haven’t seen is a ‘drawer’ that is as bug as one as in a morgue.  😄  My wife is a retired registered nurse, so that is the analogy that came to mind!  

Still working on the railroad!  Here are a couple of pics of the lower level track as it starts its run to the upper level.  I was fixated on cutting curved sections out of a sheet of plywood and perhaps laminating 1/4 ply together. Then saw a guy showing how he made an HO scale helix. BING light bulb went off!

I have always been concerned with wood waste on any of my projects this was no exception. Cutting sweeping curves from plywood sheets would create a lot of waste. Using trapezoids allowed me to cut straight sections, in my case 12 inches thick to accommodate the double track. And then using 4 sections to make the 90 degree turn meant 15 degree angles on the trapezoids.  I made a mock up with cardboard and purely eyeballed the sections would work best at 18 inches long measured across the middle of the trap.  DUH ! The circumference of a circle is pi x D.  The arc length of a 90 degree 72 diameter is about 56.5 inches. The arc length of an 088 section is 69.1.  So the eyeball came in not too bad.  I should have made the sections at 14 inches instead of 12.  Now all I have to do is figure out the corner benchwork to support this and the upper section.  As shown there are 6 inches between center rails.  This will make laying out the single track curve easier.

I can easily adjust the grade from the yard entrance back to the upper level entry point. I'll add stiffeners to the long 1/2 inch thick 8 foot long grade sections as they are a little bendy.

Grade curve 1Grade curve 2

Below is the entrance to the yard with the offending L-girder removed. A little more needs to go.


Yard Curve 

mceclip0

Attachments

Images (4)
  • Grade curve 1
  • Grade curve 2
  • Yard Curve
  • mceclip0

Update, more benchwork in.  I think I worked out the transition section.  Looks like the grade will be a little over 2% and not the 3% I was concerned about. Installing the supporting risers in a way I can go back and re-adjust so I have a consistent grade.

Here is a photo of the layout as of this evening. Track is just laid in place to get an idea of placement especially for the curves, but also switches.

TPRR2 wide angle

This is a mockup of the center section for the intermodal and grain terminals. Except for the Ross 4way, all the inner loop is Atlas track.  All other track is Ross switches and track, with a few Gargraves flex track sections thrown in.  Not convinced the 4way will work as conceived. As is I will only have 2 to 3 feet past the switch for terminal track. Maybe a 3 way would be better?

TPRR2 center isle

The far left track is rising from the lower level yard. The furthest left track will continue its run to the upper loops. The second track will terminate in a dead end for additional train storage.  This section will probably be split to allow the storage track to be at 0% grade.

TPRR2 incline

My thought right now is to have a water level route for the far right track. The other 4 tracks will be covered by a removable mountain/hill. No switches here - I do not expect problems, but one never knows.

TPRR2 left side

I wonder why sectional track seldom lays in its 90 degree  config - always have to coax it into a 90. Atlas seems to be much better in this regard.  Still have to work on the back left corner and the bridge section in front. 

Attachments

Images (4)
  • TPRR2 wide angle
  • TPRR2 center isle
  • TPRR2 incline
  • TPRR2 left side

Hi all, thanks for the comments.

RE - staging and storage - I learned the value of both from trying to run TPRR1. I kept adding passing tracks, freight yards and ultimately a "below the town" 4 track yard. Taking engines and cars off the tracks, re-boxing and taking replacement trains out was simply not something I wanted to spend my time doing - it took the fun out of running trains.  My sweet spot for running trains is 15 to 30 minutes. I suppose if I had a switching activity or a crew together the time could be extended. BTW many on this forum recommend planning new layouts with plenty of staging and yards - of course that is hard to translate to someone building a new layout especially when their only experience is with simple loops and short trains. I read the same recommendations, but did not comprehend the real meaning until experience reared its head.

RE - materials - I built TPRR1 with 1/2 CDX plywood in order to keep the costs down. Turns out not to be a good idea as this stuff moves, twists and warps all by itself. 1x3 and 1x4 pine works fine. If you can get the stuff out of Sweden, the wood grain is a bit tighter so seems to be more stable. For plywood I was recently searching for baltic birch plywood. Really hard to find right now so the options fall to other "cabinet grade" plywood.  At $50 to $80 a sheet vs $25 to $35 for CDX, and that a new freight car is running up to $100, not a big financial decision to go with the better ply.  So far I invested in 4 sheets -  Less than what I paid for my recent "win" from Cabin Fever.

@Dave_C  You could always consider modifications to your layout to make room.  Many of us are redoing our layouts - for any number of reasons.

Trying different options in corners and the front entry to TPRR2. I've got the inner loop of Atlas track laid to the point I could add power and run a train with a little more work.  I forgot about connecting the double mains as I used my Ross crossover for a connection to the inner loop.  Space is an issue and now I think the only solution is to get a L&R pair of Ross curved 96/72 turnouts mated with a pair of #4s.   

Thanks for your update, Jeff! I was like you and read many times to add staging and storage tracks, but as you stated when I started 7 years ago all I had was 1 engine and maybe 5 cars. It is funny how much you collect as you build because you know as you're going along that I need this, and I need that! LOL

Your information on the plywood is great lesson and looks amazing too boot!

First - its been great seeing all the work being done, the trains run, the building details added ... WOW

One of the things about starting with a blank canvas is there are so many options. They just get reduced as we go along.  I finally decided to go ahead and build out the incline section thinking I can always change it later.  I'll post photos later, not much to see from the previous posts.

My total run from upper section to lower section is about 399 inches and encompasses nearly 3/4 of the way around the outer edge of the layout. That was me wanting a large passenger station and freight yard on a lower level.

In order to make sure the grade was consistent across the distance, I measured distances and heights off the floor at key sections. Since I am building this in sections, each corner is a section and the straights connecting them are sections. In the long straight runs, the 1/2 ply is supported at the edges with 1x2 pine strips for rigidity. That means I only need to support at the ends ... no sag in the middle. Sections are screwed together at the sub-road bed to limit movement relative to each other. Remove the screws and the sections come apart.

After that, it was to the spreadsheet to model the slopes. For the most part I tried to keep changes to the 1/4 inch.  Happy to report I was able to have a 2% grade (roughly)

HIGHLOW
SEGMENT Length080635083555216
TOTAL Length080143193276331383399
Height40.53937.7536.753533.832.7532.75
Increment Height1.51.2511.751.21.050
Grade SEG1.88%1.98%2.00%2.11%2.18%2.02%0.00%
Grade Run1.88%1.92%1.94%1.99%2.02%2.02%1.94%


I also wanted to see if the grades were fairly consistent. A scatter plot shows a pretty consistent slope, although you can see that from the table data.

The graph below shows the initial build - note the change in slope in section 3. The end section is a short level section which holds 2 switches where I wanted a flat lead to avoid operating problems. It was just a matter of playing with the elevation at each section to obtain the slopes. Once the slopes were as I wanted, I went back to the layout and raised or lowered the sections as needed.

Now its lay down some track and see if a car will coast down the grade into the yard.

Attachments

Images (3)
  • mceclip0
  • mceclip1
  • mceclip2

@Bill Webb  That must have been quite a bash. 

Our courts of honor probably had 100 to 150 total - maybe more.  With 60 to 80 boys plus parents and siblings it added up pretty quickly. Of course not all the scouts would attend, especially the high schoolers. 

This was a typical summer camp crew for us.  And yes we could hear a train in the distance blowing its horn at crossings - A requirement for any scout campout. The high schoolers usually would go to summer camp as we did not require them to do anything except put on a few campfire skits.

Owisippe2000

Attachments

Images (1)
  • Owisippe2000

Jeff- things are looking good. I was never into Scouting, did 4H for a few years. I admire your dedication to the Scouts. Same for you @Bill Webb.

Yours and others discussing hidden storage had me fiddling around with the track plan I've been designing for the space where my current layout resides (need one less kid taking up space first).

I was able to add a 7 track yard under the main layout with a run around track that would allow for some subway runs too. I haven't calculated the grades since I may never build this layout but it does work as far as I can tell.

The yellow track is at grade, with the yard lead on the left dropping down, and the red is below the table.

Test Plan 1.0.1_hidden yard

Attachments

Images (1)
  • Test Plan 1.0.1_hidden yard

Bob, as I recall your space is tight.  I like the run around approach.  I suggest you look at running the red track exiting the yard along the back and then down the left side. Use that track length to make the climb to the next level.  Even at a 4% grade you would need 14 1/2 feet plus the transitions. I think you have that length on those two sides. Mine is complicated by the 72 dia curves with the parallel main at 88 dia.

Add Reply

Post
The Track Planning and Layout Design Forum is sponsored by

AN OGR FORUM CHARTER SPONSOR

OGR Publishing, Inc., 1310 Eastside Centre Ct, Suite 6, Mountain Home, AR 72653
800-980-OGRR (6477)
www.ogaugerr.com

×
×
×
×
Link copied to your clipboard.
×
×