Dear Friends,

Finally I brought my first car project on the way. I wanted to do a UP O-50-6 tank car and since there is no kit or finished model out there, I decided to convert a Red Caboose 10.000 gal. ready to run car.

Since overall dimensions seemd acceptable, I checked out some prototype photos only to find out that they're maybe not THAT similar.

The Red Caboose car comes totally without rivets, also there is only one holding strap instead of two. The ladder is shorter and the underframe totally different. I gave it a try and stripped the model of all small parts. A Dremel helped getting rid of the single strap while I salvaged the turn buckles and stole four more from a second kit. Tichy Train Group buckles were quickly ordered for that second car. 

Clearly I would have to make compromises. I decided to be O.K. with that underframe and tried to focus on more distinctive features. Bill Davis of American Scale Models has the National B-1 trucks. I stripped the Texaco car with brake cleaner, paint came off nicely. 

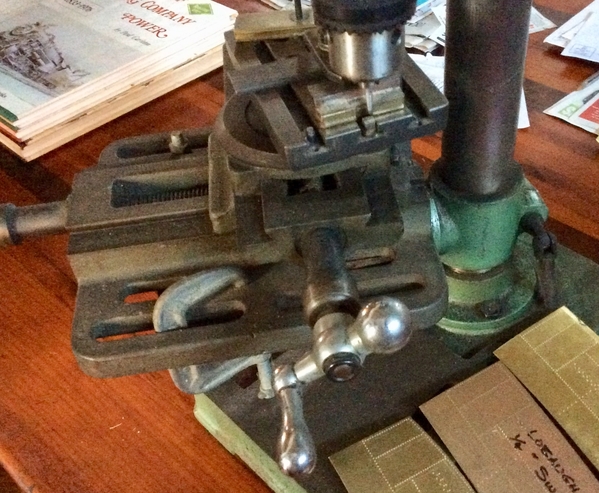
The rivets gave me a hard time, I had to make myself familiar with the NWSL Riveter tool. It's a nice tool but the table is a bit short for O scale. Also I had to tighten the retaining ring on the thread before the table stopped bouncing. Now it can be used in both directions alike.


Making the rivets was not the funniest thing in my life but finally I got the hang of it.

O.K. it's a strip. I found Evergreen .010" sheet material worked fine. Thinner and the rivets would break out. Cutting styrene was also challenging, it has a tendency to be not square when I do that. o_O

But after styrene there came brass. So hard to cut a straight line with sheet scissors. How do you guys cut brass? A tiny belt saw would possibly work, any ideas? Finally I had 10 brackets done and the railing could come on. Oh, I was so proud ... only to discover that the dome of the UP car should be much lower. 

With a heavy heart I razor-sawed off the turret and trimmed it to size. Not so smart with all the grab irons installed. But it worked out!

Car is getting ready for paint shop. I'll have to finish my spray booth first. 

Since this is my first car (virtually the first car that is out of its box for more than just a quick inspection) I am very interested in your comments and thoughts. Your suggestions are highly welcome.

Attachments

Images (7)
  • mceclip0
  • mceclip1
  • mceclip2
  • mceclip3
  • mceclip4
  • mceclip5
  • mceclip6
Original Post

Replies sorted oldest to newest

Yes - nice work.  I like tank cars.

I use a drill press with a carbide scribe, a female die appropriate to rivet size, but squared off to hook preceding rivets on, and a fence for straight rows of rivets.

For cutting stuff, you need shears, not scissors. I use Wiss-7.  They are 15" long, and heavy.  I can cut ladder uprights in O Scale or valve gear rods out of .032 HH brass.

Thanks for the hint, NWB. I'll check it.

In the meantime I came across an O scale rivet product – Archer's resin rivets. Compared to these my own effort looks like Lego. The one for under 3 year kids. The good thing about these is that they bend around domes but they really want to be convinced to do so.


Straight application is easy, curved is not. There's some video support from Archer but you really have to get familiar with the product's behavior. I found that the best way of manipulating the decals is a wooden cocktail stick.

My only concern is that these rivets, although in O scale, might not be all too visible on the finished model. In comparison the prototype rivets have been app. of the same size but more prominent. I'll find out.

Attachments

Images (3)
  • mceclip0
  • mceclip1
  • mceclip2
Sarah posted:

The good thing about these is that they bend around domes but they really want to be convinced to do so.

Straight application is easy, curved is not. There's some video support from Archer but you really have to get familiar with the product's behavior. I found that the best way of manipulating the decals is a wooden cocktail stick.

Good to know. I usually am using a cotton tipped applicator stick which is essentially a 6" long single ended Q-tip that's not very soft and absorbent.

Yours look very good around the base of the dome!

Thanks *smile*

I must give that a try. I found it easy to work the decal strip very wet. I used the point of the stick because you can "touch" a single rivet, that's useful when it comes to slowly bending the decal. It takes about half a minute until the softening solution starts to soften the decal. 

Hi Bob2, looks like a very accurate transfer table. These rivet rows in the foreground look great!

Here is the painted car. I am not sure if I have chosen the right color to decal on. It's Floquil Engine Black and it turned out a bit rough. I might have had the primer and paint sprayed with too much pressure. We'll see. 

The Archer rivets are still visible. But the black color absorbs the effect a little bit. Maybe I can highlight these when weathering the car. I hope I don't mess it up. -_-

Attachments

Images (2)
  • mceclip0
  • mceclip1

HI Sara,

Your car is looking great.  Some things to note about painting/decaling.  First, if you are using the lacquer version of Floquil Engine Black, e.g. requires lacquer thinner for cleanup, then you can get what they call crazing of the plastic.  Basically, crazing is where the solvent in the lacquer paint attacks the raw plastic and this can leave a rough crystalline-type finish which appears to have a series of small fine cracks in effected areas.  Some types of plastic are more susceptible to crazing than others.  On the other hand, Floquil Engine black is also a very, very flat paint and almost has a light “powdery” texture once it dries.  It is difficult to tell from the dark color in the photo if you have any crazing evident or if it is just the flat texture of Floquil paint that raises your concern on the paint finish.   As for avoiding any possible crazing issues in the future, you can use a plastic-compatible primer coat to provide barrier to the solvent-based paints prior to applying the lacquer-based finish color.  Or you can just use acrylic-based paints which, which are plastic compatible straight from the bottle or can be thinned with just water for spraying.   

One other important detail with using Floquil flat lacquer-based paint is that you really NEED to gloss coat your model before decaling or the decals will “silver” and not adhere to the flat paint at all.  A nice glossy surface is required for a good decal job.  Then once the decals are applied (and allowed to dry overnight), apply another gloss coat to sandwich the decals between two gloss coat layers and this not only protects the decals while handling the car, but the second gloss coat layer helps to hide the decal film edges to the point that they practically disappear completely.   Then go back and apply a flat or satin finish to taste to remove the glossy finish and, finally, add weathering to taste.

Also, a note on the color, again, this is a personal preference thing and not a hard rule, but many modelers will lighten up dark colors, especially black, with a little white added since our models are predominantly displayed indoors and the amount of light that we have indoors is pale in comparison to natural sunlight.  Therefore, dark colors, especially black, are frequently lightened up on models to compensate for the reduced indoor lighting and helps the details on the model standout and not get swallowed up by the dark color in the indoor lighting.  You are on the right track with some lighter colored weathering as this will help make the details/rivets pop back out.

Good luck with the remainder of the project.

Scott

Austin, TX

Dear Scott and Bob,

thank you so much for your useful hints. Alas, good advice came too late for my car. As you might have assumed, I had to learn it the hard way. I applied a gloss coat prior to decaling but somehow the paint job was just too sand paper like to blend the decal film in. There was quit a lot of reflection from the film. So I ended up in learning how to apply decals at least. 

I hope I'll get it right now. Car was brutally stripped with airbrush cleaner (the plastic took it sportily) and this time I try to keep the surface smooth. Less air on the brush and well diluted I used grey Auto Borne Sealer for a base coat and to blend with the non stripped paint over the Archer rivets. When cleaning my gun I realized that this brand is far more stable and does not solve so easy. I have high expectations in that product line. I'll report.

I fear I have chosen not the easiest task for my first project. 

Attachments

Images (3)
  • mceclip0
  • mceclip1
  • mceclip2

Sarah, hopefully you will never have to strip a model again but there are far less damaging ways to strip plastic than airbrush cleaner, likely lacquer thinner.  90% Isopropyl Alcohol will remove most paints from plastic without damaging the plastic. Find a suitable container cover the model with alcohol and let it soak. The older the finish the longer it must soak.  A soft nylon brush can be used every couple hours to help the process along.  Sodium Hydroxide (lye) is also good for removing paint. Today Sodium Hydroxide is most often used as a drain cleaner. I like it over Alcohol as it is not flammable. I use safety goggles as it could damage your eyes if it were to splash, though at this dilution you would have plenty of time to rinse them thoroughly. Also use gloves your hands can stand a bit of exposure but it will dry and chaff them.  I use a cup of S.H. crystals in about a gallon of water. I have used two cups but not much stronger if you mix it too strong it can generate enough heat when you soak your item to warp the plastic. Mix the solution with warm not hot water.  I use an old plastic 5 gallon (19 liter) pail, filled about 3/4 full, that sheet rock mud came in. It has a snap on lid and I have been using the same bucket full of stripper for years. I noticed you are in Europe and modeling US trains. Did you grow up in the US ?   j

Dear John, thank you very much for your advice. I'll try Sodium Hydroxide next time. Yes, in my case it was a strong lacquer thinner but surprisingly the plastic took no harm at all. Thanks Red Caboose guys! So you use the solution over and over? Wow. I'll do that with the next tank car. 

Meanwhile I was able to decal the painted car again, this time there is no reflection on the tank, just the underframe remained a bit dull and you can see that with some reflection as a result. I'm satisfied. 

Now I'll start to do some weathering with oils. It's a very complex topic and I have some HO stuff around to practice. Shouldn't I ever post an update, I ruined the car :-)

Attachments

Images (3)
  • mceclip0
  • mceclip1
  • mceclip2

Oh, I forgot – No I was actually never in the US. But I plan a trip over there maybe next year to learn about train operations. I'm very interested in that. My grandpa took me trackside when I started to walk but trains were never a big issue .... UNTIL I came across an issue of MR and on the cover was Ed Rappe's magical Horse Shoe action at his former layout. Since then I really got caught and I know what I want to achieve. 

I've managed to weather the car by now and with the correct trucks that should arrive every day the project comes to an end. I tried dark and neutral washes with enamel washes by MIG and used wilder weathering oils to simulated faded paint of the letters and a streaking effect. There is some spilled oil on the turret and sides. I realized how much lies in that topic and that I have a long road ahead of me in terms of painting, lettering and weathering. 

I hereby want to thank you all for your comments and the sharing of your modeling techinques with me. THANKS! I enjoy modeling a lot – I really found that out. 


Attachments

Images (3)
  • mceclip0
  • mceclip1
  • mceclip2

Thanks, Edwin – actually I don't yet have a layout. But a big space. For now I have my workshop and a moderately sized room that I call my test lab. I am currently determining the minimum radius and curvature easements along with frog sizes for various locos and passenger cars. 

I consider myself to be very much at the beginning in the hobby but I got plans :-) Looking forward to seeing more of your work!

Sarah

Add Reply

Post

OGR Publishing, Inc., 1310 Eastside Centre Ct, Suite 6, Mountain Home, AR 72653
800-980-OGRR (6477)
www.ogaugerr.com

×
×
×
×
Link copied to your clipboard.
×
×