


All was going well with upgrading my K-Line Union Pacific semi-scale passenger car fleet until I got to this Ocean Sunset sleeper part# K4690-31305. I thought this sleeper car was going to be easy. All I had to do was follow the same formula I used when upgrading my other passenger car interiors. Step.1, Start by removing the existing K-line interior from the shell. Step.2, Separating the benches seats and passengers from the plastic base. Step.3, Put down a new floor and start making walls. But I was wrong.

The difference in this sleeping car is there’s a tremendous amount of interior walls, bathrooms, closets, convertible sofas, upper berths, lounge chairs and that were sinks needed. And Union Pacific’s original plans called out for 5 bedrooms, 2 drawing rooms and 2 compartments to fit in the very narrow window spaces given in my semi-scale K-Line shell. As it turns out, when I installed all these items it completely blocked the viewer from getting a good look inside and it blocked out most of the lighting from above. I did not realize how square these K-Line windows were (they should have been rectangle shaped) until my first attempt at the Ocean Sunset interior was fully painted and reinstalled back into the shell. To make things worse, I filled all the seats with passengers and installed 7 porters in the hallway to give the viewer something to look at in the foreground. My first try at upgrading doing the Ocean Sunset interior did not look good. It was way too packed when looking in from the outside. So, I chalked up this first attempt as a failure and took it all apart and tried again.
Second Attemp:
There is nothing wrong with failing the first time, as long as you learn from your mistakes. To learn what I had did wrong I decided to visit some real Union Pacific Pullman sleeper cars to get fresh ideas. But all 5 of the Ocean series cars have either been scrapped or had there interiors gutted. So, I looked around and found the restored Union Pacific Pullman sleeper National Forum owned by the Pacific Railroad Society was open to the public. I took a detailed look inside at the rooms, chairs, upper berths and convertible sofas. Then I drove to Perris, CA and took a guided tour with a docent of the National Scene Pullman sleeper owned by the Orange Empire Railroad Museum. Even though the sleeper cars in Union Pacific's National series were built with 6 sections, 4 double bedrooms and 6 roomettes these still were excellent examples of Pullman sleeping cars. Sure, they may not have matched my exact Ocean series floor plan but these full size Pullman passenger cars gave me a new perspective on what items I really needed to include in my interior of my Ocean Sunset.
To make the new floor on my K-Line car I used a thin sheet of 1/16” x 3” x 24” basswood. Then cut it to the same width as metal K-Line base. The basswood floor was cut slightly shorter due to the clearance for end caps. I elevated the basswood floor on wooden strips to gain clearance above the existing power and ground wires from the trucks. The new floor then got mounted on top of the metal K-line base using the same exact screw locations that held the plastic interior. The trick is to line up your wooden strips with the factory screw hole locations. In 1999 K-line made this 18" long semi-scale compressed version of the real 85 ft Union Pacific 1305 Ocean Sunset sleeper build by the Pullman Standard Car Manufacturing Company in 1956. As with my other interior upgrades this meant the 85 ft Union Pacific plans did not line up with my semi-scale K-Line windows. The most important part of this semi-scale build is to position the new walls of your rooms to fit inside the blank spaces between the existing windows in the K-Line shell . Using the shell as reference, start by marking your exact window locations with a pencil on your new basswood floor. Then arrange your interior walls to match inside your window spacing. You can then you can figure out how much space you have left to install the convertible sofas, chairs, counters, bathrooms and closets based on the Union Pacific plans.
To make the new interior I found my existing K-Line bench seats were not long enough to be used as a convertible sofa. But with a little bit of modification I was able to extended/stretched these bench seats to the length of the room. To do that, I used 1-1/2 bench seats per room. By cutting one bench seat in half and attaching it to another full size seat. By extending the seats I was able to get the length and look of a convertible sofa that I needed to fill the room. Also, to help get more light into the room, I made the upper berths flat against the wall instead of curved out into the space.
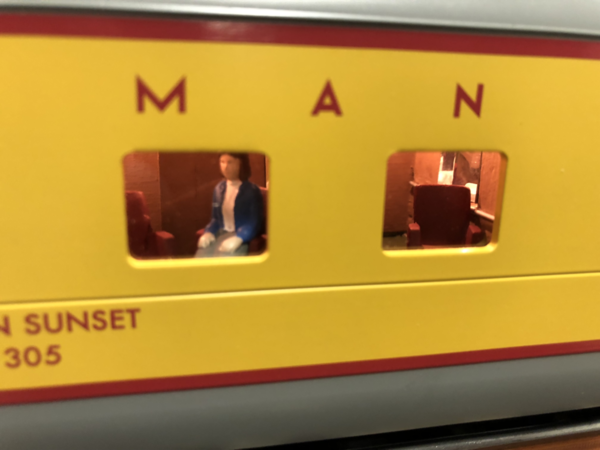
It really is amazing how little of this room can be seen when looking inside through the window. The first photo below is with the shell off.

Another photo of the same room. This is a close up looking in through the window.
Third photo of the same room as the car goes down the track. And this is the biggest room in the car!

Some of the figures were from a Preiser pack (part# 65602) and the rest were the K-Line figures that originally came out of my other passenger cars. Since the Preiser figures are 1/45th scale and the floors are higher than normal, you will need to trim the feet off. Also, I recommend trimming the bottoms on your figures to make them fit in the seats better. The lounge chairs and sinks in the rooms were all from www.ScaleCityDesigns.com.
**Edit**
Third Attempt: I was still not satisfied how the Ocean Sunset interior turned out. It was missing the bathroom sections, the interior walls were too dark and the people sat to close to the windows. I took the Ocean Sunset interior down to the basswood floor again and rebuilt it a third time. Here are the results.


Since I was opening up the shell again this also gave me a chance to upgrade the overhead lights to LEDs. I mounted the circuit board just behind wall just in front of the vestibule.

My advice for upgrading a semi-scale K-Line sleeper is the less items you put into the rooms the more your viewer will be able to see. You have a small space to work in so keep the rooms plain and simple. I will attach the original UP plans for this car at the end of the post. I hope this write-up with plans helps others who want to upgrade their Union Pacific 1305 Ocean Sunset Pullman Sleeper.
Thanks,
*** Edit***
To look at the other interior builds in this series click on the links below. They are listed in the order I run them on my layout:
https://ogrforum.ogaugerr.com/...-an-e-8-cab-interior
https://ogrforum.ogaugerr.com/...interior-upgrade-rpo
https://ogrforum.ogaugerr.com/...6327-k4690#lastReply
https://ogrforum.ogaugerr.com/...car-interior-upgrade
https://ogrforum.ogaugerr.com/...enger-car-8003-k4690
https://ogrforum.ogaugerr.com/...lounge-car#lastReply
https://ogrforum.ogaugerr.com/...enger-car-1305-k4690
https://ogrforum.ogaugerr.com/...upgrade-k-line-k4690
https://ogrforum.ogaugerr.com/...upgrade-k-line-k4690
https://ogrforum.ogaugerr.com/...senger-car#lastReply
https://ogrforum.ogaugerr.com/...upgrade-placid-haven
https://ogrforum.ogaugerr.com/...oenix-aluminum-shell
https://ogrforum.ogaugerr.com/...pullman-sleeping-car


