Dad'sTrackPlan

Here is the only track plan that I have.  I want to try to draw one that is easier to understand, but I'm not that good of an artist.  The top half is the lower level and the bottom half is the upper level.  The interchange tracks between levels are shown on the upper level plan.  One is 2% grade and the other is a 2 1/2% grade.  Curves are a minimum of 072 everywhere.  No duck-unders and all aisles are at least 30" wide.

Art

Attachments

Images (1)
  • Dad'sTrackPlan
@Chugman posted:

Thanks for your reply to one of my favorite topics, operating sessions.

I am having a problem making a track plan that is easy to read and understand.  I need one for my operating sessions too.  I have one that my son made in a track planning software that I will post.

My layout started out as a long double-track mainline that one track was designated as a freight line going one direction and the other a passenger line going the other direction.  There are two freight yards and a passenger terminal.  Then there is an upper level, single-track branch line that has reversing loops at each end, a long passing siding in the middle, and two interchange tracks connecting it to the lower level.  I have 9 sidings with various industries for switching.  past operating sessions consisted of running 2 trains in each direction on the mains, switching at local industries, and making up of trains in the yards.  I've tried using car cards, but do not have unique numbers on all my cars yet and it really slows down operating sessions.  I'm currently trying "exchange 3 loaded meat reefers for 3 empty ones" for example.  It seems to work better so far.

I've recently converted my thinking to running all tracks in a bi-directional manner and instead of freight mainline and passenger mainline thinking, it is main # 1 and main # 2 and running trains on the same track towards each other.  It has added a new, exciting, realistic element to operating sessions.  In order to facilitate this we have been installing a complete layout, working signal system that we will run our trains by.  It will require a dispatcher directing the flow of trains, where they will meet, who will take which passing track, and etc.  A tower operator to control the crossovers and switches.  Two yard masters to run the two freight yards and of course engineers and conductors to run the trains.  The complexity and number of trains ran will be determined by how many operators we have and their comfort with the system at each session.  With this approach I have at least a taste of it all: making up trains, switching local industries, running unit trains between yards, meets, scheduling, determining which trains have priority during op sessions, and so on.

Coupling/uncoupling is an ongoing problem.  May have to eventually go to Kadees?  Some couplers work great, a lot don't.

Sorry for such a long reply, but I feel it is a fun topic and deserving of our discussion.

Art

Great reply - thanks - I don't think it's too long, since there's a lot to cover.  Looking forward to studying your track plan.  IMO, what you posted is plenty precise - just showing the relationship among the lines, yards, and sidings.  My biggest challenge is conceptualizing a scheme that will be interesting over the long term.

Re cards and car numbers, a couple of the layouts where I operate use cards that designate a type of car, without worrying about the car number.  Probably not entirely prototypical, but more practical for a model layout and easier on older eyes and can be plenty challenging.  And it's a heck of a lot easier to re-stage when you're not worried about car numbers.

Re couplers, converting to Kadees is a lot of work, and they can be fiddly.  My experience has been that manual effort is often required, regardless of the coupler type.

Last edited by Mallard4468

One of my main objectives for my Pennsylvania & Western was to build a layout that was designed for prototypical operation (including lots of switching) using 3-rail equipment.  This meant retaining the Lionel-style couplers.  In early testing, I found that Atlas, MTH and Weaver couplers mated with each other pretty well.  Some Lionel, and most K-Line couplers did not couple well with these other brands.  K-Line couplers have been banished from the railroad, and Lionel cars are individually tested.  Most do not make the roster.

I've standardized on Atlas couplers as much as possible (the older style with round pull-down tabs).  Somewhere many years ago, I read that coupling could be improved by substituting the factory spring on the coupler armature with a Lionel #400E-103 spring (actually half of that spring, since it is a long one).  I have done this with all of my Atlas trucks and also with similar older style MTH trucks with the round pull-down tabs.  My cars couple like butter.  Locomotive electrocouplers have also been replaced by Atlas electrocouplers (mostly the short ones that come on Atlas Erie-Built locomotives.  I shoot a little powdered graphite into them before installation.

My method of using the 400E-103 springs is shown in the Great Layout Adventures, volume 11 video.  Unfortunately, I don't think those springs are available from the parts guys anymore.

@Bob posted:

One of my main objectives for my Pennsylvania & Western was to build a layout that was designed for prototypical operation (including lots of switching) using 3-rail equipment.  This meant retaining the Lionel-style couplers.  In early testing, I found that Atlas, MTH and Weaver couplers mated with each other pretty well.  Some Lionel, and most K-Line couplers did not couple well with these other brands.  K-Line couplers have been banished from the railroad, and Lionel cars are individually tested.  Most do not make the roster.

I've standardized on Atlas couplers as much as possible (the older style with round pull-down tabs).  Somewhere many years ago, I read that coupling could be improved by substituting the factory spring on the coupler armature with a Lionel #400E-103 spring (actually half of that spring, since it is a long one).  I have done this with all of my Atlas trucks and also with similar older style MTH trucks with the round pull-down tabs.  My cars couple like butter.  Locomotive electrocouplers have also been replaced by Atlas electrocouplers (mostly the short ones that come on Atlas Erie-Built locomotives.  I shoot a little powdered graphite into them before installation.

My method of using the 400E-103 springs is shown in the Great Layout Adventures, volume 11 video.  Unfortunately, I don't think those springs are available from the parts guys anymore.

Bob, I am so glad that you posted as I was trying to remember where I had read your comments about your coupler improvements.  Most of us have a 4 letter word reserved for our thoughts regarding 3-rail couplers.  We must have someone that will read this that can offer a suggestion on what to replace that spring with?

Art

@Mallard4468 posted:

Great reply - thanks - I don't think it's too long, since there's a lot to cover.  Looking forward to studying your track plan.  IMO, what you posted is plenty precise - just showing the relationship among the lines, yards, and sidings.  My biggest challenge is conceptualizing a scheme that will be interesting over the long term.

Re cards and car numbers, a couple of the layouts where I operate use cards that designate a type of car, without worrying about the car number.  Probably not entirely prototypical, but more practical for a model layout and easier on older eyes and can be plenty challenging.  And it's a heck of a lot easier to re-stage when you're not worried about car numbers.

Re couplers, converting to Kadees is a lot of work, and they can be fiddly.  My experience has been that manual effort is often required, regardless of the coupler type.

I really like your comments regarding using car types rather than specific numbers.  The car type can be relatively specific for example a "meat" reefer for my packing plants, not just any reefer.  An air-flow covered hopper for flour, not just a grain covered hopper.  A "food grade" tank car for liquid sugar, not just any tank car.

I have attended two different 2-rail O scale layouts that used car cards that were a lot of fun to operate, but it was a chore to find the exact car and exactly where it had to go.  I think that this method will preserve most of the fun, but make things go a little faster and with less stress.

Great discussion!

Art

I’m in the same boat with no hidden staging. If I knew where I was heading 35 years ago I would have planned on it. I’ve been trying to come up with a way to operate for years. Lots of ideas on how to pull it off. But also a lot of confusion as to where you are on the RR. I saw a You Tube video series on an HO layout that gave me a few ideas. I’ve always had towns on the RR. I ended up developing sort of a timetable. You basically run from town to town following the timetable. Most instances you travel through a town listed further down the line and just ignore it. Even though my layout is fairly large. It doesn’t take long for a through freight to run the entire mainline. By skipping over towns and sort of running laps it really helps increase the running distance.

  I loosely model a 100 mile segment of the Rutland.  I used the DCS trip odometer to measure the distance between towns or areas. Came up with a believable formula to convert 10ths of miles into multiple miles and come up with a close to 100 mile timetable run. I understand it which is good.  I hope when I get into sessions fellow operators will. Just follow the timetable and search out the next town and you will get there. Everything in between you just pass by. The timetable presently has no time on it. Just mileage between towns and the towns in the correct order.  Just going to run in a sequential form to see where this goes. The local freights are much easier to figure out.

Looking forward to following your operations. I’m sure I’ll pick up some tips.

Dave, I really like your description of your layout.  I'm assuming that you have a single-track mainline?  Is it point to point or can you continuously run?  Also do you run trains bi-directionally? 

I have had the pleasure of  participating in two different 2-rail O scale layouts that were over the top fun and at times complicated.   Each time when I came home, I said that's the most fun I have ever had in model railroading!  And I wanted to improve my own operations.  Each of these layouts were single track mainlines with one being point to point with 5 levels.  It was designed for operations by a real railroader.  You make up trains in yards by car cards with assigned engines and cabooses.  You run to many towns and switch cars at each location .  Trains pass you in either direction that is controlled by a dispatcher in a separate room that can't see the layout.  You get to the end of the line division point yard, drop your train and pickup a new one that has been put together for you.  You loose track of time and feel like you are running a real railroad.

The other layout was smaller but operated very similar with car cards and a fast clock.  Teams stayed in the larger towns and switched cars and made up cuts of cars to be picked up by the local when it came through.  The local freight switched at small towns and worked it's way to the larger towns.  A local freight would go the opposite way and have to be allowed to pass at designated meeting places.  At noon all the freights had to be off the mainline to allow the scheduled passenger train to have the mainline.

I want to add mile post markings on all my signal cabinets, crossings, some RR buildings and etc.  I have researched the real mileages from downtown Chicago's Union Station to add to my version of real towns.  But they are not in the proper order and probably would be confusing to operators.  They would however add a lot of prototypical "eye candy" to the layout.  Do you have these or would they work on your layout?  It would fit right in with your theme.  I am trying to use timetables (without using the times) for my passenger train time tables too. 

I also like to change which type of train has priority depending on what era or type of equipment I am running.  In the 60's running passenger trains have priority, with the exception of my "meat train" which has top priority due to full perishable meat reefers when going Eastbound, but not with empties going Westbound.  In more modern era running my BNSF Z stack train has highest priority.  Have to get those UPS cars there on time.

Thanks for a fun discussion, I like your approach.

Art

Here is a link to one of the layouts I operate on.  If you scroll down to page 4, you'll see an explanation and example of the cards that are used.  Each card has two sides - car order (for delivery) and pickup order.  When a train leaves the yard, it includes several car orders.  The switching destination has a box containing pickup orders.  The operator drops off the car orders, then flips the cards inside the sleeve so that they become pickup orders for a later round.  (This process is easier to see and do than to explain in writing.)  If done correctly, the process is self-staging for future sessions, and there's no need to generate switching lists.

https://www.operatingsessions....ON%20%204.5.2023.pdf

I guess I have what would be called a folded dog bone. Just a lot more twist and turns. It is single track. But if you look at the majority of it. It first appears to be double tracked. When trains pass one another they are always going different directions. In my case now. North and South. I can accommodate probably 3 trains on the mainline. I really only have one long passing track which also doubles as a yard lead. Operation wise it’s probably not in the best of spots. My layout was built way before command control. I wanted a long mainline with trains only passing one another going different directions.
When I started out I was all NYC and a bit of New Haven as things were available. Lots of passenger cars.  I later switched to the B&A. I still found coming up with an operation scheme to be difficult with my present layout and what I was running. They all focused on main line modeling with a lot of traffic. I’ve always had a thing for Milk Trains. I started looking into modeling the Rutland. Nothing available except a MTH Mikado. I started weathering rolling stock years ago and felt a little more comfortable trying re lettering. Luckily the majority of what the Rutland ran was sort of generic Steam with close enough for me models available as well as decals. At a price I was comfortable paying doing conversions. They ran shorter trains. Especially passenger trains which freed up a lot of yard space. I bought every Volume of Nimke’s books on the Rutland. Lots of info as to what they shipped and received. This way I could model industries that would have been served by the RR. I’m finally focused on what needs to be done to get a layout multiple operators can run. It’s been a long journey.

Yes I did add mileposts. Whether or not anyone notices them is okay. I know they are there. I found some pictures and ended up going with some Scale City whistle posts. Filled in the W and decaled the miles in. I’m still not sure I’ve done them right. I have them as miles to go to the division point. But I’ve also seen them with miles from town.

I wished I had planned better from the beginning and thought it out better as to what I would want years down the road. But who new what would be in the future. But I’m going to make it work. It’s just going to require a little imagination versus a layout designed specifically for operations.

@Mallard4468 posted:

Here is a link to one of the layouts I operate on.  If you scroll down to page 4, you'll see an explanation and example of the cards that are used.  Each card has two sides - car order (for delivery) and pickup order.  When a train leaves the yard, it includes several car orders.  The switching destination has a box containing pickup orders.  The operator drops off the car orders, then flips the cards inside the sleeve so that they become pickup orders for a later round.  (This process is easier to see and do than to explain in writing.)  If done correctly, the process is self-staging for future sessions, and there's no need to generate switching lists.

https://www.operatingsessions....ON%20%204.5.2023.pdf

Wow!  There are a lot of interesting ideas contained in the package.  Thanks for sharing.  I need to study it before commenting any further, but great information!

Art

@Dave_C posted:

I guess I have what would be called a folded dog bone. Just a lot more twist and turns. It is single track. But if you look at the majority of it. It first appears to be double tracked. When trains pass one another they are always going different directions. In my case now. North and South. I can accommodate probably 3 trains on the mainline. I really only have one long passing track which also doubles as a yard lead. Operation wise it’s probably not in the best of spots. My layout was built way before command control. I wanted a long mainline with trains only passing one another going different directions.
When I started out I was all NYC and a bit of New Haven as things were available. Lots of passenger cars.  I later switched to the B&A. I still found coming up with an operation scheme to be difficult with my present layout and what I was running. They all focused on main line modeling with a lot of traffic. I’ve always had a thing for Milk Trains. I started looking into modeling the Rutland. Nothing available except a MTH Mikado. I started weathering rolling stock years ago and felt a little more comfortable trying re lettering. Luckily the majority of what the Rutland ran was sort of generic Steam with close enough for me models available as well as decals. At a price I was comfortable paying doing conversions. They ran shorter trains. Especially passenger trains which freed up a lot of yard space. I bought every Volume of Nimke’s books on the Rutland. Lots of info as to what they shipped and received. This way I could model industries that would have been served by the RR. I’m finally focused on what needs to be done to get a layout multiple operators can run. It’s been a long journey.

Yes I did add mileposts. Whether or not anyone notices them is okay. I know they are there. I found some pictures and ended up going with some Scale City whistle posts. Filled in the W and decaled the miles in. I’m still not sure I’ve done them right. I have them as miles to go to the division point. But I’ve also seen them with miles from town.

I wished I had planned better from the beginning and thought it out better as to what I would want years down the road. But who new what would be in the future. But I’m going to make it work. It’s just going to require a little imagination versus a layout designed specifically for operations.

Dave, thanks for the description of your layout.  I forgot to mention before, I love your scenery and weathering.  It sounds like your plan gives you a long mainline and can accommodate a number of trains running at once.  I guess the biggest question is how best to add operating interest and excitement?  Do you have very many crossovers?  If you do, you could inject inject  challenges by switching from one track to the other on them while running trains toward each other.  Every place your have two crossovers, you in essence also have a passing siding.  Adding crossovers isn't cheap, but is one of the easiest changes to an existing layout.  Just a thought.

Art

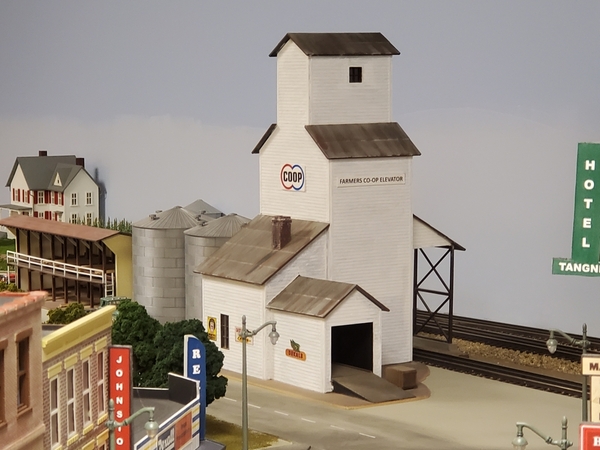
I was working on adding more details to my grain elevator last night.  I added the grain chutes that Alan made for me and I have been wanting to next add some Plastruct  caged safety ladders.  I have cleaned out my local hobby shop of these in the past and only had one left.  I measured, painted, glued, and added them to two of the chutes.  I really like the looks of them and them help with the realistic look that I am after.

Caged Ladder 1Caged Ladder 2Caged Ladder 3

I've got an idea to share with Alan to add further detail.

Art

Attachments

Images (3)
  • Caged Ladder 1
  • Caged Ladder 2
  • Caged Ladder 3

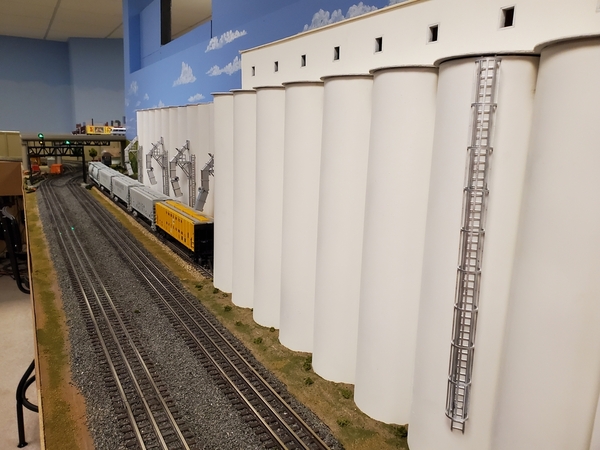
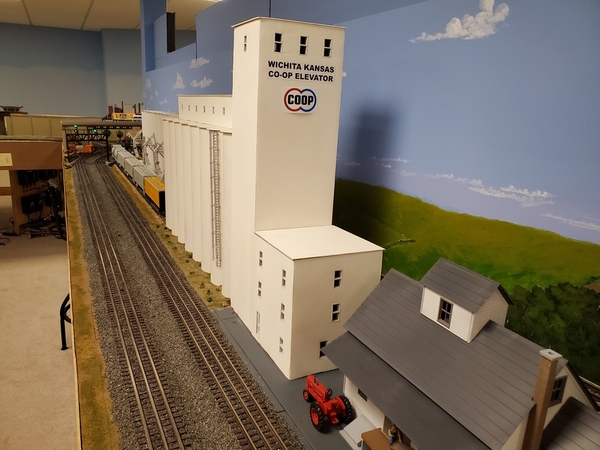
This is a little update on adding the details to my grain elevator.  The most difficult and complex part was the grain unloading chutes.  I was pleased and amazed at how Alan made them.  We felt that there was no reason to 3D print the caged ladders as they are readily available from Plastruct, assuming you can find them.  I was lucky in that regard too as my local hobby shop had them in stock.  I have added 4 grain chutes and caged ladders on the loadout silos.  I just added a caged ladder on the main silos and have repainted all the silos.  I just added sand, grass, and weeds to the base of the elevators.  I still want to add some lights over the main head house doors and some workers, but things are pretty close to being done.  Here are a few pictures.

Caged Ladder 4Caged ladder 5Caged Ladder 6Caged Ladder 7

Attachments

Images (4)
  • Caged Ladder 4
  • Caged ladder 5
  • Caged Ladder 6
  • Caged Ladder 7

Art, everything looks great!  I’ve lived my life in Appalachia, so I have only see silos like yours once, on a work trip to Mattoon Illinois.  My experience is with coal conveyance.

Please correct any mistakes in my assumptions.  I am taking it that there are a lot of conveyors inside the prototype.  You mentioned the holding silos, which I take are where grain is trucked in and stored.  Then it is transferred to the loading silos, where it funnels down the chutes to covered hopper hatches.  Is grain stored below the hatches where the chutes attach to the silos?  If so, more conveyors to raise it up to the chutes.  They are simple to look at on the outside, but I think there is a lot going on inside.  😃

Thanks, Mark.  I have lived most of my life in the Midwest where grain elevators are everywhere.  Almost every small town has one and most of them are the old wooden variety like the Lionel one.  Some towns became more successful in receiving the local farmer's grain directly out of the fields and added more modern concrete elevators with cylindrical silos.  I am basing my detailing on the complex located in my wife's home town of Ruthven, IA.  It has one of the better elevator complexes in that area of northwest Iowa, but is a town of less than 1,000 people.  The concrete elevator I am using the detailing on is based on one located in Wichita, KS where we lived for two years in the late 1970's.  It is 1/2 mile long and is a very impressive structure.

Most of my limited knowledge on grain elevators is from observing them during my train watching activities.  I do know that grain is delivered to an elevator by pouring it into the grills in the floor onto a conveyor that takes it into the elevator and then is transferred to the top of the silos either by bucket elevators or pneumatic tubes or conveyors and dropped into the silos.  It can then be transferred to any other silo through a system of conveyors or pneumatic tubes.  When they are ready to discharge the grain into tricks or rail cars, it is through discharge chutes like Alan made for me.  It is gravity fed into the openings on the tops of the covered hoppers.  I understand the elevator business is getting more complicated these days with keeping regular grain separated from genetically modified and organic grain.

I first made the basic structure for this elevator around 25 years ago out of 3 1/2" PVC pipes.  I used a Suncoast Models HO elevator instruction sheet for the design.  It has given the "look" of the concrete grain elevator all this time and now I am trying finally to super detail it and "finish" it.  I was held back by wondering how I would tackle making the grain chutes until Alan said if I could send him a picture of what I wanted, he would try to 3D print it for me.  I knew he was really good at it, but I was totally blown away by the final product!

Art

Here are a few pictures of the traditional wooden style grain elevator that was seen in nearly every small Midwestern town.  This is a Lionel model that I painted, weathered, and added signage to replicate the one in Ruthven, Iowa.  Typically elevators would add metal grain storage bins (Butler bins) to increase their capacity before adding the more modern and expensive concrete silos.  I used HO bins as they looked right to me in this application.

Ruthven elevator 1Ruthven elevator 2Ruthven elevator 3

Art

Attachments

Images (3)
  • Ruthven elevator 1
  • Ruthven elevator 2
  • Ruthven elevator 3
Last edited by Chugman

Art, love your  modeling of the elevators. Its one of those things I want to add to my layout. At least today, central Illinois elevators are often very large corrugated steel silos massed together with the complex of material handling systems. I am also seeing the newer ones being large square/rectangular and squat concrete structures. Not sure but I think those are designated for the ethanol producers.   

I have been working on determining trains to run during operating sessions.  I have limited switching opportunities as I didn't plan my layout for that when I designed it.  So, I want to maximize what I have.  I have my Milwaukee Road "meat train" that will run as #62 eastbound to pickup loaded reefers at my two packing plants and the same train westbound as #63.  I also need a train that will service my grain elevator, flour mill, and Wonder Bread bakery.  I have decided to call that my "grain train" and have been debating how best to run it?  It needs to pickup loaded grain covered hoppers at my Wichita Coop Elevator, take them to the Sunny Kansas Flour mill, pickup loaded flour cars at the mill, and swap them out at the Wonder Bread bakery.

And I discovered that I needed a road switch engine that I could dedicate to this job.  In looking at my inventory I came across an Atlas SD35 that I have had for 20 to 25 years sitting on the shelf not being used.  I have never been able to resolve the arcing and sparking issues with it.  It looks and sounds great and runs beautifully on straight track, but terrible running through switches.  I have all Atlas track and switches too. 

After a train friend's luncheon on Thursday, my friend Les came over to run a few trains and talk operating strategies.  I had just cleaned this engine and we ran it until it reached the 072 switch that leads to my Eola yard.  It shorted out repeatedly trying to run through this switch.  We discovered that the center wheel set (three wheels per truck on this engine) was making contact with the power center rail causing the short.  We took the engine apart to get at this wheel set.  The wheel set had enough play to reach the rail by 1/32".  The engine came with a replacement set of center wheel sets that had flanges on the wheels, but no traction tires.  The ones on the engine does not have flanges.  This was allowing the wheel set to move enough to contact the power rail.  We ground some of the edge of the wheel and it didn't short out, but still sparked a little.  We then ground off some on the top edge of the power rail and it worked. 

After putting everything back together, we ran a grain train around the layout and performed all the switching duties.  The engine finally ran great but exposed some dirty track that now needs some elbow grease.  The engine has been assigned a spot at the Proviso engine facility and is on the roster for regular duty.

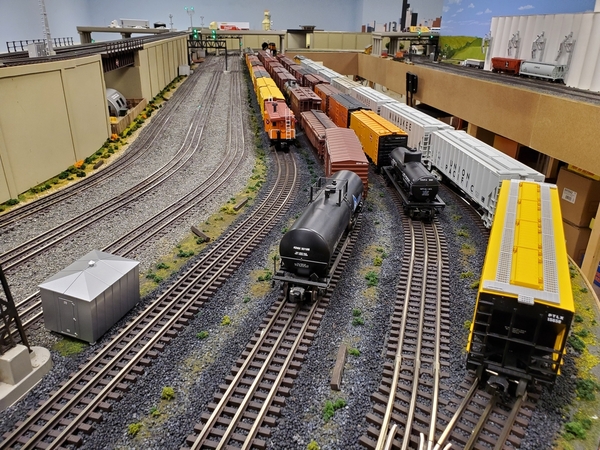
Here are a few pictures of the engine tied up on track #1 at the Eola yard after it's initial run.

Grain train arrives at Eola yardGrain train on track 1 at Eola yardUP SD35 switcher back in service

Art

Attachments

Images (3)
  • Grain train arrives at Eola yard
  • Grain train on track 1 at Eola yard
  • UP SD35 switcher back in service

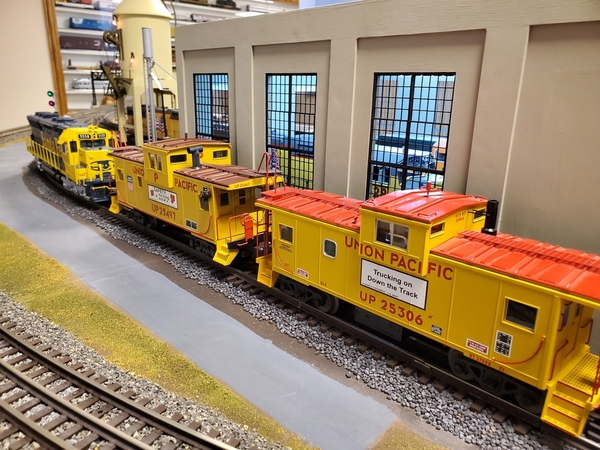
I went down to my Proviso engine facility to see how things were going on the first day of the new year.  Things were pretty quiet, but I did see a Santa Fe switcher idling on the caboose track preparing for the day's activities.  All the other engines tied up were either Union Pacific or BNSF being serviced for their next assignment. 

Proviso caboose track 1Proviso caboose track 2Proviso caboose track 3Proviso caboose track 4

Waiting for family to arrive to celebrate the new year and three birthday's:  My wife's, my grandson's, and mine.  I wish you all a very Happy New Year!

Art

Attachments

Images (4)
  • Proviso caboose track 1
  • Proviso caboose track 2
  • Proviso caboose track 3
  • Proviso caboose track 4
@Chugman posted:

I went down to my Proviso engine facility to see how things were going on the first day of the new year.  Things were pretty quiet, but I did see a Santa Fe switcher idling on the caboose track preparing for the day's activities.  All the other engines tied up were either Union Pacific or BNSF being serviced for their next assignment.


Waiting for family to arrive to celebrate the new year and three birthday's:  My wife's, my grandson's, and mine.  I wish you all a very Happy New Year!

Art

Happy Birthday and Happy New Year Art.

We have 4 over Memorial Day weekend. My birthday (25th), our anniversary and Mother in laws b'day (27th) and my wife's b'day (29th).

Bob

Add Reply

Post

OGR Publishing, Inc., 1310 Eastside Centre Ct, Suite 6, Mountain Home, AR 72653
800-980-OGRR (6477)
www.ogaugerr.com

×
×
×
×
Link copied to your clipboard.
×
×