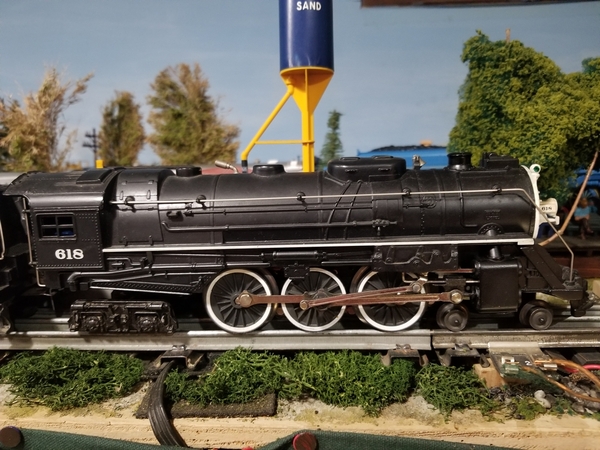
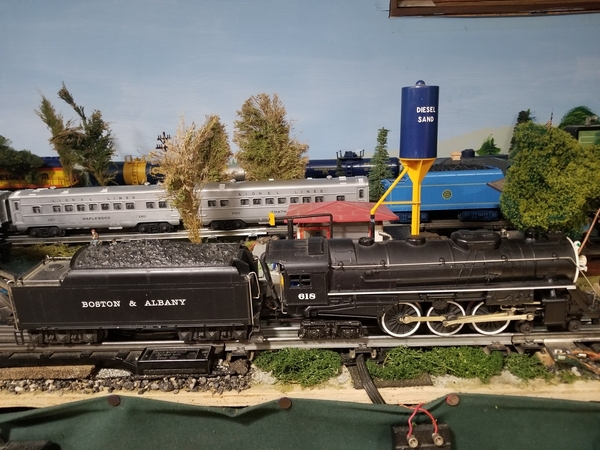
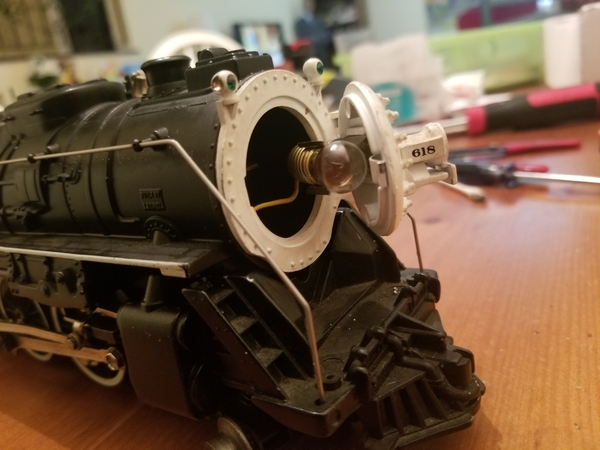
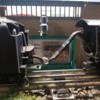
I have a Lionel Boston & Albany Hudson # 618, which I believe was manufactured in the late 1980s. I don't have the product number because I bought it over 20 years ago without the box from a LHS.

It runs OK at slow speed, but it often makes a wheezing sound and slows down at moderate to fast speed.

The problem is not lubrication. I already recently sent it to a very reputable train repairman, who thought he fixed it by thoroughly lubricating it, but it still has the same problem: wheezing and slowing down at moderate to high speed.

After reading John's current thread about the gear dilemma, the thought occurred to me that maybe my engine has a gear problem, and I decided to start this thread to get some ideas for a diagnosis and possible solutions for fixing it.

Here are photos of the engine:

20210419_062937

20210419_062949

20210419_063004

Arnold

Attachments

Images (3)
  • 20210419_062937
  • 20210419_062949
  • 20210419_063004
Last edited by Arnold D. Cribari
Original Post

Replies sorted oldest to newest

That’s a spur gear model Arnold, nothing like what John is experiencing......the sounds you’re hearing are most likely due to insufficient lube. Those locomotives are built exactly like their postwar predecessors. A heavier lubricant would be ideal IMO, especially if you desire to give the patrons on your RR whiplash at higher speeds. A good quality grease on the gears, and drops of oil on the shafts is important. Be sure to oil all shafts, armature, axles, and the shafts the spur gears sit on......hope that helps,.

Pat

Thanks, Pat, one of our Sponsors (will keep anonymous because the Sponsor already made a good faith effort to fix it) told me he  lubricated it to solve the problem, but it still weases.

Based on your post, maybe the Sponsor did not use the correct lubricants in all of the necessary places.

I Googled my engine and got more information. I believe it's a Lionel with Railsounds Product # 6-18042.

Here is a short video in which you can hear the weasing sound:

Arnold

Attachments

Videos (1)
20210419_063526
Last edited by Arnold D. Cribari

Thanks Pat, Matt, Jon, Joe and John for your helpful advice.

What puzzles me is that there is no wheezing sound at all when the locomotive is run at slow speed. I just ran it slow while pulling my new Lionel heavyweight passenger cars and it ran fine. Does this change anyone's thoughts about the problem?

It seems to me that if there was insufficient or improper lubrication, there would still be some wheezing at slow speed as well as moderate and fast speed.

Arnold

Last edited by Arnold D. Cribari

For the life of me, I couldn't figure out what you were all talking about. Then I got it!!!  What an amazing language, English, right? Someone ought to compile all the words in a list, with the correct spelling, and then figure out how to make that list available in a computer program, so that when you type a word, it somehow offers to correct the spelling!!! Then when people try to search for the topic, later on, they can find it and be helped by the answers. Just goin' out on a limb, here.

Arthur, after reading your comments, I immediately Googled the spelling of "wheezing" and now know that is the correct spelling.

Will change the spelling of that word in the title of this topic, etc.

Arnold, if you have a toothpick and some motor oil, you can cure this problem yourself. Lay her on her back in a towel or a cradle, put some motor oil in the cap of the bottle, pick some up with the toothpick, and drop it on the armature shaft ends. Use the toothpick to push on the shaft ends gently and work the shaft ends back and forth, ( they have a little play in them) this will work the oil into the bearing surfaces......it doesn’t have to be some super duper model train oil, ....whatever motor oil you have in your garage or workshop will suffice, ....5W-20, 10W-30, 10W-40,...whatever, they’ll get the job done,....

Pat

Thanks Pat, Matt, Jon, Joe and John for your helpful advice.

What puzzles me is that there is no wheezing sound at all when the locomotive is run at slow speed. I just ran it slow while pulling my new Lionel heavyweight passenger cars and it ran fine. Does this change anyone's thoughts about the problem?

It seems to me that if there was insufficient or improper lubrication, there would still be some wheezing at slow speed as well as moderate and fast speed.

Arnold

Arnold...the dry shaft or axle would tend to flop around "HUNT" more at higher speeds....thus making noise...no noise at lower speeds...keep at it I had a time with a 224  took a while but I got it...joe

Arnold, don't be surprised if, after oiling the armature bearing, the sound returns at some point down the road. This merely points out the need to relube periodically. Remember, oil does dry up when an engine is left sitting for a long time!

I agree with most comments on here about the source of the problem being dry armature end bearings. That said, I have heard spur gears make a similar noise, but much less frequently - a drop or so on each of the spur gear shafts will address that.

The reason for this occurring at high speeds reveals itself with a close observation of the armature "bearing" hole though the brush plate. If you insert a 1/8" drill bit (the smooth end) into that hole and look closely, you will most likely see some wiggle room - not a good thing, since this allows the armature to "rattle" back and forth, side-to-side, creating the wheezing sound as you described it. The higher the speed of the armature, the more likely it is to set up this lateral motion due to minor imbalances, and suddenly the noise begins.

Should you find that the noise keeps reoccurring more often than you like, the cure will be a new brush plate (plus continued lube on a periodic basis.) Your brush plate assy is part number 6008702132 and appears to be available from Lionel for $7.50 + shpg.

arnolds brush plate assy

The above photo from Lionel's parts page reveals something interesting - it appears that Lionel added a metal bearing for the armature shaft on this newer version. So if you do end up getting a new one, with proper lubing, it should last for a very long time!

Attachments

Images (1)
  • arnolds brush plate assy

Arnold: FYI - I own the same 'conventional' #618 engine, the product number for which is 6-18042 that Lionel released in 1995.  I know that because it was the 1st or 2nd 'new' Lionel engine I bought after deciding to get back into the hobby that I'd long since forgotten since my childhood.  It came with the distinctive 'white wall' wheels and also the 'Funky' (grhh) sharply bent electrical cord (that I see in one of your photos) between the engine and tender which - initially - caused my engine to derail constantly, and prompted me to have someone rewire it to eliminate the sharp bend.  It's a nice little engine and, with its Pullmor motor, gives off the same 'coffee grinder' sound (even when properly lubricated) and ozone aroma that I remember as a child.  In particular, I've always found its whistle quite appealing as it's reminiscent of the real steam engines I used to observe trackside when I was a kid.

All very helpful contributions. Thank you again.

This is one of my favorite engines. Terrific, realistic basic sounds, bell and horn,  excellent puffing smoke, and great appearance, IMO.

What I'm about to say is a joke: maybe I should take this engine to a good respiratory therapist (there is one among us on the Forum) to cure the wheezing. LOL, Arnold

What puzzles me is that there is no wheezing sound at all when the locomotive is run at slow speed.

The sound you are hearing is due to a lack of lube, but not where everybody is sending you.  The backs of all of the gears need to have a thin film of Lucas Red 'N' Tacky #2 on them. Without the grease, a harmonic is set up causing at least one of the spur gears to vibrate at only certain speeds, which will vary depending on the load on the gear train.

Rob or anyone else that knows, I have a few questions that will show my ignorance, but I ask bec because my I've never used Red n Tack before.

I just bought a tube of it. On one end of the tube, it says "This End Into Gun First."

Do I need to get something like a gun that's used for caulking to apply the Red n Tacky to the gears?

For putting this product on the gears of a model train, it's obvious I only need to use a little bit. Should I use s toothpick or the tip of a small screw driver to apply it to the gears?

What do you recommend that I use to apply it to the gears?

Arnold

Do I need to get something like a gun that's used for caulking to apply the Red n Tacky to the gears...  ...should I use a toothpick or the tip of a small screw driver to apply it to the gears?

No gun, no tool needed, serve right out of the tube. These are meant for grease guns(pump or pneumatic), no spouts or ratchets like caulking guns.  I have a round toothpick in each tube of the Lucas(I have 4 going). As the grease is used, I just cut down the tube with a utility knife to the level of the grease and keep using the white plastic cap it came with to cover.

Last edited by ADCX Rob

Arnold, your tube will be fine, it's the same stuff. I bought a plastic jar with screw on lid - easier than keeping a caulking gun or a grease gun at the bench. I would just squirt some out into a screw top container, then have at it with a small screwdriver, or a toothpick, or even your fingers if they are long and pointy and you want to immerse yourself in the moment!!

George!

Arnold - Similar to you, I'm a neophyte when it comes to lubricating internal gears.  So what I noticed in Rob's comment was that he said to put the RnT on "The backs of all the gears..."  Consequently because he didn't say 'teeth' (instead of back) I'm saying to myself - "Huh" followed by...Surely he's not talking about the flat side of the gears, because that wouldn't serve any purpose IMO.

In my world a picture's worth a thousand words.  Once I'm shown how to do something properly I consider myself a quick learner, but initially (because I'm not mechanically-inclined) sometimes I have difficulty visualizing what people are explaining verbally.

PS - This is why I'm also a firm believer in the 'KISS' philosophy. (lol)

@PH1975 posted:

...Surely he's not talking about the flat side of the gears, because that wouldn't serve any purpose IMO...

Yet, I am. Try it, you'll like it!  And actually, a glob behind each gear would be ever better, but then it might sling off at high speed - so find a balance. @PH1975, it's not just for lubrication... read the reason above in prior post. It's for dampening.

Last edited by ADCX Rob
@PH1975 posted:

Arnold - Similar to you, I'm a neophyte when it comes to lubricating internal gears.  So what I noticed in Rob's comment was that he said to put the RnT on "The backs of all the gears..."  Consequently because he didn't say 'teeth' (instead of back) I'm saying to myself - "Huh" followed by...Surely he's not talking about the flat side of the gears, because that wouldn't serve any purpose IMO.


PS - This is why I'm also a firm believer in the 'KISS' philosophy. (lol)

PH ,  I think since the back of the gears move against the truck housing and the axles the gears ride on that they

might benefit by the application of grease.     It probably would also cut down on the harmonic noise too.  !?! 🤔

Not sure , but so far all my MTH engines don't seem to have any " wheezing " issues.

I think since the back of the gears move against the truck housing and the axles the gears ride on that they might benefit by the application of grease.     It probably would also cut down on the harmonic noise too.  !?! 🤔

Yes!

...so far all my MTH engines don't seem to have any " wheezing " issues.

Which MTH engines have the parallel plate spur gear motors?

Last edited by ADCX Rob

Rob, E-Unit-79 and Dallas - Thanks for the clarifications and Rob, after reading your first Post I even googled Harmonic Vibration .

As Jim Carrey would say - 'Alrighty then!'  

Seriously though, in the past I've gone on line and seen various plastic lube dispensers one can buy with needlepoint tips (as E-Unit has alluded to) and since I already use LaBelle oils which have these (and coincidentally I just finished a bottle) I'll try using it to apply grease into tight spaces such as this.

Thanks again everyone for all of the comments!

@E-UNIT-79 posted:

The easiest way I think to get it behind the gear is with some type of needlepoint Oiler. You load the grease into the oiler and stick the needle behind the gear and get it in there.

Skip the oil, use the Lucas. I pack the Lucas into a plastic syringe when I need to get it into a tight spot, but for this use, the point of the toothpick works fine. It doesn't need any great amount, just enough to smear the backsides of the gears.

Last edited by ADCX Rob
@PH1975 posted:

Rob, E-Unit-79 and Dallas - Thanks for the clarifications and Rob, after reading your first Post I even googled Harmonic Vibration .

As Jim Carrey would say - 'Alrighty then!'  

Seriously though, in the past I've gone on line and seen various plastic lube dispensers one can buy with needlepoint tips (as E-Unit has alluded to) and since I already use LaBelle oils which have these (and coincidentally I just finished a bottle) I'll try using it to apply grease into tight spaces such as this.

Thanks again everyone for all of the comments!

Great suggestion, I have an empty LaBelle needle point applicator that I saved (pack rat that I am) and will also use it for the RnT.

I bought the RnT #2 today.

Is there any concern about applying too much RnT?

I don't care if any extra splatters all over the place and makes a mess.

The reason I ask is I already had a very reputable Forum Sponsor with a great reputation for fixing conventional O Gauge trains lubricate this engine, and the wheezing persisted, so I am inclined to put a lot of RnT #2 wherever you folks say it should go.

Arnold

Last edited by Arnold D. Cribari
@ADCX Rob posted:

Skip the oil, use the Lucas. I pack the Lucas into a plastic syringe when I need to get it into a tight spot, but for this use, the point of the toothpick works fine. It doesn't need any great amount, just enough to smear the backsides of the gears.

To get into tight spaces I cut off a piece of handrail from my  ' inventory drawer '  from an old steamer .   

I just dip it into the grease or oil . Not very much is needed.

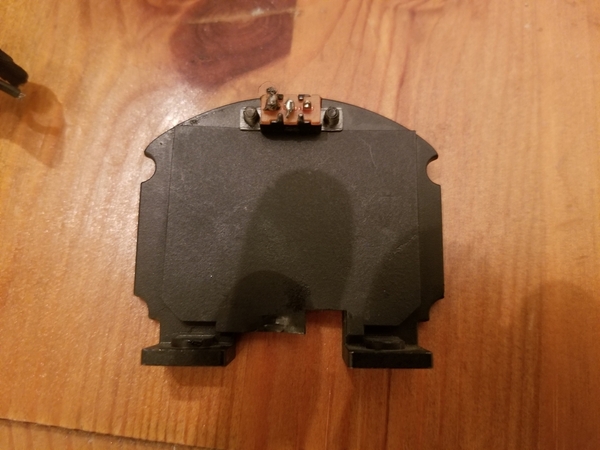
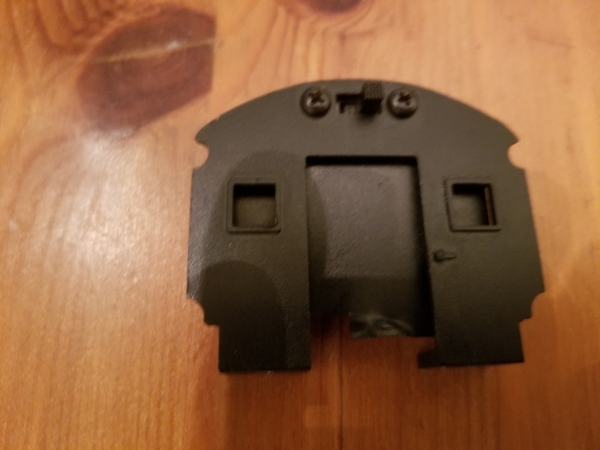
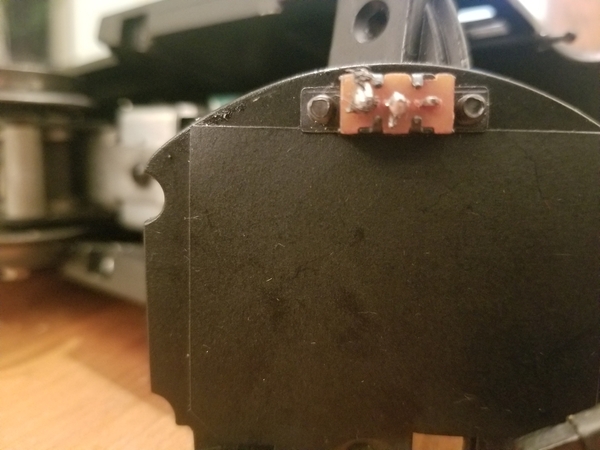
Well, I got the red n tacky on the gears but, unfortunately, I ripped off 3 little wires (black purple and white) that were soldered onto a plate with a switch in the back of the engine. These 3 wires at the other end of them are still connected to the circuit board (thank God!).

Below are photos of what I'm talking about.

In the bottom photo, the engine is on its side, the white and purple wires were and are taped together, and the black wire is separate.

The middle photo shows the outside of the back plate with the switch on top. Since I don't have the owners Manual, I'm not sure what that switch is for, but my guess is it is for the smoke, the horn and/or bell. It's not for the Railsounds because that switch is under the tender.

The top photo shows the inside of the back plate where the 3 wires need to be re-soldered to the connections on the top.

I desperately need some expert advice as to where each of the 3 wires need to be soldered.

Arnold

20210420_19490220210420_194922

20210420_194609

Attachments

Images (3)
  • 20210420_194609
  • 20210420_194902
  • 20210420_194922

Arnold, this is funny! I thought a ultrasonic nebulizer with some transmission oil, followed by a high dose of magnesium and steroids might help. What is the age and weight and height of the loco? Does it have any allergies? Does it have a history of wheezing? Is there nocturnal wheezing? Audible wheezing is usually a dry gear (or cardiac noise referred sound) So long as You aren’t with a reactive airway or your loco with a steam chest issue!
I had the same issue with one of my postwar locos. Shaft lube needed and check for uniformity or gear integrity. Something might be slipping the wrong way with increased resistance to flow. Hmm, what are we talking about here again? Lol.

great topic and associated videos!


Arnold, when you get all thru greasing and lubing, take several clean, dry cotton swabs and clean off your wheel treads and your wheel flanges, I can see grease globs on or close to both. Do not use the same area of the swab to make multiple passes while cleaning, just one swipe at any small smudges of grease, then rotate to find another clean side of the swab and wipe a new area. Same goes for any globs of grease you find on any moving parts, clean it off before it has a chance to sling off.

I would caution you in regard to applying grease and/or oil to the armature shaft where it goes through the brush plate. While the armature shaft absolutely needs to be lubricated (both ends), any excess applied to the shaft on the brush plate side can easily sling off onto the commutator segments on the armature and will cause havoc if they do so. Keep it light. Through trial and error, my preference is to only use a light oil, and just a very small drop. The engine will tell you if/when it needs more.

Just for grins, you may want to watch this short video on lubrication from Lionel, it talks about NOT applying grease to your gear teeth - when you're done with that, watch this video from some lad named Dean - I have no idea who he is, but he recommends that you do put grease on your gears!

What's the point you ask? In short, the point is that everybody has an opinion on the way things should be done, and they are rarely all the same. As a repair shop manager, I learned that if you have ten different technicians all working on the exact same product, you will have ten different products rolling off your service line unless you provide them with one standardized repair procedure and then train them all to that procedure. What if there is no standardized procedure? Then follow the manufacturer's recommendations - they hire real engineers and even do testing to come up with their procedures. That said, the Lionel video seems pretty minimal in my opinion, but I would bet Lionel has supplied additional info over the years that can be found in operator's manuals, instructions sheets, perhaps even more videos. It will make some interesting reading.

For now, just clean up any excess lube you have on your drive train and get your wires soldered. I suspect that after watching videos and learning more about the repair of your toys, and getting your feet wet, you will, like most of us, develop your own particular approach to doing things like this.

I have attached an excerpt from Lionel Supplement #30 for your engine. You can see the purple and white wires do go together and are soldered to one of the end terminals on the switch, while the remaining wire appears to go to the center terminal. Best of luck!

George

Attachments

So, here's the upshot, which is mixed.

The Red n Tacky worked beautifully. The engine can now fly down the track with no wheezing. I was generous, but not outrageous, with the Red n Tacky wherever there was a gear.

It took my FOREVER, after taking the brush plate off, to get it back on with the little bronze cylindrical things (forget what they are called) to stay in place. But, with the patience of Job, after cleaning the copper colored top of the armature (armature plate) with an eraser, and running a tooth pick through the little slots, I FINALLY got the d.... thing back together. What a PITA!

More good news. I re-soldered the 3 wires where I guessed they belonged, and the engine runs, smokes, and all sounds (Railsounds, bell and whistle) work great. What a relief!

So, what problem could there be? The headlight doesn't work. I don't think the 3 little wires (black, white and purple that is in the photo above) have anything to do with the headlight. The wire for the headlight came off, so I resoldered it back on, but still no light.

I will post a picture of the headlight and wire.

20210420_224040

Attachments

Images (1)
  • 20210420_224040
Last edited by Arnold D. Cribari

.

The middle photo shows the outside of the back plate with the switch on top. Since I don't have the owners Manual, I'm not sure what that switch is for, but my guess is it is for the smoke, the horn and/or bell. It's not for the Railsounds because that switch is under the tender.


Arnold

20210420_19490220210420_194922

20210420_194609

Arnold - The switch inside the cab is the LCRU switch for Forward/Run or Program/Lock, the latter to enable the engine to be locked into a single operational state if you wanted.  Incidentally, like many other engines the Owner's Manual for this steamer can be found on Lionel's website under Support by typing in the product number as you normally would in the space provided.

@Leroof posted:

Arnold, this is funny! I thought a ultrasonic nebulizer with some transmission oil, followed by a high dose of magnesium and steroids might help. What is the age and weight and height of the loco? Does it have any allergies? Does it have a history of wheezing? Is there nocturnal wheezing? Audible wheezing is usually a dry gear (or cardiac noise referred sound) So long as You aren’t with a reactive airway or your loco with a steam chest issue!
I had the same issue with one of my postwar locos. Shaft lube needed and check for uniformity or gear integrity. Something might be slipping the wrong way with increased resistance to flow. Hmm, what are we talking about here again? Lol.

great topic and associated videos!


Leroof, you are the best respiratory therapist in the World. LOL, Arnold

@GeoPeg posted:

Arnold, when you get all thru greasing and lubing, take several clean, dry cotton swabs and clean off your wheel treads and your wheel flanges, I can see grease globs on or close to both. Do not use the same area of the swab to make multiple passes while cleaning, just one swipe at any small smudges of grease, then rotate to find another clean side of the swab and wipe a new area. Same goes for any globs of grease you find on any moving parts, clean it off before it has a chance to sling off.

I would caution you in regard to applying grease and/or oil to the armature shaft where it goes through the brush plate. While the armature shaft absolutely needs to be lubricated (both ends), any excess applied to the shaft on the brush plate side can easily sling off onto the commutator segments on the armature and will cause havoc if they do so. Keep it light. Through trial and error, my preference is to only use a light oil, and just a very small drop. The engine will tell you if/when it needs more.

Just for grins, you may want to watch this short video on lubrication from Lionel, it talks about NOT applying grease to your gear teeth - when you're done with that, watch this video from some lad named Dean - I have no idea who he is, but he recommends that you do put grease on your gears!

What's the point you ask? In short, the point is that everybody has an opinion on the way things should be done, and they are rarely all the same. As a repair shop manager, I learned that if you have ten different technicians all working on the exact same product, you will have ten different products rolling off your service line unless you provide them with one standardized repair procedure and then train them all to that procedure. What if there is no standardized procedure? Then follow the manufacturer's recommendations - they hire real engineers and even do testing to come up with their procedures. That said, the Lionel video seems pretty minimal in my opinion, but I would bet Lionel has supplied additional info over the years that can be found in operator's manuals, instructions sheets, perhaps even more videos. It will make some interesting reading.

For now, just clean up any excess lube you have on your drive train and get your wires soldered. I suspect that after watching videos and learning more about the repair of your toys, and getting your feet wet, you will, like most of us, develop your own particular approach to doing things like this.

I have attached an excerpt from Lionel Supplement #30 for your engine. You can see the purple and white wires do go together and are soldered to one of the end terminals on the switch, while the remaining wire appears to go to the center terminal. Best of luck!

George

Outstanding tutorial, Geopeg, on making this repair, and doing repairs in general.

I will clean off the globs of red n tacky as you recommend.

Based on you excerpt from Lionel, it seems that I did not solder the wires in the correct places, but by some miracle the engine still runs great. So like Yogi says if it ain't broke, don't fix it. LOL. Arnold

PS: later on, I will post a video showing how well the engine now runs at high speed

Geopeg

One more thing, I remembered from many years ago, when I did more Postwar maintenance than now, to put only 1 drop of light oil on the end of the armature shaft near the carbon bushings (is that what those little cylinders are called?), to use an eraser so the copper armature plate is shiny, and to run a wooden toothpick through the little slots.

Arnold: ...Based on you excerpt from Lionel, it seems that I did not solder the wires in the correct places, but by some miracle the engine still runs great...

What you did  is electrically equivalent to what the diagram shows. As long as the purple and white wires stay together and go to one of the terminals and the black wire goes to the other.


Arnold: "...near the carbon bushings (is that what those little cylinders are called?)..."

They are brushes

Watching your video, I can almost hear the clear, easy breathing!!!

George

Last edited by GeoPeg

I mention the above because after I got the shell about 90% off and could access the gears, there were quite a few screws I removed, and I was not 100% sure how to put it back together.

Also,  wires that had been soldered got disconnected and I was not sure where to solder each wire back into the correct position.

I was very relieved that the train ran so well after I put it back together.

Arnold

Last edited by Arnold D. Cribari
@ADCX Rob posted:

The shell does not nave to come off to access the spur gears! It's all done from the bottom/side.

This is very important. It would have saved me a lot of trouble if I did not take the shell off. Taking the shell off caused wires to come loose, which, IMO, are not easy to re-solder back on because the wires and where they are connected to the LCRU. are very small. Also, the headlight wire got disconnected, which is tricky to get to work again.

The wheezing is gone, as stated above, but there is a new problem. The locomotive is inconsistent when cycling from forward, to neutral, to reverse, etc., often getting stuck in neutral. As a result, when it's stuck in neutral and I want it to go forward, I need to apply power from transformer and press the Direction button several times, maybe 10 times, to get it to go forward.

Any thoughts as to the cause of this, and how to fix it?

My guess is that the cause is the LCRU unit, and my failure to re-solder the black, white and purple wires back on correctly and/or in the correct places.

20210420_19460920210420_200417

Last night, at first, I did not have this inconsistent recycling after applying the RnT and re-soldering the wires. Maybe the re-soldering connections got loose? What do you think?

Arnold

Attachments

Images (2)
  • 20210420_194609
  • 20210420_200417

I had some insomnia last night, but made my sleeplessness productive by working on this locomotive. Do any of you guys do that?

More good news. I believe working on this project has substantially improved my Postwar repair knowledge and skills. (I regard this 1995 Railsounds locomotive as postwar-like, because, although it has an early circuit board, it has a Postwar style motor and it isn't dominated by circuit boards and wires like the more modern Lionel and MTH engines). I studied (like I studied for the Bar Exam) the Supplemental Diagrams Geopeg posted above, and very carefull and correctly soldered the purple and white wires, and the black wire, on the little terminals for the LCRU. I used just a little solder to make the connections very neatly (like I was doing brain surgery, LOL), and doing this makes me much more confident about my soldering technique.

This morning I ran the engine. At first, it didn't run at all. I checked it out and made the connection more snug between the locomotive and tender. When I did that, I got the sounds, still no headlight, and the engine ran, but there was still inconsistent cycling from forward, neutral and reverse.

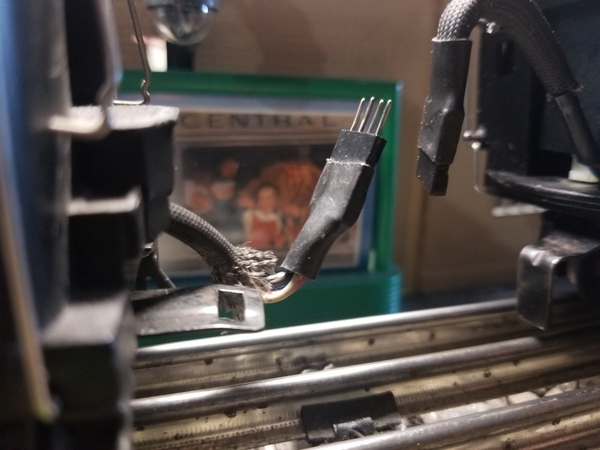
Here are 2 photos showing the weird locomotive-tender connection plugged in and unplugged:

20210422_082243

20210422_082300

I unplugged and reattached the locomotive-tender connection, and the cycling was better. I don't know if that is a coincidence or not. Often, when it got stuck in neutral, I could get the engine moving by manually pushing the locomotive forward or backward.

I suspect that the problem with the now occasional inconsistent cycling from forward to neutral to reverse has to do with the connection between locomotive and tender.

What do you think?

A couple of more questions: can this engine, which I love, be overhauled so it runs like an MTH Proto 3 or LC+? Also, if that is done, can I keep the same smoke, horn and whistle that it currently has? If so, approximately how much can such an overhaul cost if done by an expert (not me)?

My guess is the cost of such an overhaul would not be any less expensive than buying the identical engine in very good to excellent condition (not mint) without the box.

Arnold

Attachments

Images (2)
  • 20210422_082243
  • 20210422_082300
Last edited by Arnold D. Cribari

Arnold as the old saying goes....practice makes perfect and it also builds confidence.

Here are some of my thoughts which are limited since I don’t have a LCRU board schematic.  The white wire from your switch goes to the tender Railsounds Board. Not sure of the wires function but its connected. When you had the engine apart could you have impacted the ground (black) or power (pink) connection at the board? Is the power connections at the wire nut good and secure? I don’t know if they are just twisted together or soldered? You may want to check them. Lost of power usually causes something to cycle.

Keep at it and we will help you get this running as it should.

"I suspect that the problem with the now occasional inconsistent cycling from forward to neutral to reverse has to do with the connection between locomotive and tender."

Arnold - As I mentioned in my earlier comments the sharp bend in the cord caused my #618 to derail, and when you look at the latest pics you've provided perhaps the bend causes your fragile 4-pin connection to come loose and cause other problems as well.  Just a thought.

Secondly, I know (by you mentioning trying to run the engine through the F-N-R cycle) that you've been running in conventional mode, but did you realize that this engine is command equipped - or is supposed to be (see first page of Owner's Manual).  I only mention this because I see your cord has 4 pins (which mine originally had when I bought it new) but I wasn't into Command Control as yet.  Later, after I had had someone re-wire mine to correct the derailing problem, at some point I noticed that they had used 3-pin wire - but really didn't think much about it at the time.  As a result, when I eventually got TMCC components and then tried to assign an ID# to this engine, to my dismay as soon as I put 18 volts to the track my engine went 90 mph and I was very fortunate to be able to catch it before it went flying off my layout table.  Consequently I concluded - rightly or wrongly - that you need a 4 pin connection in order to run this engine in CC mode, but a 3 pin connection will enable it to be run conventionally.  In my case I've been content to run my #618 in conventional mode only. 

... The locomotive is inconsistent when cycling from forward, to neutral, to reverse, etc., often getting stuck in neutral. As a result, when it's stuck in neutral and I want it to go forward, I need to apply power from transformer and press the Direction button several times, maybe 10 times, to get it to go forward.


20210420_19460920210420_200417


Arnold

Arnold, as I look at the broken wires in your picture above, these breaks appear to be due to flexing, not pulling apart. I suggest you go back and check ALL of your wires (again) for proper connection, on both ends (board and switch.) I suspect other folks have been in this engine a few times and have flexed those wires more than a few times! Sometimes a wire looks connected but may be held in place by a small glob of heated insulation, or a cold solder joint. That may have something to do with your headlight as well, but for that I would check against a known good bulb first.

But before you tear your engine apart again, try the easy stuff first. The switch in your engine is a slide switch, and changes the engine between the RUN mode (contacts completed) and the PROGRAM mode (contacts open). If the switch is intermittent, it could be that your engine is jumping into the PROGRAM mode which would explain why your reversing actions are not working.

Slide switches are by nature, self-cleaning, so turning the switch on and off a few times will likely scrape any oxidation off the contacts, albeit temporarily. Turn that switch on and off about 10 times, then make certain it's fully in the RUN position and give it a try. If that fixes things, spray some contact cleaner into each end of the switch and work it back and forth another 10 or so times, then test it again.

In summary 1. test your switch, 2. test your bulb, and 3. CLOSELY examine your wiring again!

Add Reply

Post

OGR Publishing, Inc., 1310 Eastside Centre Ct, Suite 6, Mountain Home, AR 72653
800-980-OGRR (6477)
www.ogaugerr.com

×
×
×
×
Link copied to your clipboard.
×
×