I'll put this thread here as all my models are 3 rail, I'm sure most 3RS people weather or have weathered models, and the others who are just absolutely disgusted by weathering our trains.........well, no comment


First let me say that I'm NOT saying that what I do, or what I use is the correct way, the best way, or the best materials and techniques to use. I do not consider myself an expert, there are many modelers who are much better at this than I, so I just do what I do for fun, after all it is a hobby. I didn't come up with any of this stuff on my own, I'm not trying to take credit for any of it, I'm just answering some questions for fellow modelers who are curious. So feel free to add your 2 cents, comments, suggestions, critiques (I have thick skin), or your own tips and techniques. I've done a lot of "homework" through the years learning from others and then trying different combinations of my own to achieve the "look" I like for my own models. Working for the railroad for the past 17 years also gives me an up close and personal view of all the modern equipment and what happens to it over time. I can honestly say that I have about 3 of "my own" engines that are weathered, because everything I have done in the past I end up selling because I wasn't happy with it (call me anal, though that's probably not politically correct here). I've done a lot of custom weathering and detailing for clients in the past, but no longer have time for that. I have too many of my own irons in the fire so to speak.


So enough blabbering about the boring stuff.....


materials

Just about all the materials I use are seen here. Pretty much self explanatory although I just show a couple bottles of paint. I use various colors obviously but weathered black and grimy black a lot. I do not use acrylic paint in my airbrush, only Floquil and Scale Coat paints, and yes I know Floquil is discontinued and all the health risks and everything under the sun that we could agrue about re airbrushing. Again, this is what I do...it may not be for you.


Isoproypl alcohol has many uses, but notice it's 70%...for thinning, cleaning, washes, etc. I use 91% to strip paint and it normally works just fine. 


Compressor & Air Brishes

This is the compressor I use now as I just got it for Christmas from my parents. Before that I used a big Dewalt unit that was loud and annoying to my neighbors at 10 o'clock at night. This thing is quiet, super quiet, and you can carry it anywhere....like over to my parents house to work on the layout. I have several airbrushes and have tried many over the years. The one on the left is a cheap Harbor Freight $20 dual action model that is great for general use, like painting track, finish coats (dull-cote) and bigger jobs like that. The one to the right is a Master brand, dual action, gravity feed for more detail oriented work (like weathering) and runs about $50ish. I've been airbrushing since around 1985, so cleaning them is no big deal to me, 5 minutes with some thinner/cleaner and a few Q-tips....I'm good to go.


IMG_0239

This is a dummy unit I just converted to fixed pilots and Kadee couplers so I'll demonstrate with this since I have a weathered unit already done. It's an MTH 2945-3 Dash 8-40CW, Santa Fe Warbonnet of course.


IMG_0242

The 1st thing I do to my diesels is weather all the screens, grids, grills, filters etc. Weathered black, grimy black, and sometimes even a mix of roof brown and black. Depends on how big the screens are and whether they are easily accessible, I tape them off and spray them with a diluted wash....lots of thinner and a little paint. You can always make them darker, but it's real hard to make them lighter without re-painting the original color. I use the green FROG tape, gives a nice tight line and won't peel the paint off. Always pull the tape downward at an angle


IMG_0243

The small grills are too hard to get to without taking the model apart, so I just paint them by hand. There is usually enough paint in the lid from shaking the bottle, so just go slow and take your time. I used to do this in HO scale, I have no idea how, now that I've been doing O scale for years now. I wouldn't even want to try doing this in HO scale now, I'd go blind even quicker!


IMG_0247

You can see the difference between these 2 models. The one in front has all the grills blacked out, and I did them all by hand. I think it was actually quicker just to hand paint them, rather than mask off a few of the bigger ones. I also have to mention a lesson learned the hard way... While airbrushing the black around the exhaust stack, I decided to go over the radiator screens on a couple that I had already finished hand painting....why, I don't know. Well in the powered units the motor with the tach tape is right there, and guess what...you can read about that in another thread.


IMG_0250

The unit in the back is clean, ready for weathering. The middle unit has the blacked out screens/grills, and the unit in front has been weathered and ready for the layout. This particular unit has a light weathering, just enough to make it look like it has some miles on it. Nothing major, just the stuff that shows signs of use first. It got a wash of ink (brown & a little black) applied with a soft brush over the entire unit. More on the truck side frames than anywhere else. The ink is thinned with the 70% isopropyl, but I don't have a formula. I just go by looks, but its very thin...a lot of thinner. Remember you can always go darker by adding more ink/paint, or just do multiple coats.


IMG_0253

You can also airbrush a wash of dirt on the entire unit, but brushing it on allows the wash to flow into all the seems, crack, and crevices like dirt really does.


IMG_0258

I darkened up this photo to give you a better shot of how the weathering really looks to the naked eye. The bright light will wash out a lot of the details and how much you can really see. You can see the dirt on the side of the cab...remember to always brush up and down....gravity does the work I the real world.


IMG_0260

I use a cheap carousel when I spray the entire unit with the finish Dull-Cote or dirt wash. Also helps so you can spray at an upward angle for the running gear and fuel tank. Watch out for the windows....I usually mask them off for lead units, and spray right over them for middle/intermediate units of the consist. I also remove the crew figures and fold the sun visors down for those units in the middle of the consist.


IMG_0268

I use a lot of weathering powders as well, Bragdon and AIM. You see here on the bottom of the plow and the fuel tank, I added a little extra dirt. Earth brown and grimy black work well. Remember though, black powder is very dark so use it sparingly. a little goes a long way.


Attachments

Images (14)
  • materials
  • Compressor & Air Brishes
  • IMG_0239
  • IMG_0242
  • IMG_0243
  • IMG_0247
  • IMG_0250
  • IMG_0253
  • IMG_0258
  • IMG_0260
  • IMG_0262
  • IMG_0264
  • IMG_0268
  • IMG_0269
Last edited by Former Member
Original Post

Replies sorted oldest to newest

This GP30 is a non-powered unit I converted to fixed pilots. It's running mate, GP35, newly acquired at Christmas is in pieces now. My PSC parts order finally came in.


IMG_1287

IMG_1304

IMG_1317

This particular unit was done with the airbrush and powders...no ink wash. The yellow was so bright, and the first thing to show dirt in the real world. So I mixed a very diluted spray of boxcar brown and sprayed the entire model. After of course the blackened grill treatment, and you can still see the yellow paint through the dirt on the front screens behind the cab. There was a lot of powder used on this model as well. All the door latches and fuel tank were dusted with powder. Dab on a bit and then brush it out....and if it's too much, just wipe it off with a q-tip or rag. Lots of dirt picked up on the front pilot as well.


Clear coating the powder can be tricky...too much air pressure, or too wet on the spray and you will make all that powder disappear. I usually do it at 15psi with a 50/50 mix of Dull-Cote, and 8-10 inches away. Very light and easy is the key. Some people don't even clear coat, but I finish everything I do with Dull-Cote.


Even if you take your brand new shiny boxcar and spray it with a flat finish, it's a difference of night and day.


Attachments

Images (3)
  • IMG_1287
  • IMG_1304
  • IMG_1317

I would agree the photo is not taken properly, but if you're saying the weathering is not done properly then I would definitely disagree. I would NOT even consider myself an amateur when it comes to photography, but I assure you the weathering is there and can be seen by the naked eye   

Last edited by Former Member


Basically what I meant is…..

If one’s weathering is too conservative, it’s generally reflected in the photo as well.

It shows that one was timid, overly cautious and not ready to lean into it.

My early photos reflect this as well.


There is much more than just dusting up a model. Dirt and rust in most cases are in a specific area for a logical reason.

R&D of a real photo is also required to apply the weathering in the proper areas on the model.


Perhaps spending time on this forum would help some people achieve the realistic look they would like to get - http://theweatheringshop.com/


Just my observations.


I commend anyone who wants to attempt it.


J.L. RS-1 [8)

Attachments

Images (1)
  • J.L. RS-1 (8)
Last edited by SIRT

I like the conservative approach vs the rust bucket look any day. SIRT your stuff looks awesome too but I do like these diesels a lot. Everyone's tastes are different and I've seen a lot of examples by those who try that I would literally classify as junky looking. Not realistic but junk. Rust can ruin the look big time. I like dirt and grime but not so much on the rusty look. Just my opinion. 

Originally Posted by Jeff78rr:

I like the conservative approach vs the rust bucket look any day. SIRT your stuff looks awesome too but I do like these diesels a lot. Everyone's tastes are different and I've seen a lot of examples by those who try that I would literally classify as junky looking. Not realistic but junk. Rust can ruin the look big time. I like dirt and grime but not so much on the rusty look. Just my opinion. 


Excellent point! I've spent my entire working life in the railroad motive power business, both diesel and steam, and for locomotives in regular daily service, there really isn't that much rust. Of course the wheels and couplers do rust, since it is an FRA violation to paint either component.

I respect your opinion and also have enjoyed your work Jeff.


I also have a collection of items never posted that are lightly weathered reflecting newer cars for my late 70’s time frame.

I just find the rust buckets more interesting.

As I said on prior posts, “nothing to see here folks”


Last edited by SIRT

Wow, Laidoffsick, I can't thank you enough for posting your tips. 


As I said in the three rail thread, you nailed the diseasels.    Weathering is a very subjective detail that we add to our models, some like one technique, others like it another way. 


What I really do appreciate is having the technique explained so that I can experiment on my own, and do a look that looks good to me on my models.


SIRT, your weathering also looks awesome, as does the work of Industrial Models, who sells a lot of his work on e-Bay.  But there is a distinct difference in the work SIRT and Industrial Models do from my point of view.  When I see their work in a photo, the car itself is the focal point of the picture.  My eye is drawn to the detail of the weathering, individual patches of rust, and the extreme detail of the object of the photo. 


Personally, I don't like that level of detail in my weathering on an individual model, but a lot of other people do.  Once again, weathering preference is VERY subjective, and one of the reasons that I HATE weathering stuff for anybody but myself (and a couple of close friends that share a similar taste in weathering).  What I do like in LOS's weathering is that is "blends" all kinda nice into an overall scene.  It all fits nicely together, in balance.  When I see a photo like the one below, the diesel just kind of finds it's way into the scene.  It looks just like any number of diesels that I've seen over my career, doing it's thing, day in and day out, not asking for attention, just makin' money.  In this scene, the track looks great, the rock castings look great, the ground foam blends in nice, and what I love about the scene is everything blends in together and no one detail stands out.


Some consider that type of weathering boring. 


It's all good stuff, I appreciate seeing everybody's effort, and as I've stated over and over again, what trips the trigger of one person, doesn't work for somebody else.


LOS, thanks again for taking the time to explain your techniques, step by step, and giving me the push I need to get off the couch watching the Blackhawks and down into the basement to weather something I haven't tried before. 


Regards,

Jerry Zeman


Thanks Jerry, that particular unit was for a client a few years ago. He picked out a picture of a real engine and I just copied it. That one was all airbrush. Although its on 3 rail track, it was a 2 rail model.  The Conrail unit belonged to the same guy and also was, done entirely with the airbrush. He too just wanted an overall fade from dust and grime.

LOS thanks for posting this, excellent stuff.  I have engines that vary in the amount of weathering they have received.  I mostly model steam in the 40's and 50's.  Some of them are extremely filthy and do for a shopping, while others have just a hint of road grime.  I love the look on the passenger power, some slight grime on the pilot and looks like some soot and minor grime on the roofs...looks great.  I also like to vary things from engine to engine or car to car so it all doesn't look like it was done by me...  i.e. the same ole' thing again and again....I've made that mistake a couple times.


gnnpnut- no way...that FURX unit looks great...looks nicely used.

I was always afraid of trying to weather stuff especially locos. Seeing this thread is motivating me to try. I have 2 of the original Lionel Santa Fe scale dash 9's with the warbonnet. I don't run them much and have thought to sell them. They now seem like keepers to experiment with. Plus seeing SIRT and LOS showing off their skills is treat.

I'm definitely in the light weathering camp too.  LOS I love the weathering on your diesels!  SIRT does a fantastic job but most of his is a little too rusty for me.  Again, that is just my personal preference.  After seeing properly weathered items I don't see how I could go back to the shiny, out of the box look.  Good thread!


Art 

This is absolutely a must archive for later post! Would really be neat if -- as a premium member maybe -- you could push a button that would convert the entire post to pdf for future reference. This kind of stuff is pure gold.


With many years of MMRing ahead weathering is on my priority skills list. To me its all about having the confidence to do it. With results like the ones shown here, why would you NOT want to weather your trains?

LOS, your SF E6s look fantastic, just right. I remember you having a thread on setting them up with tighter coupling, fixed pilots and proper ride height. Have you done a set of Lionel's F units yet?


I tend to like the 'in service' weathering as opposed to post nuclear video game style of 3D rust blobs and bullet holes, teeth marks, etc. The trend seems to be the latter though. Aw well. Good job on your diesels!

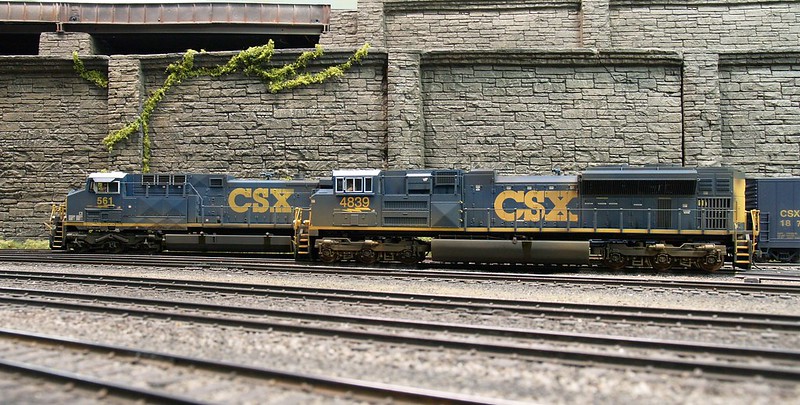
thanks for sharing the technique and photos, both sick and Sirt!  the weatheringshop.com makes my stuff look absolutely caveman.  I'm going to incorporate it in to my workflow.  I took a cleaver approach instead of the scalpel with surgical precision.  I did all air brushing when I started these in '07 and the only thing hand brushed where the fuel spils, glossy clear yellow.  Over the years more articles and images where posted and the work is simply incredible.  These where inspired by photos of some really grimy units.
like this one.  Seems CSX doesn't own a wash...  The wheels and side frames where removed for separate spraying.

MTH CSX CW44AC 561 and SD70ACe 4839

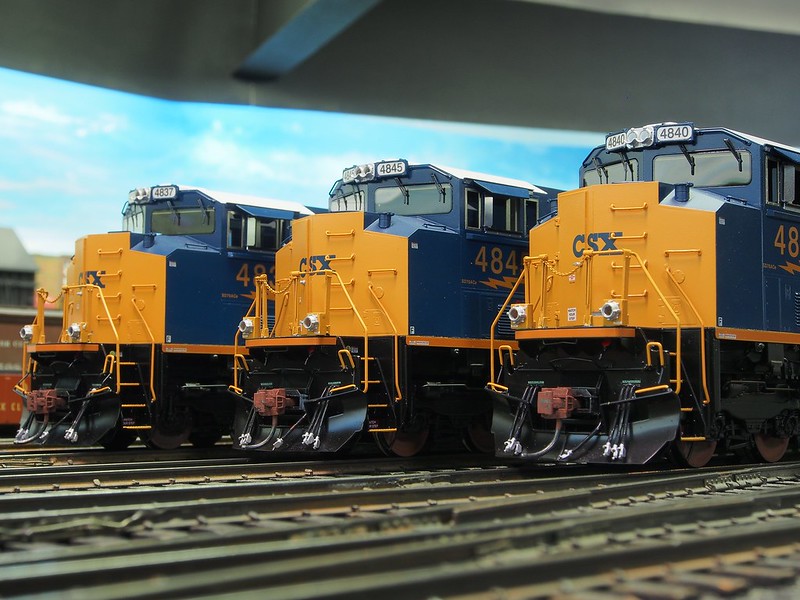
these guys are next but sure how far I should go.Untitled

Last edited by pitogo

Here is a photo of my WM F7 A and B units with light weathering. The A unit represents WM 51 after GM rebuilt it to an F7. It was kit bashed from an old (1972) Atlas F9. The high fans are a casting made using an All Nation roof as a pattern. I also moved the front port hole. The B unit was kit bashed from two old Atlas F9 A units. Both units have wire grabs.The weathering on the grills is based on photos. I tried to capture the bow wave effect just behind the pilot on the A unit. It shows faintly in the photo. There is light weathering along the bottom of both units.


Larry Kline


WM FA 51 FB 231-B

Attachments

Images (1)
  • WM FA 51 FB 231-B

Norm thank you, I follow your work closely as I consider you to be a "Master Modeler", no matter what it is, scratch building, detailing, weathering etc etc it's all top notch work. I have not done a set of "F" units YET, but I have an ABBA set of F3's, an ABBBA set of F7's, and an ABA set of PA's. I have the 10 car Super Chief set recently built by Golden Gate Depot so those engines are on the top of my "To Do List". I have contemplated back and forth whether to do body mounted Kadees, truck mounted Kadees, or make drawbars for them with a couple different spacing options for different radius curves. Of course fixed pilots on the A units. I've noticed there can be a problem when running multi powered units together with Kadee couplers. If the units fight each other at all, even a little bit, it creates enough slack for the units to uncouple and separate while running.... that's where the idea for drawbars in.


 Michael, great looking CSX units. It's so nice to weather black because it shows detail so much with little effort. Dry brushing or light colored powders make all the details really pop on black. I would stay light with the new trio, maybe just a grey/dust instead of the brownish color on your other 3....just so they are different.


Bowestym those are great looking "F" units, you captured the in service look perfectly! 

I have some heavily weathered models, some lightly weathered, and some so shiny that they represent models out of the paint shop getting builders photos.  I like them all.  My GG1s and P70 cars are actually waxed for better shine.


but take it from me - if you would like to enter a contest, go nuts with the weathering. At O Scale West, a heavily weathered Sunset will beat a beautiful scratchbuilt brass locomotive any day in the week.

Thanks LOS, but that's being too kind! I hope you consider doing your Lionel F units, I think pretty highly of their scale F unit efforts, especially on the earlier issues. With your skills at setting up the fixed pilots, close coupling and consistent ride heights, they ought to look great, and just plain outstanding with your diesel weathering techniques.


Depending on what versions you have, Lionel did put on/off Odyssey in their engines around 2002-3 in certain ones. That could solve your MU issues.

Last edited by Norm Charbonneau

LOS - Thanks to you and all who share their modeling techniques on this forum.  I also had issues with bucking powered MU'd diesels due to excessive slack action with Kadees.  My solution is to mount dummy couplers in a Kadee box on the blind end of the A and B units.  The coupler shank is drilled to fit snugly over the Kadee boss.  This totally eliminated draft gear slack action (they are un-sprune) while they can swivel as needed.  With scale dummy knuckle couplers there is minimal inter-knuckle slack.  Of course this approach is viable with units that routinely stay MU'd.  This is not an issue for me as during the early 1950's the PRR pretty much kept their first generation road diesel power  in fixed sets.


Ed Rappe

Almost any will work.  The ones I favor are the old white metal KTM dummies that came with  MG and USH locomotives & cars.  For years I threw them away.  Their advantage is that their shank is long and wide enough to be drilled and cut to length to fit in the Kadee 805 coupler pocket.


I bet if you inquire over on the 2 rail forum someone will send a couple to you for the price of postage.  I'm down to my last four and they are committed to my Sunset E7's.


Ed Rappe

Last edited by Keystoned Ed

Add Reply

Post

OGR Publishing, Inc., 1310 Eastside Centre Ct, Suite 6, Mountain Home, AR 72653
800-980-OGRR (6477)
www.ogaugerr.com

×
×
×
×
Link copied to your clipboard.
×
×