Jeff, Awesome job on the CN SD60F's![]()
Here are a couple pics of an OMI SD60f in CN livery-


|
|
Jeff, Awesome job on the CN SD60F's![]()
Here are a couple pics of an OMI SD60f in CN livery-
Mike, I didn't do the weathering on these, but had to post these pics. Very awesome locos, wish they were mine!!
"The Apprentice" had been teaching me airbrush weathering. He's better at it than I am, but I'm learning. We both have a preference for "road dirt" as opposed to rusting things out. The paint we like for this is "dust" on darker cars and "earth" on lighter ones to provide contrast and bring out the details without overpowering. I haven't ventured beyond that, but have been thinking about it now that I have a compressor at home for my airbrush.
His work:


Mine under his supervision:


The second unit as solo work.


Some cars I was fiddling with. Used Floquil "Dust" paint as these were darker cars.

Sadly, don't have photos of the best cars I've done so far. Maybe I'll pull them this weekend and photograph them.


That Santa Fe diesel looks great!!
Matt, the CNW equipment looks awesome as well!!! Jobs well done!
That Santa Fe diesel looks great!!
Matt, the CNW equipment looks awesome as well!!! Jobs well done!
Thanks Jeff.
Bernie:
Like the use of a "shooting stand" for the model with a "borrowed view" background. Great photography. I need to make one to photograph equipment on.

(the following is a joke.... only a joke.... meant to make some of us feel better about ourselves at the expense of the truly talented)
I have come to a startling realization. Some of you (yeah I'm talking to you SIRT) are pulling our chains! They don't know how to "weather" and make these model locomotives more "realistic". NO! There is no way you can make a model engine look as good/real as these guys have! They aren't weathering experts at all! They are PHOTOSHOP EXPERTS! Yeah I said it! Instead of applying chalks and paints and all that real artistry they simply take a picture of a REAL ONE and Photoshop in a crab claw coupler or a train room background!
But even though I know what you guys are REALLY doing.... keep the pictures coming they are AWESOME and truly inspiring me to get my new layout done so I can begin working on the projects like weathering and detailing!
Trackindy –
Thanks for the humor and complement!
I had refrained from posting on this thread as I didn’t want to hijack it. I generally post enough else ware and really felt it was better to see others for a change.
I’m excited to see that I may have started something along with some of the other regular weatherman on here!
I encountered someone in the past that wasn’t kidding with similar comments and had to correct their misguided way.
The only chains I pull are like the one in the photo. I don’t have a real Photoshop program because the better photos can be taken outside. Everything I weather is hand done as many OGR forum & ebay customers can attest to.
I was an H.O. weatherman for many years and a painter by hobby.
I followed Bob Ross but when the walls became full of oil paintings, I decided to make the switch.
When I decided to leave HO and traditional trains behind I began to weather true O scale cars.
I was quite impressed at the accurate details vs. the old traditional non-scale stuff and was amazed at all the photo books and photos found on the web.
Don Smith of (Industrial Models) 2r was an inspiration to me and the rest is history.
Don has shown that O can be modeled as like the masters of HO in which I never thought would be possible.
So now you know……the rest of the story.
Keep up the impressive work and be sure to check out the links below for ideas as I add new photo albums to the site.
Steve
“Good – Day”

Hey Matt thank you , that is what I did .
I shot this about 10 yrs ago with a hand held 1.2 mega pixel , don't know how .
The diesel is a bashed Lionel , my first attempt at a 2 rail conversion.
It even had a powered radiator fan , I have not had it out of the box in God knows when .
The photo boards make it easy.
Well, just wow! So much talent! This is really addicting! You are probalby going to
hate me for this, but this is some HO stuff I weathered for a client on my website.
(www.shenandoahvalleymodels.webs.com) I have not weathered the locomotive yet,
thats next!


Here are some before and after photos of one I completed this week. I added several details (class lights, pilot grab irons, coupler cut levers, brake hoses, drop-steps & safety chains, prototypical horn, etc.) to what started out as a "stock" AtlasO Trainman RS3...and then weathered it, of course!


Joey - That looks great! Has that "used" look that we all love.
Art
Here's one I just completed this week. This started out as a "stock" AtlasO Trainman RS3 that I added several details to (class lights, pilot grab irons, coupler cut levers, brake hoses, drop-steps & safety chains, prototypical horn, etc.)...then weathered, of course!
Excellent job. May I now suggest that you fix those pilots and install more scale-like couplers? That big gap sure detracts from your beautiful work.
Some talented people! I would be afraid to try. Interested in learning! Well done!
Nice job Joey!
I could never understand why so much emphasis is applied to 3r couplers and pilots. When several trains are operating around a layout, no one focuses on that stuff anyway. It’s a lot of time, effort and money for nothing.
We three railers still have a center rail so what’s the point of converting anything?
")
")
My first foray into weathering diesels is this GP30, which I only wanted to weather gently to represent her condition in tourist service on the Blue Mountain & Reading in the late 80s/early90s:
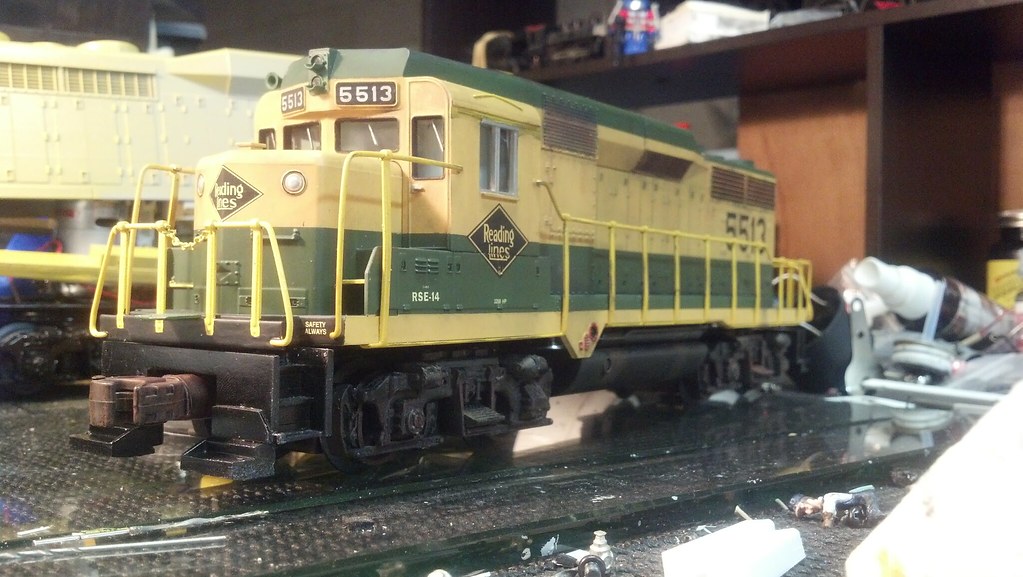
(Also, in this picture you can see the only two diesels I own - the other is a WBB GP30 I'll be painting as a Reading & Northern GP39RN, which are remotored GP30s.)
The pilot represents my compromise: I want to convert this engine to PS2 and use it on the club layout, that means lobster claw and swinging pilots. But I've removed all the cast on details, built up the gap between the body and the pilot to a mere sliver, and I'll add seperate detail parts back on after I add the safety stripe decals.
edit: that picture is really washed out, I'll try to take some natural light photos before work tomorrow afternoon.
My first foray into weathering diesels is this GP30, which I only wanted to weather gently to represent her condition in tourist service on the Blue Mountain & Reading in the late 80s/early90s:
(Also, in this picture you can see the only two diesels I own - the other is a WBB GP30 I'll be painting as a Reading & Northern GP39RN, which are remotored GP30s.)
The pilot represents my compromise: I want to convert this engine to PS2 and use it on the club layout, that means lobster claw and swinging pilots. But I've removed all the cast on details, built up the gap between the body and the pilot to a mere sliver, and I'll add seperate detail parts back on after I add the safety stripe decals.
edit: that picture is really washed out, I'll try to take some natural light photos before work tomorrow afternoon.
Nice Job Wowak!
There is a lot of great work in this thread, very inspiring.
Regards,
GNNPNUT
It's overcast, but here's a better look:
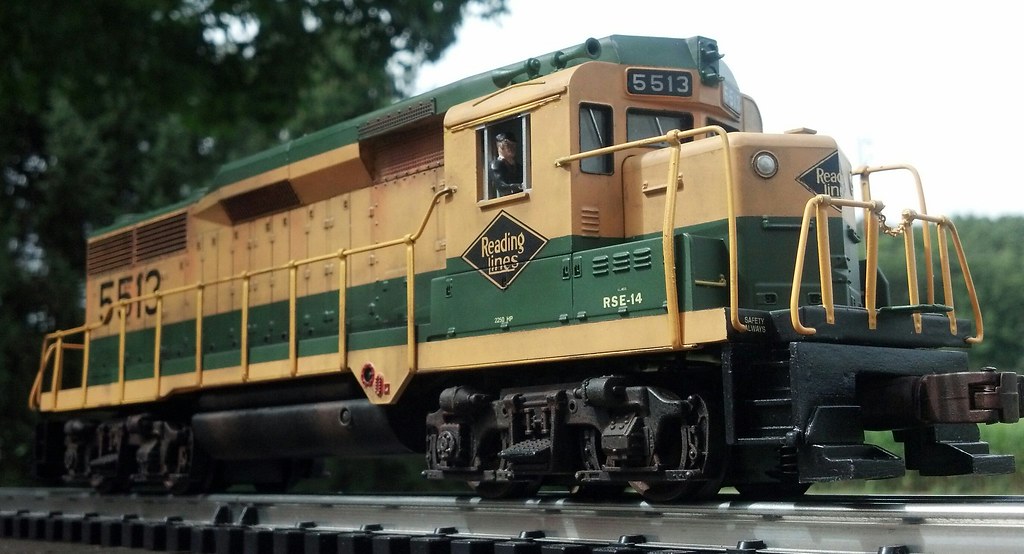
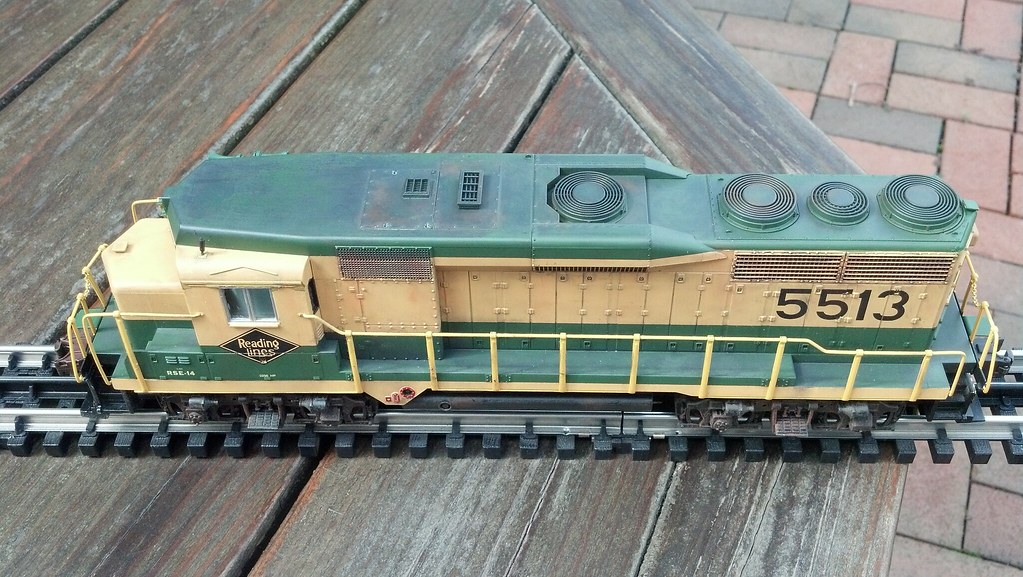
Still some detail need to be added, like the speed recorder cable and the 3rd horn on the fireman's side. I scratch-built the firecracker antenna.
A 3RS SD60 which I did a quick 'n dirty weathering job on. I also added details and set it up for the proper long hood forward operation.

I couldn't resist to share a pic.
Enjoy! Great work everyone.
Ray Marion

Man, I love looking thru these posts.
Steve, I didn't know you owned diesels. I'm used to watching for your weathered steamers in posts.
I just saw some weathered diesels sell on the bay earlier. I think it said they were done by industrial models?
http://www.ebay.com/itm/291242...e=STRK%3AMEBIDX%3AIT
I almost bought one just to get it. The Chessie looked so darn real! It was an old model that would have been hard to two rail. I probably would have to swap out the whole chassis to make it easier. Love the look of the rusted door panels. I have to learn how to do that someday.
I also would like to try weathering my G gauge Challengers. I won't touch them until I get proficient. This maybe my new favorite thread.
Most weathered 2r items on ebay I see as overly dirty. Rust is fine but the black is a little bit heavy handed for my taste.
I saw that SD and it wouldn’t in most cases look like that in real life. Most late model diesels were taken better care of by the car shops.
If that Chessie was copied from a photo, the top was not finished or faded to match the faded hand railings and stripe.
Maybe using a black colored pencil vs. power would have been a better choice?
Unfortunately the low price is common with those early QSI proto 1 models which most people don’t want.
Here’s an old GP-9 decorated by customer request as seen in its final days of service #839…
")
")
")
")
")
")
")
")
Just another Warbonnet.... but these are getting dirty ![]() I know PTC... it's a crime, major crime.
I know PTC... it's a crime, major crime.
Some grimy black added to the chicken wire screens.

Road grime to the trucks and pilot.

Fresh from the paint shop...just the way PTC likes them.

and don't forget the roof

Steam generator on the B unit got some extra attention.


HERESY, I tell ya!!!
In the heyday of the Super Chief, did Warbonnets get that dirty?
Looks great Doug!
Ron
Great weathering, Doug. What paint did you use on the bottom of the units? I have some Super-Fleet C40-8W's to weather.
The only paint was the grimy black for the grills and fans. A little oil paint on the pilot. The rest was powder, brown and grimy black powder for the trucks and tank. Went over everything with a large paint brush at the end just to blend everything and highlight the seems and rivets.
Doug,
You should add these into your next video update. They certainly look incredible and many of us would like to see them in action.
I really like what you did with them, to me, they look 'right' now.
Is there a way to weather Kadee couplers that will make them easy to see between cars and not affect the way they operate?.
I have mostly black Kadees but several rust colored ones have made it onto my rolling stock. Both are too shiny and need to be toned down. Would powdered graphite be best or does it wear off too quickly?
I've highlighted the tops of some of my Kadees with a silver marking pen so I can see them to open them with a screw driver, but maybe a light brown/rust paint would be better if it doesn't gob up the knuckle.
Bob,
I have been using Floquil "rust" to brush on to Kadee couplers. Just be careful not to get paint into the "hinge" portion.
Thanks Jack, got some in the paint box!
![]() Too many Coronas!
Too many Coronas!
When I airbrush the couplers, they work fine. I guess it's the very thin, small amount of paint. When I have weathered them by hand, sometimes they stick, and don't want to operate properly when switching. Like Jack said, just be careful with the amount of paint in the pivot points, and spring when using the 805.
As a precaution when applying paint of any type to couplers, have them in the open position. If you get a little paint that dries in them and they are frozen open, I'll close it manually (which is easier to do than the opening one that is frozen shut) and then open/close them a couple more times automatically. I haven't had any issues with one being frozen in place.
-Ed
Access to this requires an OGR Forum Supporting Membership

")
")
")
")


")
")
")
")
")
")
")
")
")
")
")
")