Let’s see your tinplate!
Replies sorted oldest to newest
Iteration #1 of the Carpetbahn. Everything would look better on some real Progress track or similar. I would appreciate some guidance on how to post a video. I can’t seem to figure it out. It’s beginning to look a lot like Christmas!
Attachments
I have a dozen or so transition era Ives/MTH Repro freight cars. Just picked up a nice Repro 1770 to pull them with.
Steve
Attachments
I am still on Santa's Naughty list I think as I have been foiled quite a bit lately ... but I did manage to sneak in another bit of Hornby while he wasnt watching ![]()

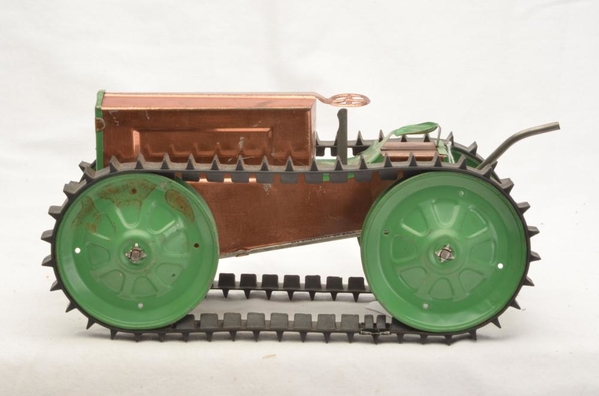
In Non-Trainy aspects I picked up a project in an Animate Toy Company clockwork tractor tho ![]()
Patent date of 1916 but made into the 20's bought very cheaply here in Australia ![]()


Also picked up a nice lot of vintage keys
Attachments
Scott Smith
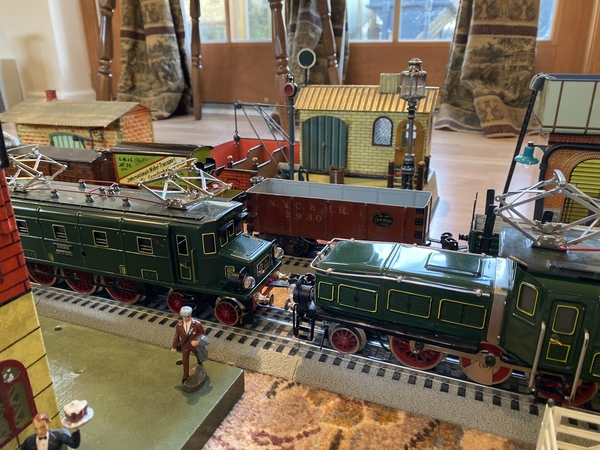
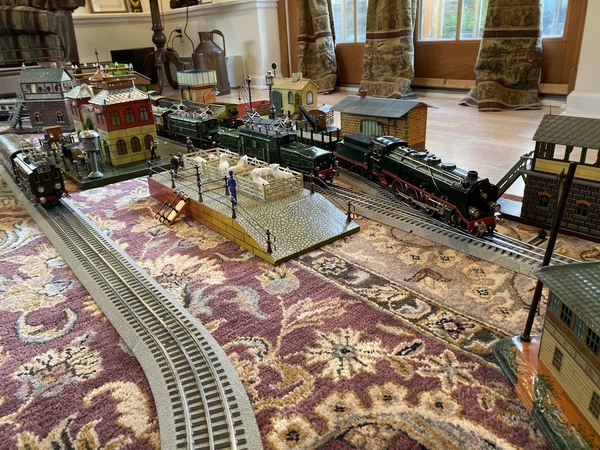
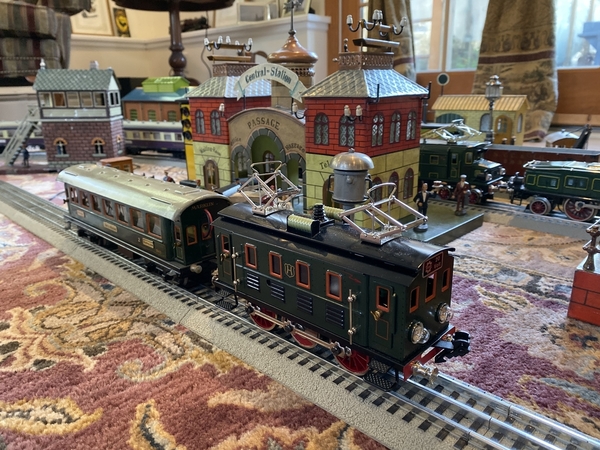
ALL very NICE, but I have to give a special shout-out to PHILLYCHRIS for those marvelous Marklin buildings and that boxcab electric loco.
RSB: VERY NICE vintage O gauge set!
A "frankenstein" of a refurbished Flyer 424 locomotive/tender combination:

It's a lovely thing, but more than anything, it needs its valve gear, which has been tough to find.
PD
PD: Looks FINE to me! ☺
Fatman posted:I am still on Santa's Naughty list I think as I have been foiled quite a bit lately ... but I did manage to sneak in another bit of Hornby while he wasnt watching
In Non-Trainy aspects I picked up a project in an Animate Toy Company clockwork tractor tho
Patent date of 1916 but made into the 20's bought very cheaply here in Australia
Also picked up a nice lot of vintage keys
picked up one of those Animate tractors myself a few weeks back without treads. Mine has the windup handle on the back.
They also came in copper
Animate also made a baby tractor with a few wagons.
Attachments
JKE: Video not working for me. 😐 All I get are freeze frames and no motion. ???
Tinplate Art posted:JKE: Video not working for me. 😐 All I get are freeze frames and no motion. ???
Art, no one else has indicated that it is not working for them so far. The first 20 seconds are still photos with music before the action starts. The train leaves the station at the 1:20 mark. Try letting the video run until then.
JKE: THANKS, I will try again. ☺ Still no luck getting the video portion - must be an Android phone issue! 😐😑
Attachments
Got her running super smooth. I wouldn’t know an armature from an armchair, but I opened her up and oiled any moving parts I could reach and it worked. Thanks GeorgeS for the help. I found if I use the halt button on the Cab1 the e unit doesn’t cycle and she stays in forward. Pretty happy here. Next project is wiring the headlight. Gotta love those colors!
Cheers, W1
Attachments
Excellent William!
William 1 posted:Got her running super smooth. I wouldn’t know an armature from an armchair, but I opened her up and oiled any moving parts I could reach and it worked. Thanks GeorgeS for the help. I found if I use the halt button on the Cab1 the e unit doesn’t cycle and she stays in forward. Pretty happy here. Next project is wiring the headlight. Gotta love those colors!
Cheers, W1
Good stuff William!! I finally just got my 20s and early 30s prewar working with my Cab1(originally had issues which I assume were from me having wired incorrectly or due to a lack ofhaving an e-unit). But last week, finally got them going and I really enjoyed running original tinplate with the remote!
Also- very cool consist! Agreed- great combo of colors from the loco to the caboose!
PhillyChris posted:
Goodness gracious(to both of your pictures), @PhillyChris , your European tinplate is AMAZING! I go back-and-forth between tinplate & modern and when I have enough space my layout will be somewhat "separated" between the two(in terms of buildings & accessories, at least). My goal is to have one working, quality prewar European diesel-electric steeple cab by February. Keep up the great work with your tinplate, sir, it's truly a sight to behold.
-Steve
Thanks for the kind words, Steve. I’ve had to sell off quite a bit of Lionel, Hot Wheels, and other pre-existing hobby collections to keep up with this new mania. Luckily, my wife hasn’t thrown me out yet.
Good luck finding that steeple cab. Check out the special Lankes auktion for this coming Wednesday (item #18). 27 lots of ultimate European tinplate indulgence.
Kind regards, Chris
My tinplate pictures from the weekend:
Starting off with some non-train items from my grandfather's collection. Tribute to him on the day his wife(my grammy)goes for her hip replacement. Would always go upstairs and see these on the shelf in the attic(except the toy gun gun and the piece next to the cast iron train). Toy gun is by Wyandotte, the broken tinplate piece is by Oro of Brandnenburg(still can't figure out what it was!) the train and red car in the back are unknown makes. The rest I can't recall the makers.
The bird is from my pop's collection and the "Sunshine Fruit Growers" trailer I purchased this past weekend at an antique shop in a box with some other tin pieces.(to be posted soon)
Attachments
Bought this tunnel over the weekend at an antique mall. I believe it is a Märklin 2521 tunnel. Railings are there but rods aren't attached, Wooden house is in great shape, painted portion is clearly chipping in some spots. Had been sitting in the back shelf of one of my train dealer's booths at a local antique mall for over a year. Want to incorporate it into my layout but since it's 2 rail and I don't want to jeopardize it by adding a middle rail not sure that I'll be able to do so.
Two rail track soldered to the inside.
Actually flag is misssing, this United States one will serve as a place holder.
Got this rusty prewar 652 gondola in the same box as the Marx "Sunshine Fruit Growers" trailer. Also bought a 1679 Lionel Baby Ruth box car w/ green roof and a 1680 Sunoco tanker. The trains were $2-$3 each which, for me, is worth it just for the couplers and trucks! Video below is of a 254E pulling the cars
Last but not least got this prewar 204 2-4-2 at a Model TrainExhibit where I might be working after they offered me a weekend side gig( website:http://modeltrainexhibit.com/video/ ![]() . Forgot to grab the tender as they were closing but I'll go back to get it this weekend. Ran when tested, lubed it up and now it runs great!
. Forgot to grab the tender as they were closing but I'll go back to get it this weekend. Ran when tested, lubed it up and now it runs great!
Attachments
Note above- the 204 runs fine- it's the track that's the issue(used, cheap MTH realtrax I bought because it had solid rails, but has bad connectors). Hence the light problems. Runs fine other times.
StevefromPA posted:Bought this tunnel over the weekend at an antique mall. I believe it is a Märklin 2521 tunnel. Railings are there but rods aren't attached, Wooden house is in great shape, painted portion is clearly chipping in some spots. Had been sitting in the back shelf of one of my train dealer's booths at a local antique mall for over a year. Want to incorporate it into my layout but since it's 2 rail and I don't want to jeopardize it by adding a middle rail not sure that I'll be able to do so.
Two rail track soldered to the inside.
Actually flag is misssing, this United States one will serve as a place holder.
Steve,
I assume that tunnel track is O gauge. To add the middle rail, don't try to remove or change the track that is in there. Get a suitable length of O gauge track and remove the outer rails. Move the ties so they fit inside the ties of your Marklin track. You may need to remove a tie or two. Put a piece of electrical tape in the middle of each tie of the Marklin track to insulate the center rail of the new track you are adding. You will also need to remove the center rail of the new track then install it back after you slip the new ties between the Marklin ties. You can clip the new track ties to the Marklin rail to maintain proper spacing. This should work for you!
George
George S posted:StevefromPA posted:Bought this tunnel over the weekend at an antique mall. I believe it is a Märklin 2521 tunnel. Railings are there but rods aren't attached, Wooden house is in great shape, painted portion is clearly chipping in some spots. Had been sitting in the back shelf of one of my train dealer's booths at a local antique mall for over a year. Want to incorporate it into my layout but since it's 2 rail and I don't want to jeopardize it by adding a middle rail not sure that I'll be able to do so.
Two rail track soldered to the inside.
Actually flag is misssing, this United States one will serve as a place holder.
Steve,
I assume that tunnel track is O gauge. To add the middle rail, don't try to remove or change the track that is in there. Get a suitable length of O gauge track and remove the outer rails. Move the ties so they fit inside the ties of your Marklin track. You may need to remove a tie or two. Put a piece of electrical tape in the middle of each tie of the Marklin track to insulate the center rail of the new track you are adding. You will also need to remove the center rail of the new track then install it back after you slip the new ties between the Marklin ties. You can clip the new track ties to the Marklin rail to maintain proper spacing. This should work for you!
George
@George S that’s an awesome idea! Also very welll explained and sounds very doable ! It is indeed o gauge track. Thanks so much- looks like I found what I’m working on tonight or tomorrow!
To summarize:
-Get a Suitable new O gauge straight(height, gauge, etc...)
- remove the all rails from the new o gauge track
-Rig to new o gauge track ties to fit the Märklin outer rails and maintain appropriate spacing
- Put a piece of electrical tape in the center of each Marklin tie. This would take the place of the center rail insulation
- Place the center rail over the electrical tape AND slip it through the new ties(with center insulator still present)
Please, Correct me if any of that is wrong but it sounds spot on to me in regards to what you said. Thank you again for this easy solution!
StevefromPA posted:George S posted:StevefromPA posted:Bought this tunnel over the weekend at an antique mall. I believe it is a Märklin 2521 tunnel. Railings are there but rods aren't attached, Wooden house is in great shape, painted portion is clearly chipping in some spots. Had been sitting in the back shelf of one of my train dealer's booths at a local antique mall for over a year. Want to incorporate it into my layout but since it's 2 rail and I don't want to jeopardize it by adding a middle rail not sure that I'll be able to do so.
Two rail track soldered to the inside.
Actually flag is misssing, this United States one will serve as a place holder.
Steve,
I assume that tunnel track is O gauge. To add the middle rail, don't try to remove or change the track that is in there. Get a suitable length of O gauge track and remove the outer rails. Move the ties so they fit inside the ties of your Marklin track. You may need to remove a tie or two. Put a piece of electrical tape in the middle of each tie of the Marklin track to insulate the center rail of the new track you are adding. You will also need to remove the center rail of the new track then install it back after you slip the new ties between the Marklin ties. You can clip the new track ties to the Marklin rail to maintain proper spacing. This should work for you!
George
@George S that’s an awesome idea! Also very welll explained and sounds very doable ! It is indeed o gauge track. Thanks so much- looks like I found what I’m working on tonight or tomorrow!
To summarize:
-Get a Suitable new O gauge straight(height, gauge, etc...)
- remove the all rails from the new o gauge track
-Rig to new o gauge track ties to fit the Märklin outer rails and maintain appropriate spacing
- Put a piece of electrical tape in the center of each Marklin tie. This would take the place of the center rail insulation
- Place the center rail over the electrical tape AND slip it through the new ties(with center insulator still present)
Please, Correct me if any of that is wrong but it sounds spot on to me in regards to what you said. Thank you again for this easy solution!
I think you got it. It could be a little challenging crimping the track clips inside the tunnel, but be patient and use a solid surface under the tunnel. Also, you can check that the center rail is insulated with a continuity meter between the center and outside rail. I have found it hard to slip the rail through the insulators. It’s easier to install them on the rail then put the rail in the track ties.
George
 Found this station at a local antique store. Litho is nearly perfect but only 2 colors plus a red roof and base/platform. It is about 12" long and about 5" wide and 7" high to the roof peak. It is all tinplate. As you can see in the pictures the front and rear of the long sides are different but the short ends are the same. The Name "Glen Ellyn" appears which may or may not be in NJ in real life. There are no "made in...." labels hence I expect it is US made but there are NO manufacturers names anywhere, no marks at all including model numbers etc.
ANYBODY KNOW WHO MADE THIS?? JUST CURIOUS ---Merry Christmas All --- Don


Attachments
Don McErlean posted:
Found this station at a local antique store. Litho is nearly perfect but only 2 colors plus a red roof and base/platform. It is about 12" long and about 5" wide and 7" high to the roof peak. It is all tinplate. As you can see in the pictures the front and rear of the long sides are different but the short ends are the same. The Name "Glen Ellyn" appears which may or may not be in NJ in real life. There are no "made in...." labels hence I expect it is US made but there are NO manufacturers names anywhere, no marks at all including model numbers etc.
ANYBODY KNOW WHO MADE THIS?? JUST CURIOUS ---Merry Christmas All --- Don
Hafner
Chris,
Hope all is well in your home, recovering from open heart surgery have not done any further purchasing of my Tin Plate. Will try to pick something up before Christmas!
All the best,
PCRR/Dave
Attachments
speedy recovery Dave. Been wondering where you've been. My Wife had by pass several years ago. Got to go for a ride in a helicopter and everything.
Steamer,
Hope your wife is all better, please no more copter rides for her! Merry Christmas buddy!
PCRR/Dave
Attachments
Attachments
PhillyChris posted:Thanks for the kind words, Steve. I’ve had to sell off quite a bit of Lionel, Hot Wheels, and other pre-existing hobby collections to keep up with this new mania. Luckily, my wife hasn’t thrown me out yet.
Good luck finding that steeple cab. Check out the special Lankes auktion for this coming Wednesday (item #18). 27 lots of ultimate European tinplate indulgence.
Kind regards, Chris
Chris, I took your advice and checked out the Lankes site. Yea verily, it maketh you want to chuck it all and start fresh with the shiny stuff! Wonderful collection you have rolling there, and I'm off to window-shop some more at Lankes.












![IMG_7072[1] IMG_7072[1]](https://ogrforum.ogaugerr.com/fileSendAction/fcType/0/fcOid/118133478377578146/primaryPicture/true/filePointer/118696450439592843/fodoid/118696450439597469/imageType/SQUARE_THUMBNAIL/inlineImage/true/frame/FIRST/thumbnail.jpg)


