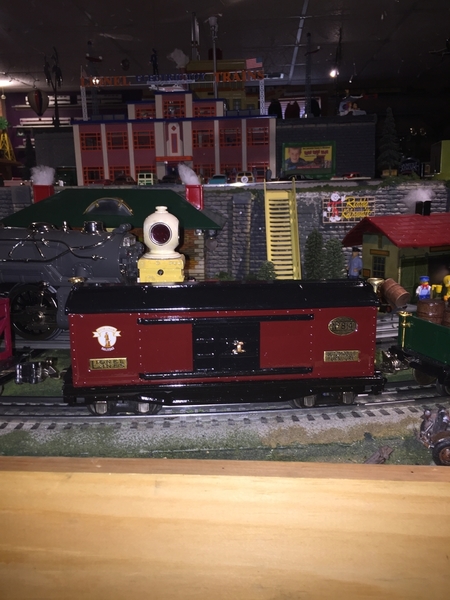
This week I finished up my B&M box car and I also got my new AF wide gauge hopper in! Let’s see your tinplate!
Replies sorted oldest to newest
Chris - Nice job on the Boxcar!
Joe
Some of the most common french HORNBY trains from 1955-60 running on carpet central. Not expensive pieces but always fun to run.
Have a nice tinplate weekend, Daniel
Attachments
Trainlover160 posted:Chris - Nice job on the Boxcar!
Joe
Thanks Joe. B&M maroon.
Installing a YLB (your last battery) so I thought I’d share a under the hood photo of my Lionel STD Gauge Commodore Vanderbilt.
Steve
Attachments
This week I show the one tinplate item of the Swiss manufacturer Buco I have; a Swiss 4-wheel reefer freight car. Buco started in 1944 making tinplate 0 gauge trains, first clockwork and later electric. In the sixties they went into H0 gauge in collaboration with the Austrian company Liliput. When the owner stopped with the manufacturing the rights, tools and parts had a whole history and there is now again (or still) is a Swiss company Buco making some tinplate trains.


Regards
Fred
Attachments
1923 (1924?) - American Flyer Set #26
The catalog cut for 1923
...and the set contents...
This set is something of a puzzle. It comes in a large box, the box is stamped #26 and the contents are as shown in the picture. The quantity of supplied track matches the large loop in the catalog illustration but there are no switches, turntable, bridge, single and double armed semaphores or small station. In addition, the engine and cars do not match the catalog set picture. I could believe the set is incomplete and it might be missing a semaphore and perhaps the station but the box size is such that it simply could not have contained everything shown in the catalog illustration.
As a check, I took equipment from some of the other Flyer sets I own and tried to see if it was possible just to add the catalog illustrated amount of track, a semaphore, and a matching small station to what you see above and have it all fit in the set box. It didn't. Perhaps this set is another example of American Flyer's willingness to change set contents to meet a customer order or perhaps this is the #26 set from 1924 (no catalog for that year). The possibility that this is the 1924 set is reinforced when one looks at the passenger car trucks - the baggage car has the newer truck style. However, at this late date there isn't any way to know. What I do know is that when properly oiled, wound up, and placed on the large track oval - the set proves to be an excellent runner.
Attachments
I started a standard gauge layout in the basement of the VMT. There is an On30, N, O and HO layouts in the same area. Most people there have never seen a standard gauge train before. I only brought 1 engine to test the track and discovered the battery was dead. So here we have 5 digit command with Protosound 2
Scott Smith
I've been missing in action for several weeks for posting. Life has gotten very busy with family and work obligations. For the most part life is good and everyone is healthy. I have been reading each week and there have been some great posts. Thanks everyone for your contributions.
I did have some train fun last weekend. The Winnebagoland Chapter of the NMRA held their Spring Meet in the same place where I put up a Christmas display each year. The historical society asked me to leave the display up (What a sacrifice! ![]()
![]() so I was there running a display of old and new trains.
so I was there running a display of old and new trains.
Have a Great Tinplate Weekend
Northwoods Flyer
Greg
Attachments
Gentlemen,
Great Tin Everybody! Chris very serious Box Car!
Greg,
Love your North Woods Flyer Layout on FT!
The restoration work on the 817 Caboose is coming along, one more coat of Black high gloss Rust-Oleum and and some time under the heat lights should complete the new paint job.
Attachments
scott.smith posted:I started a standard gauge layout in the basement of the VMT. There is an On30, N, O and HO layouts in the same area. Most people there have never seen a standard gauge train before. I only brought 1 engine to test the track and discovered the battery was dead. So here we have 5 digit command with Protosound 2
Scott Smith
That’s pretty good Scott! Can you make it go any faster? ![]() I do have one suggestion; You may not want to add any tunnels!
I do have one suggestion; You may not want to add any tunnels! ![]()
Looking good Dave! All black looks good! ![]()
Chris,
Thanks buddy for the nice comment, she will have Brass and Gold Trimming with the original flat Orange window framing also. Reworking this old 817 Caboose to a state where I could repaint her was more of a job than I actually thought it would be. The little boy who played with her, really beat her up pretty good! I have the matching Gondola Car that should be restored also. Guess I will work on her next, might restore her in the same Black Rust-Oleum high gloss as the Caboose.
PCRR/Dave
Daniel, RSB, and Fred: ALL great items as usual! Greg: special shoutout for that super display layout! Also, glad you and your family are in good health!
FRENCHTRAINS posted:
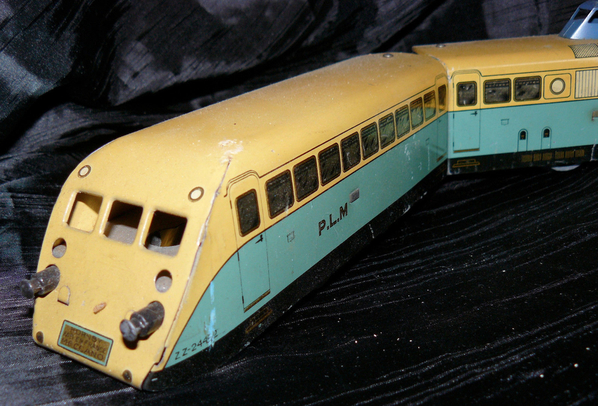
Love the autorails but I think I like the PLM version better than the SNCF in this case.
Attachments
Yes Jim, you are right, the PLM looks better for me also; unfortunately it is more difficult to find, also more expensive. Still on the wish list for the future......
Very best Daniel
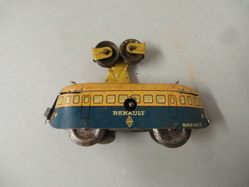
OK, here is a who dunnit on one other item I picked up this week. Renault ski lift gondola with cogged "rudder" to climb an elevated channel track, I assume and overhead pulleys. Anyone seen this one before?
The clockwork resembles Technofix
Only reference I found on the WWW was this pair of later Renault rail car coaches which were part of a ski lift toy.
Attachments
Pine Creek Railroad posted:Chris,
Thanks buddy for the nice comment, she will have Brass and Gold Trimming with the original flat Orange window framing also. Reworking this old 817 Caboose to a state where I could repaint her was more of a job than I actually thought it would be. The little boy who played with her, really beat her up pretty good! I have a the matching Gondola Car that should be restored also. Guess I will work on her next, might restore her in the same Black Rust-Oleum high gloss as the Caboose.
PCRR/Dave
You need to try Goof Off Paint Stripper from HD or Lowes. It comes with a spray bottle. Use an old toothbrush and spray over a large, disposable tinfoil baking pan. The old paint melts right off. Have two buckets.; one with soapy water and another with clean water. Wear gloves, wash and dry. Still a little work, but much easier.
George
George S posted:Pine Creek Railroad posted:Chris,
Thanks buddy for the nice comment, she will have Brass and Gold Trimming with the original flat Orange window framing also. Reworking this old 817 Caboose to a state where I could repaint her was more of a job than I actually thought it would be. The little boy who played with her, really beat her up pretty good! I have a the matching Gondola Car that should be restored also. Guess I will work on her next, might restore her in the same Black Rust-Oleum high gloss as the Caboose.
PCRR/Dave
You need to try Goof Off Paint Stripper from HD or Lowes. It comes with a spray bottle. Use an old toothbrush and spray over a large, disposable tinfoil baking pan. The old paint melts right off. Have two buckets.; one with soapy water and another with clean water. Wear gloves, wash and dry. Still a little work, but much easier.
George
I’ll second that. It does work well especially with the old paint Lionel used back in the day. The can says 15min. But I let it sit for a half hour then brush it down with a small brass wire brush. Make sure you wear heavy gloves 🧤 and always eye protection. 👓
Gentlemen,
Thanks for the advise on the stripping, however the stripping came out quite well, on the Caboose body and frame. It's the nicks and scratching the little boy made in the metal of the 817 Caboose body that needed some attention, and then a couple under coats to help even and smooth out the surface for the final Rust-Oleum high gloss Black paint. In reality I was lucky the restoration came out as well as it did.
Thanks again everybody,
PCRR/Dave
Pine Creek Railroad posted:Gentlemen,
Thanks for the advise on the stripping, however the stripping came out quite well, on the Caboose body and frame. It's the nicks and scratching the little boy made in the metal of the 817 Caboose body that needed some attention, and then a couple under coats to help even and smooth out the surface for the final Rust-Oleum high gloss Black paint. In reality I was lucky the restoration came out as well as it did.
Thanks again everybody,
PCRR/Dave
Hmm, interesting. Would have liked to see some pictures of that. I have been using the Rustoleum X2 paint and it covers really well, hiding most imperfections.
Glad it came out to your liking. Black can be tricky anyway.
George
john,
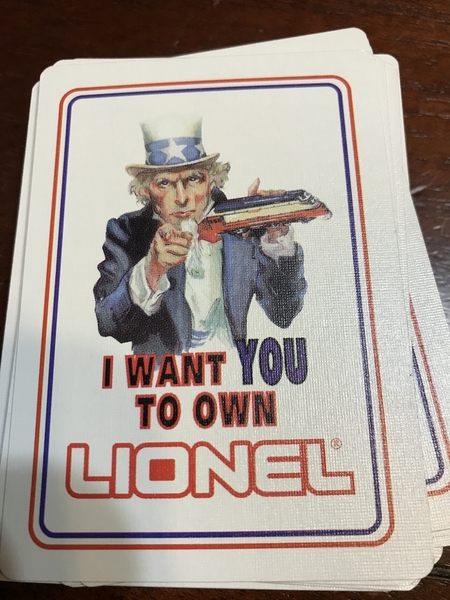
That is a great old deck of Cards!
I used the High Gloss Black, 3 coats, but 1st 2 coats of Rust-Oleum Flat Black UnderCoat, it really helped fill in the scratches in the old metal Caboose Shell big time.
PCRR/Dave
Restoration of the old 817 is coming along!
Attachments
Attachments
Pine Creek Railroad posted:john,
That is a great old deck of Cards!
I used the High Gloss Black, 3 coats, but 1st 2 coats of Rust-Oleum Flat Black UnderCoat, it really helped fill in the scratches in the old metal Caboose Shell big time.
PCRR/Dave
Restoration of the old 817 is coming along!
Hi Dave,
Are you wet sanding between coats? How much drying time between coats?
Seems like it is working.
George
the guy painting my road runner says he hasn't wet sanded in over 25 years....all it does is make a mess.
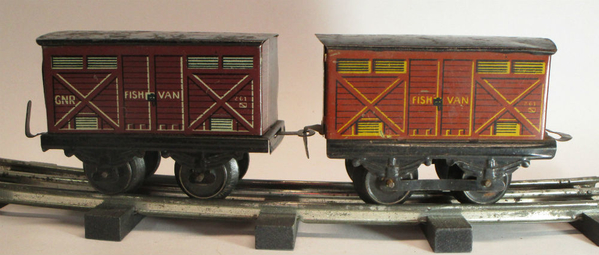
Here are some really rare exotics, which I had buyed the last months. Due to the 1st World War and the resulting trade stop for German products to UK, the company Brimtoy was founded. The early models are all more or less copies of Nürberger products. The early freight cars e.g. look the car of Fischer, Schumann or Issmayer exttrem similar.
There are 2 variants of this car, once with couplings, which are machined out of the bottom plate and a second variant with individually mounted couplings. These two versions also differ a little bit from the colors and the labels.
Motor traffic car
The left-hand car is the only one marked, with the Brimtoy logo on the front
Fish car
Fruit & Milk car
Refrigerator car
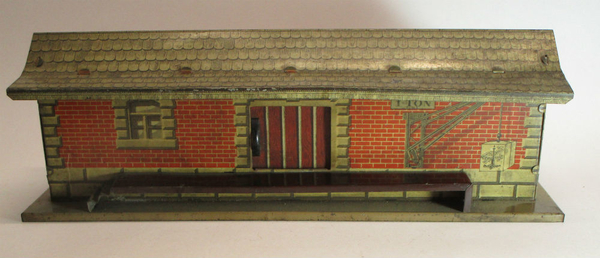
Here is a matching goods shed by Brimtoy, which is a fairly accurate copy of the goods shed 10/644 from Bing.
Greetings from Germany
Arne
Attachments
Very nice Arne, those wagons would look splended behind my BL Super Enterprise. Love the depot as well! Thanks for posting. Mike the Aspie
John,
No wet sanding as Steamer said, no need for it any more with the good paints we now have available, especially the high quality quick drying Rust-Oleum when you use a good Rust-Oleum under coating. No need for the mess what so ever.
Time between coats depends on the humidity of the day and how warm it is also Further I use the heat light after very coat including the Under Coats. Having a pretty much dust free environment to paint in, is a big help also.
If I paint in the morning, let the new paint on the item set up nicely, then put her under the heat lamp to final dry, I can usually put on a second coat that evening. If I still had an oven I would use it, however it was very old and I trashed it during the mover to the new house.
PCRR/Dave
Restoration on the old Nicked & Scratched 817 Caboose is coming along nicely. I am leaving the original faded Gold Trimming as is, will Buff up the original Lionel Brass and the Orange colored Window Trim will remain as they are also. I usually wait about 3 days before reassembling the Trim work on to the Caboose so the paint sets up real nice and hard.
Attachments
Attachments
Pine Creek Railroad posted:John,
No wet sanding as Steamer said, no need for it any more with the good paints we now have available, especially the high quality quick drying Rust-Oleum when you use a good Rust-Oleum under coating. No need for the mess what so ever.
Time between coats depends on the humidity of the day and how warm it is also Further I use the heat light after very coat including the Under Coats. Having a pretty much dust free environment to paint in, is a big help also.
If I paint in the morning, let the new paint on the item set up nicely, then put her under the heat lamp to final dry, I can usually put on a second coat that evening. If I still had an oven I would use it, however it was very old and I trashed it during the mover to the new house.
PCRR/Dave
Restoration on the old Nicked & Scratched 817 Caboose is coming along nicely. I am leaving the original faded Gold Trimming as is, will Buff up the original Lionel Brass and the Orange colored Window Trim will remain as they are also. I usually wait about 3 days before reassembling the Trim work on to the Caboose so the paint sets up real nice and hard.
Thanks for the info. You have great patience!
George
Hey PCRR Dave...when I redid my Flyer caboose, the railings were wore, and I had some gold spray paint left over from one of my projects. I used it on the Flyer parts, and I think they are spot on. Might be able to find a color for your 817.
George S posted:Pine Creek Railroad posted:John,
No wet sanding as Steamer said, no need for it any more with the good paints we now have available, especially the high quality quick drying Rust-Oleum when you use a good Rust-Oleum under coating. No need for the mess what so ever.
Time between coats depends on the humidity of the day and how warm it is also Further I use the heat light after very coat including the Under Coats. Having a pretty much dust free environment to paint in, is a big help also.
If I paint in the morning, let the new paint on the item set up nicely, then put her under the heat lamp to final dry, I can usually put on a second coat that evening. If I still had an oven I would use it, however it was very old and I trashed it during the mover to the new house.
PCRR/Dave
Restoration on the old Nicked & Scratched 817 Caboose is coming along nicely. I am leaving the original faded Gold Trimming as is, will Buff up the original Lionel Brass and the Orange colored Window Trim will remain as they are also. I usually wait about 3 days before reassembling the Trim work on to the Caboose so the paint sets up real nice and hard.
Thanks for the info. You have great patience!
George
I did this black 217 awhile back to match my 408e crackle black
Attachments
Picked this up. I needed to add the uncataloged number to my Lionel collection.
The litho is OK, but the frame is in rough shape. I'll repaint that.
Also, it has the wrong couplers, frame and trucks, but that's OK, these are not high dollar items.
George
Attachments
Glad you got one. Looks like you have some smoke chasers
Steve "Papa" Eastman posted:Glad you got one. Looks like you have some smoke chasers
I turned off the smoke at on point and they got mad!!
The dealer I got my 261 from has two more if anyone is interested let me know. He is going to York.
George S posted:
I'd like to find one of those to go with my 1719. nice find George.
terry hudon posted:George S posted:Pine Creek Railroad posted:John,
No wet sanding as Steamer said, no need for it any more with the good paints we now have available, especially the high quality quick drying Rust-Oleum when you use a good Rust-Oleum under coating. No need for the mess what so ever.
Time between coats depends on the humidity of the day and how warm it is also Further I use the heat light after very coat including the Under Coats. Having a pretty much dust free environment to paint in, is a big help also.
If I paint in the morning, let the new paint on the item set up nicely, then put her under the heat lamp to final dry, I can usually put on a second coat that evening. If I still had an oven I would use it, however it was very old and I trashed it during the mover to the new house.
PCRR/Dave
Restoration on the old Nicked & Scratched 817 Caboose is coming along nicely. I am leaving the original faded Gold Trimming as is, will Buff up the original Lionel Brass and the Orange colored Window Trim will remain as they are also. I usually wait about 3 days before reassembling the Trim work on to the Caboose so the paint sets up real nice and hard.
Thanks for the info. You have great patience!
George
I did this black 217 awhile back to match my 408e crackle black
Like that a lot - how about a red frame on the black caboose (or even maroon - kind of like the Ives). I've been thinking about putting a PRR style cupola on one of these 217's to simulate the PRR N-8 caboose, which had the rectangular windows and 'streamlined' cupola. It's got the proportions of that caboose except for the goofy cupola.
There is a guy who has a 3D model of the N8 and will sell you a 1/29 scale kit for $80, a box of 3D printed parts, but he's not willing to sell the 3D data). I may have to spring for it.
Jim
Pine Creek Railroad posted:John,
No wet sanding as Steamer said, no need for it any more with the good paints we now have available, especially the high quality quick drying Rust-Oleum when you use a good Rust-Oleum under coating. No need for the mess what so ever.
Time between coats depends on the humidity of the day and how warm it is also Further I use the heat light after very coat including the Under Coats. Having a pretty much dust free environment to paint in, is a big help also.
If I paint in the morning, let the new paint on the item set up nicely, then put her under the heat lamp to final dry, I can usually put on a second coat that evening. If I still had an oven I would use it, however it was very old and I trashed it during the mover to the new house.
PCRR/Dave
Restoration on the old Nicked & Scratched 817 Caboose is coming along nicely. I am leaving the original faded Gold Trimming as is, will Buff up the original Lionel Brass and the Orange colored Window Trim will remain as they are also. I usually wait about 3 days before reassembling the Trim work on to the Caboose so the paint sets up real nice and hard.
Gee Dave, That looks pretty sharp. I have a bunch of them, too. Another project to add to my post-retirement to-do list.
Tom
Terry Hudson,
Real nice job on the Black 217, congrats on a very fine looking Caboose!
John,
Real nice 261E & Tender! Great pick up!
Steamer,
Thanks for the advise on the Gold Trim, however I want a little rustic look to the Gold, so I was thinking about leaving the original Lionel Gold Paint on the Trim.
PCRR/Dave
terry hudon posted:I did this black 217 awhile back to match my 408e crackle black
Terry, I couldn't tell if that is a reflection off the red roof of the Gateman's shanty or if you actually have red on the back wall of the caboose. I was thinking that might look pretty attractive, gloss black caboose with gloss red exterior walls under the roof on each end, but maybe you have already done that.
Tom
MNCW posted:terry hudon posted:I did this black 217 awhile back to match my 408e crackle black
Terry, I couldn't tell if that is a reflection off the red roof of the Gateman's shanty or if you actually have red on the back wall of the caboose. I was thinking that might look pretty attractive, gloss black caboose with gloss red exterior walls under the roof on each end, but maybe you have already done that.
Tom
tom I painted the doors red
terry hudon posted:MNCW posted:terry hudon posted:I did this black 217 awhile back to match my 408e crackle black
Terry, I couldn't tell if that is a reflection off the red roof of the Gateman's shanty or if you actually have red on the back wall of the caboose. I was thinking that might look pretty attractive, gloss black caboose with gloss red exterior walls under the roof on each end, but maybe you have already done that.
Tom
tom I painted the doors red
Nice touch!
You know until you guys posted these pics I never really thought about a black caboose. 🤔 I am now! 😀
Attachments
Chris,
Just finalized the 817 Black and Gold Restoration this morning, very satisfied with how she came out.
Living around Pittsburgh, Pa ya got to love the Black and Gold Tin.
Terry Hudson,
The Red Door on the big 217 Caboose is fantastic, will need to give some serious thought to painting Orange Doors on my 817 Caboose. Might be a real nice touch.
PCRR/Dave
Attachments
Looks great Dave! 👏
Pine Creek Railroad posted:Chris,
Just finalized the 817 Black and Gold Restoration this morning, very satisfied with how she came out.
Living around Pittsburgh, Pa ya got to love the Black and Gold Tin.
Terry Hudson,
The Red Door on the big 217 Caboose is fantastic, will need to give some serious thought to painting Orange Doors on my 817 Caboose. Might be a real nice touch.
PCRR/Dave
That's a great collection of cabeese Dave!!! ![]()
George
Made some progress today.
I added a roller and light to my Ives caboose and did a little restoration on the Lionel 2719.
Also had to show my ZW-C. This is one I got off eBay for the price of one brick, but it came with two! I needed to fix a few things that the previous owner botched when messing around inside, but she works good now! I want to thank PRR/Dave for continually bashing these so I can get great deals on them.![]()
George
Attachments
I finished the frame and trucks for my work caboose.
I started painting the work caboose roof and found that my Train Enamel paint was not sticking to the metal. I had to wipe it down with mineral spirits and prime the parts. I hope to get them painted next weekend.
George
Attachments
ARNE: NICE cars - THANKS for sharing!
George S,
Way cool rolling stock, can't wait to see the Work Caboose with some serious Paint on her! The lighted IVES Caboose is way way Cool! Now that is serious custom upgrading!
You are welcome to the price drive down on the ZW-C, just remember you can not get into Tin Plate Heaven while using those stinking evil Bricks. Hope all runs well for ya George!
PCRR/Dave
scott.smith posted:I started a standard gauge layout in the basement of the VMT. There is an On30, N, O and HO layouts in the same area. Most people there have never seen a standard gauge train before. I only brought 1 engine to test the track and discovered the battery was dead. So here we have 5 digit command with Protosound 2
Scott Smith
LOL
I like your new version of hands on speed control ! BEAUTIFUL ENGINE.
Pine Creek Railroad posted:Gentlemen,
Thanks for the advise on the stripping, however the stripping came out quite well, on the Caboose body and frame. It's the nicks and scratching the little boy made in the metal of the 817 Caboose body that needed some attention, and then a couple under coats to help even and smooth out the surface for the final Rust-Oleum high gloss Black paint. In reality I was lucky the restoration came out as well as it did.
Thanks again everybody,
PCRR/Dave
I'm about to do a lot of stripping. I've done a search on the forum and found a lot of ideas, but still not satisfied I have the best method for myself.
I saw Dave's note thanking someone for advise on stripping but can't find what that refers to. Would someone please point me towards that advice ? Thanks
mlaughlinnyc posted:I'm about to do a lot of stripping. I've done a search on the forum and found a lot of ideas, but still not satisfied I have the best method for myself.
I saw Dave's note thanking someone for advise on stripping but can't find what that refers to. Would someone please point me towards that advice ? Thanks
I know this post is about chrome plating or paint, but taken out of context it’s hilarious!!


