


Congratulations John on your successful seek and find. Just in time for your guests.
Doc Holden just about completed the second diesel building. Maybe now I can get my desk back.


Attachments
Images (2)
@Lionelski glad you found the problem John. Too bad about the collateral damage tho.
Its always in the last place you look 🤣🤣🤣🤣
@Steamfan77 Nice work on the bridge Andy. 👍 Thanks for the comments on my passenger platform.
No train time for me today. The kitchen sink drain has been running very slow lately. Grabbed the bull by the horns today. Two trips to HD, new strainer, tail pieces, trap, later, it's fixed. 👍
I guess after all I did on the layout this weekend I was over due for a home repair.
Bob
@GeoPeg posted:I was gonna suggest that solution next ......
LOL!!
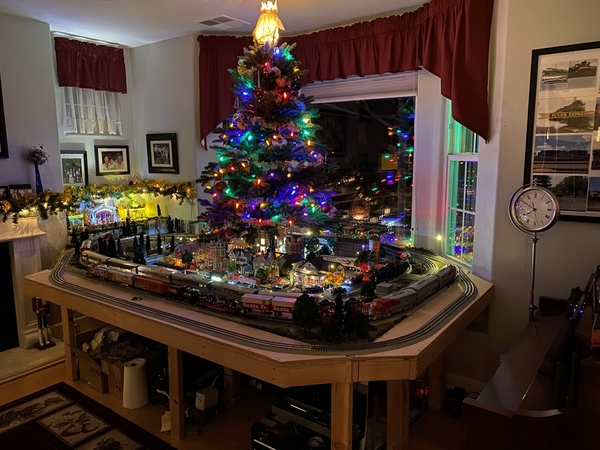
The Christmas Tree is up on the layout. Completed last night, posting today. Polar Express is out and running as well. Bay window blinds are open so anybody passing by while I'm running the trains can stop and watch from outside the window. The little kids go crazy, and sometimes don't want to leave when Mom and Dad do. That can turn into a hissy fit! LoL So I always tell the little kids the trains will be here for a long time, so come by again.
Attachments
Images (1)

@WesternPacific2217 posted:The Christmas Tree is up on the layout. Completed last night, posting today. Polar Express is out and running as well. Bay window blinds are open so anybody passing by while I'm running the trains can stop and watch from outside the window. The little kids go crazy, and sometimes don't want to leave when Mom and Dad do. That can turn into a hissy fit! LoL So I always tell the little kids the trains will be here for a long time, so come by again.
Beautiful Scott!
@chris a
I’m right there with the rest and really enjoyed the video production. Depth of field is something I once knew about with the SLR lens, aperture, f-stop, shutter speed many years ago. Now appears that is all thrown out the window now dealing in the electronics. I still love the colors of your Pennsy brick.
Attachments
Videos (1)

@Dave Ripp. posted:Beautiful Scott!
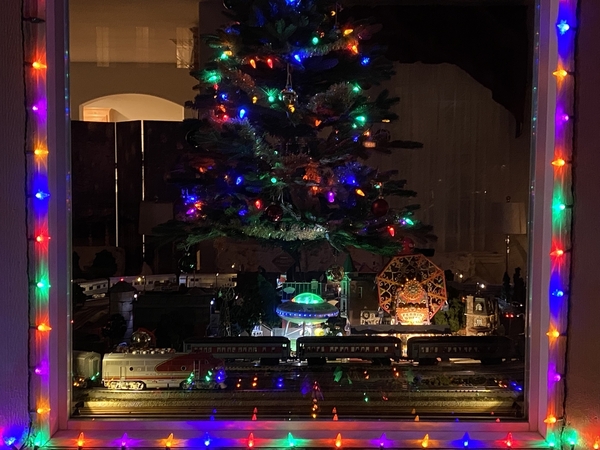
Thank you Dave! I forgot to put up the photos from outside the bay window, so here's a couple. What folks see from outside.

Attachments
Images (2)


Very nice Scott.
Andy
Scott
That's a great view thru the window. Must be fun to watch the watchers!
I continued on the trestle by creating the abutments using foam, finishing the last couple of stringers to the abutments, installing the track by screwing it down to the blocking and glued in the remaining bridge ties. The walkway is next. I have to keep the railing way off the track to clear the overhang of the longest rolling stock.


Attachments
Images (3)


Explanation for the previous 23 second video….The trolley is something I picked up at the Train show in Huntington WV this weekend.
I cleaned off the pickup rollers and did a test run on the layout this evening. Not certain where an how as yet but the trolley will become a part of the layout this winter.
The trolley reverse mechanism works but not the best with my thumbs as blocks. This particular trolley is transportation to Balboa Park which I understand is a real Park zoo…I am pleased with this Atlas colors and design.
The Interstate traffic was crazy and packed from Huntington to Charleston and back today. So I hope everyone’s family and friends reach their destinations safely this holiday weekend.
Very nice. Would love to see more of your layout, Seth. Does your bridge lift up for access?
Rick
@Seth Thomas posted:Explanation for the previous 23 second video….The trolley is something I picked up at the Train show in Huntington WV this weekend.
I cleaned off the pickup rollers and did a test run on the layout this evening. Not certain where an how as yet but the trolley will become a part of the layout this winter.
The trolley reverse mechanism works but not the best with my thumbs as blocks. This particular trolley is transportation to Balboa Park which I understand is a real Park zoo…I am pleased with this Atlas colors and design.
The Interstate traffic was crazy and packed from Huntington to Charleston and back today. So I hope everyone’s family and friends reach their destinations safely this holiday weekend.
Hi Seth, Balboa Park is in San Diego, CA. and the San Diego Zoo is just one of the attractions in Balboa Park. Within the park is a Balboa Park Miniature Railroad and the San Diego Model Railroad Museum and several other museums. There are several layouts including The San Diego 3-Railer Club with a O scale layout.
https://www.balboapark.org/explore
Happy Railroading!
Thanks for the info on Balboa. Makes the trolley trip more realistic and I will view the link on my laptop tomorrow. Another late night visiting the Forum….
And @Rixster one bridge is the Lionel Swing bridge which lifts up and rotates, but not on my layout. I duck, roll, pivot, squat under the two bridges while working on lightning and track power. Second bridge is Atlas’s double track bridge span…. I love it but as I assembled the kit years ago I used a crazy glue. Bad idea. I need to sort of re-assemble with a much better type more suitable for this plastic. The Atlas bridge is designed to lift out which works well, but I rarely do so…
Scott, the layout looks great! It's a wonderful view from the outside window!
Victor, the trestle looks great!
Bill, Doc did a great job on the engine house!
Bob, your station platform area is looking great!
John, nice run from the trolley! I'll bet there was a lot of traffic.
I finished wiring and testing the last two DZ1000 turnout control buttons. Now all the switches can be controlled via the remote or buttons. I wired and tested the first GarGraves uncoupler. All went well there. I still have to pull the wire for the other uncouplers.
@WesternPacific2217 posted:Thank you Dave! I forgot to put up the photos from outside the bay window, so here's a couple. What folks see from outside.
Looks great Scott.
@Lionelski posted:BINGO - these wires were melted together. Here is what happened. 15 or more years ago I disguised these wires by attaching vines to them with hot glue. These vines were on a thin wire base. Apparently the hot glue melted the wire coverings and, after all this time, they wore through. Four wires and the vines were melted together!
Congratulations! I could feel your frustrations and also the elations of the find!! Problem solving is a big part of this hobby and it can sometimes provide more joy than a new purchase! Well done!!
Cheers, Dave
Hi guys, its been a couple day since I have been here and wow a lot sure has been going on! I would love to mention everyone but when you have to go back a couple pages that means too many to list! LOL But I do love everything being done!
Chris A. It sure is nice to see you back, I almost called you to check if you gave up on trains and was just sticking with windows! LOL
So, guys between the Christmas lights, then the kids and grandkids visiting, I really haven't done anything in the train room/ I have got a few things from UPS, first off was a couple buck convertors, then I got 10 push button on/off buttons with no wiring diagram. Also, I got a watch dog generator form Gunrunner John. Now all I have to do is get them all wired up! LOL That could take a brick like me a year! LOL
The best thing that came by UPS was a Union Pacific 4-8-4 Steam engine from FarmerJohn. Of course, once I got it I had to check it out, first thing I did was put a BCR in it and added some smoke fluid! Let it sit for a little bit, then cranked it up! Man what a beautyful engine, I had to test it before I showed it to the wife and kids. That took a little time as I had to make sure I enjoyed it first! ![]()
Turned out the wife, kids and grandkids all loved it as much as I did. Here are a couple photos! Thanks again FarmerJohn!


Attachments
Images (3)
@mike g. posted:Hi guys, its been a couple day since I have been here and wow a lot sure has been going on! I would love to mention everyone but when you have to go back a couple pages that means too many to list! LOL But I do love everything being done!
Chris A. It sure is nice to see you back, I almost called you to check if you gave up on trains and was just sticking with windows! LOL
So, guys between the Christmas lights, then the kids and grandkids visiting, I really haven't done anything in the train room/ I have got a few things from UPS, first off was a couple buck convertors, then I got 10 push button on/off buttons with no wiring diagram. Also, I got a watch dog generator form Gunrunner John. Now all I have to do is get them all wired up! LOL That could take a brick like me a year! LOL
The best thing that came by UPS was a Union Pacific 4-8-4 Steam engine from FarmerJohn. Of course, once I got it I had to check it out, first thing I did was put a BCR in it and added some smoke fluid! Let it sit for a little bit, then cranked it up! Man what a beautyful engine, I had to test it before I showed it to the wife and kids. That took a little time as I had to make sure I enjoyed it first!
Turned out the wife, kids and grandkids all loved it as much as I did. Here are a couple photos! Thanks again FarmerJohn!
Nice going Mike and Farmer John.
So glad to see this happen. ![]()
Dallas, me too! I just had to do a little trimming on one of my tunnel portholes to get the clearance for the front over hang.my 072 curves are just fine for it!
Chris A
Wonderful Hudson video and the scenery - WOW. Eye popping.
Thanks for posting.
I always feel motivated when I see what you all are doing, and for that, I am grateful!
Mike-Congratulations on the locomotive. It looks wonderful on your layout.
I'm continuing some scenery work as well as some other projects. Here's a few photos of a small deck trestle I've built and installed. So far I've done some rock work around it and begun the creek bed under it. There are three bents, two on the ends with bulkheads and one that will go in the middle (not pictured). I will say most of the detail will not be seen by the average viewer but it was fun to build.
Dave
")
")
")
Attachments
Images (3)
")
Mike, the engine is a beauty.
Dave, outstanding as always. It may not be visible to all, but you’ll know it’s there.
Andy
@luvindemtrains posted:I will say most of the detail will not be seen by the average viewer but it was fun to build.
Dave
However Dave.......the detail will forever be out there in your photos. Great work. Keep the photos coming. ![]()
Dave. You're work on the trestle and rock work on the dry ditch is awesome. Are you going to add water or leave it dry. Some people may not notice the details but for the guys that are really into it will definitely appreciate your work and the time it takes to do it. I love it.
Got my new Weller Soldering Gun delivered Saturday and back to soldering jumper wires from one piece of Fastrack to another, plus feeder wires every six pieces of track and TVS Diodes across the Hot and Common at the track feeder connections to the Fastrack. About 80% done with the outer loop, still got to get under and get the buss wires and barrier strips in place for everything. I got sidetracked (no pun intended) and never got to it. Once I finish the outer loop, I'm going to get down there and get that all hooked up before starting the inner loop.
Andy-Thank you. You are correct, I will know it's there.
Dallas Joseph-Thank you. You are correct, the cameras pick everything up.
farmerjohn-Thank you. My plans are to add water. I guess when you start doing a lot of detailing it's easy to get carried away. There are several areas on
the layout with this "hidden" detail. Only in certain angles can you actually see it.
Dave
@Putnam Division posted:I fired up my new Railking New Haven Hudson.
I re-wired the inner loop at the far side of the layout (where I was noticing slower speeds).
I wrote down a plan of projects for the coming 6 weeks.....that is sure to be broken
at some point!
Peter

Wow!
I received a notification that Sitka "liked" this post (and, thank you!).
I didn't remember it......Wow ....8 years ago.....
An update......
1. The New Haven RailKing Hudson is still alive and well.
2. The list of projects was probably changed a thousand times.
3. The layout was nearly completed by late 2019.....some ballasting and signal wiring remained......and, I had an elaborate plan to detail that piece of "abandoned track" seen in the foreground.....
Then, life happened......work got intense during the pandemic and retirement that had been planned in 2016 for December 31, 2020, came.
The layout is now down (came down January 2021) and the attic is now the new train room......and, a new layout awaits........life moves on.......
Peter
I've really done nothing but I'm glad others are busy. I built this picinic table from scalecitydesigns . I don't recomend the table as these are fragile but they did end up giving me a full refund.

Attachments
Images (2)
@Dave Ripp. posted:I've really done nothing but I'm glad others are busy. I built this picinic table from scalecitydesigns . I don't recomend them as these are fragile and the company ignores contact.
Looks like the benches I just built Dave. Different supplier but same results. The bench parts were fine but the legs all broke when I tried to remove them from the balsa sheet.

Attachments
Images (1)

@RSJB18 posted:Looks like the benches I just built Dave. Different supplier but same results. The bench parts were fine but the legs all broke when I tried to remove them from the balsa sheet.
Yes the look nice but if you have to buy 2 to make 1 it's a little frustrating. Mine was so thin it broke more as I tried to repair it. I thank you for the review I now know 2 units not to buy.
@Dave Ripp. posted:Yes the look nice but if you have to buy 2 to make 1 it's a little frustrating. Mine was so thin it broke more as I tried to repair it. I thank you for the review I now know 2 units not to buy.
I wound up making new legs from balsa. This is what I had left when I finished attempting to cut the legs free.

Attachments
Images (1)

@Dave Ripp. posted:I've really done nothing but I'm glad others are busy. I built this picinic table from scalecitydesigns . I don't recomend them as these are fragile and the company ignores contact.
Dave,
I unfortunately am going to have to agree with you on this one. I have purchased a couple of items from them and have tried to reach out to them several times with no response.
Dave
@luvindemtrains, Dave that is some outstanding work there! Your layout looks as real as I think it can get! Very Nice!
@Dave Ripp., Your playground area looks amazing! Sorry about the Picinic table problems. I thinkif and when I need one I will just try and scratch build it out of balsa wood that I have laying around! LOL Just because I am cheap! LOL
Well for me if I get a chance I hope to get out and mount 4 buck convertors I bought and mount the Watchdog generator I got from Gunrunner john. Then sometime today I have to go help my 93yo friend down the street.
I hope you all have a great day and find to have fun with your layouts and trains!
Making a layout for the grandkids for Christmas.
@Lionelski posted:Man!! What a freak issue I spent at least 15 hours over the last 3 days trying to fix.
First I removed the trains from the mainline one at a time in case one of them was causing the dead short - nope
Then I examined the track for debris or track issues that might be causing the problem, I found one insulator that looked suspicious and replaced that track section. Of course, one needs to up root sections on both sides of it to do so. This section was on top of a 4 foot styrofoam viaduct I built. Its track ties were glued to the styrofoam - removing these sections caused damage to the top of the viaduct. Tracks replaced - not the problem.
I disconnected all the mainline wires to the transformer. Then went around the layout with a small transformer and a test light testing isolated sections between blocks and on passing sidings. No issues found this way.
I started to reconnect wires to the transformer, one at a time, leaving only those that were not producing a huge spark connected.
I then planned to re-wire connections to the sections of track that were dead without the sparking wires connected.
I started with the shortest, closest wires. These were going from the upper lever of the mainline to the transformer.
BINGO - these wires were melted together. Here is what happened. 15 or more years ago I disguised these wires by attaching vines to them with hot glue. These vines were on a thin wire base. Apparently the hot glue melted the wire coverings and, after all this time, they wore through. Four wires and the vines were melted together!
I replaced these wires and the mainline is back up and running.
Now all I have to do is clean up, repair the viaduct and repair scenery damage around the layout from this whole process.
Thanks again for your thoughts guys.
I'm gonna go braindead watching TV now.
I repaired the viaduct.
FWIW, I made this years ago for free - salvaged styrofoam and a Tippi hot wire tool.


Attachments
Images (2)
@Lionelski posted:I repaired the viaduct.
FWIW, I made this years ago for free - salvaged styrofoam and a Tippi hot wire tool.
WOW John, that looks Outstanding! Also you can't beat FREE!![]()
Well guys, I did get out to the train room for a little while today. I made 4 mounting plates for my 4 buck convertors. I use them to light all my Menards and other buildings, granted I like Menards power supplies but I got 4 of these for way less then the Menards ones.

After that I was able to get my Gunrunner John watchdog generator installed.

Thats about it for me today! LOL![]()
Tomorrow I hope to get a push button box made for my siding switches!
Attachments
Images (2)
Mike,
Thanks for the compliment. I appreciate the use of the converters to light your buildings. Wiring is not my strength and I certainly would do things differently if I ever build another layout.
Dave
Add Reply
Sign In To Reply
