Added street lights

Attachments
Images (2)


|
|
Added street lights

I have had this building for about 9 months and have wanted to add window glass to it. I used Woodland Scenics light diffusing film. It's a 2 layer product and the instructions are straight forward. The adhesive that is supplied are sticky dots and once you figure out how to handle them, work well. Use a hobby knife to lift the dots off the carrier sheet and apply per instructions. I have enough left to do the windows in the kit bashed warehouse on the left.


HMorgan125 posted:Added street lights
WOW, I love this!
Man these things are breeding like rabbits.....I grew three mountains in my sky too ![]()
Then realised as detailing them began, I needed to grow them all just a little bit bigger, especially the one on the right. The crane blocks the "engineer's" view of it. I tried putting the old A frame hoist back, (shown in one shot). But I like the way the big crane adds height, steel texture, and fills the corner, so I guess I can weather it now. (read as "guess I'll keep it there"]
The real fun is going to be my attempt to tranfer some of my childhood, pulp tunnel's bumpy surface onto to the hills behind it. The background hill wont get any bumps, just SOME for those in the foreground. Details like that are why I like black ink drawing; I was never close to as good at painting.
I want the horizon lower in the middle directly behind the depot; and I need to lighten the green down low, to closer match the grass mat too. I'm also going to try sidestep the "distance rule" of color shades; instead of each background hill being either lighter or darker than each hill closer to the viewer, Im going to use alternating light/dark/light, so I can use less shades of green total. I can always add a cloud over the dark ones, and I have a whole $2 into it; so I don't care too much if I screw it up!
Plus, I like the sky, but still hate lack of instant access to the back tracks; so I might toss it once I'm done anyhow; but nothing ventured....
....just means I'm still bored ![]()


p51 posted:HMorgan125 posted:Added street lights
WOW, I love this!
Thank you, Lee.
That means a lot to me coming from someone as talented as you as I have followed the progress of your layout for a long time.
this is follow up from yesterday's post, just to show every one that I am not just a Speedway truck man I decided to take some pictures of the other trailers in my fleet I started early this morning and as I had to set the trucks up three times as there was not enough space, I got stuck with 90 degree weather and things got real hot ,,, then I had to stop and cover up because it began to rain so I did not finish taking these pictures until 7:30 mountain time
I will post in three separate lots so the system can hand the quantity of photos 


this is the second lot I took off the shelves and placed on my 10 foot extension 


this third lot of trailer trucks are display only, a couple of them having cost me a pound of flesh but it does go to show that I am not a 100% Speedway truck guy
I did not carry out all my city trucks, perhaps I will do that another day, tomorrow it is supposed to rain so I'll go get more screws for the tracks \ now that I know I do not have too much room for my trucks I will work on some scenery and put up some building
When I first started collecting the trucks for the set we had every thing set up in the loft of my son's barn 32ft by 24 ft but then he sold the place and I moved in with my girlfriend who did not what trains in the basement so I have a 43 inch wide by with my 10 foot addition 26 ft long table with which to work on and a small 6 by 10 table in the garage .... I hate down sizing and a real bad guy for getting rid of what I do not think I might need so every thing is place nicel


 y on shelving in the un heated garage
paul 2 posted:Mark had brought up a good question of what I was going to do on the other side of the backdrop coming down the stairs. One suggestion was put in shelves for cars but unfortunately the spacing between the studs is not equal so on that I have to think about something else. And because Mark had mentioned that I went back and looked at how I did the backdrop and decided to fill in at the top where the studs were showing with Masonite. I was not able to get a perfect lining up of the two pieces so I had to resort to spackling compound to fill in the small gap. Waiting for that to dry and I can add blue to it. Hopefully before I have to go out later I will at least have all the blue done. Pic .......Paul
Paul, Your solution certainly makes sense. You could display photos, signs, etc on the stairs side. I'm thinking of myself; I'll be the first to bump one and knock it down. LOL
I've been quietly working away on my uncoupler project. I'm getting close to having all of the board wiring done on all eleven units.
This looks like a tangle of wires, but there are more to attach. It isn't easy soldering those tiny wires to the pins on those plugs.

Here's a smaller unit that is finished. The large wires at the top go out to the magnets. The open terminals will be connected to the carriage bolts that will activate the uncouplers.

The thin solder that I use was driving me nuts, because I could never get it to not sag back to the table top. I need to tin the wires, and get a small blob of solder to stick to the end. It occurred to me that my third hand could hold a small piece of brass tube, allowing me to easily do what I needed.

As I was testing one of these units, I ran into what I think was a bad relay. Everything else seemed to be working. At least I can just unplug the small wires, but all the large wires will have to be unscrewed from their terminals, the board unscrewed from the wood block, and the whole process reversed to install the replacement. At least I have a spare.
I'm interested in remote uncouplers, Elliot.
I can't see what your process is, but I'll share mine with you.
My wagons have uncouplers on board. They are actuated by means of a decoder driving muscle wire.

Here's a short video of them in action . . .
Is that what you are doing?
Cheers

Sorry Max, not even close. I'm a 3 railer, using the classic "lobster claws" and track based electromagnets. The units in my pictures will be mounted and wired to the layout.
You can read the whole story here. This is still an interesting activation method for other things, including turnouts.
Thanks, Elliot.
I'll have a read.
Since my current "layout" is a modest two lines of carpet RR my options are limited but I did solve track separation problems with my Standard gauge loop. Disassembled a bunch of scrap O gauge track I had and used the metal ties as rail clips. Works very well.
PRREmmitt posted:My son and I built the platform over the weekend where our power supplies and the dcs lionel legacy components will be.
Aahhh,, there are the truly magic words, "My son and I built..."![]()
Summer "Honey Do" lists and work have kept me pretty busy and away from the layout. Next week the wife is traveling with the kids to her parents for the week, and this leaves me a ton of time for the layout.
I did re-work some of the track with my son last week, and have a spot planned for a gas station.
Next week I hope to finish all the plaster cloth on the layout and start weathering the track. I also will be repainting a loco. Stay tuned for tons of photos.
This morning I got the last of the dark blue on. After that dried I applied the light blue. Stopped to have lunch and the paint should be dry and I can get the table in place. Pics................Paul


Nice looking Paul. And here I thought you were going over the top of the dryer! LOL![]()
Mike, I am going back down to the basement to do the table. I think that I will be going over the one corner of the dryer with a 66" lift out section. Until I can figure out what size curves the length of the section is up in the air...................Paul
paul 2 posted:Mike, I am going back down to the basement to do the table. I think that I will be going over the one corner of the dryer with a 66" lift out section. Until I can figure out what size curves the length of the section is up in the air...................Paul
Cool, cant wait to see what you come up with! Show them pictures when its up! ![]()
Still dismantling the old layout, but will post progress of new layout in the fall.
Bob
Called it quits for the night. While I was waiting for the paint to dry before I started putting the table together I got another Weaver wood chip hopper done and on the tracks. I had to cut a bit off of all the legs I made up. I cut them too long. Once I did that I bolted all the legs in place and attached the cross braces at the bottom of the legs. I sort of slid it into place somewhat and it is a good fit (thank God) sometimes I mess up on the measurements. Still have to cut the plywood to length but I hope I can get that done sometime tomorrow. Got a train get together for lunch then after lunch we will be going to one of the guys layouts for a visit. So maybe later in the day I can get the table top on and the table leveled and secured to the wall. Pics...................Paul


Paul,
That photo makes it much more clear to me what you are doing in the Washer and Dryer Branch Line! Yes I can measure twice, even thrice and still cut wrong too! I have never understood it because I am normally a detail oriented person. Looks good!
Paul it sure is looking good and as Mark stated its easier to see the direction your going with it! I too am in the same camp, I can measure 2-3 times write it down, lose the paper I wrote it on and still cut wrong! Maybe you should ask your want to be dad Cabinet Bob for some tricks of the trade! LOL![]()
mike g. posted:Paul it sure is looking good and as Mark stated its easier to see the direction your going with it! I too am in the same camp, I can measure 2-3 times write it down, lose the paper I wrote it on and still cut wrong! Maybe you should ask your want to be dad Cabinet Bob for some tricks of the trade! LOL
Mike,
I wonder if we are too old to learn Cabinet Bob's tricks. Between bad eyes, and fumbly fingers, I don't hold out much hope for myself. Layout benchwork doesn't have to look good, I'll just cover it with scenery anyway. ![]()
Mark Boyce posted:mike g. posted:Paul it sure is looking good and as Mark stated its easier to see the direction your going with it! I too am in the same camp, I can measure 2-3 times write it down, lose the paper I wrote it on and still cut wrong! Maybe you should ask your want to be dad Cabinet Bob for some tricks of the trade! LOL
Mike,
I wonder if we are too old to learn Cabinet Bob's tricks. Between bad eyes, and fumbly fingers, I don't hold out much hope for myself. Layout benchwork doesn't have to look good, I'll just cover it with scenery anyway.
Mark you maybe right about being to old, but man isn't it sure fun trying to learn new things! It's that one little second when everything comes together and Presto Your amazing yourself!![]()
Really enjoy all the activity and amazing post this summer. Here is my two cents worth:
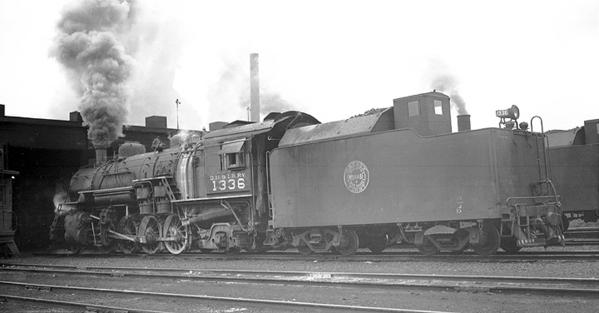
I am still working on the mountain, but I have found a new diversion. I recently purchased an MTH Premier 2-8-2 Mikado on Ebay for a decent price considering it was an “old stock” engine but new out of the box with Proto-2 DCS. The new ones with Proto-3 are more than twice the cost. I model the Duluth Missabe and Iron Range Railroad, D.M.&I.R.Ry, and have been looking for this engine ever since I purchased a set of O-scale Champ decals for a DM&IRR steam engine on the bay. I have completed a cardboard mock-up of the modifications I plan to do. This includes a tender coal bunker modification, the addition of a “Doghouse” and foot boards on the rear of the tender. I'm also adding wider foot boards to the engine pilot. The engine came dressed in Baltimore & Ohio livery, but I followed directions from a forum post reply and the markings were easily removed with a cotton swab dipped in acetone along with a little care & patience. It worked beautifully and the acetone did not even begin to cut into the black base paint of the tender and engine. DO NOT TRY THIS ON PLASTIC MODELS! My next step will be to construct everything in styrene, finish coat the additions and add the decals. Might even try a little weathering to help blend the paint.
My wife and I spent part of last week on the Minnesota North Shore of Lake Superior (Two Harbors, Beaver Bay, etc.) and I'm now inspired to construct an HO scale Taconite plant and rail yard on the upper level of my mountain. The trackage will be non operational. I modeled in HO during an earlier life so I have plenty of switches, track and suitable rolling stock to complete the effect.
Dave
My prototype Mikado D.M.&I.R.Ry #1336 & 1325 - I will live with the smoke box bell for #1326.


Looking good Paul. Who makes the bridge in the background behind the B&O hopper, or was it scratch built by you? It really looks neat!
Mike
Mike W, the bridge is the Lionel Die Cast bridge. I am using it as a lift out and I just had it sitting back there. Here is a pic of it in place..........................Paul

Cool! thanks for the info.
Mike
Took a few photos for Team Track Tuesday thread.
" New automobiles circa 1948 " 


Looks like some new Tuckers being delivered!
Mike
trumptrain posted:Took a few photos for Team Track Tuesday thread.
" New automobiles circa 1948 "
Great photos!
Darlander,
The MTH Mikado looks like a great plan!! Defacing a B&O locomotive, oh my!! LOL. I have two engines repainted into B&O. One started life as a Great Northern, the other as a D&LW! I suppose there is someone out there who would chastise me!
I think the the D&IR will look great!!!!
Finished the skirting project around the whole layout. Got area cleaned up and all trains running since I am hosting a group of retirees this afternoon. Also finished track plan for the elevated line that will be added in about a week.


Bryan, track plan is looking good. Once you get that in then you can start to scenic the layout. Catch you later today at lunch....................Paul
mike g. posted:Paul it sure is looking good and as Mark stated its easier to see the direction your going with it! I too am in the same camp, I can measure 2-3 times write it down, lose the paper I wrote it on and still cut wrong! Maybe you should ask your want to be dad Cabinet Bob for some tricks of the trade! LOL
LOL... Stanley has a tape measure you can write down the measurement on it, then erase it after you cut...
Access to this requires an OGR Forum Supporting Membership


