
Today I went back to building up the wall with some 2X4's. Had to notch them out to get a flush wall. Where the Sauerkraut factory is I am going to add a section of table at the end to line up with the backdrop. And that switch at the front of the table is coming out and I am going to run side by side tracks to the next table. I realized the freight yard on the other side of the wall would not have a long enough yard lead track to work the sidings. Maybe after dinner I'll start working on the brick walls................Pic............Paul

DSCN0868 

Attachments

Images (1)
  • DSCN0868

Paul2,  Hint:  when clamping the sidewalks or any glue up job, consider initially pinning or doweling the assembly together dry first for a precision check.  Then disassemble , glue & clamp with dowels or pins in place.  I do this all the time when routing decks with pattern bits to conform to curved edges using 1/4" or 5/16" wooden dowels.   This way you can put a stack of layers together w/o shifting. 

Works with Homosote topping also.  With Homosote I hold a Shop-Vac hose with a freshly cleaned filter immediately next to the spinning bit.  Photos upon request.

       Dad is still pretty sore today    might get to come home tomorrow

                                he will be over running trains soon

                          worked on mountain a little bit....long way to go......

                       will start blending the door and hill together next.....

                           started roughing in the upper level mountain......

                                               goes up to the ceiling......

Attachments

Images (10)
  • mceclip0
  • mceclip1
  • mceclip2
  • mceclip3
  • mceclip4
  • mceclip5
  • mceclip6
  • mceclip7
  • mceclip8
  • mceclip9
Last edited by briansilvermustang
briansilvermustang posted:

Thank you, Mike !   the last time my Dad went in the hospital, I stayed up all that night and made him a 2' x 3' N gauge layout to take up to him so he could run trains while he was there, the plaster mountain was still wet taking it there, he still has that little layout.....

That's very cool Brian, Things like that are stuff you both will remember forever!

briansilvermustang posted:

... the last time my Dad went in the hospital, I stayed up all that night and made him a 2' x 3' N gauge layout to take up to him so he could run trains while he was there, the plaster mountain was still wet taking it there,he still has that little layout.....

Recently, I've heard this said:

What people remember most about us is how we made them feel.

briansilvermustang posted:


       Dad is still pretty sore today    might get to come home tomorrow  he will be over running trains soon,   worked on mountain a little bit....long way to go......


                       will start blending the door and hill together next.....


                           started roughing in the upper level mountain......


                                               goes up to the ceiling......

Like the fuse box.  Will there be a removable section there?

Give my best to your dad.  I miss mine when I run trains.

briansilvermustang posted:

Thank you Matt !   I will.  yes, I am planning on making a removable mountain insert to cover the fuse box, hopefully later tonight....

Jeepers, slow down Brian, you’ll be joining your Dad in the hospital!  

You’re putting us all to shame with the amount of work getting done.  I bought three sheets of the cheapest paneling I could find and threw it up on the bare studded wall.  Then some shelving came in so am putting that up.  Got 6 more sections to do.  Had to go to Menards for the shelf screws and, crap, train stuff IS out, so you know...

CB07ED61-8340-447C-B17C-24CEF5F8D828

ECFC32CD-79A1-44BF-B8B8-51ECB5DAC73A

Finished the shelving, and put up some trains.

84F70B36-E7BE-453C-BB07-8370B69FFB58


Attachments

Images (3)
  • CB07ED61-8340-447C-B17C-24CEF5F8D828
  • ECFC32CD-79A1-44BF-B8B8-51ECB5DAC73A
  • 84F70B36-E7BE-453C-BB07-8370B69FFB58
Last edited by TedW

          my inspiration........this is what I am striving for on my upper level of the layout.......about 32' long down one wall,  3 to 4' down from the ceiling.....

          eventually........will need a lot of 's.........

the painted  black 1x6's are the bottom of the upper level area, which will come out 24 to 30"'s  from the wall, with the mountain scenery going up to the ceiling....

Attachments

Images (3)
  • mceclip0
  • mceclip0
  • mceclip1
Last edited by briansilvermustang

Not much I can do with two loops of  8X8' of tube track but decided to go all out. Bought a piece of outdoor carpet at HD, cut 4 strips of  8"x 8' the gray carpet and put it under the track to look a little like ballast. So now I have real carpet, heavy cardboard and a layer of green and a layer of gray outdoor carpet.  Trains run pretty good on it if I don't trip them or kick the track. Nice thing about this set up-NO DUCKUNDERS !!

briansilvermustang posted:

          my inspiration........this is what I am striving for on my upper level of the layout.......about 32' long down one wall,  3 to 4' down from the ceiling.....

          eventually........will need a lot of 's.........

Brain, If I may offer you a perspective about the trees, take a look at these photos of some forestry logging scenery I accomplished.

IMG_9055b Since the subject was forestry, I knew I'd need plenty of trees, of course.

IMG_8468

So, what I learned along the way, as I began modeling, was that if I varied the species of trees - conifers and deciduous - as well as the colors and hues and tones of the trees, the tree-scape looked fuller than it might actually have been if one were to count the actual trees.

IMG_8477Trackedharvester

Plus, I was generous with the undergrowth, too. Every woods and forest I have ever seen in the Midwest and Northeastern states (like Ohio, PA, NJ, and NY) have had forests that contained myriad tree species.

IMG_8479

IMG_8499_A

My resource for all these trees and attendant lower foliage has been Scenic Express.

IMG_8480_Ab

IMG_8483-2

If you contact Jim Elster directly, he may have ways to help you achieve such a verdant tree presence.

FrankM.

Attachments

Images (7)
  • IMG_9055b
  • IMG_8468
  • IMG_8477Trackedharvester
  • IMG_8479
  • IMG_8499_A
  • IMG_8480_Ab
  • IMG_8483-2
Last edited by Moonson

        here is some of the area planned for the mountainous scenery.......from the black boards up, which are all on a 1% grade up.......going  around the room left to right, taken from the raised floor area of the upper level....

here is the upper mountain area that I started above the entrance doorway....

      the garage door will be taken out in spring, removing these door tracks

please don't mind the crude construction method, but it is all free scrap wood,

          this area will be a coal mine area in a valley......

          view from ground level.....

view entering the train room....coal tipple area above door way,

          upper yard area will be above the blue sky.......making a horseshoe shaped yard with a passenger station.......

Attachments

Images (9)
  • mceclip0
  • mceclip1
  • mceclip2
  • mceclip3
  • mceclip4
  • mceclip5
  • mceclip6
  • mceclip7
  • mceclip8
Last edited by briansilvermustang

the reason for raising the layout, so I can put in another level which will be alot of intermodal  area, a lower level passenger station, and will be the bottom return loop with some yard areas.... Trains will start from the lower level climbing a constant 1% grade to get from level to level. the layout will have 3 main levels, with hillsides and multiple level on each of the 3 main levels.....I might build a room 10'x10' just for a helix area if needed.....the trains will get to the top level, the mountainous level, which is the top return loop around the whole room......

Attachments

Images (1)
  • mceclip0
briansilvermustang posted:

the reason for raising the layout, so I can put in another level which will be alot of intermodal  area, a lower level passenger station, and will be the bottom return loop with some yard areas.... Trains will start from the lower level climbing a constant 1% grade to get from level to level. the layout will have 3 main levels, with hillsides and multiple level on each of the 3 main levels.....I might build a room 10'x10' just for a helix area if needed.....the trains will get to the top level, the mountainous level, which is the top return loop around the whole room......

Brian- I heard a rumor that you will be running a connector to Elliot's layout in Minnesota. You may give him a run for biggest layout.

Moonson posted:
briansilvermustang posted:

          my inspiration........this is what I am striving for on my upper level of the layout.......about 32' long down one wall,  3 to 4' down from the ceiling.....

          eventually........will need a lot of 's.........

Brain, If I may offer you a perspective about the trees, take a look at these photos of some forestry logging scenery I accomplished.

IMG_9055b Since the subject was forestry, I knew I'd need plenty of trees, of course.

IMG_8468

So, what I learned along the way, as I began modeling, was that if I varied the species of trees - conifers and deciduous - as well as the colors and hues and tones of the trees, the tree-scape looked fuller than it might actually have been if one were to count the actual trees.

IMG_8477Trackedharvester

Plus, I was generous with the undergrowth, too. Every woods and forest I have ever seen in the Midwest and Northeastern states (like Ohio, PA, NJ, and NY) have had forests that contained myriad tree species.

IMG_8479

IMG_8499_A

My resource for all these trees and attendant lower foliage has been Scenic Express.

IMG_8480_Ab

IMG_8483-2

If you contact Jim Elster directly, he may have ways to help you achieve such a verdant tree presence.

FrankM.

Great advise on creating realistic forestry.  Your results turned out fantastic, Frank.  Tricking the eye into perceiving the illusion of more real estate than there actually is sure matters more in O scale than smaller ones.  Color factors into that more importantly than one might think at a casual glance.

Bruce

My repairman, Tom Schwartz,  stopped by this morning and did some minor work on some MTH switchers.  I was going to have him look at my Lionel 0-8-0 switcher because it was not running at all, however, all he had to do was walk into the train room and WHAHLA it runs like a champ .... without Tom even touching it!! Go figure!  It's nice to have those 3 switchers back in service again!

Tonight I ran trains and tinkered on the layout for a bit and made up a B&O work train.  Here's some shots of the now in service switchers. IMG_3657IMG_3644IMG_3647

Attachments

Images (3)
  • IMG_3657
  • IMG_3644
  • IMG_3647

Been busy working on the layout all week. My ADD was in full swing as I jumped from project to project.

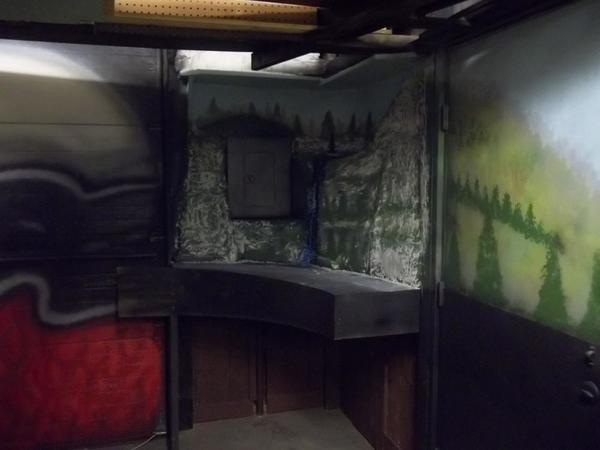
I finally busted out the paint again, and put a final coat of semi-gloss black on the fascia. I got 80% of the installed fascia done. Then it was time to bust out the letters, and start naming the places.

IMG_7676IMG_7685IMG_7683IMG_7677IMG_7684IMG_7674IMG_7675

The hard drive on my old computer died. Today I installed a new one. The TMCC base and C/MRI are connected. I still have a lot of software to load, but I'm on my way. At least I have my iTunes working again. I have a hard time being down there without some background noise.

IMG_7681

I spent a lot of time stringing these gray communication lines for the C/MRI. Three of the four nodes are now wired. I just have one connection left to make. This is the "C" node.

IMG_7678

When we removed these panels from enterTRAINment 24 years ago, the wires were just lopped off, leaving stubs attached to terminal blocks. I've made up five new sets of ends like this. Just one to go.

IMG_7679

This card is called a USIC (Universal Serial Interface Card). Each of the four nodes will have one of these. They pack and unpack the bit data that goes to and from the computer over those serial lines.

IMG_7680

This is a Micro Mark combination shear / brake for cutting and bending sheet metal.

IMG_7673

I used the shear to make my own brass strips from sheet. This is a first attempt at a maintenance platform for my signals. I'm not quite happy with this yet. Needs work.

IMG_7672

Attachments

Images (13)
  • IMG_7676
  • IMG_7685
  • IMG_7683
  • IMG_7677
  • IMG_7684
  • IMG_7674
  • IMG_7675
  • IMG_7681
  • IMG_7678
  • IMG_7680
  • IMG_7679
  • IMG_7673
  • IMG_7672

I had a sale table and a model train show today, so I didn't get much accomplished. I did, however, sell several access items and walked away with a decent chunk of money. I managed to find three 1943 dated railroad magazines, in excellent condition.

I found this light switch at Hobby Lobby this evening after the show, and it seems quite fitting for the master light switch for the layout room.1014172137-1

Attachments

Images (1)
  • 1014172137-1
Diverging Clear posted:

Brian, a speedy recovery to your Dad. Mine will be 80 in November, he still gets around pretty good. He still works on lawnmowers and small engines, he definitely keeps himself busy doing that. 

Rusty

thank you Rusty.      He is supposed to able to come home sometime today

hopefully he will go home and get his much needed rest, as he is one that does not sit still....he will be over running trains soon, I need to get busy.....

                                some more painting and cleaning.......

                     got the garage door repainted, a big difference from this.......

I am thinking this will be a static narrow gauge log line, good spot to park a shay and some log cars.....

       yes, I think a on30 shay and some logging cars would look a lot better here....

         got a lot of cleaning done, clearing of bench tops ready for some track.....

                 trains will be running soon, hopefully by next weekend.....

                       some bridges waiting for their new homes.......

Attachments

Images (15)
  • mceclip0
  • mceclip0
  • mceclip0
  • mceclip0
  • mceclip1
  • mceclip1
  • mceclip2
  • mceclip3
  • mceclip4
  • mceclip5
  • mceclip6
  • mceclip7
  • mceclip8
  • mceclip9
  • mceclip10
Last edited by briansilvermustang

             tonight, I need to move all these trains, then take down the shelves

  and the bench along that wall.  The bench gets moved along the garage door....

        in spring, that wall is getting cut out, expanding out another 12'x30'........

       the garage door will also be removed then, and that wall studded in ......

Attachments

Images (3)
  • mceclip0
  • mceclip1
  • mceclip2
Last edited by briansilvermustang

I decided to add some wood between the posts to give the walls more places for glue and stability. I had a piece of embossed paper that looks like stone. I cut it into strips to glue on the back of the flex walls because there is no brick pattern on the back. I want to glue the paper on with Weldwood contact cement. But am asking here if this will attack the foam of the flex walls. I want to add this to the back because the walls will be sticking up about a 1/2 inch above the sidewalks. Any help appreciated. For the time being I am going to work on something else till I find out if the contact cement is safe to use. Thanks Paul........Pics

DSCN0870DSCN0871DSCN0872DSCN0873DSCN0874

Attachments

Images (5)
  • DSCN0870
  • DSCN0871
  • DSCN0872
  • DSCN0873
  • DSCN0874
paul 2 posted:

I decided to add some wood between the posts to give the walls more places for glue and stability. I had a piece of embossed paper that looks like stone. I cut it into strips to glue on the back of the flex walls because there is no brick pattern on the back. I want to glue the paper on with Weldwood contact cement. But am asking here if this will attack the foam of the flex walls. I want to add this to the back because the walls will be sticking up about a 1/2 inch above the sidewalks. Any help appreciated. For the time being I am going to work on something else till I find out if the contact cement is safe to use. Thanks Paul........PicsDSCN0874

Here’s what happens on blue foam.   Of course you don’t ask how I knew this...

3CABE403-C18E-481F-9171-BCFF5EA725F6

AEF0DB6F-6174-4E7A-BFF7-F55DA8D0A1F5

For kicks I tried a slice of comercial foam portal, and didn’t seem to have an effect after a few minutes.

05BBE326-BA87-46AB-BF8D-3599F7510CAA

D0900B76-58B7-46B9-B700-3F3A6062054B


Attachments

Images (4)
  • 3CABE403-C18E-481F-9171-BCFF5EA725F6
  • AEF0DB6F-6174-4E7A-BFF7-F55DA8D0A1F5
  • 05BBE326-BA87-46AB-BF8D-3599F7510CAA
  • D0900B76-58B7-46B9-B700-3F3A6062054B
Videos (2)
4D0EC920-F72E-4A2B-A907-47478E8B9579
8FC199F8-6425-4649-855D-2982D84BCF9F
Last edited by TedW

Add Reply

Post

OGR Publishing, Inc., 1310 Eastside Centre Ct, Suite 6, Mountain Home, AR 72653
800-980-OGRR (6477)
www.ogaugerr.com

×
×
×
×
Link copied to your clipboard.
×
×