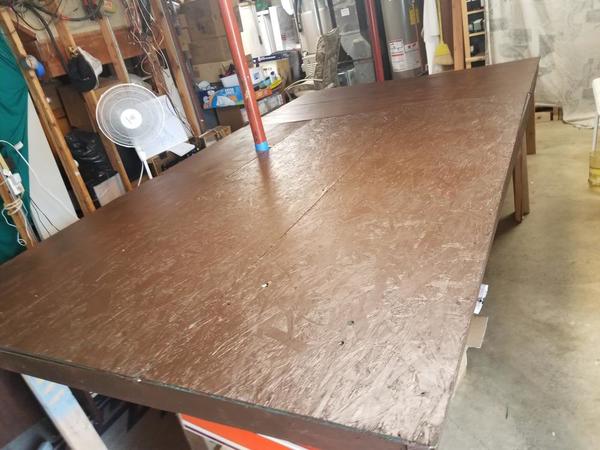
Had a frustrating couple days working on the layout, but think that I am back on track again now.  I was measuring and cutting rural two-lane roads out of Masonite.  I thought I had them the way that I wanted, so I painted them with aged concrete color paint and let them dry.  The next day I added striping for lane markers and then used black chalk to weather them.   The next day I thought that they were too dark, so I rubbed more chalk off with a damp rag.   

Yesterday I went down and glued them in place thinking they were good.  Next I had bought some Woodland Scenics grade crossing timbers and tested them for fit.  I discovered that I had cut the roadway 3/4" short to work with this material!  I couldn't believe it.  So today I was in damage control mode and finally got things figured out so they will look good.  And naturally the worst problem was right at the front edge of the layout where it is most visible.  Murphy's Law was working overtime on this one.

Hey, I only had to replace 7 pieces of Masonite it could have been worse.  They are painted and I will stripe and weather them tomorrow.  That is just the front road, the other two are on the back side and will get redone tomorrow I hope.  Some days are better than others.

Art

paul 2 posted:

Bob, the skirting is adding a nice finishing touch to the elevated line. Mike your moving fast on the framing. You are going to have a nice train room when done. Mark, keep the construction pictures coming. Good job so far. Now that the train show is under my belt today I spray painted the sidewalks and am waiting for them to dry. Headed to the basement and painted the cork in the grain elevator area. Then I placed the buildings in the oil depot in another position which I think is the final one. This afternoon I'll ballast the cork, mark out the buildings and apply plaster, glue sidewalks down and work to finish the Pawn Shop. "WHEW" I think I just tired myself out LOL. Pics.......Paul

DSCN1571DSCN1572DSCN1570 

Looks nice Paul! I think you should take a walk around video of your basement layout sofar! I think it would be cool so see what you have done sofar!

Today, I completed cleanup of the yard area:

TT yard before-cleanup

In addition to putting away the last of the tools and materials, I also sent a wave of Pledge+paper towels through the yard area, making a vast improvement in its appearance. Only slightly evident in these photos is my giving the wall paneling the same treatment, and completely hidden is the cleaning on the woodwork on all the cabinet doors, not to mention the video light and light stand I bought to assist with future videos. 

TT Yard after cleanup

I also found and repaired a couple of broken transition joiners between the tubular and 2-rail Atlas with-added-third-rail trackage. I pulled off the MTH Santa Fe C40 in the previous video and am preparing to install some traction tires it haad been missing for many years, and maybe do a short video with more runby shots focusing on the train it's pulling rather than the lights brightening up its path.

---PCJ

Attachments

Images (2)
  • TT yard before-cleanup
  • TT Yard after cleanup
Bryan in Ohio posted:

Major thanks to this forum and forum member Stephen Horling for walking this electrical novice through this project.  I wanted to swap out the very dim lights in the MTH Flood Light Towers that I am using as the lights on my baseball field to LED's.  After reading the few threads and Stephen emails I was able to get the first tower done this afternoon.  I think I can make them even better now that I know I have to fix a few aspects (bigger hole to fit LED back into fixture better, longer wire leads to allow lights to swivel better) but not to bad for a first attempt and of course the most important thing they worked!!!! Major improvement from the original lights that come standard.

DSC_1228[1]DSC_1231[1]DSC_1229[1]

Bryan, the light looks great! I did that to one light tower with bright white. You make me think an amber light might be better!

OK after a long day of putting away my Christmas molds, grocery shopping, and visiting past family members gravesites, I got to fool around with some trains for a while. 

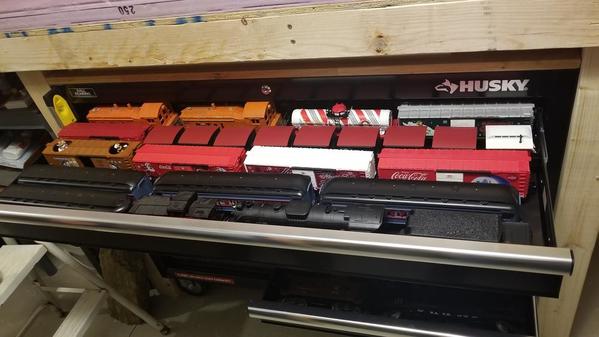
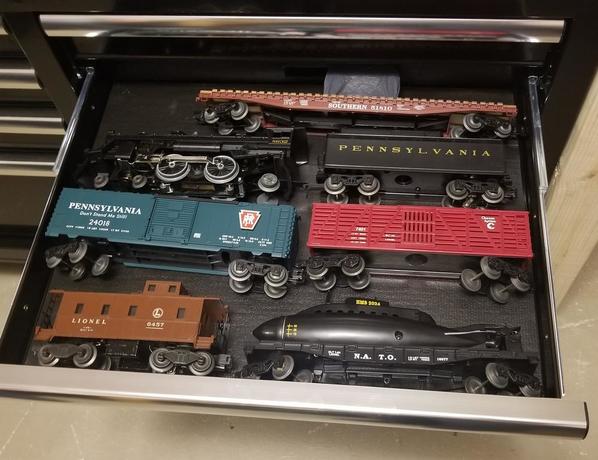
Mark this is a few pictures of the toolbox loaded with some rolling stock.  20180304_20410120180304_204610

And  couple of the spurs I turned into pass through sidings .   

20180304_204236 [1)

20180304_204217

Then I was looking at some old posters I have.  And I have a real print 16x20 of the Southern 4501 engine I have(in the very back next to the wall)  that looks to be taken in the late 1960s!!!!    Ive had it for a number of years and had forgotten about it! 

Jim 

Attachments

Images (4)
  • 20180304_204101
  • 20180304_204610
  • 20180304_204236 (1)
  • 20180304_204217
Last edited by carsntrains

Eh my wife took and sent me eitght pictures (more rolling stock in drawers) but they never did get to my email.  Tried twice and only got the 4.     

Something I noticed is the newer 036 switches are not like the ones I already have.   The ones I had have metal backs with tons of screws.  The new ones I just got have nearly nothing on the back except a small plastic panel over the moving parts of the switch and the screws for the switch stand that can be moved to the other side.   

Jim 

Last edited by carsntrains

Didn't work all afternoon on the layout. Ask the wife if she wanted to take a ride in the afternoon and she said can we go look for eagles. Ended up at Chippewa Lake Ohio and found they had built a new nest closer to the road. When we got home I made the suggestion of going out to eat. So I did a shortened version of work but I have the ballast laid down and ready for glue tomorrow, added signs to the Pawn Shop, painted the hanging sign so I can glue the signs to it and hang it, laid out the sidewalk and placed a building front in the Brewery area. I have two more flats coming. Not sure where I will exactly place them. They will be mixed in other types of flats. Mike, a video sounds good but right now to do something like that I would have to clear off tables so the track work and scenery could be seen. Pics.............Paul

DSCN1573DSCN1574DSCN1575DSCN1576DSCN1577DSCN1578DSCN1579DSCN1580

Attachments

Images (8)
  • DSCN1573
  • DSCN1574
  • DSCN1575
  • DSCN1576
  • DSCN1577
  • DSCN1578
  • DSCN1579
  • DSCN1580

Last night I actually did some work on the layout and got my hands dirty for a change. I had a few bare homemade trees that lost their flocking.  I took some diluted matte medium that was left over from another project, mixed in some Elmers glue, dabbed it with a large medicine dropper onto the bare spots, and sprinkled and placed left over Woodland Scenics Fine Turf (nice shade of green) onto the same bare spots.

What made the project particularly enjoyable is that I played a CD of Beethoven's 6th Symphony known as the Pastoral Symphony during this scenery project. It is truly the perfect music to play when doing scenery work. 

Arnold


Jim, the tool box is a grand idea, but if I did that then the wife would want to know what new tools I bought and I have done a good job hiding that so far! I like the pictures of your pass through sidings. Room for lots of trains! 

Paul, Sorry you have to drive so far to see Eagles. The wife and I see them all the time at work, we have 3 couples that fly around above the store we run on Hoodcanel, WA. But back to trains, your roadbed and ballast is coming right along! I was thinking that the Pawn Shop might be a good place to fine a deal on some used trains! As far as the video I understand,  I can wait, it cool just seeing what you get done!

Pat, Thank you! Its kind of like what the wife says. A little here and a little there and next thing you know it's done! LOL Yea Right!

Nice pictures to start the day Brian, Thanks!

DZ-1000s wired to AIUs and local controls. The local controls in many cases are mounted/wired remote to the turnout. I've just been taking my time to get all of the LED pilot lights and switch motors functioning to my satisfaction. When I select "All", &  "Straight" on my DCS remote, I want to see nothing but green lights and every turnout set for straight through operation.

Another thing that is sucking time; I originally planned for an Atlas signal system. As such, I connected only one outer rail at each power drop. This has proven problematic. I'm going back an adding the connection to the other outer rail too.

The next turnout switches to a 45 degree crossover with a relay to control power to the center diamond. 

Bob, nice score. Good beer and still Family owned. DEUCE, post pics when you get all your tank cars. This morning after watching Arnold's video I went to the basement with my feet still going to the music. Stormed through a number of things. Ballast is glued down, I scored the outline of the depot refinery so I can plaster the area. I finished off the Cooter's building and set it in place. The one long Cooter's decal I had to go through the dirt devil bag to find it because I accidentally sucked it up. Luck out though, still in one piece. Got the hanging sign done and ready to hang on the building and the roof sign is ready to be glued to the roof. And that building will be done. This afternoon apply some plaster and start piecing the sidewalks together and gluing them down. Pics...........Paul

DSCN1581DSCN1582DSCN1583DSCN1584DSCN1585DSCN1586DSCN1587DSCN1588DSCN1589DSCN1590DSCN1591 

Attachments

Images (11)
  • DSCN1581
  • DSCN1582
  • DSCN1583
  • DSCN1584
  • DSCN1585
  • DSCN1586
  • DSCN1587
  • DSCN1588
  • DSCN1589
  • DSCN1590
  • DSCN1591

Bob, Even thought its not Coors. I have to say nice score! They sure look nice!

Tom That's quite the undertaking, I will be watching for updates, Really want to see how it turns out!

Brian, I always love the Santa Fe paints.

Paul, The pawn shop turned out wonderful, Your layout is coming together so nice it nice to see it! Thanks for all you hard work and for sharing it with the rest of us!

Last edited by mike g.

Did some more before dinner. Trying to get a lot done today and tonight before Bryan breaks my arm tomorrow night so he can catch up LOL. Got the plaster down in the oil depot area, just about finished the Pawn Shop, got the roof sign glued in place and the hanging sign glued in place. Still have to trim that. And underneath the spools, plaster jug and mineral spirits I glued down a portion of the sidewalk. Going to have to take a corner piece and trim it down so the rest of the sidewalk will follow the road. Maybe if the wife gives me the go ahead I can do that and start laying down track in the Grain elevator area. Pics.....................Paul

DSCN1592DSCN1593DSCN1594DSCN1595DSCN1596


Attachments

Images (5)
  • DSCN1592
  • DSCN1593
  • DSCN1594
  • DSCN1595
  • DSCN1596
paul 2 posted:

Did some more before dinner. Trying to get a lot done today and tonight before Bryan breaks my arm tomorrow night so he can catch up LOL. Got the plaster down in the oil depot area, just about finished the Pawn Shop, got the roof sign glued in place and the hanging sign glued in place. Still have to trim that. And underneath the spools, plaster jug and mineral spirits I glued down a portion of the sidewalk. Going to have to take a corner piece and trim it down so the rest of the sidewalk will follow the road. Maybe if the wife gives me the go ahead I can do that and start laying down track in the Grain elevator area. Pics.....................Paul

DSCN1592DSCN1593DSCN1594DSCN1595DSCN1596


coming along very nicely!

Looking good Paul! I hope you had a big dinner so you can spend a lot of time on the layout before going to Bryans! I am guessing you wont be getting much done after he breaks your arm! LOL You might think about bringing the wife to Bryans with you to be your body guard!

All I did today was put in bird block. WOW was that a blast! LOL

Paul you are doing some great work there!!  We want to see the rest of your layout PLEASE!!!! 

Deuce now you are onto something!!   That K Line truck looks much better..  Still on the fence about the bus though!   

Now here is a picture of the new 036 manual switch on the right and the older 036 manual switch on the left.  I had moved the switch lever on the new one.

20180305_181942

And yes since you see switches that means I was moving stuff around again lol  I think I'm heading in the right direction finally!!  They Wabash that I didn't have a siding long enough for, now could have two more passenger cars added to it! : )    I got some PA cars out of the tool box and added some to that train.   And put the submarine car on the John Deere train.  

BTW the sub car is vintage 1994.   

Jim 

Attachments

Images (1)
  • 20180305_181942
carsntrains posted:

Paul you are doing some great work there!!  We want to see the rest of your layout PLEASE!!!! 

Deuce now you are onto something!!   That K Line truck looks much better..  Still on the fence about the bus though!   

Now here is a picture of the new 036 manual switch on the right and the older 036 manual switch on the left.  I had moved the switch lever on the new one.

20180305_181942

And yes since you see switches that means I was moving stuff around again lol  I think I'm heading in the right direction finally!!  They Wabash that I didn't have a siding long enough for, now could have two more passenger cars added to it! : )    I got some PA cars out of the tool box and added some to that train.   And put the submarine car on the John Deere train.  

BTW the sub car is vintage 1994.   

Jim 

That's it Jim, keep moving things around till you find where you really love it not just like it! LOL But don't do it to many time cause that might get people wondering about your sanity! 

Add Reply

Post

OGR Publishing, Inc., 1310 Eastside Centre Ct, Suite 6, Mountain Home, AR 72653
800-980-OGRR (6477)
www.ogaugerr.com

×
×
×
×
Link copied to your clipboard.
×
×