
Mark Boyce posted:
TedW posted:
Gilly@N&W posted:

I'd post a picture or two, but who really cares to see a DZ-1000? Today I passed the 1/2 way point in wiring switches. Just finished #13 of 24. I also have power feeds for 3/4 of the layout complete.

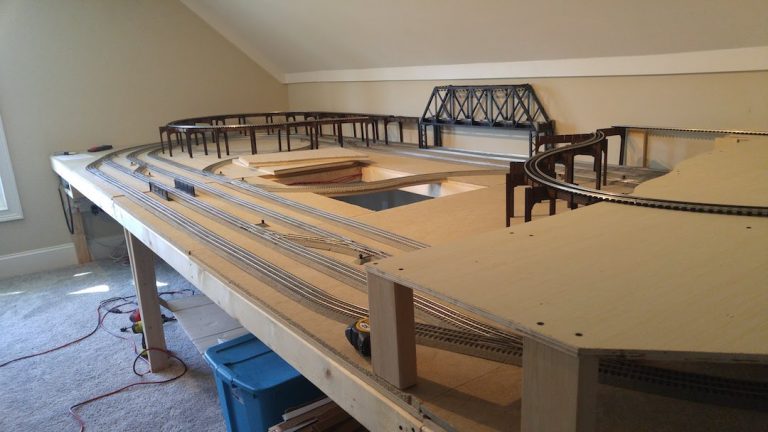
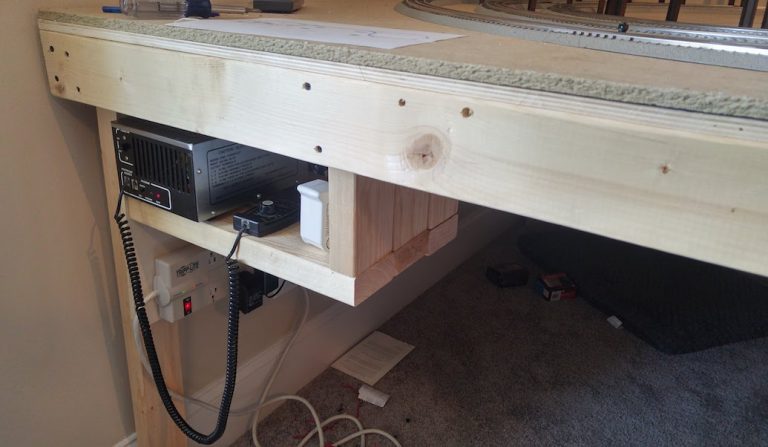
Wiring DZ-1000s to the MTH is the way to go. These Ross switches operate smooth as glass. The accessory output on the CW-80 is more than up to the task of powering these switches.

It's snowing here too. Back to the attic.

I for one haven’t seen these switch machines wired to Ross switches.  I know most have, but it would help me a little to put the pics and instruction/methods in the thread bank.

Tom, I'm with Ted.  I would be happy to see also if you can.

Okie-dokie. I'll shoot some pics tomorrow.

Elliot. that is one long expanse but when it's done it is going to look good. Once you are done with everything and are just running trains it is going to be hard to pick a scene. They will all look good. And for Mike, Mark and the rest I did do what I promised. Not as much as I would of liked too but I actually ran an engine on a nine foot section of track. I did a hot wire job to do it as it shows in the one pic. But it actually felt good to run something after all this time. This is it  for now. I thought I had more wire for the ground but I had to order more. Once that gets here I can get more track wired up. Pics..............Paul

DSCN1704DSCN1705DSCN1706DSCN1707

Attachments

Images (4)
  • DSCN1704
  • DSCN1705
  • DSCN1706
  • DSCN1707
TedW posted:

Whew, Bob.  This’ll be interesting.  I wouldn’t know where to begin...  my Lionel Dwarf signal has three wires, red,black,yellow;  red/black-power/ground, yellow to insulated rail.  No idea how the connections are made inside.  Is that what you’re thinking?

Yea something like that. I need to do some research on block signals and how they are supposed to work. My thought is that they will be green for an oncoming train unless there is another train in the block ahead in which case the signal would change to red.

The first part of the layout I want to use them will be controlled by a toggle switch on my control panel and will correspond to which side of my transformer is powering the section of track. Details here

2018-03-08 20.25.34

Attachments

Images (1)
  • 2018-03-08 20.25.34
Last edited by RSJB18
paul 2 posted:

Elliot. that is one long expanse but when it's done it is going to look good. Once you are done with everything and are just running trains it is going to be hard to pick a scene. They will all look good. And for Mike, Mark and the rest I did do what I promised. Not as much as I would of liked too but I actually ran an engine on a nine foot section of track. I did a hot wire job to do it as it shows in the one pic. But it actually felt good to run something after all this time. This is it  for now. I thought I had more wire for the ground but I had to order more. Once that gets here I can get more track wired up. Pics..............Paul

DSCN1704DSCN1705DSCN1706DSCN1707

http://gifimage.net/wp-content/uploads/2017/11/its-alive-gif-10.gif


Elliot, thing are looking great! Matches the pictures very well!

Bob, sounds like a lot of work, but I will be watching so I can learn something new! When I bought my LED's I got the ones with the resisters on them already!

Paul, I am so very happy for you! Its wonderful to see all your hard work coming together and running trains!

Cmontagna posted:

Snow day today! Gave me some time to breakout the airbrush for the first time and begin blending some colors around a creek and pond scene. While I had it out I tried my hand at some weathering too! 


weathering

Looks good Chris! The creek and pound should turn out nice! The box car looks a lot better weathered! Nice work!

JD2035RR posted:

Elliott, looks great even though I know it's frustrating to have to go back over it.

 I saw some pictures you posted in another thread about the modular tables and you mentioned EnterTRAINment. What's the history of EnterTRAINment? What was it exactly? How did you start it? Were you solo?  How long did you do it? What was its demise?

Sounds like a conversation to have around a campfire/fireplace, so I'll pull up a seat and have a listen if you would kindly oblige my request

OK JD, all your questions are answered. You can find them here.

Building my fuel columns.

First had to drill out the bend here so I can insert a portion of a paperclip, to which I will slip the "hose" over.

20180321_215312

Cut a section of alum tube and dry fit the elbow. Looks good.

20180321_215330

Will this be scale? I dunno ...

20180321_215254

Added the valve. Now to JB Weld it all in place.

20180321_215050

"Finished" product before trimming off excess epoxy, priming, painting and hose installation.

20180321_223157

Attachments

Images (5)
  • 20180321_215312
  • 20180321_215330
  • 20180321_215254
  • 20180321_215050
  • 20180321_223157
Last edited by Deuce

I bought a sheet of newspaper fronts, printed on very thin tissue paper, from an eBay vendor, made by a company called Dave's Decals. A personal printer couldn't possibly make these. Anyway, I scattered several of them around the layout, looking like discarded newspapers. This is the kind of thing I'm focusing on now on the layout.0321181957-10321181955a-10321181955-10321181954-1

Attachments

Images (4)
  • 0321181957-1
  • 0321181955a-1
  • 0321181955-1
  • 0321181954-1

So yesterday, I managed to complete the laying out of track andupper level of the layout. Curves are 089 gargraves preformed. Will do final positioning and alignment and then screw the tack and roadbed to the table. Couple of photos:

IMG_4311

left side


IMG_4310

right side


so tonight, thought I would take out some motive power hadn't run in a while. Process was test run to make sure its running then do a little lube. 

First the Weaver G5s. Put it on the track, plugged in tether and it was moving nicely at 7-8 volts using the DCS hand held variable channel. so after 5 minutes or so, brought it back to do the lube . When I picked it up, the valve hanger screw came out and the valve gear slider came out of its slot with everything disconnected where the it fits to the valve hanger bracket on the loco.

I have macular degeneration so vision is clearly a problem. This is a time when nmy Mrs has assumed the railroad position as Master Mechanic. WE fussed with this thing to get the slider back into the steam chest. She could see the opening for the slider but it took a bit of fussing to get in to ride into the slot and move freely. Of course it fell out while we were trying to get the rods and valve hanger together with the screw. Kind of like a quarterback sack. So more fussing and finally back into the steam chest. Now we get the valve gear positioned and the screw inserted. A little fiddling and it makes up with the threads in the hanger on the inside and we get it tightened down. For reference, we checked the tightness of the screw on the opposite side. It was tight and we set the screw we just put in to about the same tightness.  So now to test it , running it back and forward over a ten foot distance a few times. Checked the screw seemed tight. Did not have any lock tight so used a drop of clear nail polish on the screw head where it meets the valve hanger. While it was drying we oiledthe moving parts in the valve assembly both sides and did the same test run over the short distance. Screw stayed in position we set it before the nail polish. Decided to make a loop or two around the layout and then checked the screw position. Seemed to be still fixed as we left it. So Aim thinking this done now. Still somewhat nervous about it coming loose though.

ok so now we try the weaver H10s. This one has a few more miles than the G5s. Applied some oil to wheel axles, roller ends and the moving drive rods and valve gear joints. It seemed to run nicely around the layout . Addded a five car freight and ran it around for about 5 loops . Well looks like a front taraction tire has come off the engine. When I inspected it, there was one off the rear on the opposite side. The engine seemed to run fine and had no trouble with the short train. Tempted to try and acc the tire in place or take it off altogether. Getting the rod off the driver with the valve assembly in front of it seems like aa bear. 

So put that one aside for now. 

To close the night, I rolled out a MTH railking size Challenger in Greyhound colors This one is simple. No DCS just conventional control. Added a little smoke fluid and let it rip . Ran for about ten minutes just fine. This one has been run on the layout from time to time. It gets frequent use. It probably runs to fast but it is satisfying and dependable. 

So much for todays adventures. 

Attachments

Images (2)
  • IMG_4311
  • IMG_4310

After my less than successful attempts with the AF M10005 and the Marx 10005 over

the last couple days, I put them both back on the shelf. My track radius is just not

compatible with the AF and the Marx has some damage I did not notice before. 

Then I ran my childhood scout set for a few minutes, it ran fine so kinda boring. 

Then the little Jep  streamliner that I go a couple of weeks ago caught my eye, just

sitting on my little layout doing nothing. I did the usual first aid when I got it, wd40,

contact cleaner, clean the wheels. All it would do is a few feet, stop and start smoking.

Not a good sign. So tonight I got out the dreaded screwdriver and took it apart. 

Not as easy as it sounds. Anyway, cleaned the commutator, filed the brushes, more

lube and put it back together. As you can see in the first video, less than spectacular

results. I was about to call it a night when it shifted into second gear (second video). 

Better, but mind you this is my prewar Type V cranked to 25 volts. Anything else

would be through the wall and into the street at this voltage. IMG_20180321_224121

Attachments

Images (1)
  • IMG_20180321_224121
Videos (2)
VID_20180321_223048 (1)
VID_20180321_223153 (1)

We've been discussing mixed trains on another thread here,  so I decided that the Razorback Traction Co. needed an express boxcar for its crackled express (as you will recall, the paint job is a little iffy).  Grabbing materials on hand (a Baby Ruth boxcar and some vinyl stickers), the shops swiftly produced this masterpiece!   

GEDC0827GEDC0828

I may see about approximating some high-speed trucks with whatever I can scrounge from my truck box... 

Mitch 

Attachments

Images (2)
  • GEDC0827
  • GEDC0828

Maybe it wasn't my Birthday Cake but it has just as much flame as that one does.  Lol

Big Ken posted:

OK, which of you smart alecks took a picture of my birthday cake and posted it here?

No one took your Birthday Cake

1 Google Image Birthday Cake

It's a copyright Google Image.....................

Gary

   Cheers from The Detroit Mackinac Railway

• Pronounced: (mac-in-aw)

My YouTube Channel

Detroit Model Railroad Club  Video Tour


With the somewhat dubious assistance of Shop Supervisor Sylvia Siamese (Norma Bates Kitteh being out in the back yard terrorizing the local wildlife), a pair of MPC highspeed trucks were fitted to the express boxcar: 

GEDC0833

N.B.: Postwar couplers can be fitted to MPC trucks; one merely has to grind the ears off the sides next to the mounting tabs.  

GEDC0831

Mitch 

Attachments

Images (2)
  • GEDC0831
  • GEDC0833
Tom M posted:

Added the big table to the layout yesterday. None of the track is in its final position yet. Excited to get a full loop of track running. It can't come soon enough.20180307_21591220180321_125907

I predict, based on my own experience with my layout, over the years, starting in 1995, that you are going to expand and widen that plywood acreage. Yup. I'm sure of it, even if it is just a few inches you manage to squeeze onto the plan and abut to what you have now.

For example, see this neighborhoodIMG_0068b - note its proximity to the stairs IMG_0070

The original layout ended at the far right of the picture, out of view here, leaving what you see here as an aisle, so visitors and I could move closer to the layout. In short order, I said to myself that such an absence of miniature acreage was a waste, and that it would be more fun to have more space in which to model more of my little community, as well as to extend the mainlines into. So, I built and attached a narrow strip of additional layout right there, even constructing it of the same materials as the main layout - 3/4" plywood and 2x4 framing and legs.IMG_0604cx

FrankM

P.S. I can smell the wonderfully inviting fragrance of your fresh plywood from here, Tom M (!)

Attachments

Images (3)
  • IMG_0068b
  • IMG_0070
  • IMG_0604cx
Last edited by Moonson

Well, I just typed out a comment to each person who posted starting with Lee and his newspapers, down through Mitch and Sylvia and the Razorback car.  However, the Hoopla Server had a hiccup and it didn't take.    Next time, I'll save to clipboard before posting!  

Here is the Cliff Notes version:

Lee, Howard, Bob, LIRRSteamer, Beardog, Mitch, Tom, Doug, Jim, Frank, Nice work!

Beardog, LIRSteamer, sorry you ran into difficulties!

Jim, that photograph is priceless!

briansilvermustang posted:

Brian, The Canadian Pacific units remind me that I saw two Canadian National engines on the Bessemer and Lake Erie line here in Butler for the first time Tuesday.  When CN purchased the B&LE several years ago, I read that they were not going to repaint engines in CN colors.  I have seen CN maintenance trucks on the roads for several years, but these were the first engines.  I told Mrs. B that I wouldn't be surprised to see more and more CN as the B&LE engines are retired or go through major maintenance.

I'm sure you have some CN somewhere in your massive archives!  

I'm really getting into this "fine detail" work.  I need a "nozzle" for the fuel columns, so I went to Scale City Designs, and I think a screw jack will work nicely in that regard. While I was there, I grabbed a fire extinguisher station (they come in pairs) that I can couple with each of the two fuel columns that will be on the station (separated by the sand tower). And lastly, you never know when a pallet jack truck will come in handy, so I purchased one of them for the other platform.

I finished painting the fueling station platform this morning. I'm hoping tonight I can assemble the other fuel column, and then I'll prime and paint them. Will cut out some minor details for the base of the columns, glue it all in place, and we'll be done. I expect to have it completed by Christmas. 

Nice detail Lee! It all adds up to making your layout look more and more real!

Gandy, beautiful scratch build!

Bob, the bridge turned out looking great along with the ballast!

Lirr, quite the layout! The addition looks really nice!

Looking good there Tom! Keep up the great work!

JDEVLEERJR, take all the time with the kids you can get! I hope it last along time, my kids were not into trains, my grandson was but has moved on to tablets and video games!

OLDMIKE, Nice addition!

MODELTRAINS, good call on the fence! I am surprise they didn't call for a walk over bridge! LOL

To sum it up, GREAT work is being done by all!

Mark Boyce posted:
briansilvermustang posted:

Brian, The Canadian Pacific units remind me that I saw two Canadian National engines on the Bessemer and Lake Erie line here in Butler for the first time Tuesday.  When CN purchased the B&LE several years ago, I read that they were not going to repaint engines in CN colors.  I have seen CN maintenance trucks on the roads for several years, but these were the first engines.  I told Mrs. B that I wouldn't be surprised to see more and more CN as the B&LE engines are retired or go through major maintenance.

I'm sure you have some CN somewhere in your massive archives!  

          https://youtu.be/Faamcj_57bk

Attachments

Images (17)
  • mceclip0
  • mceclip0
  • mceclip1
  • mceclip0
  • mceclip0
  • mceclip1
  • mceclip2
  • mceclip0
  • mceclip1
  • mceclip2
  • mceclip3
  • mceclip4
  • mceclip0
  • mceclip1
  • mceclip2
  • mceclip0
  • mceclip1
Last edited by briansilvermustang
Jdevleerjr posted:

Ran trains with my younger son yesterday when the older kids were at school.  He hasn't shown my interest in trains, but the last few weeks he keeps asking me to run them for him.  He loves to play with his cars and trucks at the front of the layout as the train runs.  IMG_20180320_083616457

Hey Jim- good to see a post from you. Hope all is well. Looks like a fun time was had by all. Any updates on the layout?

Bob

Lots of progress this week

  • Scratch built steel bridge supports to position the Atlas truss bridge at the correct height for the BridgeBoss Supports that I've been working with @Bridgeboss Jim on
  • Built a shelf and swapped out the Lionel ZW-C I had for the MRC Dual Power O27 (the ZW-C had a DC offset going to the track causing PS1 locos to blow their horns constantly, also the MRC is lower profile)
  • Mounted and installed DCS AIU
  • Changed the PS3 sound set on my upgraded MTH ATSF 4-8-4 Northern to use the 4-8-4 Greenbrier soundset - I LOVE the whistle of the Greenbrier

Next up, I'm pulling all trains/track/bridges off the table to paint the homasote with brown latex paint, then laying ballast.

Add Reply

Post

OGR Publishing, Inc., 1310 Eastside Centre Ct, Suite 6, Mountain Home, AR 72653
800-980-OGRR (6477)
www.ogaugerr.com

×
×
×
×
Link copied to your clipboard.
×
×