
Strap Hanger posted:

Finished another Sherman tank flat car load. This one was heavily weathered, since after its deployment to Europe at the end of WW2, it was shipped to Korea when that war started.  It’s seen a lot of mileage.  Next I need to weather the flat car and attach the tank with some chains.  A fun project. 

99DF96B8-A86F-416F-817F-F4990756B356CF847881-D052-46F7-B275-FCAE7746E3A26FB48DD5-9FDC-433B-AA27-65A735D7320E641A3130-94BF-4C2A-85D9-9FD2042AA014443566D6-DEA5-4082-BDA0-D568041E5456

Very nice looks good on that depressed car 

I put in a good day's work.

There was more track upgrade and CTC clamp-on elimination today.  I made up three straights and three curves with track power wires soldered to the bottom.  They will go on the lower level.  Another "To be Assembled" pair of straights will be added to  the second level.  I removed my covered bridge for future use on the third level.  New, attractive, uprights are on the to do list.   I took advantage of the degree of disassembly to improve the West End engine yards to better use the available space.  Minor rewiring of the yards starts tomorrow morning. 

WEST END      West end

NORTH EAST   North East

SOUTH EAST      South East

Attachments

Images (3)
  • West end
  • North East
  • South East

Got a ton done on the module this weekend.  Put an HO transformer under it to power all the accessories and vehicles.  Had to put some DC step downs in because it seems like nothing runs on the same voltage and add wire leads to be able to hook them up under the module.  Finished the backdrop to add depth to the module, put figures in the vehicles, added the chain link fence and some other little items, and finished the blacktop.  Really the only thing to do now is to add my smoke generator under the module to have smoke coming out of the car wreck scene.  Next time we show is this Saturday so hopefully everything stays working.

DSC_0494DSC_0495DSC_0496DSC_0497DSC_0498DSC_0499DSC_0500DSC_0501DSC_0504DSC_0506DSC_0507DSC_0508DSC_0509

Attachments

Images (13)
  • DSC_0494
  • DSC_0495
  • DSC_0496
  • DSC_0497
  • DSC_0498
  • DSC_0499
  • DSC_0500
  • DSC_0501
  • DSC_0504
  • DSC_0506
  • DSC_0507
  • DSC_0508
  • DSC_0509
Strap Hanger posted:

Finished another Sherman tank flat car load. This one was heavily weathered, since after its deployment to Europe at the end of WW2, it was shipped to Korea when that war started.  It’s seen a lot of mileage.  Next I need to weather the flat car and attach the tank with some chains.  A fun project. 

CF847881-D052-46F7-B275-FCAE7746E3A2443566D6-DEA5-4082-BDA0-D568041E5456

It looks great and as much as I love the .50 M2 machine gun and the M1919A4 .30 cal on the socket mount, neither would be on the vehicle during rail movements. I could snatch the "Ma Duce" off the turret in 10 seconds by pulling just two pins holding the weapon in place. Do you think the track commander wants to explain that to the Company Commander when it gets to the final destination and the belt-fed weapons are missing?

Sorry to ick nits on a fine model, but years on heavy mechanized Army units hammered that into me...

Finished up the paving work on the new road today with second coat of asphalt...plan to apply the road striping tomorrow.  Placed the bus station, and will place the train station tomorrow.  Still a little smoothing out of the joints needed.  Notice the two police officers stationed at the site to keep the traffic off the newly coated road

City 20

Attachments

Images (1)
  • City 20
p51 posted:
Strap Hanger posted:

Finished another Sherman tank flat car load. This one was heavily weathered, since after its deployment to Europe at the end of WW2, it was shipped to Korea when that war started.  It’s seen a lot of mileage.  Next I need to weather the flat car and attach the tank with some chains.  A fun project. 

CF847881-D052-46F7-B275-FCAE7746E3A2443566D6-DEA5-4082-BDA0-D568041E5456

It looks great and as much as I love the .50 M2 machine gun and the M1919A4 .30 cal on the socket mount, neither would be on the vehicle during rail movements. I could snatch the "Ma Duce" off the turret in 10 seconds by pulling just two pins holding the weapon in place. Do you think the track commander wants to explain that to the Company Commander when it gets to the final destination and the belt-fed weapons are missing?

Sorry to ick nits on a fine model, but years on heavy mechanized Army units hammered that into me...

Well, if you're going to get picky... The main gun should be in travel lock.............

Busy weekend on the railroads.... passed out a bunch of likes. Great work everyone

Nothing exciting on the RSJ&B this weekend. Did a little more painting on the Ameritowne model walls. Nothing photo worthy. I also ordered an Atlas switch machine from Mr. Muffin. I'm going to try and MacGyver a retrofit on a 5122 switch. The solenoid buzzing is really annoying.... If it works great, if not, on to plan B.

Bob

Bryan,  you did a good job on your module. Will you still be charging me a toll to run my train through your module LOL.

Lee ( P51 ), I agree with Bob. The lighting brought the scene together. 

Lee, nice find on that Weaver boxcar. I like to gondola you just did. Where do you get your decals???

No work yet. Catching up on the topic. I will be outside later this morning finishing up all the silos...........Paul 2

paul 2 posted:

Bryan,  you did a good job on your module. Will you still be charging me a toll to run my train through your module LOL.

Lee ( P51 ), I agree with Bob. The lighting brought the scene together. 

Lee, nice find on that Weaver boxcar. I like to gondola you just did. Where do you get your decals???

No work yet. Catching up on the topic. I will be outside later this morning finishing up all the silos...........Paul 2

Thanks Paul. I got the decals from K4 Decals off of eBay don’t buy them horrible very thin hard to work with and the cloud up after you apply them. When he sent them He Just put them in an envelope with no protection. Don’t buy these decals. Tichy Trains are better 

Last week I stopped at a local antique store on the advice of a friend that knew I was looking for some old Gilbert American Flyer S gauge straight sections of track.   I bought a bundle of  straights for $10.   The “T” profile of the Flyer rail is quite prototypical for O scale and each 12” section yielded two 40’ long O scale rails.

S-gauge

For the first half of the twentieth century, most rail segments were 39-40ft long.   As rail cars grew in length, so did the rail segments they could transport.   Today we see mostly welded rail in mainline use so it’s not uncommon to see piles of decommissioned rail along the right of away awaiting the opportunity to be sold for scrap.

decommissioned rail

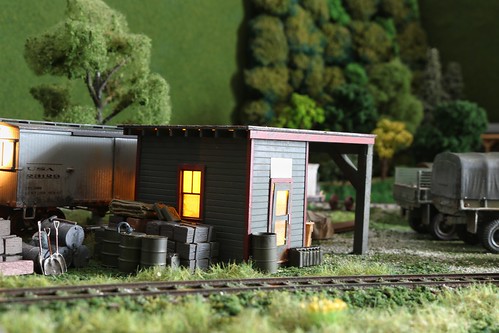
The Flyer rails make a nice scrap pile of discarded rail.   An added bonus, the junked ties make for great load & unloading material to use with my magnetic crane.  

DSC07716DSC07717

Another use for the rails would be as posts for building embankments.

HIGHWAY-SAFETY-H-PILE-AND-RAIL-STEEL-STABILIZATION-Embankment-Failure-Repair-Mercer-County-KY-3
The first thing after disassembling the track was to wash the rails and ties.   With the help of my shop vice, I hammered out the tie dimples that remained in the rail sections.  Using my Dremel and a wooden spacing jig, I drilled 2 prototypical bolt holes in the ends of each section.  The rails were again washed as I used oil lubricant during drilling.   I base coated with ACE Premium Red Oxide Primer before shading with some other colors.   I am still experimenting with color shade for the rusted rail. 

hammered out tie dimplesDSC07712DSC07713
Currently the decommissioned rails are resting in piles along side my yard track and the old ties are riding around the layout awaiting visits to the scrapyard crane.

DSC07723DSC07733

Another recent project was adding the smoke box platform to the pilot of the #1121, thus bringing it another step closer to the #332.

DSC07720IMG_6504IMG_6503

John Rowan, your passenger car detailing is outstanding!   In addition, your painting skill and patience are enviable!

Lee (P51), your continued focus on history and detail is inspirational!

Paul2, what is the source of the silo tops?  Fun to follow your layout progression - as always, great work!

Mitch, a special thank you for your devotion to promoting the hobby and fun at train shows.   It represents a real time commitment on your part!  Thanks again!!

Thanks to all for posting and sharing!   Fun to follow all the projects!

Cheers, Dave

Attachments

Images (13)
  • S-gauge
  • decommissioned rail
  • DSC07716
  • DSC07717
  • HIGHWAY-SAFETY-H-PILE-AND-RAIL-STEEL-STABILIZATION-Embankment-Failure-Repair-Mercer-County-KY-3
  • hammered out tie dimples
  • DSC07712
  • DSC07713
  • DSC07723
  • DSC07733
  • DSC07720
  • IMG_6504
  • IMG_6503
Last edited by darlander
p51 posted:
Strap Hanger posted:

Finished another Sherman tank flat car load. This one was heavily weathered, since after its deployment to Europe at the end of WW2, it was shipped to Korea when that war started.  It’s seen a lot of mileage.  Next I need to weather the flat car and attach the tank with some chains.  A fun project. 

CF847881-D052-46F7-B275-FCAE7746E3A2443566D6-DEA5-4082-BDA0-D568041E5456

It looks great and as much as I love the .50 M2 machine gun and the M1919A4 .30 cal on the socket mount, neither would be on the vehicle during rail movements. I could snatch the "Ma Duce" off the turret in 10 seconds by pulling just two pins holding the weapon in place. Do you think the track commander wants to explain that to the Company Commander when it gets to the final destination and the belt-fed weapons are missing?

Sorry to ick nits on a fine model, but years on heavy mechanized Army units hammered that into me...

P51, totally correct. I seriously considered leaving them off, but my kid (and advisor on all things with my layout) told me to leave it on because it looks “cool”.  I can’t argue with that.  The thing I need to fix is that one HVSS suspension spring that is on backwards and facing the wrong direction.  

This isn't too advanced, but my "Knights of Atlantis" lay-out includes Atlantis' hodgepodge fleet, as well as Lex Luthor's pirate fleet. I had previously converted a card stock British destroyer into the Polish destroyer "Thunderbolt!" and I had noticed that there was an identical card stock model that was painted differently. I had wanted an aircraft carrier anyway, and after buying the copy, I took razor knife in hand and built one. Then I added pewter pieces from the Monopoly "Century of Flight" game.

Pictures 1 & 2 are the "Thunderbolt!" which single-handedly took on the super-battleship Bismark, making it impossible for the Bismark to escape the British Navy. Pictures 3 & 4 are an identical ship kit-bashed into an aircraft carrier.

SUNP0001SUNP0002SUNP0004SUNP0005

Attachments

Images (4)
  • SUNP0001
  • SUNP0002
  • SUNP0004
  • SUNP0005

Fruitful afternoon and I don't even like fruit LOL. All silos painted. I finished off  painting the bakery silos with a fourth coat along with parts of the shed. The metal color silos I will put a coat of dule coat on. They are a tad too shiny. Now I can start to build the top part for the bakery silos. Not sure what color I will do that yet. But today was a good day. Pics....................Paul 2

DSCN0135DSCN0136DSCN0137DSCN0138DSCN0139DSCN0140DSCN0141

Attachments

Images (7)
  • DSCN0135
  • DSCN0136
  • DSCN0137
  • DSCN0138
  • DSCN0139
  • DSCN0140
  • DSCN0141

Still painting more Preiser 65602 Seated People for the two Canadian Pacific Coaches and Dining car.  The Baggage, Observation, Vista Dome and 10-6 Sleeper are finished.  Seven more packs should arrive from Questmark2 in Germany tomorrow.  I will paint those while watching March Madness Basketball.

I find if I do shorter painting sessions and relax when I paint, I get more work done.  I was pushing to finish the Canadian Pacific cars and going extremely slow.  I took a two day break, and productivity improved.

John Rowlen

Attachments

Images (3)
  • IMG_1698
  • IMG_1695
  • IMG_1690
Bryan in Ohio posted:

Got a ton done on the module this weekend.  Put an HO transformer under it to power all the accessories and vehicles.  Had to put some DC step downs in because it seems like nothing runs on the same voltage and add wire leads to be able to hook them up under the module.  Finished the backdrop to add depth to the module, put figures in the vehicles, added the chain link fence and some other little items, and finished the blacktop.  Really the only thing to do now is to add my smoke generator under the module to have smoke coming out of the car wreck scene.  Next time we show is this Saturday so hopefully everything stays working.

DSC_0494DSC_0495DSC_0496DSC_0497DSC_0498DSC_0499DSC_0500DSC_0501DSC_0504DSC_0506DSC_0507DSC_0508DSC_0509

Bryan:

Your module is superb. How many of you does it take to get it to a show where modular club is running? Also, I have been looking for railing like you have on the bridge in front of the second level. Is that commercially available? If so,, where can I get it?

Paul,  Thanks for the comment on the pastel colors for the clothing.  Since the figures are not wearing winter coats, I opted to set the season at Spring/Summer on my layout.  The pastels are bright for the women, and the men's suits add a contrast.  An occasional male figure will be put in a bright red, green, brown or blue.  These figures are few, but the contrast of the intense color grabs the viewers attention.

Sincerely, John Rowlen

New gate crossing, a couple of Lemax buildings which I still need to put the lights in, wired up my rotating beacon and finished up some track wiring. 

I ordered 20 street lamps some trees and people which will keep me busy for a while. I plan to use some leftover roofing paper to make some asphalt roads by the houses.

Picked up some Dietz lanterns too, guessing the small white "night watch little wizzard" is a RR one? 


Attachments

Images (6)
  • 20200303_074714
  • 20200303_074722
  • 15832401497135520426667713520213
  • 15832402409143470117757300040686
  • 15832407524707982354167571617971
  • 15832407797004579022554431547068
Last edited by PRRick
Randy Harrison posted:
Bryan in Ohio posted:

DSC_0506

Bryan:

Your module is superb. How many of you does it take to get it to a show where modular club is running? Also, I have been looking for railing like you have on the bridge in front of the second level. Is that commercially available? If so,, where can I get it?

Thanks Randy for the compliment.  Our group "The MOD Squad" has about 16 guys and we currently have 14 straights and 8 curves.  We just started in November and have as many as 14 straights (7 each side) to as little as 6 straights (3 on each side).  As long as the curves are there we can run. 

As for the railings the whole bridge came as a laser cut kit from Andre at River Leaf Models (https://riverleafmodels.us/) I don't know if he sells just the railings but you could ask him. 

Paul, the silos look great!  --  Glue factory, Bob!  

Bryan, thank you for your itinerary on show setups for the Mod Squad.  You gents will be busy!  I'm going to try to send you and Paul PMs so as to not get off topic.

As for me, I put in my first support bracket for the around the wall layout last evening, but see I measured a half inch too low.  Oh well, that's what they make spackling and blue paint for.  

Last edited by Mark Boyce

Add Reply

Post

OGR Publishing, Inc., 1310 Eastside Centre Ct, Suite 6, Mountain Home, AR 72653
800-980-OGRR (6477)
www.ogaugerr.com

×
×
×
×
Link copied to your clipboard.
×
×