The flats look great Richie!
@mike g. posted:Sure sounds like the green light! I cant wait to see your progress! The Brewery is really looking good!
Semper FI!
Thanks brother, trying to just keep it at a good pace. Will be starting the city section next, as I wait on some parts to come in.
Attachments
Finally got this station kit-bash in a "presentable" state. Scuffed up the top washed it down with IPA and shot a light coat of flat white on it, so I could see it better and decide if the height to width proportions look right. Almost to the point where I can go work on the back wall arch which will be scratch built and then work on the roof.
Attachments
This is a great project. I wanted something like this. But when I laid out my railroad, it was clear that this would have been way too big for this layout. But I love what you're doing here!
Don Merz
@chris a, it's your railroad empire and your project so your station need please only you.
For all of the wonderful elements in your bash, my eye can't get past the discordant notes struck by the interior corner junctions where the window lines are abruptly altered. Would such a symmetrical building in every other respect have windows and masonry juxtaposed as shown?
The great arch and pillars are wonderful; but, could they be achieved without the asymmetry of the interior corners?
Carl, I know what you're speaking of. I appreciate your comments.
Unfortunately that layout resulted from the way the 2 kits had been cut up by the previous owner, before I purchased them. I may decide to live with it, but I'll probably take one more look at how much more cutting / fabrication would be involved with moving the windows lower. I doubt I am wiling to try and move them further from the corner, just too much re-work. Had to make a few compromises, and decided early on that I wasn't investing in another bank.
The irony is that because the parts were cut up the way they were that's what caused to go the Great Arch design or I would have probably ended up with the more common Kit Bash !
Don Thanks for your comments as well.
To me everyone is doing an outstanding job on there projects! I just got the Atlas signal tower from Dustin and some other very cool stuff. I plan on cleaning up the tower and repainting it, adding some lighting and figures. I am going to place it right at the mouth of my yard! I hope to get some photos tomorrow!
Everyone keep up the great work !
Chris a. Looking outstanding I am fallowing this build like a lost puppy fallowing someone home for dinner! LOL
I agree with Mike everyone is make great progress and looks good.
Lee Grass always looks better! LOL Or at least better then just painted board! Looks good.
Everything looks so impressive; and intimidating.
Chris, the station looks incredible and it has led me to reconsider an approach I was going to take; in the future.
Brad, the shed is a unique idea. I don’t recall having seen such a detail.
@mike g. posted:Lee Grass always looks better! LOL Or at least better then just painted board! Looks good.
Thanks Mike. This is one burden off my list
Attachments
I went down to my folk's place yesterday and took a piece of Super O track to see if I could make an uncoupling section with an O-27 uncoupling unit. We did the same thing that Jim Barrett showed years ago on one of his videos. He used his dremal tool to cut the center rail and ties out of gargraves track to install the coil and it actually worked with Super O. I just have to set the speed down on the dremel tool to about half because it melts the plastic ties if you go too fast! It doesn't look great right now and I still have to install it on the layout but I'm super happy to see I don't have to chase down original uncoupling units.
Attachments
@lee drennen posted:
Lee- are you doing an Inglenook? Lot's of switching fun with a small set of sidings.
@Berkshirelover726 posted:I went down to my folk's place yesterday and took a piece of Super O track to see if I could make an uncoupling section with an O-27 uncoupling unit. We did the same thing that Jim Barrett showed years ago on one of his videos. He used his dremal tool to cut the center rail and ties out of gargraves track to install the coil and it actually worked with Super O. I just have to set the speed down on the dremel tool to about half because it melts the plastic ties if you go too fast! It doesn't look great right now and I still have to install it on the layout but I'm super happy to see I don't have to chase down original uncoupling units.
I did the same with tubular track. I had some old UCS's that were mangled but the magnets worked. I cut the rail and modified the magnet to fit. Good luck!
Attachments
After fixing a leaking pipe in my basement yesterday- not over the layout fortunately, I finished up the corner and am calling it done for now. I put the high line back together and added some of the tall grass pieces I made. Still more detailing to add but I will live with it for a while and decide what I want to do.
That expanse of bare plywood is next on my list....
Bob
Attachments
Bob. I guess you can say that I’ll be adding some more track to the sidings later and maybe another switch. I like that design you can service different facilities this way and I can still run the loop. Your layout here lately is really looking good nice work
@lee drennen posted:Bob. I guess you can say that I’ll be adding some more track to the sidings later and maybe another switch. I like that design you can service different facilities this way and I can still run the loop. Your layout here lately is really looking good nice work
Looks good, Lee. Does this make any sense ? You could delete a siding or two to make more room for buildings, terminals, vehicles, etc.
Attachments
Last night, I completed a month-and-half effort which folks on OGR helped me attain:
I recreated the town and sinister carnival depicted in Ray Bradbury's novel, Something Wicked This Way Comes. File limits on the media are blocking me from uploading the fun stuff (ie, videos), so I've included this link: https://khorosanluna.wordpress.com/2021/03/02/palimpsest
Attachments
@Richie C. posted:
Richie glad you asked I’m going to be adding more buildings on the old part and new part. The old part will have more small town buildings and the new will have more industrial ones. I will also be adding 4 more feet to the place I just got done. I still have lots of room in my garage to add on if need. Thanks for the idea through.
@Richie C. posted:Bought the OGR/Ameritowne grab bag and assembled three pieces for a flat to fill a bare wall spot on my layout.
Sanded the mating surfaces smooth and even and glued them together with CA glue and an accelerator. Then spray painted it with dark brown and applied some Roberts Brick & Mortar. I then hand painted some details - cornice, base, window tops, door and transom and applied some weathering and some extra decals I had. Finally shot everything with dullcoat (Tamiya TS-80 flat clear). The window backing was made from a large section cut out of a clear, frosted sticker sheet that I spray painted the back side with a light blue and sealed with white and just peeled it off and stuck it on the back.
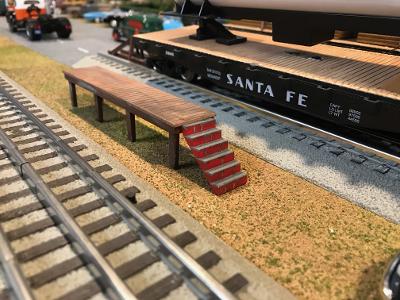
I also picked up the Ameritowne loading dock and painted the base and legs a dark brown and the top a lighter brown. Added black lines between the boards with a fine tip ballpoint pen. I painted the stairs a dark concrete color and added red to simulate brick risers. Finished with some weathering and dullcoat. I'll add some people and crates later.
Richie. I like those building fronts you have and that platform
I didn’t realize how derelict I have been on this topic until I saw I had 61 emails dating back to Friday! Wow! Excellent projects everyone!
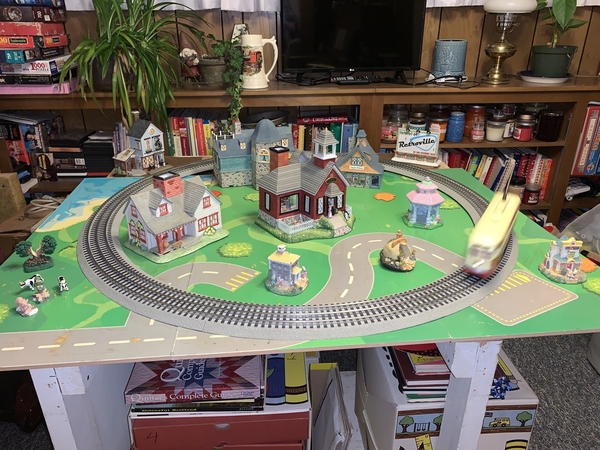
I finally put away all the Christmas buildings, snow blanket, Polar Express, and put up this spring time setup for Mrs B with a Pittsburgh Port Authority PCC car from MTH running!
Attachments
Ran this MTH Hudson after I got done with the landscaping yesterday
Attachments
Got the base coat on my next project. The former Larry’s truck and electric 1417. Once I was hired we had it at the CSO, tired to give it to the PW and NECR. Finally it’s now over at York. This engine was and maybe still needs to be scrapped. But it was the first engine I got to work on. So bought a Atlas O TMCC GP-15 and finally started to work on it a year and half later. 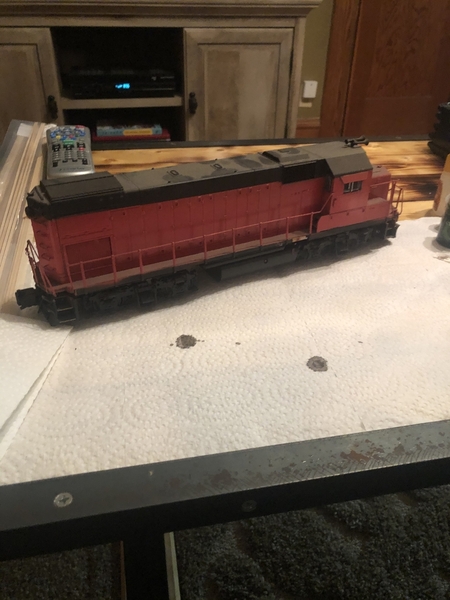
Attachments
Moved the two windows in the station bump out sidewalls. Took some time and planning, but it was worth it. Finally went out and bought another quart of Acetone. These stations are made of ABS plastic and Acetone is the solvent and is working much better and faster than Super Glue for bonding parts back together.....
Pingman you were dead right, Thanks !
Before:
After:
Attachments
Chris, that looks much better! It made an excellent building better.
Ran trains! 👍after several weeks while I was working on the corner it's obvious that the track has gotten dirty.
Attachments
Cris. Moving the widows down on you're station I'm sure was a lot of extra work however I know you'll never regret it. You're station looks really nice. Super.
Thanks FarmerJohn and Mark, While it was time consuming, it definitely sharpened my skills so it was a "TWO FER".... Definitely feeling more confident about doing major surgery on ABS plastic walls/windows/cornices... Remembered a trick I use at work all the time with the table saw, as you can't well definitely shouldn't feed stock from the exit side as the blade pulls stock out of your hands etc.... as the walls were mirror image, one side I was able to feed, the other side, not so much as I didn't cut all the way from top to bottom.... So
I lowered the blade, clamped the part to the fence securely and then raised the blade to make the cut ! Works as well with plastic as it does with wood windows.
Great work everyone! Chris, what an improvement to your station just by moving the windows down, Looks great!
Mark, I was wondering where you were? LOL I hope things are going well!
Bob the finished product looks outstanding!
I havent done anything but I hope that changes soon! I hope everyone is having a good week sofar! Remember to try and have fun!
@chris a posted:Moved the two windows in the station bump out sidewalls. Took some time and planning, but it was worth it. Finally went out and bought another quart of Acetone. These stations are made of ABS plastic and Acetone is the solvent and is working much better and faster than Super Glue for bonding parts back together.....
Pingman you were dead right, Thanks !
@chris a, you're a heckofa modeler! Fantastic improvement! Glad you were able to execute the adjustment, though I didn't understand the explanation of how you did it.
@mike g. posted:Great work everyone! Chris, what an improvement to your station just by moving the windows down, Looks great!
Mark, I was wondering where you were? LOL I hope things are going well!
Bob the finished product looks outstanding!
I haven't done anything but I hope that changes soon! I hope everyone is having a good week so far! Remember to try and have fun!
Mike, Thank you. We have been doing well. I had some other tasks to do that weren't layout related. I did get my second bridge in, but wanted to do one more thing before taking photographs. I should be able soon.
Chris, Looks great. Now I have another suggestion (easy for me to make as i'm not doing the work!). Inasmuch from looking at the design of the whole building and having passed through many old RR stations, I'm guessing in reality the center section of the station would be a large atrium area in the interior. Hence it needs more natural light. So how about adding small windows above the now lowered arch windows?
Chris - the station looks great as is. Since I'm not doing the work, a major task would be to make the crown molding line up between the wings and central entrance or remove the crown molding from the central entrance. Just kidding, if you listen to all of us you'll never finish.
Chris- The station looks much better. I've done that table saw trick a few times too. I bit time consuming to set up but it works. How did the plastic handle the heat from the blade?
Bob
@lee drennen posted:Richie. I like those building fronts you have and that platform
Thanks, Lee - that Mack (posted before) in the background is sweet, too.
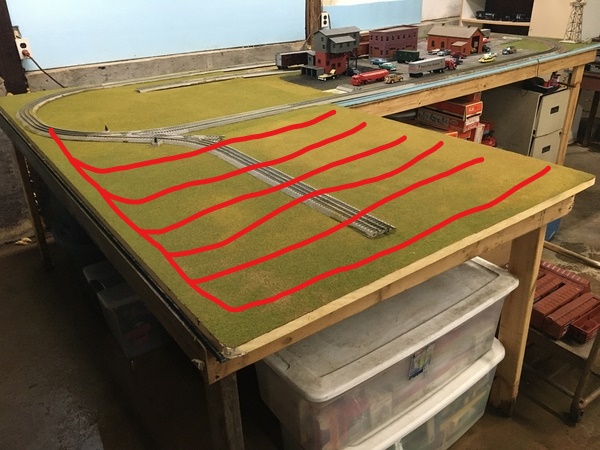
Even though the main layout is in limbo, testing needs to be done, so a temporary oval has been set up. (which, come to think of it, is how things got started fifteen years or so ago.)
The patient in question is a rather down on its luck 1130 that was gifted to me by a co-worker at the A&M RR. After spending a portion of the day rehabbing the E-unit, I determined that the motor was too tired. Fortunately, I had a spare which I'd gotten running some weeks back, so I swapped the wiring harness over and now the Scout buzzeth about cheerfully! I have a trailing truck on order, and will be fabricating marker lights from Plastruct tubing... ![]()
Naturally, you-know-who entered the scene.
Norma Bates Kitteh insisted on Train, so I obliged her.
With the weather getting nicer, I plan on getting the Homasote installed and painted, and new track laid. Watch this space! ;-)
Mitch
Attachments
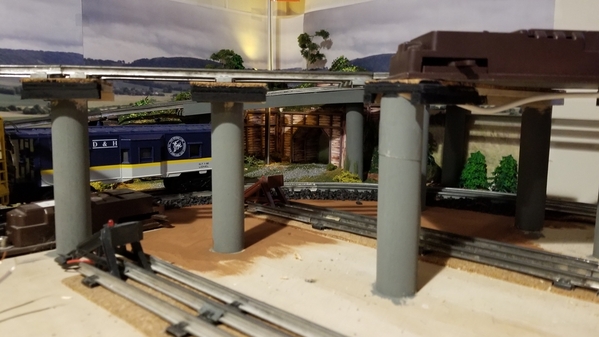
Does this count? I am so new, and rattled, at this modelling, and I marvel in your projects... I've run strips of pine from scraps of shelving. Help me make something I can be proud of and "looks" not-too-bad- for a newb. I can slice the strips and ends for more "Scale-like", as that has been a hurtle for me in prior shared posts. I think I have "Traditional Lionel Post War O-Gauge" on the carpet layout.... and understanding that alot of the lionel bridges, crossbucks and, well, everything LIONEL is not scale... I would like the engine, when it passes through a wooden tunnel/bridge, with room enough for two lionel three rail tube tracks, to look like it belongs. This will be moveable, on the carpet layout, and while I am still learning what is interesting in layouts (up a notch from our Christmas tree Circle Track) to be able to have two trains crossing the bridge in opposite directions sounds interesting.
AND, this is a sign that I am improving my scope of thinking, "EWE Mountain" might could have a wooden entrance and exit that would tie in the look of a wooden trestle/bridge/crossing.
Am I being to broad in thinking this out before I start this time.? This will be The Bridge, Part 7, ver 1x
lol. All comments welcomed. I am eager to learn, and a module-carpet-layout is where I am at today... adding buildings and tunnels and mountains "OH MY".
Thank you in advance. Should I move this to another heading?


