
Mark- Take Elliot's approach. Post progress to your thread and then copy the updates to this one once a month. If its all in your thread it will not get lost among all the Gi-raffe and flamingo chatter

Pretty cool finding a piece of your old train table. We all have one of those lumber piles in our houses. never know when you need a piece of wood.

Bob

Mike, good seeing the pouring of the concrete. Your layout officially started with the first concrete coming down the chute. Mark, this topic has got to be the longest running with so many posting everyday. That is a good thing in my opinion. As to your question about where to post progress I would say both places. One, it is a topic you started and quite possibly it is a layout, size wise, that others in the same situation  will keep an eye on. On the what did you do on your layout today there are others who have posted twice like you. Nothing wrong with that. This topic seems to have the most people following it and posting themselves here too. So I  think exposure is more on here. Reusing lumber sure does say money for other layout things. For the first time I was able to use old lumber. A friend of mine was helping his son take out a bathroom in the basement and he called me to say they had a pile of 2X4's and wondered if I would like them. I said how much and he said nothing. He even brought them to the house. I spent the next day cutting them to the size I wanted for table legs. Yesterday and today that is what I have been using on the latest table. I got the cross braces cut and screwed in place and while I was at it where I have the lift out bridge I replaced the temporary legs with permanent ones. Now I have to start dinner but while that is cooking I'll go down and paint the sides of the table and braces and legs and that will be done. Pics...............Paul

DSCN1418DSCN1419DSCN1420

Attachments

Images (3)
  • DSCN1418
  • DSCN1419
  • DSCN1420

I haven't been downstairs yet today. I'd like to get some more ballasting done. Patrick is coming over tomorrow.

Yesterday, I finished gluing the last bits in this section. I still need to climb in there and paint a short section of rail, on the mains, at the far end, behind the fan. Then, in order to ballast, I need to get some foam or something to prevent the ballast from falling off the back edge, into the hidden yard below.

IMG_8077

I spread and glued both mains around this curve between Newport and Cottage Grove.

IMG_8078IMG_8079IMG_8080

Made a quick Menards run and bought another sheet of plywood. Should be the very last one! Also got a few 2x4's. Those should also be the last. Spray paint, literally in rainbow colors. Some caulk, and three gallons of white glue. The ones in the photo aren't them. Those are the previous jugs, that I now fill with ballasting mix. I cut it 3 to 1 with water.

IMG_8081

I ballasted about 15' of mains going past the Northtown bowl tracks, and then got on the ladder and started in the yard. It'll be fun connecting the dots, as it were, because the other side of the aisle, the upper deck is mostly done.

IMG_8082

Over at Hiawatha, the glue was dry in the yard,so I did a final cleaning on the rails.

IMG_8083

After I finished cleaning, I moved the cars back,so I could start the next section. I also started working on the next street.

IMG_8084

I spent a little while studying this spot on Google Earth. There are four different grain facilities in this three block section. Three are still active. My brother-in-law just got a new drone. We've been talking about flying along the corridor above the tracks, among other train related places. The temperature has to be above 14F, so it might be a while before we can get out.

Gotta keep pounding away at this thing. They want to take photos at the end of the month for the National Narrow Gauge Convention in September.

Attachments

Images (9)
  • IMG_8077
  • mceclip0
  • IMG_8078
  • IMG_8079
  • IMG_8080
  • IMG_8081
  • IMG_8082
  • IMG_8083
  • IMG_8084
mike g. posted:
paul 2 posted:

Mike, looking good.   How long before you can start to put walls up........Paul

I don't know, I have never poured concrete before. This is a first for me, I was thinking a week. Maybe someone here knows! LOL

Well, the timing is good as it's supposed to be sunny tomorrow and only a little rainy off and on through next week. Sure is better than the previous uber-wet weather we had bene having.

carsntrains posted:
beardog posted:

From my experience as a general contractor, the concrete should cure in 

a day or so

I had a builder here tell me that some crews started framing on fresh pours the next day!! ( I wouldn't) Then he started talking about pre-tensioned cable instead of rebar.   

Jim 

To be honest I think I will wait a week before I start framing!

mike g. posted:
carsntrains posted:
beardog posted:

From my experience as a general contractor, the concrete should cure in 

a day or so

I had a builder here tell me that some crews started framing on fresh pours the next day!! ( I wouldn't) Then he started talking about pre-tensioned cable instead of rebar.   

Jim 

To be honest I think I will wait a week before I start framing!

It looks great Mike!!!   I would start laying things out tomorrow.  Knowing how I am I might would even go ahead and build the walls and set them aside until I was satisfied that the concrete was ready to build on lol   I wish you were nearby.  I have a framing nailer (round head) and enjoy building stuff!!!    20776371_10210070895236693_4806117927470521678_o

Attachments

Images (1)
  • 20776371_10210070895236693_4806117927470521678_o
carsntrains posted:
mike g. posted:
carsntrains posted:
beardog posted:

From my experience as a general contractor, the concrete should cure in 

a day or so

I had a builder here tell me that some crews started framing on fresh pours the next day!! ( I wouldn't) Then he started talking about pre-tensioned cable instead of rebar.   

Jim 

To be honest I think I will wait a week before I start framing!

It looks great Mike!!!   I would start laying things out tomorrow.  Knowing how I am I might would even go ahead and build the walls and set them aside until I was satisfied that the concrete was ready to build on lol   I wish you were nearby.  I have a framing nailer (round head) and enjoy building stuff!!!    20776371_10210070895236693_4806117927470521678_o

To be honest, I think I am going to take tomorrow off! This was enough for this guy for the weekend! But I might have a beer or 2! That's about as much lifting I want to do!

Mike the project pictured.  I went and got the supplies on a Thursday, built the walls on Friday, put the floor joists up on Saturday.   Took Sunday off other than picking up the 4x8 floor panels.   Then Monday put the floor down.  : )    I think I'm a bit younger than you though.   52.   

Jim 

That loft is 20x25!  That's in our shop.   It would make a GREAT train room lol   

Last edited by carsntrains
carsntrains posted:

Mike the project pictured.  I went and got the supplies on a Thursday, built the walls on Friday, put the floor joists up on Saturday.   Took Sunday off other than picking up the 4x8 floor panels.   Then Monday put the floor down.  : )    I think I'm a bit younger than you though.   52.   

Jim 

That loft is 20x25!  That's in our shop.   It would make a GREAT train room lol   

LOL Thanks for the input Jim, you are 2 years younger then me, But the big "C" took a lot out of me! I still do what I did before, just takes me longer. But I am still here!

mike g. posted:
paul 2 posted:

Mike, looking good.   How long before you can start to put walls up........Paul

I don't know, I have never poured concrete before. This is a first for me, I was thinking a week. Maybe someone here knows! LOL

Concrete reaches 65% of it's strength in 7 days and 90% at 14 days.

NJCJOE posted:
mike g. posted:
paul 2 posted:

Mike, looking good.   How long before you can start to put walls up........Paul

I don't know, I have never poured concrete before. This is a first for me, I was thinking a week. Maybe someone here knows! LOL

Concrete reaches 65% of it's strength in 7 days and 90% at 14 days.

Thanks Joe!

mike g. posted:
carsntrains posted:

Mike the project pictured.  I went and got the supplies on a Thursday, built the walls on Friday, put the floor joists up on Saturday.   Took Sunday off other than picking up the 4x8 floor panels.   Then Monday put the floor down.  : )    I think I'm a bit younger than you though.   52.   

Jim 

That loft is 20x25!  That's in our shop.   It would make a GREAT train room lol   

LOL Thanks for the input Jim, you are 2 years younger then me, But the big "C" took a lot out of me! I still do what I did before, just takes me longer. But I am still here!

Mike and Jim,

 I am starting to take the wisdom of my dad to heart as I am over 60.  Dad, in his 70s to mid 80s  would take the day off after one or two hard day’s work.  Yesterday, I did a lot on the layout  carrying 1 x 10s to the patio to rip into 1 x 4s and crawling under to put drill from underneath.  Anyway the day off helped Dad keep active until age 86, when a healt issue got him down.   He exercised but didn’t overdo it. 

paul 2 posted:

With dinner in the oven I went down and put a coat of black on the table edge, legs and braces. I don't paint the entire brace because they will be under the tongue and groove shelves. I only paint the outside of the braces that can be seen. So I'll let this coat dry and then apply a second coat. Pics................Paul

DSCN1421DSCN1424

The painting looks good Paul.  I'm going to do the same.  The linoleum tiles do look good.  I was told once by an inspector the asbestos content is okay as long as they don't start to crumble and the stuff get airborne.

beardog posted:

Mark, I have to disagree with your inspector, just walking on them 

can raise dust and that is the problem. The dust gets airborne and

you inhale it. Simply putting a coat of floor wax or a clear finish

or a coat of paint on the areas you walk on will solve the problem. 

Beardog,

That all does make sense!  At least I don’t own that house anymore.  It was over 25 years ago.  Thank you very much!

Today my bookend came and am working on sign parts. Here is a mock up of what I am envisioning 

The other thing I am doing to give the flat more depth is to create a false sense on an interior.

I am going to use a back lit photo film inside the center window area outlined in red and two of the lower dock doors I plan to do a small interior space of the dock with

kegs and cases of bottles etc. since they fall below the benchwork and track that runs behind these fronts. I've got about 5-6" of depth I can utilize.

Here is the image that is being printed on the back lit material.

and I found these thin LED light boxes on ebay really cheap and they are very thin, less than 1/4"

http://www.studiozphoto.com/Lightbox.jpg

I just finished wiring my last miller engineering sign. Finished cleaning up my parts schelves up and throwing away a bunch of junk that is no longer needed.  I still have some wiring to be dun under the layout for the tracks and buildings (later my knees are hurting) i'm going to try and take pictures tomorrow and figure out how to post them on here. good night all.

chief and CEO of the EA&J RR


Last edited by EA&J Rail road
Mark Boyce posted:
beardog posted:

Mark, I have to disagree with your inspector, just walking on them 

can raise dust and that is the problem. The dust gets airborne and

you inhale it. Simply putting a coat of floor wax or a clear finish

or a coat of paint on the areas you walk on will solve the problem. 

Beardog,

That all does make sense!  At least I don’t own that house anymore.  It was over 25 years ago.  Thank you very much!

Guys- the tile in Paul's house is most likely asbestos ceramic tile (ACT) was common place up until they banned asbestos in the late 60's. A good indicator is if it's 9" X 9" it's ACT. Fortunately the process used to make the tile permanently bonds the fibers into the tile. It cannot become airborne unless pulverized to a fine dust. Even a cracked tile is not hazardous. A good coat of wax is advisable though.

We still have lots of it in some of our older buildings at the College I work at. It still has to be removed by a licensed asbestos contractor but its probably the least hazardous asbestos containing material around these days.

Bob

mike g. posted:

Not to much, but I can tell you its to much for this old guy! check it out!20180209_14312320180209_143135No all I need to do is start putting up some walls when it dries!

WHOO HOO ! Looks good Mike.

I would wait as long as possible before starting framing. The more time you give the concrete to cure the better. Remember dry concrete is not the same a cured concrete. If you want to know for sure check with your building department. They may want to inspect before you begin framing any way.

On the big construction projects on my campus we get test reports on concrete- they do breaks on test cylinders at 7, 14, 30, and 60 days. The strength of the concrete goes up with each test.

Don't over do it. The work will get done when it gets done.

Bob

mike g. posted:

Hi Matt, I was going to but the wife said that was stupid. Oh well I will make sure I put it somewhere when I finish the building!

LOL!  At our last house in 2013, we were removing wallpaper and there on the sheetrock wall was "Waldo was here, Feb 1973"!  When my dad was renovating our ca. 1870 house in Danbury CT, he found Indian Head pennies inside a wall with dates in the late 1800's.  Maybe you could leave an old train car or a piece of Lionel 3rail track in a wall for a hint of its original design/use.  Best of luck as you go forward!

Thanks Bob, its not going to get done fast that's for sure, but it will be a slow process. I feel as long as I am moving ahead its all good! I am going to try and pick up some of the lumber next week some time. I will frame the wall and get a roof on it first. Then go back and sheet the walls. I know its easier to sheet them while there laying down before I stand them, but money is a factor so I thought it more important to get a roof on it! 

Wish me luck! LOL

decoynh posted:
mike g. posted:

Hi Matt, I was going to but the wife said that was stupid. Oh well I will make sure I put it somewhere when I finish the building!

LOL!  At our last house in 2013, we were removing wallpaper and there on the sheetrock wall was "Waldo was here, Feb 1973"!  When my dad was renovating our ca. 1870 house in Danbury CT, he found Indian Head pennies inside a wall with dates in the late 1800's.  Maybe you could leave an old train car or a piece of Lionel 3rail track in a wall for a hint of its original design/use.  Best of luck as you go forward!

Matt. I love that idea! I have the perfect train car to pack in the wall. I will put a little note with it!

RSJB18 posted:
Mark Boyce posted:
beardog posted:

Mark, I have to disagree with your inspector, just walking on them 

can raise dust and that is the problem. The dust gets airborne and

you inhale it. Simply putting a coat of floor wax or a clear finish

or a coat of paint on the areas you walk on will solve the problem. 

Beardog,

That all does make sense!  At least I don’t own that house anymore.  It was over 25 years ago.  Thank you very much!

Guys- the tile in Paul's house is most likely asbestos ceramic tile (ACT) was common place up until they banned asbestos in the late 60's. A good indicator is if it's 9" X 9" it's ACT. Fortunately the process used to make the tile permanently bonds the fibers into the tile. It cannot become airborne unless pulverized to a fine dust. Even a cracked tile is not hazardous. A good coat of wax is advisable though.

We still have lots of it in some of our older buildings at the College I work at. It still has to be removed by a licensed asbestos contractor but its probably the least hazardous asbestos containing material around these days.

Bob

Bob, Ah ha!  The house was built in '52 if I recall correctly.  

decoynh posted:
mike g. posted:

Hi Matt, I was going to but the wife said that was stupid. Oh well I will make sure I put it somewhere when I finish the building!

LOL!  At our last house in 2013, we were removing wallpaper and there on the sheetrock wall was "Waldo was here, Feb 1973"!  When my dad was renovating our ca. 1870 house in Danbury CT, he found Indian Head pennies inside a wall with dates in the late 1800's.  Maybe you could leave an old train car or a piece of Lionel 3rail track in a wall for a hint of its original design/use.  Best of luck as you go forward!

I grew up in the house my great grandfather had built in 1888.  We didn't know the exact year until Dad took the fireplace mantle down when removing the crumbling chimney in the mid '60s.  Behind it in pencil was the man's name and date, "Lincoln Staley, November 18, 1888".  A little history, the man was a noted builder of a simple two story rural house in the area north of Pittsburgh, and was named for Abraham Lincoln obviously.  What I find interesting is that he married the daughter of a Southern planter who lost everything in the Civil War.  This is the same house that my dad lived in his whole life until he and Mom had to go to a personal care home last summer.  The mantle with the pencil inscription is still in Dad's outbuilding shop.

Brian, That is a great layout you have started for Mike!!

Elliot, That is pretty cool you have the rail painting and ballasting job in various stages of progress on your layout.  Yes, the drone will help you for your layout to see what Google can't clarify for you!

Everyone, thank you for the comments on the rolling layout section.  Being a below average carpenter, with the minimum of tools, I am pretty well pleased.  It is level and sturdy; those are my two basic criteria.  The uglyness will be covered up with layout and facia.  Also, when I release the four brakes, it rolls freely! 

Bob and Paul, Thank you for the comments on placing both places.  I don't know if I could post monthly updates like Elliot does so regularly on the very first of every month, but timing isn't important.  Yes, this topic defiantly has the highest exposure of any, so I will post here, and I will on my own topic.  We will see how it works out, and I will make adjustments as to what I post where as seems necessary! 

I didn't do anything yesterday, as I had my third Euflexxa shot in my knee in the morning, then took the dog to the vet in the afternoon because she has been getting treated for a bad ACL.  She isn't doing the stairs in our stupid split entry house, so I twisted the knee and hip on one of the lifts.  Actually getting her back into the car to go home.  Anyway, all three of us have knee problems.  (I say stupid split entry because we had a ranch, but my mother-in-law insisted we buy this house from her after my father-in-law passed away in 2011.  I shouldn't complain, we still owed $20,000 or so on the ranch, and we came out of the deal with no mortgage.) 

Not on my layout but for my (eventual) layout.  I've fabricated these two Alaska RR vista domes out of full vista dome bodies from an e-bay auction and sacrificial MTH RK-6012 Santa Fe Vista Domes.  Roof ,frames and interior from the Santa Fe cars.  Had to alter the mounting system because the Alaska bodies mounted to the frame in each corner and the Santa Fe roofs had two mounts along the centerline of the car.  Added passengers and some interior details.  The full vista dome is there for comparison.  Note the all have the same road numberIMG_1062IMG_1063IMG_1064IMG_1065

Attachments

Images (4)
  • IMG_1062
  • IMG_1063
  • IMG_1064
  • IMG_1065

Well y'all know that things been a little rough lately ..   Soooo.   I went down to Lowes and Home Depot to "look" at tool box-work stations.   Lowes had some nice ones.   Went to HD and they had the perfect one.   I measure it and was walking away.  Manager said "you take that with you, I'll give you 25 dollars off".     Hmmm  Wife grabs the handles on it and starts rolling it to the cash register!!! YAYYYY!!!!!!!!!!!!!!!!!!   And by golly that rascal fit just right....  with a little tuning!  38 inches tall, 46 inches long.  Had to take the handle off of it.

20180210_143656

Attachments

Images (1)
  • 20180210_143656
decoynh posted:
mike g. posted:

Not to much, but I can tell you its to much for this old guy! check it out!20180209_14312320180209_143135No all I need to do is start putting up some walls when it dries!

Nice start Mike.  Did you remember to carve name & Date in the concrete?

     Too late now, but the old Italians around here used to throw a new coin onto the dirt before a pour. There are lots of cement laid where the company will press their logo and/or the date laid laid into the pour too. You see them a lot in my neigborhood; great advertising

   Dimes to dollars; the old solid silver coins when sold at modern silver prices, makes keeping and eye out during old concrete removal jobs worth the look.       The most I've found is three Mercury dimes; but a buddy found some Liberty dollars and near a dozen quarters under his storefront's walkway and drive.    We also uncovered various wall advertising, in layers, dating back to the early 1900's; the oldest being a hand painted bread ad. There was bread, beer, gas, Old Gold, Beech clove gum, 8' o clock coffee, Doublemint, two festivals, two store logos, and a good number of others we couldn't keep intact enough to tell. Three frames, new built right over the old frames created a 20'x60' time capsule. It is all recorded with the coins in a picture box in the office.

...but I doubt it will survive like the subject of the tribute has; it's a cool old building 

Shell painted, assembled and stickered!  

GEDC0768

Also, tidied up the workbench. 

GEDC0769

Since the factory brakewheel went AWOL,  I superglued a postwar repro into place. 

GEDC0770

And, of course, ten seconds after taking THAT picture, guess what I see suddenly appear on the carpet... 

GEDC0771

Oh, well.  I'll save it for some other project.

Onwards and upwards! 

Mitch 

Attachments

Images (4)
  • GEDC0768
  • GEDC0769
  • GEDC0770
  • GEDC0771
Mark Boyce posted:
decoynh posted:
mike g. posted:

Hi Matt, I was going to but the wife said that was stupid. Oh well I will make sure I put it somewhere when I finish the building!

LOL!  At our last house in 2013, we were removing wallpaper and there on the sheetrock wall was "Waldo was here, Feb 1973"!  When my dad was renovating our ca. 1870 house in Danbury CT, he found Indian Head pennies inside a wall with dates in the late 1800's.  Maybe you could leave an old train car or a piece of Lionel 3rail track in a wall for a hint of its original design/use.  Best of luck as you go forward!

I grew up in the house my great grandfather had built in 1888.  We didn't know the exact year until Dad took the fireplace mantle down when removing the crumbling chimney in the mid '60s.  Behind it in pencil was the man's name and date, "Lincoln Staley, November 18, 1888".  A little history, the man was a noted builder of a simple two story rural house in the area north of Pittsburgh, and was named for Abraham Lincoln obviously.  What I find interesting is that he married the daughter of a Southern planter who lost everything in the Civil War.  This is the same house that my dad lived in his whole life until he and Mom had to go to a personal care home last summer.  The mantle with the pencil inscription is still in Dad's outbuilding shop.

Mark That is a great story about your Grandfathers house! Some day when they open up the wall on my train room they will find a box car with a note in it! LOL

briansilvermustang posted:
mike g. posted:

Not to much, but I can tell you its to much for this old guy! check it out!20180209_143123No all I need to do is start putting up some walls when it dries!


                      off to a GREAT start Mike, trains will be running soon

Brian, that sure is a nice Layout plan! I like how in included my lift bridge! Now I know how many trees to buy when the time comes! By the way Thanks for the great gifts!20180210_13234720180210_132405

Attachments

Images (2)
  • 20180210_132347
  • 20180210_132405
Mark Boyce posted:
decoynh posted:
mike g. posted:

Hi Matt, I was going to but the wife said that was stupid. Oh well I will make sure I put it somewhere when I finish the building!

LOL!  At our last house in 2013, we were removing wallpaper and there on the sheetrock wall was "Waldo was here, Feb 1973"!  When my dad was renovating our ca. 1870 house in Danbury CT, he found Indian Head pennies inside a wall with dates in the late 1800's.  Maybe you could leave an old train car or a piece of Lionel 3rail track in a wall for a hint of its original design/use.  Best of luck as you go forward!

I grew up in the house my great grandfather had built in 1888.  We didn't know the exact year until Dad took the fireplace mantle down when removing the crumbling chimney in the mid '60s.  Behind it in pencil was the man's name and date, "Lincoln Staley, November 18, 1888".  A little history, the man was a noted builder of a simple two story rural house in the area north of Pittsburgh, and was named for Abraham Lincoln obviously.  What I find interesting is that he married the daughter of a Southern planter who lost everything in the Civil War.  This is the same house that my dad lived in his whole life until he and Mom had to go to a personal care home last summer.  The mantle with the pencil inscription is still in Dad's outbuilding shop.

I love these kinds of stories that can make history personal.

Coach, those are some great looking cars, I am going to have to build me an Alaska RR train cause I know they come to Washington!

Jim, great find! I know it will come in handy and Kudo's to your wife for taking charge!

Adriatic, I need all the money I can get so not even a penny goes in the dirt! Neat idea, but not for me! LOL

Mitch, not my kind of engine, but I do love the work you are doing! It going to turn out great!

M. Mitchell Marmel posted:

Shell painted, assembled and stickered!  Also, tidied up the workbench. 

Since the factory brakewheel went AWOL,  I superglued a postwar repro into place.

And, of course, ten seconds after taking THAT picture, guess what I see suddenly appear on the carpet... 

GEDC0771

Oh, well.  I'll save it for some other project.

Onwards and upwards! 

Mitch 

I think we can all attest to this exact thing happening to each of us on more than one occasion.

I've "found" more tools and parts than I've "lost" over the years.  Sometimes I can stare at the workbench for 5 minutes and not see the part right in front of me.

I have not seen Fortesque inspect your work yet Mitch. I hope he finds it acceptable.

Heck with all that is going on on here I don't have time to work on the layout LOL. Today I had to take the wife for some tests so while I was waiting for her I was thinking about something I wanted to try. So when we got home I found some wax paper. My thought was I had a lot of the glue I bought for the cat tails left over. My idea was to lay out the glue on the wax paper and press small pieces of foam into the glue. I used a couple of different colors. I am hoping this will work to cover up where my tunnels join the brick walls because they are somewhat different the the edges show. I am hoping this will work to cover up the seams between the two. This is also my first time at trying to make this so it will be trial and error. After dinner I'll check to see if the glue dried. Pics.............Paul

DSCN1428DSCN1425DSCN1426DSCN1427DSCN1429DSCN1430

Attachments

Images (6)
  • DSCN1428
  • DSCN1425
  • DSCN1426
  • DSCN1427
  • DSCN1429
  • DSCN1430

Brian, Mark and Mike, thanks for the encouragement.  All that liked my post thank you all.

Mitch nice job.  I was wondering why red in your earlier post because the Gi-raffe Central is two-tone blue.  I forgot you said Razorback in your original search for a low priced RS-3.

Al, the casting looks great.

mike g. posted:

Mitch, not my kind of engine, but I do love the work you are doing! It going to turn out great!

Thankee!  

briansilvermustang posted:

"I have not seen Fortesque inspect your work yet Mitch. I hope he finds it acceptable."

             I'm sure when he gets back from railfanning, he will check it out...

Indeed!  

GEDC0772

I do think I'm going to hold off doing the chassis swap until next week.  I wanna mask off the chassis and spray the handrails white, and it's too cold and rainy around here for that right this second...

Apples55 posted:

Looking good, Mitch... not Tuscan, but at least not that obnoxious blue!!!

Heh.  Well, it WOULD be prototypical, but the RSD-4 doesn't like the gi-raffe ramp,  so Razorback Red it is! 

Here's a quick flashlight test of the painted cab windows... 

GEDC0773

Mitch 

Attachments

Images (2)
  • GEDC0772
  • GEDC0773
M. Mitchell Marmel posted:
mike g. posted:

Mitch, not my kind of engine, but I do love the work you are doing! It going to turn out great!

Thankee!  

briansilvermustang posted:

"I have not seen Fortesque inspect your work yet Mitch. I hope he finds it acceptable."

             I'm sure when he gets back from railfanning, he will check it out...

Indeed!  

GEDC0772

I do think I'm going to hold off doing the chassis swap until next week.  I wanna mask off the chassis and spray the handrails white, and it's too cold and rainy around here for that right this second...

Apples55 posted:

Looking good, Mitch... not Tuscan, but at least not that obnoxious blue!!!

Heh.  Well, it WOULD be prototypical, but the RSD-4 doesn't like the gi-raffe ramp,  so Razorback Red it is! 

Here's a quick flashlight test of the painted cab windows... 

GEDC0773

Mitch 

I am thinking flamingo pink would have looked best. So the gi-raff went into hiding, huh

I advanced some  infrastructure  on my layout...I unboxed a recently purchased Lionel Grand Central Station.....I love it ...it compliments the MTH New York  Yankees World Series Subway and the Dept.56  Chrysler Building nicely.... the train was stopping at  42nd Street  Grand Central  but the building was non- existent ...now the departing passengers won't be  confused....


IMG_5337

Attachments

Images (1)
  • IMG_5337
Last edited by gladstone23
carsntrains posted:

Well y'all know that things been a little rough lately ..   Soooo.   I went down to Lowes and Home Depot to "look" at tool box-work stations.   Lowes had some nice ones.   Went to HD and they had the perfect one.   I measure it and was walking away.  Manager said "you take that with you, I'll give you 25 dollars off".     Hmmm  Wife grabs the handles on it and starts rolling it to the cash register!!! YAYYYY!!!!!!!!!!!!!!!!!!   And by golly that rascal fit just right....  with a little tuning!  38 inches tall, 46 inches long.  Had to take the handle off of it.

20180210_143656

Fits great, looks great!

mike g. posted:
Mark Boyce posted:
decoynh posted:
mike g. posted:

Hi Matt, I was going to but the wife said that was stupid. Oh well I will make sure I put it somewhere when I finish the building!

LOL!  At our last house in 2013, we were removing wallpaper and there on the sheetrock wall was "Waldo was here, Feb 1973"!  When my dad was renovating our ca. 1870 house in Danbury CT, he found Indian Head pennies inside a wall with dates in the late 1800's.  Maybe you could leave an old train car or a piece of Lionel 3rail track in a wall for a hint of its original design/use.  Best of luck as you go forward!

I grew up in the house my great grandfather had built in 1888.  We didn't know the exact year until Dad took the fireplace mantle down when removing the crumbling chimney in the mid '60s.  Behind it in pencil was the man's name and date, "Lincoln Staley, November 18, 1888".  A little history, the man was a noted builder of a simple two story rural house in the area north of Pittsburgh, and was named for Abraham Lincoln obviously.  What I find interesting is that he married the daughter of a Southern planter who lost everything in the Civil War.  This is the same house that my dad lived in his whole life until he and Mom had to go to a personal care home last summer.  The mantle with the pencil inscription is still in Dad's outbuilding shop.

Mark That is a great story about your Grandfathers house! Some day when they open up the wall on my train room they will find a box car with a note in it! LOL

LOL !!

Steamer posted:

Mitch I have had tools, car parts vanish......and they magically  reappear after I either buy another one or after I get disgusted and head to the house for a break. I think it's my late Uncle Jim messing with me.

I blame gremlins.

As for me today, I figured out how to wire the 1122 switches @Apples55 was kind enough to send for my boys. Also used a Just Plug Nano LED to light the Marx Switch Tower I purchased as it did not have any internals.

I'm at the point where I really need to clear off the table and get ready to wire. I'm a bit hesitant because this means I need to drill through the table to run my feeder wires. Once I do that, there is no going back.

What do people use to "fill" the holes after running their wires? I was thinking of some black latex caulk.

I was looking at my water car, and it totally dawned on me. The thing doesn't have a brake wheel. That was quite annoying, realizing I had submitted an article on it. In real life, once the tender got disconnected from locomotive, it would need its own brake wheel to set. Anyway, I grab some pins that I had bought a while back, and whipped up a brake wheel and stand. It's at a slight angle, but at least it looks better than it did before. I gave it a quick blast of the same paint I painted the car with, then hit it with some Rust powders.

0210182036-1

Attachments

Images (1)
  • 0210182036-1
Last edited by p51

As promised, Patrick was here today, and as usual a lot got done. We started by finishing filling in between the tracks with plywood. This will all be riverbed, but because it's winter, it will all be frozen.

IMG_8101

We moved on to the Cottage Grove scene. Here Patrick is installing 2x4 supports.

IMG_8085

By the end of the day this will all be covered with the OSB from the old floor, which was swapped out for 3/4" ply.

IMG_8086IMG_8087

With all of the irregular shapes to fill, it's almost like a jigsaw puzzle, no seriously, we used the jigsaw to cut everything. As you can see, Patrick grabbed my camera again.

IMG_8089

The OSB is filled in between the mains from St Croix to Chemolite the full length of the scene. Here you are looking uphill from St Croix.

IMG_8090

Here it is looking downhill from Chemolite.

IMG_8091

Patrick is installing another support for the section between the main and the Chemolite spurs.

IMG_8092IMG_8093

I'm stapling sections of cardboard to fill the vertical gap between the mains. This will get plaster cloth, and probably some carved rock faces.

IMG_8094

There's still one little piece left to fill in here, but a small section will remain open for access. The plan is to have 3D structures on both sides of the tracks.

IMG_8097

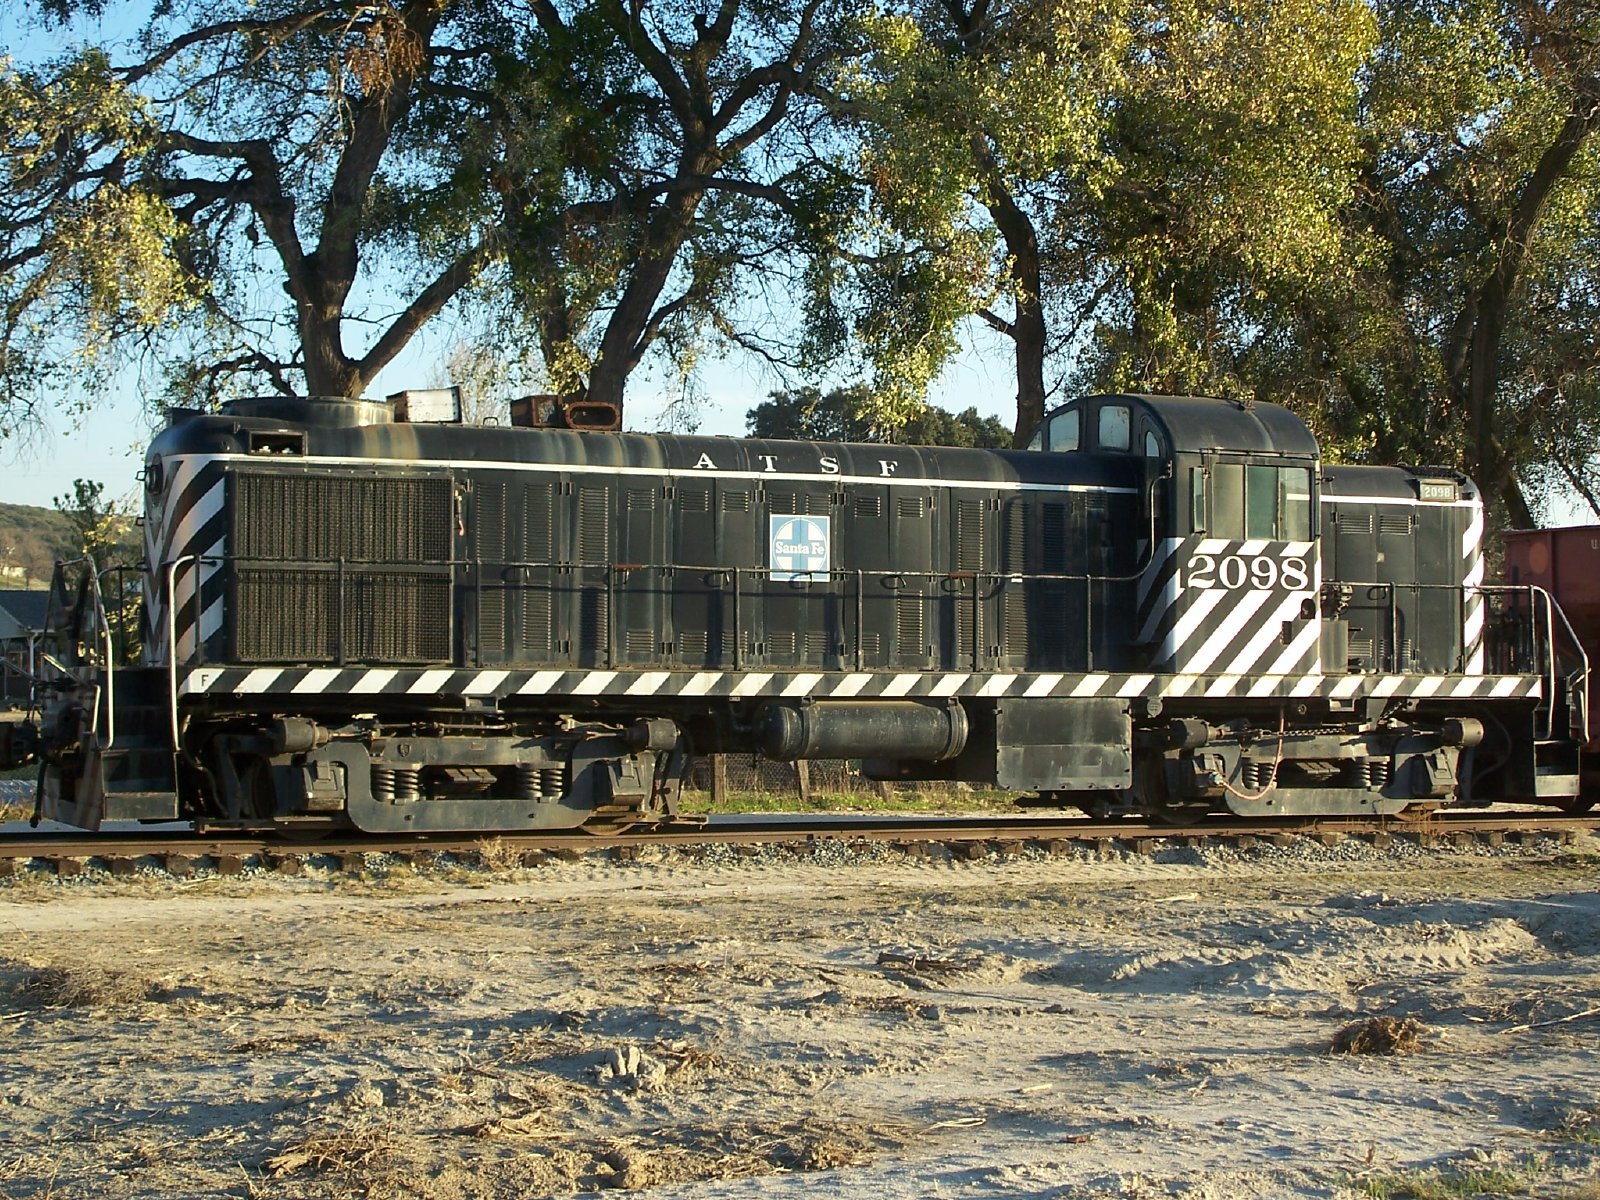
This is the real 3M Cottage Grove site. The Mississippi is on the right, and the BNSF (ex Cb&Q) main is right next to the river. On the other side of the plant, on higher ground, are the CP (ex Milwaukee Road) tracks. Both railroads share both tracks and are dispatched by the BNSF in Ft Worth, TX.

Here's a closer view of the tracks entering the plant.

More of the cardboard embankment is stapled in place.

IMG_8099

I'll be back at it tomorrow. The plan is for Patrick to return next Saturday.

Attachments

Images (14)
  • IMG_8101
  • mceclip0
  • mceclip1
  • IMG_8085
  • IMG_8086
  • IMG_8087
  • IMG_8089
  • IMG_8090
  • IMG_8091
  • IMG_8092
  • IMG_8093
  • IMG_8094
  • IMG_8097
  • IMG_8099

Jim, I really like where you moved the track to! What are your plans for the open space in front now?

Lee, the break wheel turned out looking like stock! Great job!

Elliot, what does one say? Another great post and things are really coming together! I know when you post an update I will always be amazed at what you have done and where you came from as far as when you first started!

Got my work bench cleaned off and organized yesterday. I picked up some small parts bins at HD to sort out all the small stuff that was in piles surrounded by other piles of junk.

Just in time too- the steam shop had to open up to service the ATSF 0-6-0. Seems to be stalling on some of my switches since it took a dive to the floor a few months back. Runs fine with the reverse unit off but when its on it stalls and reverses. Nothing obvious so far still digging.....

2018-02-11 07.22.15


Attachments

Images (1)
  • 2018-02-11 07.22.15
RSJB18 posted:

Got my work bench cleaned off and organized yesterday. I picked up some small parts bins at HD to sort out all the small stuff that was in piles surrounded by other piles of junk.

Just in time too- the steam shop had to open up to service the ATSF 0-6-0. Seems to be stalling on some of my switches since it took a dive to the floor a few months back. Runs fine with the reverse unit off but when its on it stalls and reverses. Nothing obvious so far still digging.....

2018-02-11 07.22.15


Good luck with figuring out that puzzle. It seems that trains gives us puzzles to figure out all the time.

mike g. posted:

Jim, I really like where you moved the track to! What are your plans for the open space in front now?

Lee, the break wheel turned out looking like stock! Great job!

Elliot, what does one say? Another great post and things are really coming together! I know when you post an update I will always be amazed at what you have done and where you came from as far as when you first started!

Thanks Mike and good question.   There really isn't much space.   So maybe a road or something?  I still have to put down some pink foam under all the track. Or something.   And I need to get some more bumpers for the ends of spurs.  

Jim 

Add Reply

Post

OGR Publishing, Inc., 1310 Eastside Centre Ct, Suite 6, Mountain Home, AR 72653
800-980-OGRR (6477)
www.ogaugerr.com

×
×
×
×
Link copied to your clipboard.
×
×