

 Added this building I had Al Graziano make the March continues to the finish of the water area
Attachments
Images (3)


|
|
Nice! Love the B&O sign...![]()
Mike ![]()
LoadMaster posted:Nice! Love the B&O sign...
Mike
That’s from miller engineering
Thanks for the info. I just checked them out, they have a lot of really nice stuff....
Mike ![]()
Why the wife was watching her Cavs game I got a chance to work on more of the scenery. I added more to the second abutment and the cliff. Still have to do a bit more. Then I glued down the ground turf I had down. Still have to glue down the cinder roadways. Pics.............Paul


Paul- have you checked clearances between the main and that siding? Looks tight to me.
Bob
I actually did something on my layout yesterday!! WHOOHOO!!
The CEO was on a school trip with my son so I had a day to myself. In between cutting the grass and some other chores I was able to build a few of the signals I started on weeks ago. I've got three done plus the prototype that I can probably put to use as well. Need to order more resistors. The kit came with 10 1K's but 20 LED's- guess they figured both would be on at the same time.
Ran trains for a while too and removed the afterburners from my new K-line S2 (wired the motors in series). If you own one...you know.
Glued the LED's in place

Put the resistors on the board

Set the board on the LED's - lining up all the wires in the correct holes is a PITA

soldered everything and added the wire. I'm using some 4/22 stranded phone wire.

Testing

I tried a couple of methods to cover the back. Settled on a 1/2" styrene tube cut open and wrapped around the back. The top is a few small pieces of flat strip. I sanded the top to match the shape of the tube.

Need to paint to match after all of them are done.


Hopefully I can continue today and then start installing them.
Bob


RSJB18 posted:
Paul- have you checked clearances between the main and that siding? Looks tight to me.
Bob
It all good Bob, as long he only goes one direction with a car sitting there !LOL
John, the bridge is looking very nice! Good job and good luck on your move!![]()
FL9TURBO2, I think the water front is looking amazing! Also that new building sure is sharp! Al really builds some great stuff! Very detailed person!![]()
Paul, everything is looking great! I also really like the cinder roads! Wonderful job on it all !![]()
Bob, the signals look good, I don't think I could do that I would probably melt everything together! But I may try some day!![]()
looks GREAT Mike !!! ![]()

trains will be running soon !!! ![]()

and a quote from Bob...

 take a break today !!!!

![]() have a great day !!!!
have a great day !!!! ![]()


Looks great Mike. very nice job ![]()
Now on to the important stuff- TRAINS!
The signals are easy. You can do it!
Thanks guys!
Mike, congratulations on finishing the outside. Now the real fun begins. Mike did you, by chance, allow for an exhaust fan to clear the smoke when your running your trains soon. Bob, it does look close. I put an engine on the curve and it is sitting at the closest point to the car on the siding. This table and the one around the corner will only see this size switcher or the MTH 44 tonner. And I also like your signal project. So this morning I glued the cinder roads. Later this afternoon I'll go back to the cliff and abutment and add more scenery. Pics............Paul


mike g. posted:As for me I just finished the out side of the train room. Got it all sided, finished the roof, trimmed out all the corners. Now all I have to do is call the building inspector to come and sign it off for final!
NICE! The T-111 looks clean & neat. My only recommendation would be to get a few yards of 3/4" gravel and put it about 4" deep and as wide as your overhang. It will keep the T-11 clean from splash back. I love spending other peoples money! Looking forward to the time capsule ceremony. also, Tank should be in the pictures. He's a handsome guy.


Changed some trucks on a couple freight cars & put those cars into service

 , did a total weathering job on one freight car and began weathering two others, created new scene for this coming week's Team Track Tuesday thread, took photos ..... all while running trains. Had YUGE fun!!!
FYI - the newly weathered freight car will appear in this week's run of Team Track Tuesday.
FL9TURBO2, Your buildings for the waterfront look great! Al did a great job!
Paul, the siding looks great and I like the cinders.
Bob, the signals look nice! Good job on the soldering!
Mike, the exterior of the building looks great!
Brian, great looking Hiawatha observation car.
Pat, I always love your scenes!
RSJB18 posted:The kit came with 10 1K's but 20 LED's- guess they figured both would be on at the same time.
You can also gang the two common leads from each LED to one resistor. That way you would only need 10 resistors for the 20 LEDs. When I made my signals, I had to use a lower ohm resistor for the red LED as it was not very bright with the resistors supplied. Unless you are experience that same intensity problem I faced, you could get by with only one. From your picture, it looks like you are using the same ohm resistor for both the red and the green LED. In that case ganging the common leads to a single resistor should work just fine and you would only need one resistor for each signal head. In any case, keep up the good work.
Dave
I've decided to tear down my layout and am in the process of building a new one. Room is 16 by 16 and "u" shaped layout is 14 1/2 by 14 /12. I work in "O" gage traditional lionel track.
Continued the downsizing started a few days ago. I take a box, go find the car, bring the box and car to my wife who is sitting at a table with soft brush and dust cloth. She cleans the car and packs it in the box. What a team!
Dennis
Yesterday, I started trying to fit in some of my operating accessories to see what will work. The more I fiddled with it, the more I started thinking about FasTrack operating track sections I bought a few years ago, but never used. Since the yard will be a separate power block, I figured I would just cut a piece of Fastrack to meet the GarGraves. Here is where I left it to look at another day.


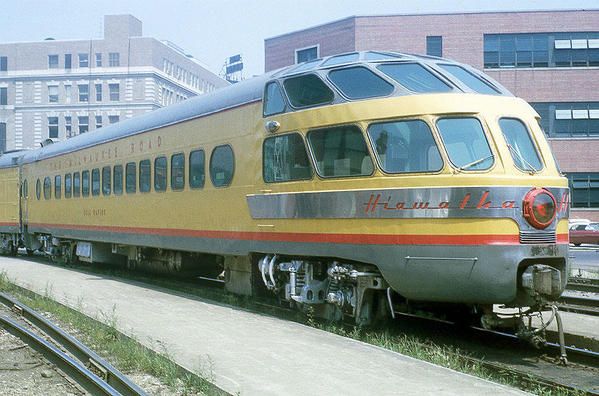
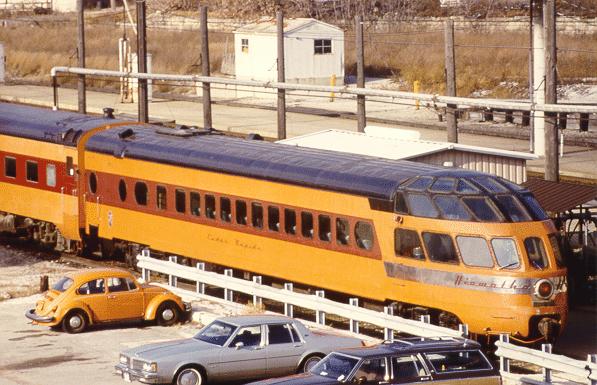
Brian" Have you noticed that the Milwaukee Road cars on your two photos are different from each other? The model car, which i believe is an MTH product is a model of a "Skytop Pullman" car. The lower photo shows one of the "Skytop Parlor" cars. Both are correct models but the differences are that the 10 Skytop Pullmans were built by the Pullman Company and were used on the Olympian Hiawatha for service between Chicago and Seattle/Tacoma. When that service was discontinued in 1961, the cars were sold to the Canadian National for service on their trans-continental trains. The four Skytop Parlors were built by the Milwaukee Road, itself, and were for use between Chicago and Minneapolis on daytime only Hiawatha's. These were kept in regular use until about 1970, shortly before the advent of Amtrak. One of those cars, the Cedar Rapids, has been preserved, restored and used for many years behind the #261 Milwaukee Road S-3, Northern for excursion service based in Minneapolis. K-Line made models of these cars, except that they never understood the difference between the two series of cars and installed compartmented bedrooms in what should correctly be a rotating seat, parlor car.
Paul Fischer
darlander posted:RSJB18 posted:The kit came with 10 1K's but 20 LED's- guess they figured both would be on at the same time.
You can also gang the two common leads from each LED to one resistor. That way you would only need 10 resistors for the 20 LEDs. When I made my signals, I had to use a lower ohm resistor for the red LED as it was not very bright with the resistors supplied. Unless you are experience that same intensity problem I faced, you could get by with only one. From your picture, it looks like you are using the same ohm resistor for both the red and the green LED. In that case ganging the common leads to a single resistor should work just fine and you would only need one resistor for each signal head. In any case, keep up the good work.
Dave
AHH HAA!- I have been putting the resistors on the positive side so that would explain the shortage. I'm a high voltage guy- we would never put anything on the common (neutral).
I just ordered more resistors yesterday- I'm sure they will not go to waste.
Thanks
Finished up the last signal that I need for this project. Scoped out their locations on the layout and started planning the wiring. I got a coat of paint on them last night too. No new pix just yet.
Bob
And ... more people. I think my first scene is going to be a parking lot in front of the train station. There isn't a lot of space, but I figure a couple of buses and a car or two will suffice. I have some Arttista parking meters on their way, so they'll go on the "far end" of the lot, and the buses will park right in front. I have the buses ... just need a couple of cars (maybe from CVS).
I'm reluctant to do too much in way of scenery because I have a feeling that if I can get this shed cleared out before the end of the summer, I may expand a bit sooner than I thought I might. Then again, I'm putting the cart before the horse because I don't even have the whole thing wired up properly yet.
And if anyone knows if anyone makes this hopper in O scale, let me know. I want one. Came across it today, and think it looks really cool.

Deuce posted:And ... more people. I think my first scene is going to be a parking lot in front of the train station. There isn't a lot of space, but I figure a couple of buses and a car or two will suffice.
Don't forget some cabs.
Ok this is going to be a long one so bear with me! LOL
Paul, thank you ! I have a window in one end and can put a fan in the doorway to force air in and smoke out! Things sure are looking good on your layout!![]()
Thank you Matt, I plan on taking the dirt down and putting in rock, But I wanted to get everything done that needs inspected done so I can move forward with the inside!![]() I was looking for Tank for the pictures, but he was taking his afternoon nap! LOL
I was looking for Tank for the pictures, but he was taking his afternoon nap! LOL![]()
Pat, Looks Great!![]()
Darlander that is great information, thank you for sharing it here so the rest of us are also able to learn from you!![]()
GK, that's quite an undertaking, taking one down for another one to go up! I think the one I will be building will be the last!![]()
Dennis, sounds like a great team! But I am sorry your downsizing!![]()
Mark, you sure have a lot of things to fit in a small place! I sure hope you figure it out so it make you a happy young man!![]()
Bob, WOW you sure got them done fast! I guess you don't want your trains to run into each other! Don't forget pic's!![]()
I took Momma shopping for new plants for the yard! That's what makes her happy, which in turn makes the train room happen! Fair deal from my point of view! I hope everyone has a great day!![]()
Mike,
You are so right. Now I do have the town that will be on the other end of the layout. I have some buildings and accessories off to the side for there, and I haven’t decided to use all that are sitting in this town here or switch them out for the other town. I will have some time to keep looking at it and pondering what to put where.
RSJB18 posted:Finished up the last signal that I need for this project. Scoped out their locations on the layout and started planning the wiring. I got a coat of paint on them last night too. No new pix just yet.
Bob
Regarding your resistor order, at least they are cheap!!!
Bob, How do you plan to use your signals? I used mine to indicate switch directions. They were easy to wire to my Tortise switch machines because they have two internal SPDT switches that can be used to power frogs and/or signals. Used the same DC power source for the signals as for the switches. The internal SPDT controls the signal light change. Anxious to see yours installed. Dave
Red for divergent alignment.

Green for Straight alignment.

Black wire common (upper right) to appropriate blue wire power feed for the switches. The two blue parallel wires upper right are the power feeds for the switches. The blue/white wire is the common ground for both switch machine and signal. Remember, this is a 6 volt DC source. LEDs are diodes and direction of DC flow is paramount!
Red wire to the Red LED and green wire to the Green LED.

Dave- I'm using 5121 and 5122 turnouts. Not going to be that complex or realistic. I plan to wire them through a double pole switch that also powers a section of track between both sides of my KW transformer. The signals will be green for one side (ground level) and red for the other (elevated level).
The section of track right in front of the controller is the area I'm doing. The first signal will be on the turnout where the red box car is coming down the hill and will come around to the turnout past the tanker. A total of 4 turnouts.
I will post more pictures as I go.


Looks good Bob! Is that one light that's on one of your new signals? By the red boxcar!![]()
briansilvermustang posted:
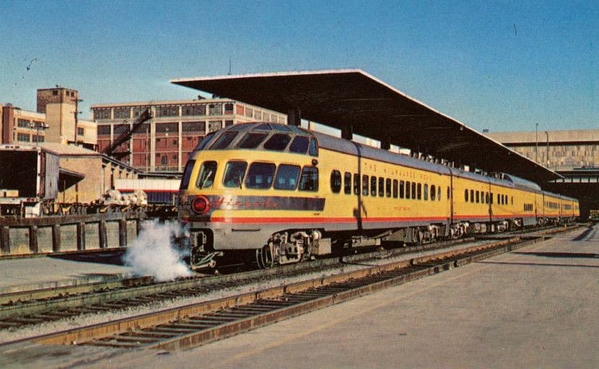
Love those Skytop Observation cars!!
Larry
Had a chance to work on the layout tonight. Small stuff. Had to apply a second coat of glue to the ground foam. The first coat didn't quite glue everything down. Then I started to make up the extension of the dock so two cars car sit at the dock. Then I went back and added some ground cover to the dirt path that goes down to the river by the side of the building. Got a lunch again with a bunch of TCA guys so I doubt tomorrow I'll get to the layout because I have to work in the yard when I get back home. Pics................Paul


mike g. posted:Looks good Bob! Is that one light that's on one of your new signals? By the red boxcar!
No- its the indicator in the switch. I haven't installed any of them yet.
Bob
Looks good Paul! Have a fun time at lunch with the guys! Also don't work to hard in the yard, you need to save your energy for the layout! LOL![]()
Thanks Bob!![]()
PSAP2010 posted:briansilvermustang posted:
Love those Skytop Observation cars!!
Larry
me too !!


Amtrak train #7, the westbound Empire Builder, begins its journey to the Pacific Northwest, leaving Chicago Union Station and heading across Canal Street. In tow on the rear are three Milwaukee Road Hiawatha cars.
@1:11 https://youtu.be/yvfKtwxcmGw


briansilvermustang posted:PSAP2010 posted:briansilvermustang posted:
Love those Skytop Observation cars!!
Larry
me too !!
Amtrak train #7, the westbound Empire Builder, begins its journey to the Pacific Northwest, leaving Chicago Union Station and heading across Canal Street. In tow on the rear are three Milwaukee Road Hiawatha cars.
@1:11 https://youtu.be/yvfKtwxcmGw
My favorite observation cars and I don't own one! Milwaukee Road engines and cars are very attractive. Maybe one of these days , I'll get a set to display with a Mil Rd Hudson to drag it.
Got my Texas Special ABBA unit delivered today at work. Rushed home and got it on the layout along with the passenger cars I already had and sat back and enjoyed.
![DSC_1241[1]](https://ogrforum.ogaugerr.com/fileSendAction/fcType/0/fcOid/12129987997660671/filePointer/79142442773498237/fodoid/79142442773498233/imageType/LARGE/inlineImage/true/DSC_1241%255B1%255D.JPG "DSC_1241[1]")
![DSC_1241[1]](https://ogrforum.ogaugerr.com/fileSendAction/fcType/0/fcOid/12129987997660671/filePointer/79142442773498237/fodoid/79142442773498233/imageType/LARGE/inlineImage/true/DSC_1241%5B1%5D.JPG "DSC_1241[1]")
Sweet Bryan, now all you need to do is add a passenger terminal....Paul
Populating. Working primarily on the passenger station area. I saw a trick about using 100 grit sandpaper sheets for a parking lot, so I'm going to lay that down and put in some white stripes for parking spaces for the buses. Will set a small section aside for "repairs" as I have some brick masons that I want to use in a scene. Once that is done, I plan on working on the back area with the house ... I have a couple of playground items which I will set to the side of the house, along with a garden and will do a white privacy fence as well.

Am I going to decorate the entire layout? I figure if I do, I'll tear it up sooner rather than later for an expansion, and if I don't, the layout won't change for several years.


Deuce, the station area is looking good! Yes you won’t know what you could make better until you put in initial scenery !
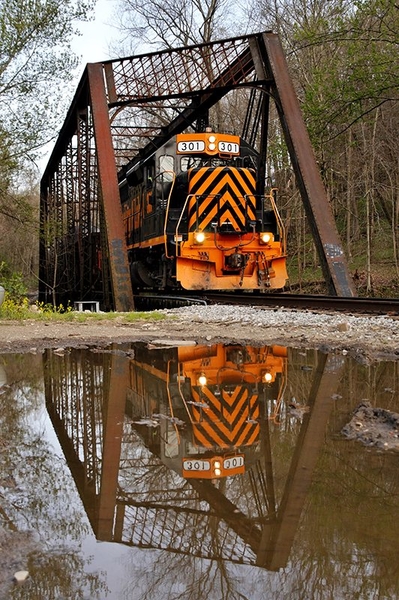
briansilvermustang posted:
Brian, you captured the rusty look on that bridge very well. What did you use?
Art
hello Art, was just messing around out side with a cheap black snap together bridge and some spray paint. there are 3 different colors of red primer, some flat black mixed in (actually was spraying black and brown at the same time), and then some grey misted in for some highlights, just got lucky on the outcome...
New pantograph for the Red Rocket II!
https://ogrforum.ogaugerr.com/...or-the-red-rocket-ii

Fortescue and Flamingo were observing from atop the parts drawers.
Mitch


Broke out my Canadian National set for a spin around the layout...
Forgive me guys, it's been over two weeks since my last "confession".
Some of you already know that my layout is now listed on the convention website. I've added links to my signature to reflect that. Now the sprint to the finish!
I took this plain Jane Plasticville signal bridge and jazzed it up by painting and weathering it. This one will have a very prominent place on the layout, directly in plain view.


I got the signals on my new triple track bridge.

In order to try and light some of the signals, I started to wire the first panel. I have to hang it, power it, then run the wires from there out to the signals.


I put a coat of brown paint over all the plaster cloth at Newport.


I made my static grass applicator from an electric flyswatter and a strainer. Still needs work though, I may have screwed up the on / off switch.

I started to glue together my grain elevators over at Hiawatha. Don't have to worry about knocking them over anymore, they're heavy.

I'm using the regular PVC pipe cement from the plumbing department. Stinky stuff! The problem with this group is it is just a single line, so I took a chunk of pipe and ripped it on the table, then glued the strips on as reinforcement.

Stood the unit up against the backdrop. HEAVY!

I've been working from Google Earth to get a feel for sizes and shapes. I'm going to use Art's Masonite construction method to do all the non silo bits.

I decided to offset this batch because the angle fits the street rather nicely, and for full support. It's tricky getting the glue on six surfaces before it dries.

There's still a lot to be done here, but it's taking shape.

Finally, I hung a section of pegboard, to organize some of my scenic supplies. Makes me feel like I'm working back at the hobby store again.

A few items couldn't be hung.

looking GREAT Elliot !!! WOW ![]()
Wow, Elliot, that is a grain elevator complex. I love grain elevators. The PVC pipes are heavy when you have a lot of them glued together. But they sure look great.
Art
Fantastic work!
Mike ![]()
Nice engines Mitch, Brian, and Howard!
Elliot, The silos are looking good! Wow, your scenic supplies do look like right from the hobby shop; you bought the wall along with them!! ![]()
Last night I moved the summit back to the layout and filled the seam with Sculptamold modeling compound. Also added a few more rock castings here and there. Placed the buildings and rail cars and hit the power button. Next step will be to complete the summit scenery and add some larger pine and spruce trees on the slope. Dave


Dave, You are literally moving mountains!!! Looks good. I like the United States Steel plant too. Reminds me of their old sintering plant that was near here on the B&LE. Even the snow got that oxide tint to it. ![]()
Well the weather has been warming up so I've been busy with outdoor activities, including tinkering with my old Thunderbird. I have managed to make some progress on the downtown redo the last few days. I added the plywood base yesterday and then painted it with asphalt colored paint before work this morning. I just just need to add lighting to the "underground" terminal tracks and then start on the downtown scenery. About half way to the end now.
![20180509_103553[1]](https://ogrforum.ogaugerr.com/fileSendAction/fcType/0/fcOid/12129987997660671/filePointer/79142442785054294/fodoid/79142442785054287/imageType/LARGE/inlineImage/true/20180509_103553%255B1%255D.jpg "20180509_103553[1]")
![20180509_103604[1]](https://ogrforum.ogaugerr.com/fileSendAction/fcType/0/fcOid/12129987997660671/filePointer/79142442785054295/fodoid/79142442785054288/imageType/LARGE/inlineImage/true/20180509_103604%255B1%255D.jpg "20180509_103604[1]")
![20180509_103703[1]](https://ogrforum.ogaugerr.com/fileSendAction/fcType/0/fcOid/12129987997660671/filePointer/79142442785054296/fodoid/79142442785054289/imageType/LARGE/inlineImage/true/20180509_103703%255B1%255D.jpg "20180509_103703[1]")
![20180509_103650[1]](https://ogrforum.ogaugerr.com/fileSendAction/fcType/0/fcOid/12129987997660671/filePointer/79142442785054297/fodoid/79142442785054290/imageType/LARGE/inlineImage/true/20180509_103650%255B1%255D.jpg "20180509_103650[1]")
![20180509_103553[1]](https://ogrforum.ogaugerr.com/fileSendAction/fcType/0/fcOid/12129987997660671/filePointer/79142442785054294/fodoid/79142442785054287/imageType/LARGE/inlineImage/true/20180509_103553%5B1%5D.jpg "20180509_103553[1]")
![20180509_103604[1]](https://ogrforum.ogaugerr.com/fileSendAction/fcType/0/fcOid/12129987997660671/filePointer/79142442785054295/fodoid/79142442785054288/imageType/LARGE/inlineImage/true/20180509_103604%5B1%5D.jpg "20180509_103604[1]")
![20180509_103703[1]](https://ogrforum.ogaugerr.com/fileSendAction/fcType/0/fcOid/12129987997660671/filePointer/79142442785054296/fodoid/79142442785054289/imageType/LARGE/inlineImage/true/20180509_103703%5B1%5D.jpg "20180509_103703[1]")
![20180509_103650[1]](https://ogrforum.ogaugerr.com/fileSendAction/fcType/0/fcOid/12129987997660671/filePointer/79142442785054297/fodoid/79142442785054290/imageType/LARGE/inlineImage/true/20180509_103650%5B1%5D.jpg "20180509_103650[1]")
Big_Boy_4005 posted:
Boy, I wish my LHS was that well stocked. ![]() Good progress, Elliot.
Good progress, Elliot.
Elliot, Dave, and Lou- great progress by all three of you. Keep up the good work.
Bob
Elliot, the signal bridges are looking wonderful! The silo's are great, just wondering what size pipe you are using? Lol it sure looks like you have your own train store there! I have never seen one so well stocked!![]()
Dave you sure are doing some great work there and once again I really love the lighting effect!![]()
Lou, you are moving right along there, next thing you know there were be streets and buildings with tons of people hanging around!![]()

I have Lionel's Milwaukee Road four car 18" passenger car set which I purchased a few years ago. None of the cars had been out of the box until last month. I discovered that the rear red light did not light and the wrap around bright metal strip on the rear had come unglued at the ends on the Skytop lounge observation car. I took the frame off the body and found that one of the wires to the light had broken at its solder joint. I re-soldered it and used contact cement to fix the unglued metal strip. Larry
looks good Larry, can you get a photo of engine to the right in the photo, thanks...
Larry: Nice looking train, (although, maybe the wrong colors! To me the Milwaukee ceased to be the day they took on the U.P. paint scheme) Note the differences between the Skytop Parlor cars (on your model) and the Skytop Pullmans like those produced by MTH. The parlor cars had more, somewhat smaller windows on the sides of the car compared to fewer, larger windows on the Pullmans. Also, the Pullmans had their Skytop Lounge area with the glass enclosed rear end, extended more forward, into the sides of the car than did the parlors. Also the chrome band below the lounge windows was smooth on the parlor cars, whereas on the Pullmans that strip was corrugated. Finally, but not very noticeable, was the fact that the parlor cars were actually six inches wider than the Pullmans. Of course, the Pullman Skytops were built by the Pullman Company and the Milwaukee Road built the parlor cars in their own, Milwaukee Shops.'
Just thought that some of you might be interested in these differences.
Paul Fischer
Big_Boy_4005 posted:
I got the signals on my new triple track bridge.
In order to try and light some of the signals, I started to wire the first panel. I have to hang it, power it, then run the wires from there out to the signals.
I made my static grass applicator from an electric flyswatter and a strainer. Still needs work though, I may have screwed up the on / off switch.
Elliiot, your electronic applications never cease to amaze me - your panel & grass applicator, case in point! Also, your scenic storage area looks like an aisle at Scale Model Supplies on Lexington & University! Looking great as always!
Dave
I just hung out with the Building inspector from the County till he gave me the final signature! All set to start on the inside!![]()
Elliot, great update report. Just amazing how you can zip through so much so fast. Can hardly wait to see your work in person. Mike G, congratulations on the final inspection for the outside. Now no matter what the weather you will have no more delays. Now you can really roll up your sleeves and got to town. I have had to work outside on the yard for the past few days. I got a nice package today of train stuff and tomorrow I should get my Scenic Express package so at least with that I can start on scenery again. I going with the policy of if it is raining it is going to be a work on the layout day the rest of the year...................Paul
This one work, Brian?
Working on first scene.


Need to figure out how I'm going to join each sheet of sand paper. Thinking of a small bead of black roofing caulk that I can then flatten down. Then if I weather it a bit (dry brush with some brown and some grey acrylic paint) it may look like a repaired parking lot. I hope.
PSAP2010, Very sharp looking engines!
Deuce, Good looking scene. I like the bus and microbus! Your idea for the seam sounds like it would work. I don't know of any others.
PSAP2010 posted:This one work, Brian?
yes, great looking engines Larry !! thanks ![]()


Deuce, the parking lot is looking nice! you might be able to hide the seam by taking a black marker an running it along the edge of the paper to hide the light edge!![]()
DUECE, station area is looking good. Mike beat me but I agree with him. Maybe a sharpie pen may blend in the edges..,.....Paul
paul 2 posted:DUECE, station area is looking good. Mike beat me but I agree with him. Maybe a sharpie pen may blend in the edges..,.....Paul
Paul, I would say great minds think alike but mine has been slipping lately! LOL![]()
Deuce posted:Working on first scene.
Need to figure out how I'm going to join each sheet of sand paper. Thinking of a small bead of black roofing caulk that I can then flatten down. Then if I weather it a bit (dry brush with some brown and some grey acrylic paint) it may look like a repaired parking lot. I hope.
Deuce-
I made my roads out of cardboard and painted them with Rustoleum textured paint. For the seams I just painted them with some black paint to simulate a tar-filled joint.
Bob


Mike G, you can come build be a out building for my train layout. You would only have to travel about 20 minutes to get to my place. ![]() Congratulations on completing your addition!
Congratulations on completing your addition!
I've have been slowly replacing the batteries with BCRs in my 23 MTH PS-2 engines. I've done maybe five or so since I got all the components.
Paul, Mark and Brian, thank you for all you nice comments!
Paul, I'm not really crazy about the Union Pacific armour yellow but I really like the FP45s in that scheme. I bought the Lionel Legacy Milw. E8 AA set and four car passenger set to go with them several years ago. Since I have mostly MTH engines I was reluctanct to buy the Legacy system, but bit the bullet and got it when I decided to buy the Lionel Legacy engines. Even though DCS can run the Legacy engines it isn't quite the same as running a DCS engine. I have always liked FP45s and had bought an MTH Milw. FP45 in Milwaukee's freight colors several years before I came across the three in the UP livery. I will probably sell the Lionel E8 set.
Larry
Yesterday ordered from Scenic Express at the right time. It showed up on my door step today. Not sure but I think it was Mr Brown again. I am going to have to find out his name. He stops here so often I should offer him something of sustenance. So now I have the materials needed to finish of the scenery in the section I have been working on. Hoping tonight to do that. It is suppose to rain. Pics..............................Paul


Thanks guys!
Art - I love grain elevators too. The Hiawatha Milling District is special though. In a mile and a half stretch, at one time there were at least six different facilities. I'm going to sneak in a seventh for extra switching. This link will take you to Google Earth, where you can see what's left. I think only three are still active, two ADM's and a General Mills. People in the neighborhood are chomping at the bit to repurpose the district. I don't know how much longer it's going to be around. When the mills are gone, the tracks and the Milwaukee Road Short Line Bridge, will be history.

Mark - Gotta stay somewhat organized.![]()
Pat - This is just a small sample of Scenic Express' catalog. They've gotta be HUGE to stock all the stuff they do.
Mike - There are three sizes of pipe/ The really big ones are 6", then 4" and 3". I've got to get some 2" for some really small silos. Those are all inside diameter, so the 6" comes out to about 26' scale.
Dave - The static grass applicator isn't a difficult contraption to understand or build. All it is, is a $4 electric fly swatter, and a cheap kitchen strainer. Cut off the bug zapper part, and there's a red and a black wire. Red goes to the strainer where you put the grass, black gets a longer lead and an alligator clip. Place a nail in the layout, and clip the lead to it, that's your ground. Fill the basket with grass, push the button and shake. Saw it on YouTube. Save yourself at least $120. I think I accidentally glued my push button into the on position. Now I have to take it apart again. The panel isn't rocket science either: buy all the parts for the boards, follow the instructions, and do a good job soldering. Finally, mount them neatly on a chunk of plywood, and get 12VDC to them. Connect the input side to your computer, and the output side to the signal's LED. The computer is only tricky on the first one, after that they're all the same. BTW, your mountain looks great!
Paul - Looking forward to your visit. I'll only have another six weeks before the convention. I'm saving a couple weeks to clean up. I know all about getting boxes from Scenic Express. Looking forward to meeting the owner at the convention. I'm also looking forward to visiting your layout in September. It looks great! As soon as I know my dialysis time, we can figure out when. We'll be in town September 22 - 24, then it's on to visit Mark.
---------------------------------------------------------------------
Yesterday, I spent all afternoon out in my workshop cleaning. The goal was to clear a table so I could start working on the flat walls for the elevators and mills. I'm going to go with Art's Masonite method, but this is going to be complicated by the addition of windows in all of the visible walls. The plan is to use strips cut to width for the sides of the windows, and rectangular pieces to for the tops and bottoms. I can make any size or shape opening I want. I'm going to start tomorrow.
What a mess!!! In this regard, I am the antithesis of Art. His shop is immaculate, you could eat of the floor. I think I'm going to have to fire the cleaning lady.

This is what 18 years of buildup looks like. Every so often I sweep up some of the big piles of sawdust. On rare occasions, I have a fire. But every time the layout makes progress, I make more scraps. I guess there's a reason I don't throw much away. This project will consume all the bits and pieces of Masonite. The trick is to get organized.

There's a lot of cleaning left (understatement), but this'll get me started. Waste not, want not (the extreme version).

Oh, I almost forgot, after more than three years of sitting in my garage, I finally opened my remaining bags of ballast, only to discover that I had even more of that dark color that I can't use. I called my guy, and set it up to grab another batch next week. I'll get back to ballasting, while I;m waiting for the glue on my walls to dry.

mike g. posted:I just hung out with the Building inspector from the County till he gave me the final signature! All set to start on the inside!
Congrats Mike! Hopefully, you didn't have to give him a RTR set to make it happen! :-)
Was checking over the re-pantographed Red Rocket II in the train room, when Norma Bates Kitteh jumped up on the train table, sat down in the middle and gave me a "Well?" look. I chuckled, put on the Razorback Express passenger cars and ran the RRII around for a few minutes as Norma laid down, watched the train and purred... ![]()
Mitch
Thanks Larry, I would be more then willing to help you out! Where are you located? I have been looking for O gauge train guys in our area!![]()
Paul, I am thinking you need to buy Mr. Brown Lunch, heck maybe even dinner! LOL The stuff looks great, cant wait to see it on your layout!![]()
Elliot, thanks for all the information and what a nice shop! I would sure hate to have to clean it! LOL![]()
Dr. Joe, Nope didn't have to give anything! Come to find out he is a former MARINE also! So we clicked right off the bat!![]()
Elliot, Your "warehouse" you are standing in looks bigger than my house! ![]() It is good you have room to store all the scraps because they sure can come in handy!!
It is good you have room to store all the scraps because they sure can come in handy!!
I pulled some wire today. I decided since the Ceiling Central RR is in an adjacent room I would run it off the DCS as well. Here is the transition from rooms. No I am not going to drill through a wall of concrete block, brick, and real wood paneling to get from here to there. I'll dress it up a bit, but this will do. Yes, the ends are tagged. ![]()

I started cutting for a backboard for terminal blocks, but our daughter the singer came over to practice with my wife playing piano, so I had to stop making noise! ![]() The soprano and piano sound so much better than a noisy circular saw and drill anyway!!
The soprano and piano sound so much better than a noisy circular saw and drill anyway!! ![]()

Mark, the section with the buildings looking good. You are making steady progress........Paul
Paul? Thank you! I haven’t had much time, but I have been pleased
Elliot- that's quite a pile to go through. I tend to be a wood scrap hoarder too- good thing I don't have much space or I'd be cited by the fire marshal ![]() . My wood shop is my two car garage which I vowed to keep both cars in when we bought the house. Right now mine is out but the wife's is in. Once I finish my current project the car will go back inside.
. My wood shop is my two car garage which I vowed to keep both cars in when we bought the house. Right now mine is out but the wife's is in. Once I finish my current project the car will go back inside.
The Aerial America series recently aired a show about Minnesota and featured the Hiawatha area that you are modeling. Pretty cool to see the real thing. That must have been one busy spot back in the day.


Had to go with the weather outside so I did work in the yard. Got done just before the rain. Maybe after dinner I can get some layout work in. I just got done ordering a bunch of Korber building flats from Mr Muffin. Took some measurements for the 3D building areas of the Brewery complex. So when they get here I can start piecing them together. May not make it down to work on the layout the wife doesn't have a game till tomorrow.........Paul
If planning the power connections of a new layout counts then that was my unenviable task.
I'm planning for conventional + DCS including: 4 power blocks made of 27 power districts (is this the right term?), 33 isolation points, 5 storage/operations sidings, 4 passing sidings, two back-and-forth trolley circuits, 3 loops, a yard w/Inglenook and 22 switches. Also specified the required LEDs, SPST/DPDT/rotary switches (for a control panel), and associated electrical stuff.
Phew... by 1 AM I had enough! The wine helped!
Kirk R
Hi all , I am so tired right now all I can say is great work everyone! I to had to do yard work, only after I got all my outlets mounted and the wire ran. Then mounted the celling outlets for shop lights and ended up 12' short of wire! Oh well it will be there when I get more! I hope everyone is having a great weekend!![]()
It has been a long time since I have posted but I have worked on the layout a bit.
Me and my son are planning a 2nd level on the layout. I hope to buy some plywood and foam this week to get it started.
Kirk R posted:Here's what I followed.
Impressive! Love to see your panel when you build it. ![]()
I jumped the gun before the wife's Cavs game starts. I decided to go back and try to finish the Scrap Iron Yard before I get too many more projects started before finishing any of them. I added rust to the inside of the galvanized fence. When I go back down I am going to start making up the dividers for separating the different metals in the yard. The last pic I decided to take a low shot of the Sauerkraut Factory. Pics......................Paul


Jim, Glad to hear from you. It’s good you and your son are going to get started.
Paul, How did you get started before the Cavaliers game? And on Mother’s Day to boot! :-)
Very easy Mark. When I went grocery shopping this morning they were making chocolate covered strawberries so I bought the wife a dozen. In like Flint to work in the basement LOL..............Paul
Access to this requires an OGR Forum Supporting Membership


