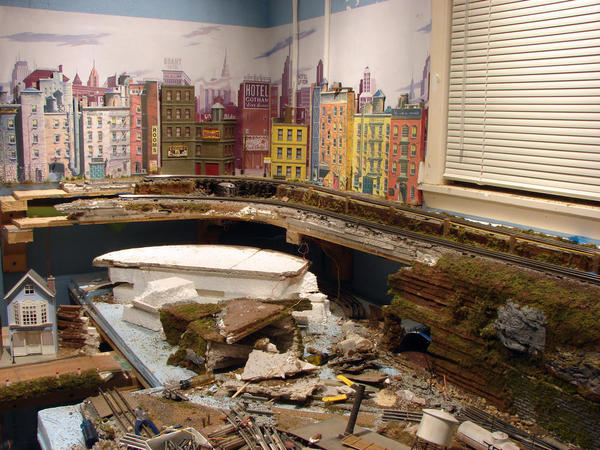
I can relate to the situation, Bob.
 
Various health issues have played havoc with my layout building over the past five years of the eight I've been a-building.
 
Sucks, but does lead to bursts of activity when up to it.
 
 
Originally Posted by Cobrabob:

Absolutely nothing, and not by choice! I had my knee surgery three days ago and I have not been downstairs to my trainroom yet.   My knee is feeling somewhat better, so I may try to venture down tonight to atleast watch some trains run!!

Cobrabob.


Kerigan & Kobrabob   I can understand how things are.I went tru A loss of a leg, and then a Kidney transplant,and then 3 way bypass all with in 8 months. And now they say I need to have a valve replaced in my heart And I just turned 45 a couple of week ago. So I know how things can be. All I know is that I will build this layout even if it takes me more time then other people to build.It gives me a lot of energy when I am building this.So with the weather getting nicer you will see me out in the breezeway  working on the layout.

I have 90% of the supplys needed to get going on scenery and tunnels and the mountains. All I need to do is finish the track, which is about 85% done, Then the fun part To wire this layout. And You have to remember that I have very little help and its my son and myself living hear.  So I need to get going  I have a layout to build.So I wish you guys the best and hope you recover soon Kobrabob.

In the last two days I made 72 catenary poles. Only took me about four and a half hours total. Really got a production line going. I need a lot more but that will keep me going for awhile. Now I'm working on a Korber Trolley Barn. Added a tile roof with a sway in it. Needed to raise it up a bit to clear the overhead wires and made it into a two stall barn. I still need to weather it and a few other things. Don

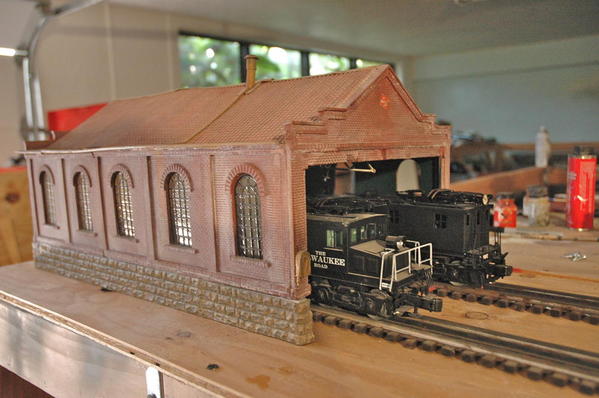
electric engine house

Attachments

Images (1)
  • electric engine house
Glad to hear you are a determined railroad builder in spite of the "odds" Life has thrown your way!
 
Needing to "get up and work on the layout" has inspired me more than once to get off my butt and make it all happen!
 
hasOriginally Posted by sp2207:

Kerigan & Kobrabob   I can understand how things are.I went tru A loss of a leg, and then a Kidney transplant,and then 3 way bypass all with in 8 months. And now they say I need to have a valve replaced in my heart And I just turned 45 a couple of week ago. So I know how things can be. All I know is that I will build this layout even if it takes me more time then other people to build.It gives me a lot of energy when I am building this.So with the weather getting nicer you will see me out in the breezeway  working on the layout.

I have 90% of the supplys needed to get going on scenery and tunnels and the mountains. All I need to do is finish the track, which is about 85% done, Then the fun part To wire this layout. And You have to remember that I have very little help and its my son and myself living hear.  So I need to get going  I have a layout to build.So I wish you guys the best and hope you recover soon Kobrabob.

Did you find an source for inexpensive plaster cloth?
 
I've been thinking about trying to get some rolls of the kind hospitals use for casts ...
 
Anyone used it before?
 
Originally Posted by Jdevleerjr:

Ran some trains and carved out some foam near my harbor, going to lay some more plaster cloth in the next few days.  

My wife found some plaster cloth online from a veterinarian about six months ago.  When I say some, it was actually a case containing two boxes.  Weighs a ton ;-).   


You might find it for a good price at a local vet since quantity for the vet is probably cheaper for him/her and the savings on a larger order could be shared.   Same product as for people, but costs less since it is for dogs and cats, etc.

Originally Posted by Bill Cantrell:

My wife found some plaster cloth online from a veterinarian about six months ago....

You might find it for a good price at a local vet since quantity for the vet is probably cheaper for him/her and the savings on a larger order could be shared.   Same product as for people, but costs less since it is for dogs and cats, etc.

I sure wish that was true for all vet products and services!  In the past two months alone, I have spent over $2,000 on medical tests for my special girl; am buying her special food from the vet at $2 a can (only available from vets); and her meds costs about three times more than mine on a monthly basis.


I'll have to ask them about plaster cloth when I drop her off tomorrow for even more tests to be done while I'm away at York for a day or two.

Good Morning

4 Days to go !! Well the town is done the expansion turned out to be a Gravel road turned out pretty good. Started putting up the skirting around the layout, did a 100' yesterday and doing another 100' today. Still want to get my temporary industrial area done. A lot of little things to do. People, vehicles, lights, shrubs. Today was suppose to be my last day on this project

clem 

I was able to get the railing and walkway finished before the high wind hit.

here are a few photo's to view.

 $oo


  these screws have got to go!

New Deck Girder Bridges 001


walkway I found this planking in a 24" sheet so easy to break apart

New Deck Girder Bridges 002


I have to find an easier way to do the railings! 

New Deck Girder Bridges 003


what do you folks think? this is my first attempt

at doing anything on my own no kit this is all me

and a few pictures online to get a feel for sizing

the structure.

New Deck Girder Bridges 004

Attachments

Images (4)
  • New Deck Girder Bridges 001: ugly screws
  • New Deck Girder Bridges 002: walkway I like hobby shops that carry modeling supplies
  • New Deck Girder Bridges 003
  • New Deck Girder Bridges 004
Last edited by $oo Line
I feel your pain Allan.
 
Over the past 6 months we've spent about that much on our special friend with dental surgery, jaw bone infection, special food, and the list goes on ...
But Indigo is family ....
And cost about as much as a new 3rd Rail steamer ...
But worth twice as much as a companion ...
 
Originally Posted by Allan Miller:
Originally Posted by Bill Cantrell:

My wife found some plaster cloth online from a veterinarian about six months ago....

You might find it for a good price at a local vet since quantity for the vet is probably cheaper for him/her and the savings on a larger order could be shared.   Same product as for people, but costs less since it is for dogs and cats, etc.

I sure wish that was true for all vet products and services!  In the past two months alone, I have spent over $2,000 on medical tests for my special girl; am buying her special food from the vet at $2 a can (only available from vets); and her meds costs about three times more than mine on a monthly basis.


I'll have to ask them about plaster cloth when I drop her off tomorrow for even more tests to be done while I'm away at York for a day or two.

billshoff....


I found the planking at hobby bench in phoenix,az if you have a hobby shop close by that also sells airplanes and so on they should have the balsa wood and various modeling wood planking this particular one is 3" wide x 24" long  it is scribed every 1/4" so you can snap anywhere you like and trim to size if need be with a straight edge and an e-xacto knife.


click on link below what I used is really wood sheathing for a doll house hope this helps or if you have a well stocked hobby shop look for where they have the balsa wood for aircraft and various other modelers.


corkectomy!!

imagine all the train supplies you could have!


so is bailey a cork connoisseur now LOL.


http://www.micromark.com


$oo

Last edited by $oo Line

I have it sealed with a red primer for now until I decide on color for the girder portion torn between black and a dark gray. here are pictures with it in place I need to make 2 new supports with a cutout so bridge will be in same spot then I can cut the tracks so it can be removed.


$oo


New Deck Girder Bridges 001


used the flash on camera this shot.


New Deck Girder Bridges 002


Attachments

Images (2)
  • New Deck Girder Bridges 001: final resting place this is the shay logging line
  • New Deck Girder Bridges 002: I can see light at end of tunnel on this project

Work on the RR has defiantly slowed down now that winter is finally leaving!  I am not making it to the basement as often, and have a had projects half done for a very long time now.


I do need to get started on my sons train table for his birthday, 2 months away.  He will be 3 and I am building him his own train table with wooden track and wood thomas.  The other side of the table will have some O27 track on it so it can be flipped over and he can run his Lionel Thomas set on it.  


As of right now I am enjoying the 65 degree weather, mostly sunny.  Out on the back porch grilling some salmon and watching my son play in the yard!

Originally Posted by billshoff:

Bailey swallowed a wine cork and I paid $1700 for a corkectomy.

Bailey

The cork

Bil.....approx. 1 month after we adopted my dog from the Humane Society my wife left a bottle of Gorilla glue where she could get it. Not sure how many people know this but Gorilla Glue absorbs water and grows significantly in volume and mass. 2 days later and about $2800 later they removed a glob of Gorilla Glue the size of a baseball from her stomach. Needless to say with the number of surgeries I have had the dog and I share a very special bond (not Gorilla Glue either!).

Jdevleerjr, "Why do you not us it anymore?  I heard the stuff fromt he med supply stores is very messy. ".

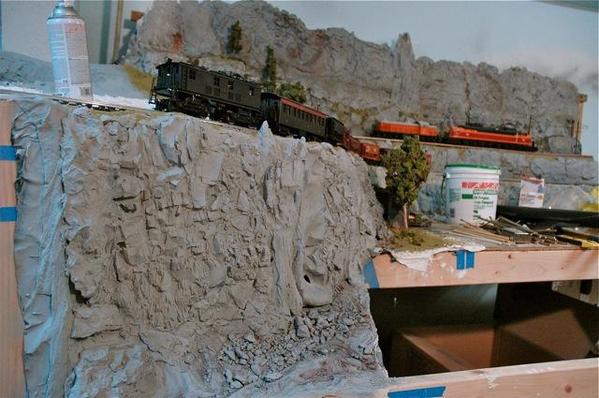
It wasn't messy, I just have a much better way. I use Black Wrap for shape. Very little webbing or much of anything under because it's so strong. Then just use paper towels dipped in plaster and lay it on the Black Wrap. Don

DSC_0028

Attachments

Images (1)
  • DSC_0028

I get it from Film Tools http://search.filmtools.com/se...p;go.x=44&go.y=4  

a Hollywood company for TV and movie production. Back Wrap is like a very heavy aluminum foil but flat back. It's used in lighting and to flag off stray light when filming. I used rolls of it before I retired and had a few extra rolls when I started building my last layout. It's very strong but you can cut it easily and shape it like rocks. Just a little webbing of masking tape and it will stay in place. You can staple it to the frame of your layout. Then a little plaster on top and your done. I place rock moulds over it but you can just leave it as it is. It comes in two different widths and is cheap. You can order it from Film Tools. I'm writing a article for OGR about using it for mountains. It's great stuff. Don

I finally got up enough energy to day and ran to the pet store to pick up some supplys  for the dogs and cats. And I noticed that they carried chick Grit, so I picked up a couple of bags today. I also cut some 2" x 4"s for another table that I need to continue  my lay out. to discover that I'm out of the proper size nails . So tomorrow I need to run to Ace Hardwere to buy more nails.

Earlier I painted on a kitbash. Its drying. I was just now taking a break right now from my 2 track ceiling/wall shelf layout (rectangle). I have been cutting track pins & block wiring a pre war Z(not zw) to split my loop#1 into four sections-ground level(shared main with loop#2), grade #1, elevated tressels(parallel over top of a ground level branch{loop#2}), and finally grade#2. The KW has been reassigned to lighting, loop#2 on the left throttle(except for short merge with main), and two toggled sidings on the right throttle. Eventually the main will get a relay to switch between the Z and the KW automatically so I can run engines that have big power requirement differences together better. But tonight by Jove, the juice will flow again! Back to work.....

Darn.   Powered up the newly rewired track power and somewhere from the Z4000 to the TIU the electricity isn't going where it is supposed to go ....


Back under the layout to do the painful step-by-step tracing of the wires and current checking to see where all the volts and amps are leaking into the floor instead of going to the TIU ...

Originally Posted by Kerrigan:

Darn.   Powered up the newly rewired track power and somewhere from the Z4000 to the TIU the electricity isn't going where it is supposed to go ....


Back under the layout to do the painful step-by-step tracing of the wires and current checking to see where all the volts and amps are leaking into the floor instead of going to the TIU ...

Sorry to hear that. Hope you find it quickly. That is why I like to approach my electrical like I do my blue jean cutoffs, one short leg at a time. I had better luck with the Z and KW last night, even ran a now dedicated lamp circuit for a bridge and yard light, another 2 lock-on's removed. I only had to flip the plug on one transformer to phase them. Then, one by one I set the throttles on the $35 Z , kicked back, hands free and watched as my rectifier and 10 ore hoppers climbed and descended around the ceiling smoothly, over and over and over.. ...now were are those relays I have for the main? I know they are here, I can hear them laughing at me.....pesky relays.

Opened the boxes and examined 3 engines that Gary at Weaver returned after installing ERR and [RS in two]. Placed on the Yard rails but did not test run them, having a little health upset today. Maybe run this weekend.


Weaver Ps-4 "Tennessean" [ERR and RS].

Weaver E8 "A" unit [ERR and RS].

Weaver 0-6-0 Switcher [ ERR only,no room for RS]

Did some looking, measuring, and brainstorming for a small extension on my layout. Hope to have it done by June. I won't be able to really get started for a few more weeks but will likely swing by Home Depot soon with my list of lumber and other needed things to get started. 


I will be using my 4x4 Christmas layout. I will be putting legs on it and incorporating it into my current layout. 

Back at it today under the layout; this time it's to hook up the now-found uncoupler wires for both freight yards.

Then I'm going to finalize the track plan for the engine terminal, pack up the turnouts for now, sand down the remaining joints, vacuum up the mess, and tape off for painting with "storm cloud" grey paint.

I can see the light at the end of the tunnel!

Worked on my Diesel Locomotive shop. Got the roof all done and painted , the sides are painted and weathered too now im just waiting for some styrene pieces to come in to trim the windows and overhead doors out. Then I need to cut some .020 lexan for windows and cut some window detail out on my vinyl cutter eh 

started on second deck bridge this time I used 1/4" plywood as the beam and cut 1/8" hardwood to create the I beam at bottom is so much stronger.

will start the small detail wood work friday.

am going to order some flat rail from gargraves once this bridge is done so can order enough packages to do derail feature on both deck bridges.


$oo

It has been 2 years now since I've been to York. Would like to go back, but I certainly can say I CAN live without it very happily. What I DO miss from York are the people. The trains are only second. 


Anyway, I took today as a much needed "mental health day". I started my layout expansion. Not much, just my 4x4 Christmas layout but it will expand my mainline a tad which was the overall goal. Only downside is, despite doing everything I could with what I have, getting rid of the 0-42 curves and going with 0-31. Not what I really wanted to do but it was either put up with 0-31 curves or nothing at all. I don't anticipate any major issues with the tighter curves except my more rigid wheelbase steamers won't be particularly enthusiastic about it and my 60' Passenger cars will look like crap but whattayagonnadoaboutit?

IMG_0039

Attachments

Images (1)
  • IMG_0039

Yesterday and today are all about shelves.  I removed 10 feet of narrow shelving and put up 27 feet of much deeper shelving for a net gain of 20 square feet of shelf space in my workshop.  Today is all about adding 43 linear feet of additional display shelves in my train room, which will give me room to display everything I have on counters now so I keep them clear, and still have room for every loco and the City of LA, etc., that I have on order now. 

Ran trains all day

 Well I made it finished putting the people and cars down 30 minutes before showtime. First day of Blissfield Railroad Days 144 visitors at my house, don't now how many at the other layouts in town. The shuttle tram worked pretty good getting people out to my place. Had an electrical glitch for the first two hours of operation, turned out to be the K- line TV camera car. Took it off and everything started working good again. Left it on a powered siding and no problem. Tomorrow another day 10:00 to 4:00. Met a lot of great people and a lot of happy kids.

Thanks for stopping by Locodan great to meet you and Donna


clem 

PROGRESS FROM the mythical town of PATSBURG on the FREE STATE JUNCTION RAILWAY.

Since my last entry, I have weathered an MTH B&O Docksider, an MTH bobber B&O caboose, and a MTH Western Maryland scale test car..... all of which run on my mountain division along with a weathered ( bought this way ) Lionel flatcar with a log load.


I've also rearranged yard tracks at the west end of my layout ( The Free State Junction Railway ) 


While at the York TCA show yesterday I bought a wooden tunnel portal ( one of several purchases )  for my " new mountain to be".


Last week I aquired wire mesh from a friend.  Also purchased Fushion Fiber, Whitison Ballast ( great looking stuff!! )  from Harrison Trains at the Great Scale Model Train Show in Timonium, Md. I'll use the Whitison Ballast to ballast the tracks of my mountain division.   I also bought some tools at Harbor Freight.  Now I'm ready to begin phase two of building my mountain to the ceiling ( or just about ).  I just hope once built this mountain won't make my layout look like "Whoville" from Dr. Suess Cat in the Hat.  Well even it does, kids will probably dig it and it might lure them into the hobby :-)


Keep driving the spikes and happy railroading.

Patrick W.

Here is a photo of the Bollman Bridge I purchased at York from Vernon Peachy in the fall of 2011.  The prototype  bridge is two blocks from my house in Savage, Maryland.  Although there were around a hundred of these bridges used throughout the B&O railway system this one is the only survivor.  The model came with a 5 page historical briefing of the prototype and photos.  I had been searching for a model of this bridge for almost 10 years.... I walked into the orange hall and there it was :-)!!


This bridge is the catalyst for my building a mountain to the ceiling and will take the mountain division of the Free State Junction Railway across Lake Christopher.  


Keep driving those spikes and happy railroading!

Patrick W.

Attachments

Images (1)
  • Bollman Bridge FSJR

Ran trains all day again Actually for the last two days the trains ran all day, thanks to my volunteer engineers, they ran I'm. I just talked to everyone that came in. 209 people toured the layout today, total of 353 for two days. What a good time we all had !! Even had a couple of human error derailments. Only one mainline engineer today, three trains on one 3 scale mile line. I was going to help but he was having to much fun, kept running trains 30 minutes after doors closed. Just one more lap! The switcher kept the industrial park with all the operating accessories going, the kids really kept him busy. The kids love the Lionel coal,lumber mill, and oil drum loader. the adults liked the MTH gas station, the musical diner phone and the Harley dealer with the custom sounds.  everyone liked the lighted vehicles, and the I SPY items scattered about. The large area's of countryside scenery was also noticed by fellow modelers. All in all a great train weekend. Now to start thinking about next winters rail projects.

Thanks to all the forum members that answered my questions and gave me ideas.


clem k   

Jim,

Believe it or not I got to spend the whole weekend working on the layout.  Been about 5 months since I did anything besides clean up around it.  Got to building the new 12x12 benchwork in what was my workshop.  Finished 4 large benches that an elephant could sleep on, just need to cut the holes for wiring and will be able to lay track soon.  Will Give me a total of 25 x 13 of layout space.

NEWS FROM PATSBURG home of TH FREE STATE JUNCTION RAILROAD .... Today I put together and glued a Plasticville log cabin that I bought for 2 bucks at the GSMTS in Timonium, Md. a week ago.  Used my Sinbad glue I bought at York this past weekend.   Sinbad is great stuff!  I've been using it for several years now.


Also glued a pantograph on one my Williams GG1s.  Tried several location on the layout to place my house of ill- rupute ( a watered down version bought at York of Wicked Wanda's by Scale University )   I am looking at a spot on "the other side of the tracks" which may work quite well for this establishment.  The town's zoning ordinance is really strict :-)


I ran a 19 car mixed freight powered by two scale Williams GG1 ( powered an dummy ) on the lower main line...... and a 3 car train on my mountain division.  Spending lots of time running trains as a test before I continue covering track with the mountain.


Viewed a Alan Keller video of Howard Zane's layout. ( I think Vol 48 )  Great instruction on how to make a water falls.  I think I will use Howard's technique of water fall making on my mountain. Howard makes things look so simple and really gives good precise instruction on how to  build things.  I really appreciate him as a person , his talents,  and find him very inspiring!!


Keep driving those spikes and have BIG FUN with your Railroad!


Cheers

Patrick W 

I recently doubleheaded my Lionel Milwaukee Road S-3s...#265 on the point, and #267 behind the 265. My friend did a quick video on U Tube, and I am going to try and see if it is included here, if not I'll try something else, or perhaps someone out there can tell me how to post it here...or I can post the U-Tube link. By the way, the engines starting up sounded great! Out of beat exhausts until we got the engines running, just like doubleheading a real pair of locomotives!!


I see the attempt did not work, so here is the link if you'd like to take a look...http://www.youtube.com/watch?v=aF6L7JhFP7Q


Thanks for looking!


Jeff

Attachments

Files (1)
http://www.youtube.com/watch?v=aF6L7JhFP7Q

Hello today I built the table that I need to continue on the layout, after a long day driving  a total of 146.3 miles round trip to go see a DR. for my leg. Now tomorrow I'll add the legs to the table and continue building it. and hopefully ad the top to it also. this layout is the only thing that keeps me going since I lost the leg 2.5 years ago. So don't let things bring you down and think positively  If I can do it so can you. It may take me a lot longer to build the layout but it relaxes my mind and the pain I go thru sometimes..

Last edited by sp2207

I moved to the new refinery area of the layout and glued roadway to the benchwork. I also painted station platforms that will go with the new train station complex.


I had a limited opportunity to work on the layout today, but I wanted to get a few things done. I have a goal of finishing the renovation project within a couple of weeks so any progress at this time is a help.

Well, so far (the afternoon is only half done - I'm taking a break while glue dries) I've added another thirty-two feet of display shelves.  I got so into shelves this past weekend, adding 41 feet, that I worked at figuring out how to squeeze another two 16-foot long train display shelves in a nicely viewable area above the shelf portion of my layout, but still low enough that I can reach them without a ladder. 

I finally hung the backdrop today. It's 8'x2' vinyl and came with 8 clips to hang it but I lost them, so I used 3M doubled sided tape. The attic wall is sloped but it looks ok...good enough for me and my 3 year old grandson anyway.

photo

photo1

photo2


I found the panoramic picture on Wikipedia (free license to use) and had it printed on vinyl for $17.

Attachments

Images (3)
  • photo
  • photo1
  • photo2

Wow, it's been almost a week and a half since I last went downstairs. Had a cold and just didn't feel like moving. Only spent an hour, moving things around, and planning the addition of the suspended ceiling. It needs to get done before some of the track gets laid.


Prior to getting sick, I did get some track down and painted 32' of backdrop blue, but I guess I never took any pics. I'll get some tomorrow. Patrick comes over Thursday.

Started to work on the Caterpillar dealership area. Finalized the placement of the MTH CAT Rental Building, installed a grass area for it to sit on, and un-boxed the Caterpillar equipment that will go inside the building and on the sales lot. They use more tie downs on these models than anything I have seen before. They have been in boxes for the past twelve years and have never been opened. A CAT sales/rental lot will be a very good use of them.

At York and Timonium I picked up several O scale structure kits, including one each from OGR and Korber.  I was going to just use a cellar pit as the remains of my ghost town station, but bought the OGR Flag Stop, and am kitbashing it horribly.  I found that it comes with two identical sets of walls that allow you to double the size of the building.. so that is done, and chunks have been sawed out of the "stone" to created a crumbling building, and a missing freight door opening.   One peaked end (can't think of the word) has crumbled, and windows, doors,  and roof are gone, which is good, as the kit's roof would only cover the smaller building....splintered platform, detailing, and paint will finish...signs for "Arroyo Dorado" are done, but will be somewhat

askew... trains don't stop there anymore...

Ballasted most of the track on my extension. Of course, I ran out of ballast about a foot before I reached the end of the track and the original mainline picks back up, which is fully ballasted and untouched. I glued everything down, will let it dry overnight, pick up some more ballast tomorrow and hopefully finish it and do a few touch ups. 


I will be making a trip up to Catoctin Mountain Trains on Saturday (www.cmtrains.com) to pick up some buildings and other things I need to work on it and keep me busy for a few more weeks. 

Another busy day with Patrick. We got a section of the upper deck reinforced, so now 2 of the 3 peninsulas are completed. We also hung 57' of backdrop, which tied together two previously finished sections for a total of 122' of continuous backdrop.

These first two shots are a little before and after.


IMG_1164

This curved section was installed today. Of the 3 tracks that go through the backdrop, the one on the right will be completely hidden. The other two will disappear under a bridge.


On the right side of the picture, the backdrop doesn't go all the way down to track level, because the scenery will go up to meet it.

IMG_1173

A little blue paint makes a big difference.


IMG_1175


IMG_1174

The post will have a cement plant disguising it.

IMG_1177

It's kind of strange not being able to see across the room anymore.


IMG_1179


IMG_1180


IMG_1181


Patrick will be back on Monday. Let's see if I can get all of this painted before then.

Attachments

Images (8)
  • IMG_1164
  • IMG_1173
  • IMG_1175
  • IMG_1174
  • IMG_1177
  • IMG_1179
  • IMG_1180
  • IMG_1181
Clem,  that's alot of people!  Any kids there?  I always hope so because that keeps this all going!  we have one in my area tours and I hope to participate some day.......  when I have my final layout finished.  my office buddys told me I should have done this already, but my setup was seasonal!  Originally Posted by clem k:

Ran trains all day

 Well I made it finished putting the people and cars down 30 minutes before showtime. First day of Blissfield Railroad Days 144 visitors at my house, don't now how many at the other layouts in town. The shuttle tram worked pretty good getting people out to my place. Had an electrical glitch for the first two hours of operation, turned out to be the K- line TV camera car. Took it off and everything started working good again. Left it on a powered siding and no problem. Tomorrow another day 10:00 to 4:00. Met a lot of great people and a lot of happy kids.

Thanks for stopping by Locodan great to meet you and Donna


clem 


I love the streets that look like brick patterns.  do you have the source for these, or did you mold yourself.  they look great.  I wanted to model some old 12% grade streets that my grandmother lived at in Pittsburgh, I saw some sheets of plastic that would work well and could curve well to the hills, but just wondered what yours were made of.
thanks
Chris Originally Posted by trumptrain:

Here are some photos of the Westend of Patsburg and of the Free State Junction Railway under construction

Elevated trolly line under construction

Patsburg Westend

Patsburg Westend & Park


hey that is great.  I cant wait to start building bridges for my new layout this fall. what supplies did you use for the planking? nice straight strips!  I thought of ripping thin sheet on a table saw, but unless you have a very fine finish blade, it would get all chopped up.  Originally Posted by $oo Line:

I have it sealed with a red primer for now until I decide on color for the girder portion torn between black and a dark gray. here are pictures with it in place I need to make 2 new supports with a cutout so bridge will be in same spot then I can cut the tracks so it can be removed.


$oo


New Deck Girder Bridges 001


used the flash on camera this shot.


New Deck Girder Bridges 002


It's not the layout, but it's going on the layout..... Still working on the roundhouse. I have many, many, many hours in this thing already... sanding, priming, more sanding, spray paint, hand paint, glue, epoxy, clamp... repeat process!


 Hand paint the walls before assembly.

IMG_0908


3 different colors of red, tan, and gray for the back.

IMG_0909


Clamping the wall caps on after priming and painting with the spray can.

IMG_0913


IMG_0915


The 7 stall kit with full extension took up the whole table

The Project

Attachments

Images (5)
  • IMG_0908
  • IMG_0909
  • IMG_0913
  • IMG_0915
  • The Project
Originally Posted by Chris D:
Actually Chris the brick pattern used for my streets are Dept 56.  They are ever so slightly textured and do look good for modeling older city streets.  This product comes in a 6 inch by about 3 foot rolls which is a perfect width for an old city street.  Dept 56 also sells cobble stone in the same size roll.  Thanks for noticing and checking out my photos of Patsburg Westend.  Happy Railroading and keep driving the spikes.
Cheers
Patrick W
I love the streets that look like brick patterns.  do you have the source for these, or did you mold yourself.  they look great.  I wanted to model some old 12% grade streets that my grandmother lived at in Pittsburgh, I saw some sheets of plastic that would work well and could curve well to the hills, but just wondered what yours were made of.
thanks
Chris Originally Posted by trumptrain:

Here are some photos of the Westend of Patsburg and of the Free State Junction Railway under construction

Elevated trolly line under construction

Patsburg Westend

Patsburg Westend & Park


I finally got around to opening up the old Reading Locomotive 8004 after burning out the smoke unit a couple months back. The smoke unit is a complet loss so now I get the opportunity to upgrade it. So that's what I'll be researching this weekend.

Too bad because burning out the smoke unit creates a marvelous visual effect it just doesn't last that long.


Went to Menards and picked up my third 5 lb box of 1-5/8" drywall screws since the first of the year. I guess that's one way of measuring progress.


In my world, trains know no season. After having skin cancer, the sun is not my friend, and warm weather has always made me wilt. I'm not overly fond of snow either. The basement is always perfect.


Nothing quite like turning on the baseball game and working on the railroad on a sunny, warm, Saturday afternoon.

With all the whining and name calling in the threads lately, rather than read all that junk I figured I should go work on something and have some fun.

I had installed EER cruise in 2 older Lionel scale SF and BNSF dash 8 locos a few years ago. Although they look great together I don't run them much and they're back in their boxes. My thought was why not take out the boards and install into older smaller scale TMCC steamers that I do love to run, an SP consolidation and ATSF Atlantic. Both had EOB but they've giving problems lately, very herky jerky. I run the steamers a lot on my little 4x11 pike. My Lionelmasters are still a little big really and larger diesels like the Dash 8's. The geeps and the like look better.

Got the EER's in stalled and what a difference. Lost the 4 chuff but whatever. The rivet counter machine gun fans can have it. I just want smooth running small scale locos to run. I picked theae sweet little locos about 10 years ago in an old antique store for dirt cheap. With the help of a brain transplant they're  better than new.

I'm a hoarder of sorts consequently I've accumulated about 30 yrs worth empty train boxes.  We I've had it with the clutter and borrowing on of Popeye's phrases "That's all I can stands, I can't stands no more" I threw away well over 200 boxes this past weekend.  The only ones I saved were about 25 post war Lionel boxes.  My hoarding days are over.

Just finished the size doubled OGR Flagstop Station.....this could comprise the whole

ghost town, with the decrepit general store, but the U.S. Land Office/Assay Office is

well along, and the saloon has been started.  The Land Office is a BTS Small Store kit

acquired at Timonium on the York trip, and will be in better shape than the others..

the station's roof has fallen in over the baggage room, as has part of its wall, and

most doors and window glass are missing.  While I've said trains don't stop there

anymore, there will be a crude, hand operated semaphore to flag trains for ranchers

and die-hard miners in the area.

Just finished unpacking from "Spring into Spring" a first time ever train show conducted this past weekend at Clove Lakes Health Care and Rehabilitation Center on Staten Island with the Richmond County Model Railroad Club in association with the Center's Volunteer Department who were conducting a craft fair.


It was a first showing! Members were very accomodating and welcomed everyone a lot of stuff came off of my home layout including 2 sets of trains several hobos, trees and even a church!


I miss the articles on my layout and plan to be up and running tonight!


Mike Maurice

Moments ago I just finished the third building in this mining ghost town.   This one is

in better shape, having recently seen duty as U.S. Forest Ranger Station, after its

life as a land office and assay office.  However that sign as all the others are stacked

against the building and the shingles are stripping, windows broken, and deteriation

has begun.  Next and probably last will be the saloon, although the station's flag stop

post needs to be done.

Started to install a new control system for the switch yard. There are 14 tracks with two rotary dials controlling tracks 1-7 & 8-14. By using this system, I am not putting power out to the sidings when the trains are in storage. I can activate just the track where I want to move a train. Considering they all will hold a passenger train, think about the power draw if the sidings were not controlled by a system similar to what I am using.

I roughed in a foam incline to reach the bridge abutment of my swing bridge. This was an afterthought. I hadn't planned on using the bridge. One day I thought why not? It set me back a few weeks but I'm moving forward again. I completed the additional wiring for the bridge, the bridge approach, and two additional passenger yards that I added. They weren't on the plan either. There is a switch half way up the incline so that had to be addressed as well. I laid some track over the loose foam and just had to run an engine up to check it out. This also accomplised checking the bridge overhead clearence. This same engine, the Williams EF-4 doesn't make the Lionel 213 but does fine on this K-Line swing bridge. Where is Maury when you need him?


101_3374

101_3375

Attachments

Images (2)
  • 101_3374
  • 101_3375

Today I completed the last two buildings in my ghost town, well, one is a cellar hole

with a chimney sticking out of it, and a rusty stove and other junk in it...the "Sluicebox Saloon", with its collapsed facade and sunken roof is done except for selecting rusty signs for the sides of the building.  Will have to search and print some Coors signs.

Added a rusty REA sign to the station ruins, and leaned a U.S. Forest Service sign

beside the now closed assay office/former Forest Ranger office.  May add a Conoco

sign to that to pile to give the building yet another, intermediary,  prior life as a gas station.

Next to assemble it in a temporary "town" shape and shoot some pictures of it.

I finished the wiring and testing of the new rotary switch control system for my switch yard, all 14 tracks work wonderfully. Big job out of the way. I can now see the finish line for my two month renovation project. Also started putting train sets back on the layout.


I have to put ballast and grass material down for the siding yard and then it is on to the large new train station complex.

Installed Lionel flagpole and MTH signal dispatch board.  Also started repairing an old Lionel Alco where the plastic shell cracked near the rear frame mounting screw.  Serviced it and applied a layer of fiberglass sheeting / epoxy to the area.  Serviced the loco and will likely install a tru-blast horn while it's open.
Just now I set the tree stumps around the cellar hole of the ghost town, and put the mail

box out in front...may add a  1920's Berkshire Valley gas pump if I have one(found a

later version, but this scene demands the glass top type), and a gas price sign...and cleared a table so I can set up the light box for pictures.  Just needs some operating

ghosts to float through...

Well today I got the table up and put another piece of plywood on top. I also got it bolted to the other 2 tables that I built. I still have some building to do  so I guess I'll have it done soon as I have enough cash on hand. This month is tough $$$ wise. So now I guess I'll I can lay some more track.

I finished the work in the central portion of my renovation project. There was a good deal of work on my hands and knees for hours on end. Thankfully, this portion of the renovation project is done.


Now I can load all of the trains back on the layout and then start work on the new train station complex that is easy to reach. The end of this project is now in sight.

Patrick was over yesterday, and we got about 3/4 of the way around the north section of the train room with the L for the suspended ceiling. We probably would have gotten it all done except for the fact that there was a section in one corner where the duct work hadn't been boxed in yet.


That was when disaster struck. We were fixing a spot that I had framed years ago, but wasn't quite straight. As he was trimming a 2x2 that was above his head, the saber saw slipped and bit the back of his hand. A few paper towels, a wrap of duct tape, and a couple of aspirin later, he was back to work. Patrick is one tough cookie.


Today, I picked up where we left off, and added another chunk to the soffit. There's still a section left to build, then it needs to be sheetrocked. I'm happy to save that for Patrick. Then I sanded some of the putty that Patrick had applied to the backdrop, and painted the section above Dayton's bluff. Finally, I did some vacuuming in preparation for $oo Line's visit Monday. There's a little more to do, but it'll have to wait til Sunday night when I get back from chasing 261.


Very little.....inspected a kit of a mining town store, and decided to kitbash it and add

it to my "completed" ghost town, so oversprayed the hydrocal brick and stone castings with a base color prior to  painting individual stones with acrylics.  I did put a "ghost", a shadowy white figure in the town's collapsing saloon where it can be seen back in the building through the vacant, glassless window.

Originally Posted by coloradohirailer:

Very little.....inspected a kit of a mining town store,......ghost town,.......  I did put a "ghost", a shadowy white figure in the town's collapsing saloon where it can be seen back in the building through the vacant, glassless window.

A little glow in the dark paint here and there could make some ghosts "disappear" till dark when they would glow for a while.

Started tearing out the 7 Gargraves switches in the freight yard and replacing them with the new Ross standard gauge switches.  The Ross operate on DC and the rest of the layout is powered by z4000 AC transformers, so this will also involve putting in a DC power supply and new wiring.   


The Ross toggle switches take up a lot more space than the toggles I was using, so I am also having to rebuild the control panel for the yard.  One thing leads to another.


im sorry to say that I took my layout down.  boy it took only 2 days to do it.  amazing the time spent to build it.  looking forward to design of the new one for winter this year.  Ill be weathering my buildings over the summer.  adding details inside of them.  good luck to all your continuing efforts guys!

At last I started the final phase of my renovation project, the new train station complex. Over the weekend I did the prep work for the main roadway to the station and applied the grass material. Today I installed the train station (over 76" long) and started the work on the two large parking lots (one for cars and the other for the taxi operators).

Today was one of those rare days when I actually RAN trains. Dragged myself out of bed at 7:30 to prepare for forum member $oo Line's visit. Had to shuffle some trains around in the hidden yard. Dirty track and dirty wheels caused some problems, but that wasn't the worst of it.


The railroad is 100% TMCC, so track power is either on or off, no other control. I had just moved a train headed by an Atlas GP, and went to turn the sound off, but for some reason it didn't want to respond. Didn't think much of it, and turned the railroad off to deal with an SD-60 with dirty wheels. Got that one back on the track, and turned on the power. The Atlas GP took off like a rocket, rear ending the train in front of it. That wreckage spilled over onto the adjacent track. At least it all happened before $oo showed up.


I always thought that it was a rule of model railroading that things go wrong when visitors are present. By going downstairs early, the layout was pre-disastered, and behaved very nicely for $oo and his wife.

My new train station complex project is well under way.Today I cut in two 40" parking lots on either side of the train station. One is for taxi cars and the other for general parking. Just about finished both of them.


Next part of the project is tree installation and working on two parks. I also have to stripe the parking lots and the roadway that runs some 22 feet.

May not sound like a big deal but installed about 26 ft. of road striping and did two 11 stall parking lots. More trees arrived today and now am waiting for street lights, park benches, and fountains.


Have yet to install a light for the newsstand, install a floodlight, and wire four of Jack Pearce's lighted vehicles. But the end of this project is in sight.

Having foolishly decided to add another building (and floored foundation of a neighboring ruin) to my ghost town, I have the stone portion finished and am assembling the front and rear board facades which will be connected by exposed rafters, as building will be roofless.  Dunno how much will (can!) actually go on layout as this town has more (ruined) buildings than others with just a station and a country store.

NEWS FROM PATSBURG.... Home of The Freestate Junction Railroad. 

Today I weathered 6 freight cars using pastel chalks, charcoal, and graphite, then hit each one with Testors Clear Coat.  They seem to habe come put pretty well  ( Ill pit ip photos later this week ) Went to the hobby shop to get the Testors and of course browse around.  Ran a 24 car mixed freight pulled by a Williams scale GG1 and a scale non powered GG1

Wednesday I received a custom built church from The Railroad Crossing which I ordered at York last Month. Richard Krieg does fabulous work!!!!!! And at very reasonable prices.  Check out The Railroad Crossing on Facebook. I highly recommend it

Since my last entry I began  putting the framework in place for the HUGE mountain which will occupy the east end of the layout. After all the framework is intact, I will attach the wire mesh then it will be time for fun with Fusion Fiber !  :-)

Keep driving those spikes and having fun!

Cheers
Patrick W

Yesterday I put the damaged floor (looks like the floor in a corner collapsed under the

weight of a stove, and foot traffic was high at the entrance)  into the kitbashed stone store, and finished installing the rafters. Floor is highly visible in a roofless building.  Have begun laying boards across the rafters, the few that remain, and will then install store on base, build a damaged porch, and then the stone foundation and damaged floor of the attached building's remains on the next lot.  Maybe with the Depression

over here in 1940, somebody will bring in a dredge to work the diggings and some

of these buildings will be repaired and put back into use. (or maybe looming Pearl

Harbor will leave it all in obscurity)

I haven't been downstairs in a week, not since $oo Line visited. Tuesday I had a minor cancer surgery on my back, second one this year. The stitches are still a little tender if I move wrong, but it wasn't as bad as the last one.


Thursday thru Sunday was spent doing layout tours around town, as a part of the NMRA regional convention. I saw 23 different home layouts, and 2 clubs, mostly HO, a couple of N , a couple of S and even a pair of F scale. That was fun, as I got the chance to re-connect with people from my past, and meet some new people too. It is possible that there will be more construction help that could come out of this, as well as a good chance of building an operating group.


Today, I moved some engines around and cleaned a little in preparation for Patrick tomorrow. We missed last week, and it seems like forever, so we'll try to get in two days this week. I'm anxious to see how his hand is doing.

Last edited by Big_Boy_4005

I finished the last ghost town store, a stone store with neighboring foundation and cellar full of junk...I hope I won't have figures in bedsheets screaming "Infidel" and swinging scimitars pursuing me, as this was a Thomas Yorke "Bildin's" kit, and I, shhhhh, dared to not only build it (is that sacriligeous?), but kitbash it, replacing the California Gold Rush iron doors and making a highly deteriorated structure whose owner has left for the next strike.  Dunno if I will start something else or wait for my material to float in for the creosote plant.

Add Reply

Post

OGR Publishing, Inc., 1310 Eastside Centre Ct, Suite 6, Mountain Home, AR 72653
800-980-OGRR (6477)
www.ogaugerr.com

×
×
×
×
Link copied to your clipboard.
×
×