briansilvermustang posted:
TASTYKAKE's are awesome, used to get them in Baltimore, Md. when I was little...

Fortescue likes 'em, too!

And yes, one can get Tastykakes in Arkansas. The place isn't TOTALLY benighted. ![]()
Mitch


|
|
briansilvermustang posted:
TASTYKAKE's are awesome, used to get them in Baltimore, Md. when I was little...
Fortescue likes 'em, too!
And yes, one can get Tastykakes in Arkansas. The place isn't TOTALLY benighted. ![]()
Mitch
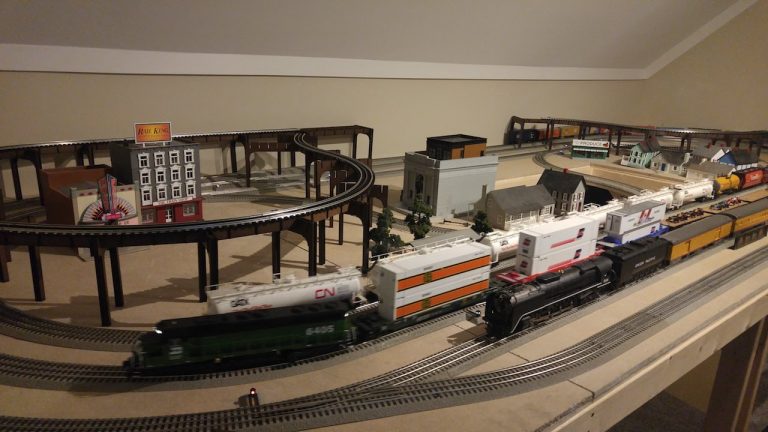
Tested out my new loop extension.
Inside track powered separately is a double reverse with a small engine yard.

Taking a little afternoon break. Tiresome cutting fence posts. At least I got an assembly line going. Cut posts, glue posts then paint the backsides after the glue dries. I think I can work into the evening. Pretty sure the wife has a game. But woe is me when I get the fence done and in place I then have to figure out where to put all the stuff I took off that table to work on it. LOL Pics..............Paul


randr posted:Finially got to run trains!
YAHOOOOOO!
Hey Paul, the fence is looking really nice! As far as where to put stuff, just build another table! LOL![]()
paul 2 posted:Taking a little afternoon break. Tiresome cutting fence posts. At least I got an assembly line going. Cut posts, glue posts then paint the backsides after the glue dries. I think I can work into the evening. Pretty sure the wife has a game. But woe is me when I get the fence done and in place I then have to figure out where to put all the stuff I took off that table to work on it. LOL Pics..............Paul
Look on the bright side Paul. They are only 1:48 scale. My arms would have fallen off if I had to bury that many posts.
Mark Boyce posted:Big_Boy_4005 posted:Thanks Mike, but one gallon will more than cover the rest. Remember, I'm still working on the first gallon, and I'm about 80% of the way done.
Thanks Mark, seems like just a couple weeks ago that I said that. In reality, it was 5 weeks ago. I believe I said that as part of a caption with this picture, and of course pictures have dates. This one is from January 31st.
Ah ha, that's it!! Thanks for looking that up! I wasn't crazy then!
Actually Mark, that wasn't it. That pic was from the January update. The comment was made prior to that, most likely here, but I couldn't find it. I know I said it, so you aren't crazy, but maybe I am.![]()
![]()
![]()
![]()
I carried another bag down yesterday, and it was another dark one. Now there are eight bags left in the garage, and I suspect three are bad. That would leave five good ones. I want to say my original estimate was very good, but having six bad bags, makes a serious dent.
Anyone need nearly black ballast or coal? As much as you care to spend on the postage. Take advantage of a flat rate box!![]()
![]()
I checked the website, and it looks like my guy is still there, after three plus years. I'll send him some pics, and see if he "needs more coffee".![]()
Meanwhile, back at the ranch, looks like all that painting I did on Tuesday is going to need serious touch up. There are a bunch of spots where it didn't quite cover. You can kind of see the lighter area by the points. It's much more obvious in person.

More of the same, its all over the place.![]()


Yesterday, I carved roadbed over at Western Avenue...

and East Minneapolis...

and at Midway.


I'll be happy when the carving is done. Getting closer.![]()

Finally, I did a very small amount of ballast gluing. Patrick and I will be making sawdust in this area tomorrow, so this will protect my "precious" ballast.

Found a loose spot on third track in, so I fixed it.

We'll be filling in the remaining holes at Western tomorrow, and maybe even get the carving done on the whole upper deck. I have two carpet knives. Divide and conquer!![]()
Good luck with the ballast hunt Elliot. At least the guy is still in business.
Elliott, looks great even though I know it's frustrating to have to go back over it.
I saw some pictures you posted in another thread about the modular tables and you mentioned EnterTRAINment. What's the history of EnterTRAINment? What was it exactly? How did you start it? Were you solo? How long did you do it? What was its demise?
Sounds like a conversation to have around a campfire/fireplace, so I'll pull up a seat and have a listen if you would kindly oblige my request ![]()
Paul, Yes the tedious work on some of our projects get to be a pain, but the results are well worth it! Looks good.
Elliot, I was thinking longer ago, but who knows. It doesn't matter. The problem seems to be some of what you have isn't fit for use now. Bummer. You and Patrick are really doing some tedious work too!
Elliot, hope your ballast situation works out. If not when I look at photos of ballast sometimes double track has two different colors of ballast. Just a thought. I was able to glue all the fence posts on. I'll let them setup. I have some wire I bought at Michael's that I used on the pawn shop but I had a lot left over. My thinking is seeing the fence post are hollow I would run the wire through them leaving a bit out at the bottom of the post. That way I would have an anchor to hold the fence in place. And the wife does not have a game till late so I may not make it back down tonight. Pics Paul


Great idea Paul!![]()
Disassembled almost entire layout....For about a year after my expansion plans took form, I could never get the affected part in correct alignment. It just didn't line up squarely on the table, and one side was always some what longer FOR NO REASON I COULD DETERMINE.......Today, during disassembly, I found out why...I had ordered 12 pieces of 0-48 curve Fastrack for a larger outer loop. Sorting it out today I found 11 pieces of 0-48 and 1 piece of 0-60 !!! NEVER NOTICED UNTIL NOW...
I'll get another 0-48 and rebuild !!!
(ever feel like a dummy ?)
Don’t feel bad Jeff! I have trouble telling one section of track from another too!
Jeff Horn posted:(ever feel like a dummy ?)
Try telling O27 O-42 from O-54 just by looking at it sometime! ![]()
Mitch
and what is AF prewar banked, 040??
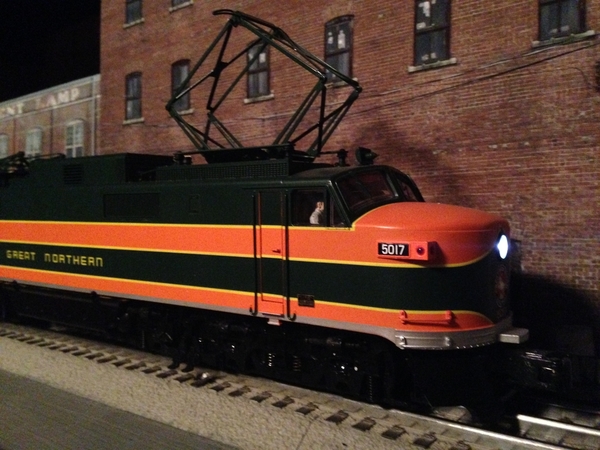
This evening on my layout I just had a great time with my 6 year old granddaughter, Karina. See her with remote in hand running the LC+ NJ Central Pacific and Postwar passenger cars around Yankee Stadium:
Like many of you know who have young children and grandchildren who get excited about our trains, it just doesn't get better than this.
Arnold

First phase of RDC to EMU conversion: Rooftop horns + overhead wires are a poor match, so...

My Phillies consist, masked off and ready for a nice coat of Razorback Red:

Meanwhile, on the Tastykake front, Fortescue was busy too:

"(burp)"
Guess the little guy was hungry! ![]()
Mitch
Arnold D. Cribari posted:This evening on my layout I just had a great time with my 6 year old granddaughter, Karina. See her with remote in hand running the LC+ NJ Central Pacific and Postwar passenger cars around Yankee Stadium:
Like many of you know who have young children and grandchildren who get excited about our trains, it just doesn't get better than this.
Arnold
That’s great Arnold!!! Our girls were never interested in trains. Maybe we will have a grandchild who is someday. Mrs. B. keeps buying train stuff for him or her. LOL
M. Mitchell Marmel posted:First phase of RDC to EMU conversion: Rooftop horns + overhead wires are a poor match, so...
Nice to see you are branching out from gi-raffs and pink flamingos to emu's...
My Phillies consist, masked off and ready for a nice coat of Razorback Red:
As a legally qualified long suffering Met's fan, I can't think of a better fate for anything Phillies (or Braves for that matter).
Meanwhile, on the Tastykake front, Fortescue was busy too:
"(burp)"
Guess the little guy was hungry!

So, if you are found deceased under mysterious circumstances, Fortesque would be a Gi-raff of interest - I am sure he will try the Arkansas version of the Twinkie Defense!!!
Mitch
Sincerely;
Your friendly neighborhood Techno-peasant Paul

guard flamingos are watching developments closely, ready to scramble at
a moments notice
after eating all those tasty cakes, the gi raff will be an easy target
Apples55 posted:Nice to see you are branching out from gi-raffs and pink flamingos to emu's...
My Phillies consist, masked off and ready for a nice coat of Razorback Red:
As a legally qualified long suffering Met's fan, I can't think of a better fate for anything Phillies (or Braves for that matter).
![]()
So, if you are found deceased under mysterious circumstances, Fortesque would be a Gi-raff of interest - I am sure he will try the Arkansas version of the Twinkie Defense!!!
I imagine so...
After a few days away, mentally challenged neighbor problems, cadillac into the shop for
engine and tranny replacement, lets talk trains. I purchased this set of uncataloged passenger
cars last year. It originally came with a black 1688 and black 1689w according to what I could find.
I found a gunmetal 1668 cheap and a gunmetal 1689 cheap. Then it sat for months.
My goal lately has been to get old purchases up and running, so I found a 1688 to scavenge
the front and rear trucks, and the marker lights from. The 1688 was fine, I just preferred the
1668. The last challenge was to replace the latch coupler on the tender to match the hook on the cars.
Finally Jeff Kane at Train tender found the right one. Thanks, Jeff
![VID_20180309_202848[1]](https://ogrforum.ogaugerr.com/fileSendAction/fcType/0/fcOid/12129987997660671/primaryPicture/true/filePointer/78438393733615302/fodoid/78438393733628127/imageType/SQUARE_THUMBNAIL/inlineImage/true/frame/FIRST/thumbnail.jpg "VID_20180309_202848[1]")
RSJB18 posted:Blue with pink poka-dots?????
Whew.... I thought for a second it was a "gold dress" when read from my email. Do you have any idea how frustrating those illusions are to an Aspie's logic? I'd be tempted to sip on Lectric Shave if convinced I'd see blue dots instead of pink ![]()
Posted by big boy 4005:
Anyone need nearly black ballast or coal? As much as you care to spend on the postage. Take advantage of a flat rate box!![]()
![]()
This idea becomes priceless if you can figure out how to mount a Go-Pro to catch the look on ol Mr Zip's face.
Those TK's must melt in the cold or something, I've never seen one.
Hostess ruled this town... before they tasted like plastic ![]()
Arnold D. Cribari posted:This evening on my layout I just had a great time with my 6 year old granddaughter, Karina. See her with remote in hand running the LC+ NJ Central Pacific and Postwar passenger cars around Yankee Stadium:
Like many of you know who have young children and grandchildren who get excited about our trains, it just doesn't get better than this.
Arnold
Delightful, Arnold. A land crafted to communicate! Very enjoyable, indeed!
FrankM
Ran trains last night while a snapped a few photos. Enjoyed the time and had great fun!!![]()


Got all my fencing and gates painted. As an after thought while I was looking at the front of the fences I decided to pen in lines to show sections. I did it at every post. So when it all dries I can start putting it all together. I still have to make some small pieces of pipe to hold the gates in place on the fences. Pics..............Paul


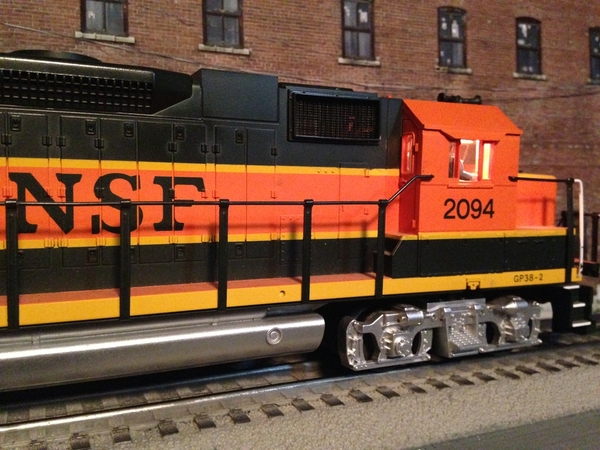
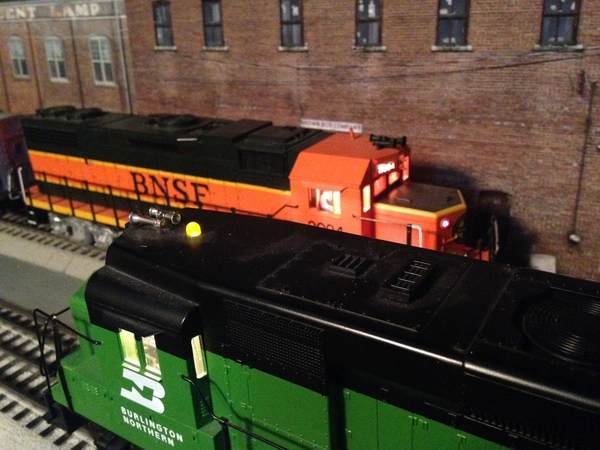
briansilvermustang posted:
Now there is a man after my own heart! I just love BN and BNSF Stuff!![]()
paul 2 posted:Got all my fencing and gates painted. As an after thought while I was looking at the front of the fences I decided to pen in lines to show sections. I did it at every post. So when it all dries I can start putting it all together. I still have to make some small pieces of pipe to hold the gates in place on the fences. Pics..............Paul
You sure have nice work going there Paul! All I get to do is put more bird blocks in! LOL![]()
Mike, just think when it is all framed in layout building starts and then running trains. Rome wasn't built in a day but you are making good progress.................Paul
Ever have a day you should have stayed away from working on the layout? Today is my day. Deconstructed a finished rock wall because there was not enough clearance for the cylinder head overhang on an engine to make the curve to go onto the branch line. Now this was not a simple process since there is a 1/2" plywood backing to the rock wall and screwed and glued to the benchwork. So cut to rock casting rip out the plaster/cardboard strips, expose the plywood now cut the plywood ro shift it back 1 1/2 ", crawl under the benchwork and remove the supporting 2x2s . These bones are not too keen on crawling under the layout. Finally cleaned up the debris from cutting back the upper shelf the rock wall was attached to and now time for the replacement rock castings. Paint the mold, let it dry, finish pouring the resin and foam when I remember that I had not lined the mold with petroleum jelly releasing agent. Spent the next hour breaking out the resin/foam mess that was supposed to be the rock casting. Well, I raised the white flag and retreated upstairs . I decided I needed to log onto the forum and take encouragement from other forum members successes. Thank you guys, Mike
I sort of had one of those days, Mike. I made some retaining wall-tunnel-portal pieces for the ends of my small layout. I thought I made the tunnel portals wide enough. I should have thought again. Measure twice, cut once.
Other than that I had a good day installing several operating accessories.


 I have a temporary layout so I can change it when I get bored. Today I set up and ran transit, my absolutely favorite way to enjoy running trains. 7 Express to World’s Fair, MTA Metro North to Grand Central, and a fantasy LIRR train. It’s not the same as working on a real layout, but it’s my version.

paul 2 posted:Mike, just think when it is all framed in layout building starts and then running trains. Rome wasn't built in a day but you are making good progress.................Paul
Thanks Paul! Right now I get my enjoyment watching all you other guys building great layouts!![]()
Protip of the Day: If the paint says it's paint and primer all in one...

Primer the **** thing anyway. Which I'll have to do once this misbegotten paint dries.
Mitch
Mitch, But it will look even better when your done!![]()
It's been a month since the basement flooded and the Cuyahoga Valley is totally up and running again.....almost!
Looks great Steamwolf!
Mark Boyce posted:Looks great Steamwolf!
O27 on 4x8 - lots of action!
Have a lionel 675 that I got as part of a package with some AMT passenger cars. It ran well
but I was missing a few valve gear parts. While I was getting the list together to see if
I wanted to put it all back together, I just turned on the transformer and watched the
train I had on, a 1668 with some prewar streamline passenger cars go round and
round my little layout. (I guess this is why I like NASCAR, round and round. Us old guys
are easy to please.) Anyway, it just amazes me how many 80+ year old trains I buy
that with only a bit of cleaning and lube run like they were new.


Adriatic posted:Those TK's must melt in the cold or something, I've never seen one.
Hostess ruled this town... before they tasted like plastic

For those in the northeast- Entenmanns!

SteamWolf posted:Mark Boyce posted:Looks great Steamwolf!
O27 on 4x8 - lots of action!
Amen Brother! ![]()


M. Mitchell Marmel posted:Protip of the Day: If the paint says it's paint and primer all in one...
Primer the **** thing anyway. Which I'll have to do once this misbegotten paint dries.
Mitch

LOL- how does the primer know to stick to the surface first??????

Finished scenicing a corner. Well, maybe not finished, finished. I'm thinking of extending the fence along the back of the billboard and then around the end next to the tree to enclose that space. What do you think of that idea? By the way, the tree to the right of the billboard is one I got for free from Menard's.


RSJB18 posted:SteamWolf posted:Mark Boyce posted:Looks great Steamwolf!
O27 on 4x8 - lots of action!
Amen Brother!
LOL Bob, you need to blow out a wall and make that bigger! ![]()
![]()
RSJB18 posted:M. Mitchell Marmel posted:Protip of the Day: If the paint says it's paint and primer all in one...
Primer the **** thing anyway. Which I'll have to do once this misbegotten paint dries.
Mitch
LOL- how does the primer know to stick to the surface first??????
LOL Now that should be the question of the day!![]()
![]()
Great start STEAMWOLF. GANDYDANCER 50, good to see you are back up and running. DANIEL B, nice weathering on the box car. MIKE G and Mark, you two are coming along just fine...........Paul


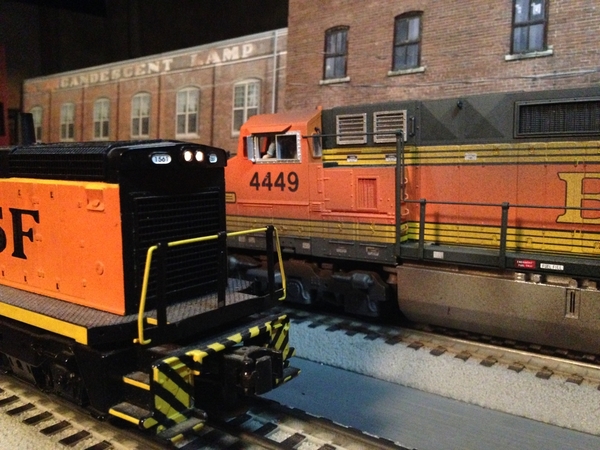
briansilvermustang posted:
Brian, you have really improved the quality of your photos lately. Great work! ![]()
thanks Ted... a friend at work gave me a newer camera... ![]()
Brian, better camera, better pictures.... Papa John LOL. I should not throw stones my camera is outdated and does not take good closeups but until it breaks I'll keep using it. Today so far I managed to glue wire in all the fence post and make up pieces to mount the gates on the poles. Being careful when gluing I can manually swing the gates open or closed. Once all the glue sets up on everything I can then start to put the fence in. And another after thought after the fence is up I have some scrap 1X4's and I think I'll make up some bins to keep the piles of scrap separate. Pics ......Paul


mike g. posted:RSJB18 posted:SteamWolf posted:Mark Boyce posted:Looks great Steamwolf!
O27 on 4x8 - lots of action!
Amen Brother!
LOL Bob, you need to blow out a wall and make that bigger!
UM Mike- I know you guys on the west coast don't have to worry about frost lines and stuff like that but.........us east coast guys have our trains in the basement. Would need to do about a 8' excavation to move those walls. ![]()
I do hope one day to expand but it would be to the right and toward the camera.
ToledoEd posted:Finished scenicing a corner. Well, maybe not finished, finished. I'm thinking of extending the fence along the back of the billboard and then around the end next to the tree to enclose that space. What do you think of that idea? By the way, the tree to the right of the billboard is one I got for free from Menard's.
The figure looks real. Is this a test?![]() Did you Photoshop
Did you Photoshop![]() him in there?
him in there?
FrankM![]()
Toledo Ed, I would run the fence past the sign...,......Paul
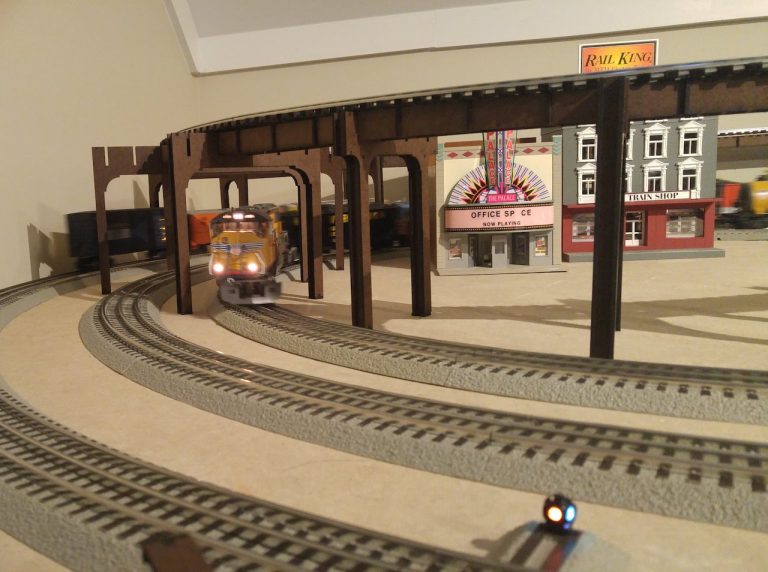
pdxtrains posted:
Created a fantasy performing Dino exhibit in the square of my Fantasy New York Worlds Fair. It incorporates a genuine 64 souvenir and some inexpensive little folk.
Cool souvenir from the '64 Fair.
Try this scene next


RSJB18 posted:pdxtrains posted:
Cool souvenir from the '64 Fair.
Try this scene next
Yes, looking for a cool unisphere souvenir to add. There's an orange one that goes with the decor that I have my eye on.
Toledo Ed, I agree to run the fence farther.
Paul, the fence is looking real good.
Bob, Yes, it figures your basement is underground. Fortunately our house is on a slope and the back lower level is walkout to a patio. My in-law's decided to build out the back so what is now my train room is on a slab. That is not that common in Western Pennsylvania, but there would be no train room without it. ![]()
Spent the day working on setting up my Dad's layout at my parent's house. Track is all laid out. Started the process of wiring for DCS. Cut breaks in the fasttrack to create track blocks per Barry's book. Next up is soldering the wires to the track and connecting to the terminal blocks. First time fully wiring a layout so it' a slow and tedious process for me. But I feel like I made good progress today.
Finished fabricating and painting railings and grab irons that were missing on this Atlas SW8 over the. Hopefully I can be genteel enough in the future so that the ridged brass construction does get bent or broken. Along with the radiator winter front I plan to make an exhaust deflector and side window sun shades. Another missing detail is the horn, that I have on hand, if only I knew in which hand it was hiding. Can't wait to get this puppy running under ERR control.
Bruce
The Great NWA Train Show is next Saturday, so I'm busy tuning up FastTrack, getting trolleys in order, grooming gi-raffes and so forth...
http://sugarcreekrailroadclub.com/
Mitch
brwebster posted:Finished fabricating and painting railings and grab irons that were missing on this Atlas SW8 over the. Hopefully I can be genteel enough in the future so that the ridged brass construction does get bent or broken. Along with the radiator winter front I plan to make an exhaust deflector and side window sun shades. Another missing detail is the horn, that I have on hand, if only I knew in which hand it was hiding. Can't wait to get this puppy running under ERR control.
Bruce
Very cool. I don't recall seeing any radiator covers modeled before, it took a sec. to figure out what the 'glair' was. Great work as usual.
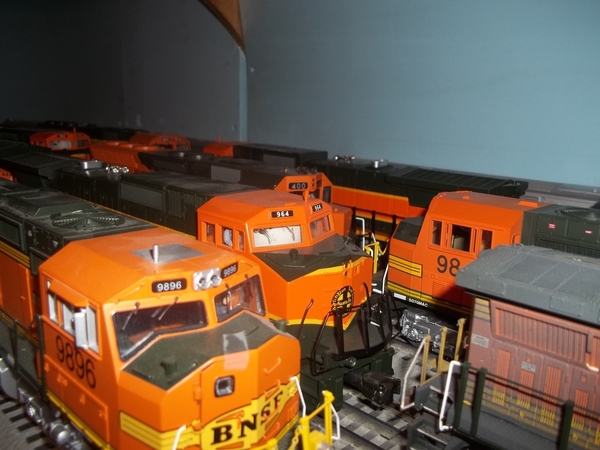
briansilvermustang posted:
![]()
![]() Thanks Brian! You rock!
Thanks Brian! You rock!
Continued on the high line side panels. Not quite sure what to call them, not girders, skirts sounds, well you know.... not very railroad like so.....
Therefore it is decreed that from hence forth they shall be known as......


Yea I know I've gone over the edge, off the rails....... ![]()
![]()
![]()


brwebster posted:Finished fabricating and painting railings and grab irons that were missing on this Atlas SW8 over the. Hopefully I can be genteel enough in the future so that the ridged brass construction does get bent or broken. Along with the radiator winter front I plan to make an exhaust deflector and side window sun shades. Another missing detail is the horn, that I have on hand, if only I knew in which hand it was hiding. Can't wait to get this puppy running under ERR control.
Bruce
that looks like a switcher that belongs on SWSAT!
Very nice work.
M. Mitchell Marmel posted:The Great NWA Train Show is next Saturday, so I'm busy tuning up FastTrack, getting trolleys in order, grooming gi-raffes and so forth...
http://sugarcreekrailroadclub.com/
Mitch
Well, Mitch, in case you get a great deal on some subway equipment...

P.S. Depending on how old this photo is, they may have been doing some scrounging at Madison Hardware which was on 23rd Street, just off the exit on the uptown side!!!


RSJB18 posted:mike g. posted:RSJB18 posted:SteamWolf posted:Mark Boyce posted:Looks great Steamwolf!
O27 on 4x8 - lots of action!
Amen Brother!
LOL Bob, you need to blow out a wall and make that bigger!
UM Mike- I know you guys on the west coast don't have to worry about frost lines and stuff like that but.........us east coast guys have our trains in the basement. Would need to do about a 8' excavation to move those walls.
I do hope one day to expand but it would be to the right and toward the camera.
Well when the time comes I know you will have it all handled! I do like the way it is now also!![]()
RSJB18 posted:Continued on the high line side panels. Not quite sure what to call them, not girders, skirts sounds, well you know.... not very railroad like so.....
Therefore it is decreed that from hence forth they shall be known as......
Yea I know I've gone over the edge, off the rails.......
Well, Bob... considering their height, you should probably get some lumberjacks to help install them, OK???
P.S. Do you have a silly walk??? ![]()
![]()
![]()
RSJB18 posted:Continued on the high line side panels. Not quite sure what to call them, not girders, skirts sounds, well you know.... not very railroad like so.....
Therefore it is decreed that from hence forth they shall be known as......
Yea I know I've gone over the edge, off the rails.......
Well Bob, I would have to say your spam side rails are looking just great! I also want you to know I think you are one smart fella! Takes a lot of smarts to realize you have gone off the deep end! LOL![]()
paul 2 posted:Brian, better camera, better pictures.... Papa John LOL. I should not throw stones my camera is outdated and does not take good closeups but until it breaks I'll keep using it. Today so far I managed to glue wire in all the fence post and make up pieces to mount the gates on the poles. Being careful when gluing I can manually swing the gates open or closed. Once all the glue sets up on everything I can then start to put the fence in. And another after thought after the fence is up I have some scrap 1X4's and I think I'll make up some bins to keep the piles of scrap separate. Pics ......Paul
Looks great Paul! But don't forget the no trespassing signs! and guard dogs on duty! Cant wait to see them in place!![]()
brwebster posted:Finished fabricating and painting railings and grab irons that were missing on this Atlas SW8 over the. Hopefully I can be genteel enough in the future so that the ridged brass construction does get bent or broken. Along with the radiator winter front I plan to make an exhaust deflector and side window sun shades. Another missing detail is the horn, that I have on hand, if only I knew in which hand it was hiding. Can't wait to get this puppy running under ERR control.
Bruce
Great work!
mike g. posted:paul 2 posted:Brian, better camera, better pictures.... Papa John LOL. I should not throw stones my camera is outdated and does not take good closeups but until it breaks I'll keep using it. Today so far I managed to glue wire in all the fence post and make up pieces to mount the gates on the poles. Being careful when gluing I can manually swing the gates open or closed. Once all the glue sets up on everything I can then start to put the fence in. And another after thought after the fence is up I have some scrap 1X4's and I think I'll make up some bins to keep the piles of scrap separate. Pics ......Paul
Looks great Paul! But don't forget the no trespassing signs! and guard dogs on duty! Cant wait to see them in place!
Mike, You think of everything!! ![]()
Moonson posted:ToledoEd posted:Finished scenicing a corner. Well, maybe not finished, finished. I'm thinking of extending the fence along the back of the billboard and then around the end next to the tree to enclose that space. What do you think of that idea? By the way, the tree to the right of the billboard is one I got for free from Menard's.
The figure looks real. Is this a test?
Did you Photoshop
him in there?
FrankM
He is real. I pulled the ladder away so stays there and keeps that billboard STRAC!
Mark Boyce posted:mike g. posted:paul 2 posted:Brian, better camera, better pictures.... Papa John LOL. I should not throw stones my camera is outdated and does not take good closeups but until it breaks I'll keep using it. Today so far I managed to glue wire in all the fence post and make up pieces to mount the gates on the poles. Being careful when gluing I can manually swing the gates open or closed. Once all the glue sets up on everything I can then start to put the fence in. And another after thought after the fence is up I have some scrap 1X4's and I think I'll make up some bins to keep the piles of scrap separate. Pics ......Paul
Looks great Paul! But don't forget the no trespassing signs! and guard dogs on duty! Cant wait to see them in place!
Mike, You think of everything!!
Just throwing ideas out there !
RSJB18 posted:SteamWolf posted:Mark Boyce posted:Looks great Steamwolf!
O27 on 4x8 - lots of action!
Amen Brother!
Heh... maybe not that much action.
Got the fence up on one end of the scrap yard. Three more sides to go. Pics..............Paul


mike g. posted:RSJB18 posted:Continued on the high line side panels. Not quite sure what to call them, not girders, skirts sounds, well you know.... not very railroad like so.....
Therefore it is decreed that from hence forth they shall be known as......
Yea I know I've gone over the edge, off the rails.......
Well Bob, I would have to say your spam side rails are looking just great! I also want you to know I think you are one smart fella! Takes a lot of smarts to realize you have gone off the deep end! LOL
They must be egg and bacon or egg sausage and bacon sides because... ![]() .
.![]() I really honestly don't like Spam
I really honestly don't like Spam ![]()
![]() (or ham!
(or ham! ![]() )
)
SteamWolf posted:RSJB18 posted:SteamWolf posted:Mark Boyce posted:Looks great Steamwolf!
O27 on 4x8 - lots of action!
Amen Brother!
Heh... maybe not that much action.
Yea, that's what you say now. And the "never done" rule is going to make you pay now; Murphy wrote it ![]()
This was done
")
umm almost ready...

not quite yet.....

maybe next year ![]()

but likely not ![]()
")
I managed to get a tank car and a EV caboose on ebay for £15 each. ![]()
Also converted a K-Line flat car to 2-rail ![]()


After 5 hours of running on Saturday, some equipment went to the shops on Sunday for COT&S.
paul 2 posted:Got the fence up on one end of the scrap yard. Three more sides to go. Pics..............Paul
Turned out nice Paul! Gives the end of the table a finished look! NICE!![]()


Yesterday I ran trains for quite some time while weathering a Weaver Great Northern boxcar. Fun times!! 
Again lots of great stuff going on. I did do the 1.5 hour round trip to get me two more switches Sunday. Had to go grocery shopping and stuff also. So when I got home I got right to the trains! Picked up another Fastrack to 027 adapter for my ash pit project. Well I got the siding taken apart only to find one of my new switches was broken. BOOOO then called the hobby shop and they had closed at 5:00.. Wife was SUPPOSED to take it back and exchange it today but she forgot it lol Oh well. But hey, the basic plan on the ash pit worked out! I made it 3 inches long roughly.. Actually worked out pretty good! Need to do some file work on the ends of the tubular track..
Jim
carsntrains posted:Again lots of great stuff going on. I did do the 1.5 hour round trip to get me two more switches Sunday. Had to go grocery shopping and stuff also. So when I got home I got right to the trains! Picked up another Fastrack to 027 adapter for my ash pit project. Well I got the siding taken apart only to find one of my new switches was broken. BOOOO then called the hobby shop and they had closed at 5:00.. Wife was SUPPOSED to take it back and exchange it today but she forgot it lol Oh well. But hey, the basic plan on the ash pit worked out! I made it 3 inches long roughly.. Actually worked out pretty good! Need to do some file work on the ends of the tubular track..
Jim
Will need to see pictures when you're done so I can swipe your idea and add it to my own track!
Taking time for lunch. Takes a bit of time to get the fence up but the whole back side is done now. The hardest thing is lining up the fence to drill the holes in the table. I did change the way I put the fence in the table. Started off drilling a hole the diameter of the wire but found out I need a little better support for the fence. So I drilled a bigger hole and cut sections of what I use for the fence posts and stuck them in the hole and the wire went into them. Pics ......Paul


It took me a moment to figure out what was going on with that trackwork in the scrap yard, then it dawned on me - travelling crane? ![]()


Jim, there is always another day!![]()
Dan, the plan looks good, mobile crane sound good also!![]()
Paul, Man your fence is just looking great! Dad is going to be proud of you!![]()
Brian, all I can say is keep the pictures coming!![]()
As for me Back to bird blocks! LOL![]()
danielb posted:Had a pop at a track plan for a "fantasy" expansion of my current layout. Should make for some interesting modelling, if I ever get to build it!
Very nice plan Daniel. I saw your post on your build thread. Hope the negotiations go well. ![]()
I have a plan for a small switching layout that is also a "hope to build it one day" project.

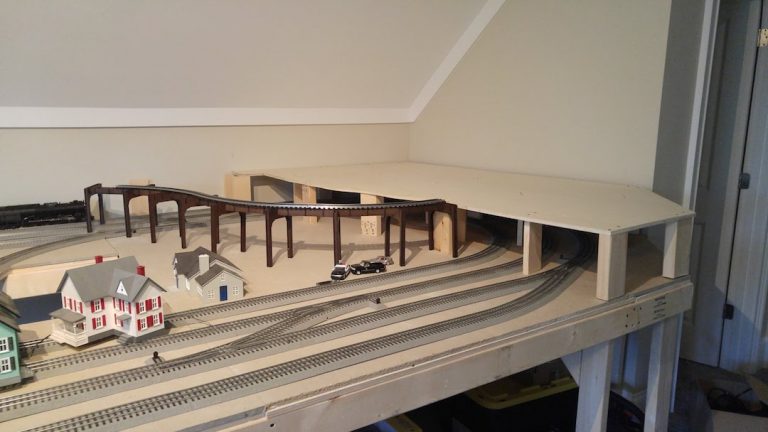
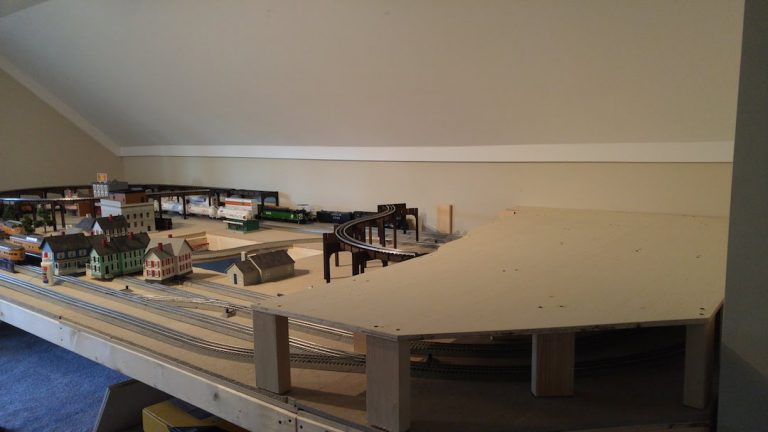
We’ve begun building the “EL” line using laser cut bridges from Bridgeboss. I’ve worked with @Bridgeboss Jim to spec out the bridges and supports for our elevated line. It’s definitely both an art and a science to ensure that the bridge supports clear the underlying track plan and overhand from long rolling stock and locomotives navigating curves. The plan is to use Jim’s bridges, along with a 40″ Atlas O truss bridge for the majority of the line, while building a mountain and tunnel platform on the North side of the layout.
All curves on the EL line are O-54, using Gargraves track and Ross switches.
For the most part, Jim’s plan has cleared the underlying track well, but for the few columns that don’t, Jim offers a “support exchange” where I can ship him back some of my column supports for different sizes. Currently, we're looking to only need to swap out two or three of the supports and I may need to order one straight section to support the Ross turnout that will “live” on the North side of the layout.
My hope is to get the plywood elevated section that will eventually become the mountain/tunnel complete this weekend before I revert back to Jim regarding which columns I need to swap out or add.
Here are a couple photos of the progress so far:
mike g. posted:Mark Boyce posted:mike g. posted:paul 2 posted:Brian, better camera, better pictures.... Papa John LOL. I should not throw stones my camera is outdated and does not take good closeups but until it breaks I'll keep using it. Today so far I managed to glue wire in all the fence post and make up pieces to mount the gates on the poles. Being careful when gluing I can manually swing the gates open or closed. Once all the glue sets up on everything I can then start to put the fence in. And another after thought after the fence is up I have some scrap 1X4's and I think I'll make up some bins to keep the piles of scrap separate. Pics ......Paul
Looks great Paul! But don't forget the no trespassing signs! and guard dogs on duty! Cant wait to see them in place!
Mike, You think of everything!!
Just throwing ideas out there !
You throw out more ideas than I ever have! :-)
#12.... recycling? You will have bottles(#14) to contend with too; be it glass or plastic ![]() I'm more of a rabbit warren guy; but that is a nice plan.
I'm more of a rabbit warren guy; but that is a nice plan.
danielb posted:Had a pop at a track plan for a "fantasy" expansion of my current layout. Should make for some interesting modelling, if I ever get to build it!
have
danielb posted:It took me a moment to figure out what was going on with that trackwork in the scrap yard, then it dawned on me - travelling crane?
"Gantry" crane ...States at least ![]()
BANDOB posted:After 5 hours of running on Saturday, some equipment went to the shops on Sunday for COT&S.
What exactly does COT&S mean? I struck out on a search in the acronym tread and online both. Here in Detroit it's a Coalition of Temporary Shelter... search engines think I want Army cots for napping ![]()
Was going at a good pace till I accidentally hit the track gate and the sections came apart. So I had to re glue it. After I did that I decided to take the wire I was using in the fence posts and add it to the bottom of the gate on both sides to give it added strength so hopefully it won't break as easily. I also had to redo a couple of the posts because they were on the wrong part of the fence. And I glued the truck gate to the fence. Figure after dinner everything should be dry and I can finish off the fencing. Pics......Paul


I am finalizing my order for Ross Custom Switches, and track. Also ordered a signal bridge.
Adriatic posted:#12.... recycling? You will have bottles(#14) to contend with too; be it glass or plastic
I'm more of a rabbit warren guy; but that is a nice plan.
danielb posted:Had a pop at a track plan for a "fantasy" expansion of my current layout. Should make for some interesting modelling, if I ever get to build it!
have
For #12 - we were looking into the possibility of an electro-magnetic crane that could actually load and unload metal scrap - just for the extra "why the heck not?" factor ![]()
#14 will have a hopper chute coming out of the front to allow cullet to be loaded into gondolas, so I've got the glass recycling down pat already - I'm using #11 Miyuki Seed Beads used in jewelry making to represent broken glass. Add in some bottle shapes from like... dolls house accessories or something, and I think it'll look the part!
As for the rabbit warren comment, you'd have loved my old HO scale layout... https://flic.kr/s/aHskRt1PTD ![]()
The O scale plan will be a LOT more urbanised than it actually looks. See the aforementioned HO scale layout to give you an idea of what I've got planned. ![]()
Very nice Dan. You've been holding out on us I see ![]()
The VW Kombi and gold SS look like they came from my old backyard.
I wondered what had happened to the SS ![]() (correct year too
(correct year too ![]()
![]()
An operating crane is tons of fun. I'd say the best accessory there is. ![]()
More progress for the day. No rest for the wicked, right? ![]()
I took this building on the left of the photo...

And have added an interior. The floor isn't fixed in place, so I can add details, figures, etc, as well as lighting. ![]()

I've also weathered a boxcar a little more, and replaced a broken coupler on a PS2 hopper. ![]()
Bob, You can do it! Just a couple more switches! LOL![]()
Matt, the EL looks great! Please keep the pictures coming!![]()
Paul, what can I say, The fence and gate looks just wonderful! A work of art!![]()
Dan, I am with ADRIATIC you have been holding out! Things are looking nice!![]()
Gilly, looks like a nice and fun layout to build and run trains! Lots to keep the mind thinking! Nice!![]()
Mark Boyce posted:mike g. posted:Mark Boyce posted:mike g. posted:paul 2 posted:Brian, better camera, better pictures.... Papa John LOL. I should not throw stones my camera is outdated and does not take good closeups but until it breaks I'll keep using it. Today so far I managed to glue wire in all the fence post and make up pieces to mount the gates on the poles. Being careful when gluing I can manually swing the gates open or closed. Once all the glue sets up on everything I can then start to put the fence in. And another after thought after the fence is up I have some scrap 1X4's and I think I'll make up some bins to keep the piles of scrap separate. Pics ......Paul
Looks great Paul! But don't forget the no trespassing signs! and guard dogs on duty! Cant wait to see them in place!
Mike, You think of everything!!
Just throwing ideas out there !
You throw out more ideas than I ever have! :-)
That's because I have no layout to work on right now! LOL
mike g. posted:Mark Boyce posted:mike g. posted:Mark Boyce posted:mike g. posted:paul 2 posted:Brian, better camera, better pictures.... Papa John LOL. I should not throw stones my camera is outdated and does not take good closeups but until it breaks I'll keep using it. Today so far I managed to glue wire in all the fence post and make up pieces to mount the gates on the poles. Being careful when gluing I can manually swing the gates open or closed. Once all the glue sets up on everything I can then start to put the fence in. And another after thought after the fence is up I have some scrap 1X4's and I think I'll make up some bins to keep the piles of scrap separate. Pics ......Paul
Looks great Paul! But don't forget the no trespassing signs! and guard dogs on duty! Cant wait to see them in place!
Mike, You think of everything!!
Just throwing ideas out there !
You throw out more ideas than I ever have! :-)
That's because I have no layout to work on right now! LOL
:-) Quite right, Mike!
YAY we went to the hobby shop.. Booo they had no more switches. Well except in a "kit" that had two switches, 5 10 inch straight tracks. and two 036 curves. SOOO I bought it lol Got the yard all put together and ran one of my older engines. Now I have 6 trains on a layout with enough room for 2 lol
Finally my 4 track fiddle yard next to the 2 mains!!! Connects to the inner main at both ends of the yard. Finding a place to park the old Wabash now has led to a longer pass through siding than needed! That's always good!

Here is a picture of my super easy ash pit! Just two Fastrack to 027 adapters and 3 inches of 027 track.

Duece its so simple its silly isn't it??
Jim


Paul, The fence looks good! That will keep the hoodlums out!! ![]()
Jim, The yard shaped up very nice! That is a quick and dirty ash pit; or it will be dirty once you drop the ashes!! ![]()
I turned my table blue... bought a little cast iron pre war AF off a member here and fixed an 1121 turnout control switch. I think on this week off i'm going to travel to the big city to Lowes to get some of that velcro-green grass mat stuff I saw elsewhere on here.

carsntrains posted:YAY we went to the hobby shop.. Booo they had no more switches. Well except in a "kit" that had two switches, 5 10 inch straight tracks. and two 036 curves. SOOO I bought it lol Got the yard all put together and ran one of my older engines. Now I have 6 trains on a layout with enough room for 2 lol
Finally my 4 track fiddle yard next to the 2 mains!!! Connects to the inner main at both ends of the yard. Finding a place to park the old Wabash now has led to a longer pass through siding than needed! That's always good!
Here is a picture of my super easy ash pit! Just two Fastrack to 027 adapters and 3 inches of 027 track.

Duece its so simple its silly isn't it??
Jim
Jim, your yard looks wonderful! I may have asked this aready, but how big is your layout?![]()
mike g. posted:Mark Boyce posted:mike g. posted:Mark Boyce posted:mike g. posted:paul 2 posted:Brian, better camera, better pictures.... Papa John LOL. I should not throw stones my camera is outdated and does not take good closeups but until it breaks I'll keep using it. Today so far I managed to glue wire in all the fence post and make up pieces to mount the gates on the poles. Being careful when gluing I can manually swing the gates open or closed. Once all the glue sets up on everything I can then start to put the fence in. And another after thought after the fence is up I have some scrap 1X4's and I think I'll make up some bins to keep the piles of scrap separate. Pics ......Paul
Looks great Paul! But don't forget the no trespassing signs! and guard dogs on duty! Cant wait to see them in place!
Mike, You think of everything!!
Just throwing ideas out there !
You throw out more ideas than I ever have! :-)
That's because I have no layout to work on right now! LOL
Paul- found the perfect dog for the scrap yard.

![]()
All I was able to do last night was get the fence with the track gate in place. Today I don't think I will have much time to work on the rest of the fence. Got to head out to grocery shop then the Tuesday lunch with a bunch of TCA'ers and this evening it a get together with the Tuesday night crew. I might try to squeeze in some time in the afternoon otherwise Wednesday will be a work day. The shed will be back in the yard when the fence is done and the Morrison door factory will be off the mainline before any trains come through LOL. Pic..........Paul

Looks great Paul.
RSJB18 posted:mike g. posted:Mark Boyce posted:mike g. posted:Mark Boyce posted:mike g. posted:paul 2 posted:Brian, better camera, better pictures.... Papa John LOL. I should not throw stones my camera is outdated and does not take good closeups but until it breaks I'll keep using it. Today so far I managed to glue wire in all the fence post and make up pieces to mount the gates on the poles. Being careful when gluing I can manually swing the gates open or closed. Once all the glue sets up on everything I can then start to put the fence in. And another after thought after the fence is up I have some scrap 1X4's and I think I'll make up some bins to keep the piles of scrap separate. Pics ......Paul
Looks great Paul! But don't forget the no trespassing signs! and guard dogs on duty! Cant wait to see them in place!
Mike, You think of everything!!
Just throwing ideas out there !
You throw out more ideas than I ever have! :-)
That's because I have no layout to work on right now! LOL
Paul- found the perfect dog for the scrap yard.
Hey now there Bob! He is a great watch dog, but can only run short distances then has to stop and rest! Heck he was tired after the last inspection! LOL![]()
carsntrains posted:YAY we went to the hobby shop.. Booo they had no more switches. Well except in a "kit" that had two switches, 5 10 inch straight tracks. and two 036 curves. SOOO I bought it lol Got the yard all put together and ran one of my older engines. Now I have 6 trains on a layout with enough room for 2 lol
Finally my 4 track fiddle yard next to the 2 mains!!! Connects to the inner main at both ends of the yard. Finding a place to park the old Wabash now has led to a longer pass through siding than needed! That's always good!
Here is a picture of my super easy ash pit! Just two Fastrack to 027 adapters and 3 inches of 027 track.
Duece its so simple its silly isn't it??
Jim
Jim, yep. Looks good! I've decided to separate the diesel (removing completely) and steam services on the long siding of my layout, so with a new sand tower coming, I'll add an ash pit relatively soon. Just need to decide if I want to hassle with making my own FT to O27 connections (can I sacrifice only one 10" FT section to make two connectors) or buy a pair?
paul 2 posted:All I was able to do last night was get the fence with the track gate in place. Today I don't think I will have much time to work on the rest of the fence. Got to head out to grocery shop then the Tuesday lunch with a bunch of TCA'ers and this evening it a get together with the Tuesday night crew. I might try to squeeze in some time in the afternoon otherwise Wednesday will be a work day. The shed will be back in the yard when the fence is done and the Morrison door factory will be off the mainline before any trains come through LOL. Pic..........Paul
Nice work there Paul! I hope you have fun today and your highly trained SWAT Team is ready for tonight! LOL![]()
Cleveland visit:
Took daughter for a visit to where I grew up. She was born in Cincinnati.
They have a light rail system (RTA) that runs from the airport to down town and continues to the east side.
it runs along the main corridor for heavy train traffic from New York to Chicago.


Down town flats have a lot of really nice bridges.


Down town terminal square.
Where passenger trains once arrived.


Couldn't leave out where Ralphie saw his red rider BB gun in the store window
and the Lionel train display! Sadly, it's now a casino.
No, that's not Jodi Foster, that's my daughter!

LOL Mike- I get the feeling he's like the bull dogs in the GEICO Insurance adds. He will lick you to death.
Deuce posted:carsntrains posted:YAY we went to the hobby shop.. Booo they had no more switches. Well except in a "kit" that had two switches, 5 10 inch straight tracks. and two 036 curves. SOOO I bought it lol Got the yard all put together and ran one of my older engines. Now I have 6 trains on a layout with enough room for 2 lol
Finally my 4 track fiddle yard next to the 2 mains!!! Connects to the inner main at both ends of the yard. Finding a place to park the old Wabash now has led to a longer pass through siding than needed! That's always good!
Here is a picture of my super easy ash pit! Just two Fastrack to 027 adapters and 3 inches of 027 track.
Duece its so simple its silly isn't it??
Jim
Jim, yep. Looks good! I've decided to separate the diesel (removing completely) and steam services on the long siding of my layout, so with a new sand tower coming, I'll add an ash pit relatively soon. Just need to decide if I want to hassle with making my own FT to O27 connections (can I sacrifice only one 10" FT section to make two connectors) or buy a pair?
Deuce- I made my own FT-tubular adapter. Not hard to do at all. I soldered the rails to make sure I had a solid connection.
Bob


Just like them Bob! Unless he is trying to sleep then he will try and bite you if you screw with him! LOL![]()


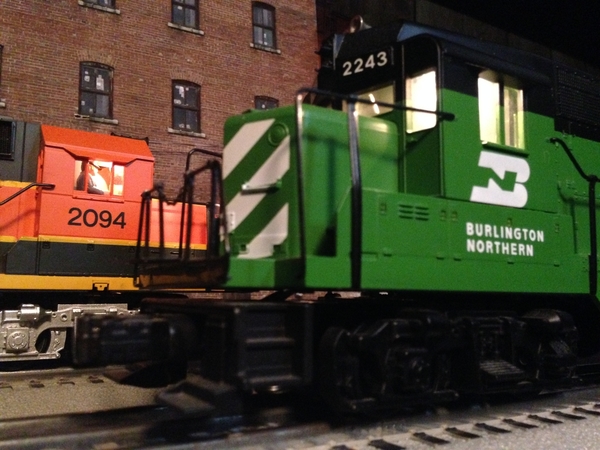
Cool Brian, I use to have a lot of the green ones when I was in HO!![]()
mike g. posted:Cool Brian, I use to have a lot of the green ones when I was in HO!
I've got a bunch of BN GEEPS in HO too Mike.
RSJB18 posted:Deuce posted:carsntrains posted:YAY we went to the hobby shop.. Booo they had no more switches. Well except in a "kit" that had two switches, 5 10 inch straight tracks. and two 036 curves. SOOO I bought it lol Got the yard all put together and ran one of my older engines. Now I have 6 trains on a layout with enough room for 2 lol
Finally my 4 track fiddle yard next to the 2 mains!!! Connects to the inner main at both ends of the yard. Finding a place to park the old Wabash now has led to a longer pass through siding than needed! That's always good!
Here is a picture of my super easy ash pit! Just two Fastrack to 027 adapters and 3 inches of 027 track.
Duece its so simple its silly isn't it??
Jim
Jim, yep. Looks good! I've decided to separate the diesel (removing completely) and steam services on the long siding of my layout, so with a new sand tower coming, I'll add an ash pit relatively soon. Just need to decide if I want to hassle with making my own FT to O27 connections (can I sacrifice only one 10" FT section to make two connectors) or buy a pair?
Deuce- I made my own FT-tubular adapter. Not hard to do at all. I soldered the rails to make sure I had a solid connection.
Bob
Deuce, I just bought the two adapter tracks because I wanted a flat wall when I make a hole in the foam that goes under the track (have not installed that yet. And the adapters come with the pins for the O27 track in them so all you do is cut the tubular track to length and slide it together. I will do so file work on mine when I take it all apart and wire it all. Got it all isolated last night.
Bob that adapter you made looks good. I just wanted straight edges.
Mark thanks and yes I used old nasty track so it would be pre-dirty!
Mike I'm anxiously waiting to see more progress on your project!! Cool dog! Layout is 17 feet long on that side.. both ends are seven (one to go around closet for other room/the other to leave room for the door) They the track bumps out to about 10 feet wide in the middle, until I get that closet taken out.
Im so glad to get that finished!
Did yall notice how small that engine is on the 3rd track in? Its a Lionel convention Pennsylvania engine.
Jim
Thanks Jim for the information! As far as my progress its slow, payday to payday! I hope to get the roof done this coming weekend! Weather permitting!![]()
carsntrains posted:Deuce, I just bought the two adapter tracks because I wanted a flat wall when I make a hole in the foam that goes under the track (have not installed that yet. And the adapters come with the pins for the O27 track in them so all you do is cut the tubular track to length and slide it together. I will do so file work on mine when I take it all apart and wire it all. Got it all isolated last night.
Sounds cool Mike and Deuce !!! Coincidence happened yesterday. Looked at Facebook and dang if it didnt show video of steamers using ash pits.. With many different sizes and shapes of them!! I'm telling ya the man is spying lol
Jim
More work on my team track area. "Concrete" surface is finished, need to play with some more detailing.


Steve, that turned out really nice!![]()
I know this is a silly question here, but does anyone run S scale?
Mike G,
Not me buddy.
PCRR/Dave
Mike... Folks. Here is my track plan that I started with

Jim
WOW Big change! I like the new layout plan!![]()
Jim @carsntrains not sure if you've seen these or not. A bit too deep for my layout but ...
Deuce that is cool! About what I have planned to do. I'll keep that one in mind.
Mike that is the track layout I started with.
I took that straights out of the center of the "lump" and moved it to the sides of it to make it go closer to that wall. Then in the middle of the curves on the end I put a switch on each end that goes to the yard. I'm going to try to get the foam under it tonight and take some more pictures. You see the square out of the one end is the closet that protrudes into my domain lol When I get that out it will make a huge difference in available "property" ..
Jim
carsntrains posted:Deuce that is cool! About what I have planned to do. I'll keep that one in mind.
Mike that is the track layout I started with.
I took that straights out of the center of the "lump" and moved it to the sides of it to make it go closer to that wall. Then in the middle of the curves on the end I put a switch on each end that goes to the yard. I'm going to try to get the foam under it tonight and take some more pictures. You see the square out of the one end is the closet that protrudes into my domain lol When I get that out it will make a huge difference in available "property" ..
Jim
I believe railroads have the right to use eminent domain. ![]()
Paul,
I like the "brick" road you made with the plaster sidewalks.... You posted photos about a week ago. Whose brick paper or brick plastic styrene, did you use for that brick road ?
I tried to read back several pages in this thread but couldn't find this question/answer...
chris a
Chris a. I got the brick paper off EBAY. Hope this works.............Paul
5 Lt. Calico Brick Seamless Paper Scenery Sheets for O Scale Model Train Layouts
Got the phormer Phillies cars primed and resprayed.
Paint's a little crazed in spots, but then, so am I. ![]()

Mitch
Paul, Thanks for fast response, just ordered a set of 5 sheets. chris
Mitch,
Using your ladies Dryer and Washer as a Paint Drying Station for your O Gauge custom work could get you in big trouble, even as dominant as I am, this is one line I would not cross! Tell her to let me know when the funeral is going to take place, I will attend.
More Power to ya buddy!
PCRR/Dave
Pine Creek Railroad posted:Mitch,
Using your ladies Dryer and Washer as a Paint Drying Station for your O Gauge custom work could get you in big trouble, even as dominant as I am, this is one line I would not cross! Tell her to let me know when the funeral is going to take place, I will attend.
More Power to ya buddy!
PCRR/Dave
Heh. This is one perk of bachelorhood... ;-)
Mitch
Jim, I am with Bob! Its your room take what you want! LOL![]()
Mitch, Dave is right! You must have some huge ? LOL I would never try that one!![]()
the single life is nice, no wife, happy life
M. Mitchell Marmel posted:Got the phormer Phillies cars primed and resprayed.
Paint's a little crazed in spots, but then, so am I.
Mitch
At least you covered up that hideous red and white pin stripe.
LET'S GO METS! ![]()
Heh. This is one perk of bachelorhood... ;-)
Mitch
It's crackers to give a rozzer the dropsy in snide!
I think Paul could get away with using the W/D as a paint table. I think its fair to say that I could too. I use 'em, and I fix 'em too! ![]()
LOL Sometimes I get in trouble if I look at them the wrong way!![]()
Another snow day here in the NE. I am sooooooo ready for Spring. 
Continued on the SPAM today. Although this looks like a girder bridge so I could pass on the SPAM and just have eggs bacon sausage and SPAM! ![]()
Before and after paint. The vertical supports are going to be silver after the gray dries.


RSJB18 posted:Another snow day here in the NE. I am sooooooo ready for Spring.
Continued on the SPAM today. Although this looks like a girder bridge so I could pass on the SPAM and just have eggs bacon sausage and SPAM!
Before and after paint. The vertical supports are going to be silver after the gray dries.
Nice Bob! That sure turned out looking sharp! Great work!![]()
beardog posted:the single life is nice, no wife, happy life
agreed... ![]()


Thanks Mike.
Made a bit more progress this week with the elevated platform that will soon become the base for Mount Krog and the Krog Tunnels. The section is cut from 1/2" plywood and supported by 7.5" 2x4s and 1x4s. The elevated section can easily hold my weight - I plan on further testing the tensile strength of it by consuming more beers this weekend
Any recommendations or suggestions as to if and how I should secure the supports to the underlying table/homasote? I'm thinking either white glue under the columns or just let gravity do it's thing. I don't really want to run screws up from the bottom as it'll affect the sound-deadening capabilities of the homasote. If the consensus is to run screws up from under the table, I'll likely only do a few columns, just to ensure that the platform stays in place.
how bout hot glue on a few columns?
Or some contractor glue for HD or Lowes ... All that looks great Mat! And my mind got to clicking. Has anyone tried advantech sub floor instead of plywood? That stuff is TOUGH!!!!
Jim
mike g. posted:RSJB18 posted:Another snow day here in the NE. I am sooooooo ready for Spring.
Continued on the SPAM today. Although this looks like a girder bridge so I could pass on the SPAM and just have eggs bacon sausage and SPAM!
Before and after paint. The vertical supports are going to be silver after the gray dries.
Nice Bob! That sure turned out looking sharp! Great work!
That turned out great!!! Some really good ideas your posting Bob!
Jim
carsntrains posted:mike g. posted:RSJB18 posted:Another snow day here in the NE. I am sooooooo ready for Spring.
Continued on the SPAM today. Although this looks like a girder bridge so I could pass on the SPAM and just have eggs bacon sausage and SPAM!
Before and after paint. The vertical supports are going to be silver after the gray dries.
Nice Bob! That sure turned out looking sharp! Great work!
That turned out great!!! Some really good ideas your posting Bob!
Jim
Thanks Jim- I've been making it up as I go. Imagine what I could do with proper planning...![]()
645 posted:beardog posted:the single life is nice, no wife, happy life
Uh - Mitch is NOT single! Did you forget about Norma Bates the Kitteh who lives with him?
Ummm- cats don't live with us, they permit us to live with them. ![]()
Bob, the overhead bridge line is looking better and better!!!
Thanks Mark. Still a work in progress but I am happy with how its going. My goal is to eventually build a station platform between the siding and the main line as a focal point.
Bob
Bob, your project is coming along great. I like the looks of the sides. Well done. This morning the first thing I did was open my package that came yesterday. I got it of EBAY. The price was right and I didn't have that road name. The only thing I have to do is mount wheels on the trailer. I have some undecorated trailers coming which I could take a set off of one of those or just hit some train shows and see what may be out there that would work. And of course next month I may find them at York. After that I worked on the last sections of the fence, all done with that little project. I'm just waiting for the glue to dry. I'll drill a hole for the wire from the sound shed and then vacuum up the area. This afternoon I'll probably start back up on track work. Pics...............Paul


Paul, the trailer on flat car looks great even missing the wheels. It's nice you have a donor vehicle on the way!! The fence looks great too! It is a much more heavy duty look than a simple chain link fence.
Thanks Paul.
The scrap yard fence looks great. Don't know how you feel about weathering but some rusty spots on it would really look sharp. Nice TOFC too.
Paul, the fence turned out really nice! Its going to be a wonderful addition to your layout!![]()
Soldered new wire leads, then I decided to solder some more wire leads, then I came back and soldered some more. Almost done, yea right.
Jushavnfun posted:Soldered new wire leads, then I decided to solder some more wire leads, then I came back and soldered some more. Almost done, yea right.
Wiring is my the part of layout building I do not like. Soldering is the worst part for me. Who would have guessed it as I was trained as an electronics technician! I'm glad I haven't had to do any of it at work the last few years! ![]()
I soldered thousands and thousands of solder joints when I was a tech at ATT.
Now that is am retired, I use wire nuts.
beardog posted:I soldered thousands and thousands of solder joints when I was a tech at ATT.
Now that is am retired, I use wire nuts.
I like the way you talk!! Terminal blocks work for me too.
645 posted:beardog posted:the single life is nice, no wife, happy life
Uh - Mitch is NOT single! Did you forget about Norma Bates the Kitteh who lives with him?
And don't forget Sylvia Siamese! ![]()
Mitch
Actually tho, when I was 7 or 8 building my first layout I soldered all the
wiring, made insulated track sections for the signals, built my own switches. Even
wound my own magnets for uncouplers.
Amazing what you learn to do when you are poor.
645 posted:Adriatic posted:BANDOB posted:After 5 hours of running on Saturday, some equipment went to the shops on Sunday for COT&S.
What exactly does COT&S mean? I struck out on a search in the acronym tread and online both. Here in Detroit it's a Coalition of Temporary Shelter... search engines think I want Army cots for napping
Did you try "railroad COT&S" as search keywords? I got multiple immediate hits.
COT&S = Clean, Oil, Test & Stencil. (Applies to air brake rework.)
Thank you. Not exactly, I used cots first and the search engine threw out the other terms. Boolean terms get tossed by the search engines now and I can't figure out how to force them to anymore. My searches were way more productive with them, but that doesn't sell me crap I guess.
Any idea what stenciling is for? Shoe dimension? Shoe tracking?
Thanks Bob on that idea. I was toying with that but have to find some pictures of a rusted fence. I have a bottle of rust paint.Had to run out to Sam's Club for some house items but I had gotten a flyer that had the LED shop lights on sale. 7.00 dollars off each one. So I picked up two more for the basement. Finishing off the fence I drilled a hole for the wire of the sound shed and vacuumed up the whole area. I didn't like the color of the base so I had some aged concrete paint left and I put one coat on. Think it made it look better. Then I got out some fine black ballast and started laying in a road through the gate over to the shed. I laid down some strips of Balsa wood for a track crossing in the yard. Later I'll start gluing the road down. Pics...................Paul


Adriatic posted:Any idea what stenciling is for? Shoe dimension? Shoe tracking?
Date the service was performed, I imagine.
Mitch
I know it's probably a Faux pas to do this, but I got my layout in an article in a competing* magazine, Narrow Gauge and Shortline Gazette, in the March/April 2018 issue:
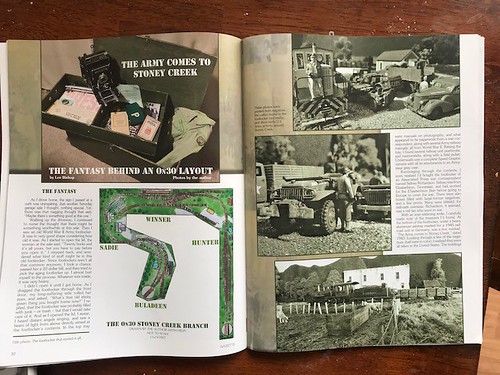
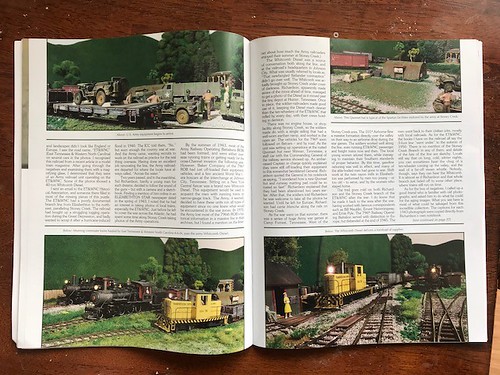
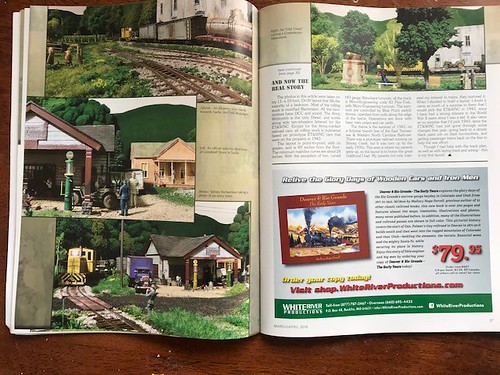
*I don't think this is competition as such, as OGR certainly is focused toward a very different aspect of the hobby...
Congrats Lee. I'm sure the publishers are ok with supporting the hobby.
Working on weathering 2 freight cars, trying some new techniques blending alcohol washes with pastel powders. At the same time, I am weathering weathering Korber Joes Pickle Factory, which I just bought from a fellow OGR forum member... Evaluating whether to put Joes together as a 6 story backdrop building, or the more conventional 39 inch long - 3 story flat....


Wonderful job especially on the freight cars. Who is the manufacturer of the outside brased gondola? I've been looking for one of these for a while now.
Thanks;
Mike
Thanks Mike, It's an Atlas O Item 8802, Atlas 40 ft. Composite Gondola NYC
Thanks Chris .Keep up excellent modeling!
Mike
p51 posted:I know it's probably a Faux pas to do this, but I got my layout in an article in a competing* magazine, Narrow Gauge and Shortline Gazette, in the March/April 2018 issue:
*I don't think this is competition as such, as OGR certainly is focused toward a very different aspect of the hobby...
Congrats Lee, well deserved!
My saga continues as I work every day cleaning out the living space where I intend to live and have a layout. The previous occupant (deceased) was a hoarder and lived like a pig but I now have the bedroom cleaned up and a nice bath. A new kitchen is being installed and almost finished. Last but not least, the living room where my layout will be is almost clean of trash and dirt. So there has been a lot of drama and progress. Right now it appears the layout will be about 9 ft wide and 15 ft long. The modules will be approximately 2 ft wide on the long sides and 4 ft wide on the ends. They will be built like my old layout- 1x4 frames and legs with cross bracing on the top covered with Homosote covered by green indoor/outdoor carpet. Using clean O gauge tubular track from the previous layout. There will be 3 loops of track, the outer one O with 072 curves, the second standard gauge with 054 curves and the inner O gauge with 054 curves. No switches, conventional control and my tinplate and other buildings. Main goal right now is to run trains. Possibly tomorrow I will start to bring the boxes out of the shed where stored. It has been almost a year- way too long and I am excited and impatient.
post flood recovery update...almost there...

beardog posted: I soldered thousands and thousands of solder joints when I was a tech at ATT.Now that is am retired, I use wire nuts.
Too many failed crimps before I started tech to ever give up soldering. I tend to spend more time inspecting crimps than it takes to heat an iron, so anything more than one or two and the iron gets hot. I do get that it is too much like work though. My pet peeve is lack of slack in wire length, or even worse, ribbon cable... or gambling on wire colors. I've even seen 5 wire codes in one machine, three countries standards and change in ones standards ![]()
Thanks Mitch; makes sense.
Well alright Jim! ![]()
Great work on the flood recovery, Gandy Dancer.
I have question. I see you have a white 6112 that is boxed. I believe it was only included in the set with the 44ton 625. Did it ever come boxed?
Thanks;
Mike
Mike welkie posted:Great work on the flood recovery, Gandy Dancer.
I have question. I see you have a white 6112 that is boxed. I believe it was only included in the set with the 44ton 625. Did it ever come boxed?
Thanks;
Mike
Great notice. The 6112 is in a repro window box!
Thanks for the quick reply. The repro boxes not only enhance your display but also afford protection for the rolling stock.
Mike
Access to this requires an OGR Forum Supporting Membership