I am running the MTH DCS system with the TIU and their remote.

I've now got a Lionel conventional item (6-18483 - C&O Ballast Tamper).

When I place it on the tracks it want to take off really fast even though the track voltage using the remote shows 0.0.

I have wired the track and TIU using the Fixed Voltage input/output. Maybe that's wrong? I want to be able to start it out slowly.

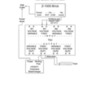
Here's my wiring diagram:0 - Wiring My Layout

Attachments

Images (1)
  • 0 - Wiring My Layout
Last edited by paulp575
Original Post

Replies sorted oldest to newest

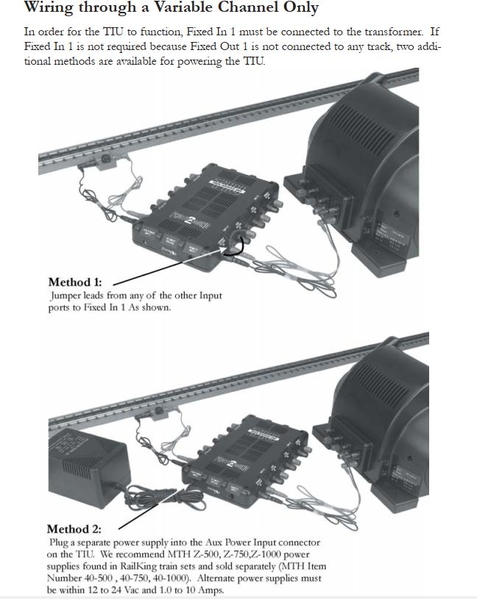
Taking a closer look at page 99 of the "DCS Operator's Manual Fifth Edition" (50-1000) it says the following:

In order for the TIU to function, Fixed In 1 must be connected to the transformer. If Fixed In 1 is not required because Fixed Out 1 is not connected to any track, two additional methods are available for powering the TIU.

Method 1: Jumper leads from any of the other Input ports to Fixed In 1 As Shown.

I've attached the page 99 so you can help me to interpret what it's saying.

I just don't want to burn up something by incorrectly wiring.

Varial output wiring

Attachments

Images (1)
  • Varial output wiring

Just parallel the transformer output to the input for FIXED #1 and VARIABLE #1.  Connect VARIABLE #1 to the track and you have your configuration.

Have I changed it correctly (see attached picture)? Added a pair of wires to go from the Fixed IN1 to the Variable IN1. And moved the output from the Fixed OUT1 to the Variable OUT1.0 - Wiring My Layout 2020-04-25

I'm presuming this will allow me to vary the track voltage using the DCS remote. So I should be able to run conventional (vary speed using the track voltage) as well as PS2 and PS3 locos?

If so, then I'm guessing my startup sequence for conventional would be to put item on track. Raise track voltage according to how fast I want it to run.

With PS2 and PS3 I'd need to put track voltage at 18.0 and then vary engine speed using the thumbwheel on the remote after selecting the loco.

Attachments

Images (1)
  • 0 - Wiring My Layout 2020-04-25

Looks good.

What I do is configure the TIU variable channels in fixed mode.  What that means is when you first power the channel up, they'll pass full voltage.  Now, if you select the track with the remote and vary it's voltage, it automagically switches to variable mode.  I normally run command, so I want fixed most of the time.  However, for the times I'm testing something conventional, I just have to power up, select the track and hit the TZV hotkey to turn off the track voltage to that variable track.  Then it runs in variable mode until you power cycle the input power on that channel again.

Looks good.

What I do is configure the TIU variable channels in fixed mode.  What that means is when you first power the channel up, they'll pass full voltage.  Now, if you select the track with the remote and vary it's voltage, it automagically switches to variable mode.  I normally run command, so I want fixed most of the time.  However, for the times I'm testing something conventional, I just have to power up, select the track and hit the TZV hotkey to turn off the track voltage to that variable track.  Then it runs in variable mode until you power cycle the input power on that channel again.Okay, I think I got it but need you to check my instructions. I currently don't have a permanent layout - yet, so have to set up and run for a few days and then tak

Looks good.

What I do is configure the TIU variable channels in fixed mode.  What that means is when you first power the channel up, they'll pass full voltage.  Now, if you select the track with the remote and vary it's voltage, it automagically switches to variable mode.  I normally run command, so I want fixed most of the time.  However, for the times I'm testing something conventional, I just have to power up, select the track and hit the TZV hotkey to turn off the track voltage to that variable track.  Then it runs in variable mode until you power cycle the input power on that channel again.

Okay, I think I understand what you are saying.
I don't have a permanent layout - yet, so I have step-by-step instructions so when I set it up I don't mess up something.
Here's my instructions:
 
Wiring My Layout (according to drawing):
1. Connect the Z-1000 brick to the TIU FIXED IN1 using the TIU/Barrel  Jack Adapter Cable.

2. Connect FIXED IN1 to VARIABLE IN1 (both red and block)

3. Connect the TIU VARIABLE OUT1 to the track (white strip to center rail).

3. Connect the Legacy Command Base/Charger to the TIU VARIABLE OUT1 black terminal.

4. Connect the Z-1000 AND Legacy base to power.

5. Insert batteries into the remote(s):
   MTH: 4 AAAA batteries
   Lionel: 3 AAA batteries

6. (optional) Use the CW-80 transformer for powering accessories, i.e., switches.


Running My Locos
1. Power up Legacy Base
2. Power up Z-1000 brick
3. Select the track and press the TZV hotkey (S2) to turn off the  track voltage to that variable track.
4. Place locomotive on track
5. Power on Cab-2 remote by pressing "CTC" button
6. Press ENG and the ID number of the loco, ex: 4 1
 
I hope I got it right! Anxious to run my just purchased AFT GS-4!


@paulp575 posted:
Running My Locos
1. Power up Legacy Base
2. Power up Z-1000 brick
3. Select the track and press the TZV hotkey (S2) to turn off the  track voltage to that variable track.
4. Place locomotive on track
5. Power on Cab-2 remote by pressing "CTC" button
6. Press ENG and the ID number of the loco, ex: 4 1
 
I hope I got it right! Anxious to run my just purchased AFT GS-4!

Since you started out trying to run the conventional ballast tamper, you would be using the DCS remote to control that using the TR key to select the variable channel, then the TZV to turn off the voltage before placing it on the tracks.  You'd then run it using the thumbwheel to vary the voltage, the DIR key to change directions, etc.

In order to run the Legacy locomotives, you would not turn off the track voltage, you'd have the locomotive on the tracks before powering up and you want full voltage to run Legacy or TMCC equipment.  In this case, you would be using the CAB2.

Simply Fixed Channels just pass through input.  There is no voltage control.  They are meant for running Command engines.  Variable are just that, you can vary the voltage of the input from about 0 to the input voltage.  Meant for conventional or under circumstances you might want to limit the voltage available.  Small children.  It is still a command capable channel.  So MTH allowed it to be set to fixed, plus a lot of other features for supporting their original conventional PS-1 engines.  G

So if I want to run only a MTH ProtoSound 3.0 I would:

1. Connect the input to FIXED1 and the output to FIXED1

2. Set the track voltage to 0.0

3. Place loco on track

4. Raise track power to 18.0 volts

5. Press the startup key; alloww loco to go through start up

6. Press DIR button and move it out

Is this the correct steps for only running MTH PS 2 or PS3?

Sorry, I need to have step-by-step instructions until such time as I get my layout built. Currently putting together a small oval on the floor to test my just received AFT GS-4.

Not that surprising, FIXED means just what is says!  If you want to vary track power using the DCS remote, you need to connect to one of the variable channels!  TR1 is Variable #1, TR2 is Variable #2.

You can parallel the input power for the fixed and variable channels, just just add a couple wires and connect the track to the variable channel.

I need new glasses!

I was jumpering the outputs between FIXED1 and VARIABLE1 outputs!

I was following the diagram I posted earlier in this post - but jumpering on the wrong side. No wonder the results were always full power.

Last edited by paulp575

Big shout out to @gunrunnerjohn and  RON ARNDT 091718 . Your replies helped me figure out this frustrating attempt.

All is well; I was able to run the my brand new DCS loco, and verify that the Lionel Defect Detector works.

I think with this setup I can run conventional as wel.

Now I need to connect the Lionel Legacy Base and use the LEGACY remote to control my LEGACY locos. I'm presuming it would be the same as the DCS remote except that once the power is applied to the track, I would use the LEGACY remote to control the Lionel LEGACY and TMCC locos.

Here's pics of the AFT GS-4 on my test track. Can't upload the video of them running on my temp track as it's over 100 MB.

Attachments

Images (2)
  • MTH 30-1776-1 with 6-83119
  • MTH 30-1776-1

The legacy connection will be the easiest thing you've done.

  • Run one wire from the track connection on the back of the Legacy command base to the outside rail.
  • Plug in the Legacy command base. 
  • Apply 18 volts to the track.
  • Fire up your CAB2 remote and start running trains.

Interesting.

I thought I read all I need to do is to run a wire from the Legacy Command Base (the "Binding Post") to the variable Out 1 on the TIU. That way I don't need more then one set of wires attaching to the track (see pictures posted above).

Add Reply

Post
The DCS Forum is sponsored by

OGR Publishing, Inc., 1310 Eastside Centre Ct, Suite 6, Mountain Home, AR 72653
800-980-OGRR (6477)
www.ogaugerr.com

×
×
×
×
Link copied to your clipboard.
×
×